Ganoderma (reishi or lingzhi) is one of the most rewarding medicinal mushrooms you can grow at home, but it demands more patience than oysters or shiitake. Get the substrate moisture, temperature, and CO2 management right, and you will reliably produce those glossy, lacquered caps. Skip a step or rush the timeline and you will be staring at a colonized bag that never pins. This guide walks you through the entire process from spawn to harvest using methods that actually work in a typical home setup.
How to Grow Ganoderma Mushroom at Home: Step-by-Step

Marcus Holloway
21 Apr 2026
What you are actually growing
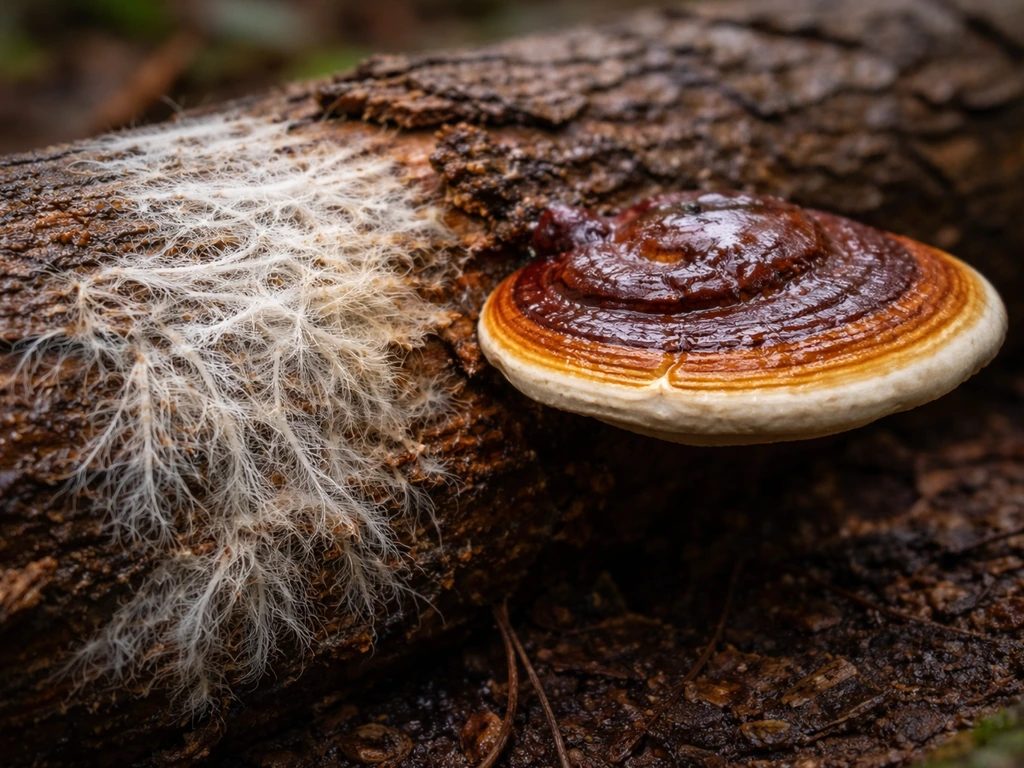
Ganoderma lucidum is a wood-decomposing fungus native to Asia, known by the names reishi (Japanese) and lingzhi (Chinese). It produces a hard, woody fruiting body with a distinctive kidney-shaped cap and a deep reddish-brown lacquered surface. Unlike most edible mushrooms, you are not growing it to eat fresh: reishi is bitter and tough, and is almost always dried and used to make tea, tinctures, or powders for its beta-glucan and triterpene content. That medicinal purpose shapes how you grow it, because you are optimizing for full cap development and potency rather than soft, fast-flushing tissue.
The cultivation cycle has two clearly defined phases. During colonization, the white mycelium threads through your substrate in warm, high-CO2, dark conditions. Once the substrate is fully colonized, you shift the environment to trigger fruiting: higher humidity, more fresh air exchange, and indirect light. Ganoderma is slower than most species you may have grown before. Realistically, from inoculation to first harvest you are looking at 90 to 120 days on a bag or synthetic log, and longer on natural logs. Plan for that timeline and you will not be disappointed.
Ganoderma lucidum is closely related to the mushrooms covered in guides on how to grow lingzhi mushroom and how to grow Ganoderma lucidum, and the cultivation methods across those topics overlap significantly. If you are also interested in other medicinal fungi, growing cordyceps or chaga involves very different biology and substrate requirements, so those are worth treating as separate projects. If you are also interested in other medicinal fungi, growing cordyceps or chaga involves very different biology and substrate requirements, so those are worth treating as separate projects how to grow chaga. If you want a different medicinal mushroom, check out how to grow cordyceps at home for the right biology, substrate, and timing. If you specifically want to learn how to grow chaga, you will need to shift from reishi-style sawdust approaches to chaga-focused substrate and inoculation steps growing cordyceps or chaga. If you are specifically looking for how to grow cordyceps, you will want to start with cordyceps biology and substrate requirements rather than the reishi steps used here.
Picking your grow method
You have two practical options for home growing: the synthetic log method (sterilized sawdust bags) or natural log cultivation. Each suits a different situation. Here is an honest comparison.
| Factor | Synthetic Log (Sawdust Bag) | Natural Log/Billet |
|---|---|---|
| Setup complexity | Moderate (sterilization needed) | Low to moderate (sourcing logs) |
| Time to first primordia | 60–90 days after inoculation | 50–60 days after spawning |
| Control over conditions | High (indoor, measurable) | Lower (outdoor variables) |
| Equipment cost | Pressure cooker, bags, spawn | Drill, plug spawn, wax |
| Best for | Beginners wanting reliable results indoors | Growers with outdoor space and patience |
| Contamination risk | Higher (requires sterile technique) | Lower (logs resist competing molds) |
| Yield per cycle | Multiple flushes from one bag | One to two flushes per year |
For most home growers, the synthetic log method in polypropylene bags is the better starting point. You can control temperature and humidity precisely, run it year-round indoors, and get predictable results. Natural log cultivation is genuinely easier in terms of sterile technique (you do not need a pressure cooker), but outdoor variables like temperature swings and competing fungi make the outcome less predictable. If you have a shaded outdoor area and hardwood logs available, it is a satisfying long-game approach. If you want results within a single season without a lot of outdoor infrastructure, go with the bag method.
Indoor bag setup basics
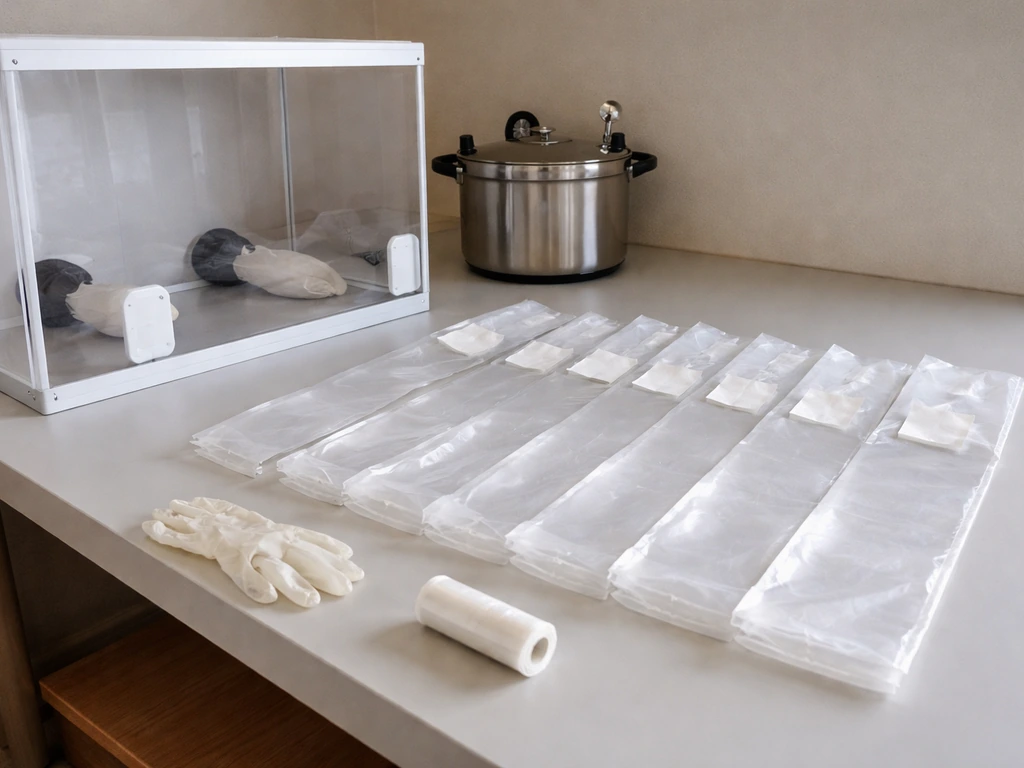
For indoor growing you need polypropylene filter-patch bags (rated for autoclave use), a pressure cooker that can hold 15 psi, a clean inoculation area (still-air box or flow hood), and a fruiting chamber you can humidify. A spare closet, plastic storage tent, or a martha tent with an ultrasonic humidifier all work well. You do not need a commercial setup to get good results.
Outdoor log setup basics
For log cultivation, source freshly cut hardwood logs, oak and maple being reliable choices, 3 to 5 inches in diameter and 12 to 18 inches long. Cut them within the last few weeks, since logs older than a month may already be colonized by competing fungi. Drill holes in a diamond pattern, insert plug spawn, seal with cheese wax, and move logs to a shaded, humid outdoor location. Primordia typically appear 50 to 60 days after spawning under the right conditions.
Sourcing spawn and starting materials
Skip spores for your first grow. Spores require agar work to get to usable spawn, and that adds weeks plus a higher failure rate. Start with grain spawn or sawdust spawn from a reputable supplier. For the bag method, grain spawn colonizes faster and inoculates more evenly through bulk substrate. North Spore, Field and Forest, and Fungi Perfecti are among the commonly cited suppliers in the US that sell Ganoderma lucidum grain spawn with a documented temperature performance window of 65 to 80°F (18 to 26°C). Always check the spawn date: fresh spawn that is still actively white and has not gone yellow or gray is what you want.
A note on vendor quality: the reishi supplement market has documented compliance problems, and that same supply-chain messiness can affect cultivation spawn if you buy from unknown sources. Stick to established mushroom cultivation suppliers rather than generalist online marketplaces. Confirm you are getting a verified Ganoderma lucidum strain, since related Ganoderma species vary significantly in growth rate and potency.
For log cultivation, plug spawn (wooden dowels inoculated with mycelium) is the standard choice. You hammer them into pre-drilled holes and seal with wax. For the bag method, grain spawn is the easiest to work with at home. The general inoculation rate that research supports is around 3% of dry substrate weight, which gives the shortest growth cycle and the best yields. In practice, a 6 lb grain spawn bag is enough to inoculate 120 to 165 lb of sterilized sawdust substrate, so a little goes a long way.
Preparing your substrate
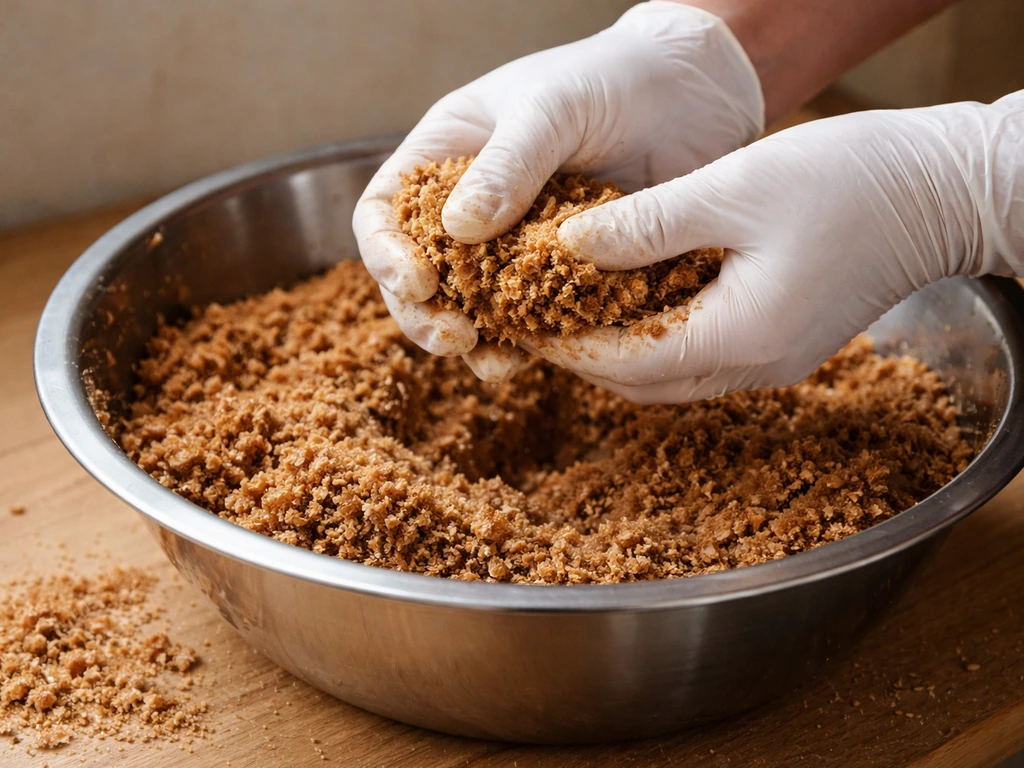
Reishi performs best on hardwood sawdust. Oak, maple, and beech are all excellent. Avoid pine, cedar, or other conifers, as their resins are antifungal. The most practical substrate mix for home growers is hardwood sawdust (around 80% by volume) supplemented with wheat bran or rice bran (around 20%), which provides nitrogen and accelerates colonization. You can also use straight hardwood pellets (the kind sold for pellet stoves) hydrated with water, which is a popular no-milling shortcut.
Moisture content is critical. Target 60 to 65% moisture, which means the substrate holds its shape when squeezed in your fist but no more than a few drops of water come out. Too wet and you invite bacterial contamination and anaerobic pockets. Too dry and colonization stalls. If you are adding water to dry sawdust, mix thoroughly and let it absorb for 30 minutes before testing.
Sterilization vs pasteurization
For Ganoderma, you need full sterilization, not just pasteurization. Reishi is a slow colonizer, and pasteurized substrate gives competing molds a window to establish before the mycelium can outcompete them. Sterilize your filled polypropylene bags at 121°C (15 psi) for 2 to 2.5 hours in a pressure cooker. Let bags cool completely to below 27°C (80°F) before inoculating, which typically means leaving them overnight. Inoculating warm substrate will kill your spawn and is one of the most common beginner mistakes.
Inoculation and incubation
Inoculation technique
Work as cleanly as possible. Wipe your work surface with 70% isopropyl alcohol, flame-sterilize any tools, and wear nitrile gloves. A still-air box (a large clear storage tub with arm holes cut in the sides) is a practical and cheap alternative to a flow hood and dramatically reduces contamination risk. Open bags briefly, add your grain spawn at roughly 3% of the dry substrate weight, seal the bag with a rubber band or impulse sealer, and shake to distribute the spawn evenly through the substrate.
Incubation conditions and realistic timeline
Move inoculated bags to a warm, dark location. The target temperature for colonization is 26 to 30°C (79 to 86°F), with 28°C being the sweet spot cited repeatedly in cultivation studies. In an MDPI cultivation experiment on Ganoderma lucidum, researchers monitored growth conditions around 28 ± 1 °C during the growth period about 28°C being the sweet spot cited repeatedly in cultivation studies. Relative humidity in the incubation area should be 60 to 70%, though the bags themselves maintain internal moisture if sealed properly. Keep CO2 high during this phase: reishi mycelium thrives in the elevated CO2 environment inside a sealed bag, so do not poke holes or add fresh air exchange yet. Full colonization takes 20 to 60 days depending on temperature consistency and spawn quality. At 28°C with fresh grain spawn at 3% inoculation rate, expect a fully white bag in 30 to 45 days. Bags colonizing at the lower end of the temperature range (around 26°C) may take closer to 60 days.
Check bags every few days. Healthy colonization looks like bright white mycelium spreading steadily from each grain spawn inoculation point. Yellow or brown patches, green or black spots, and sour or foul smells are signs of contamination and that bag should be removed immediately before it spreads to others.
Triggering fruiting: humidity, CO2, light, and airflow
Once your bag is fully colonized, it is time to shift the environment to trigger pinning. This is where reishi cultivation diverges from faster species. You are essentially simulating the transition from the protected forest floor to open air. Three environmental shifts drive this transition: increased fresh air exchange (dropping CO2), higher humidity, and introduction of indirect light.
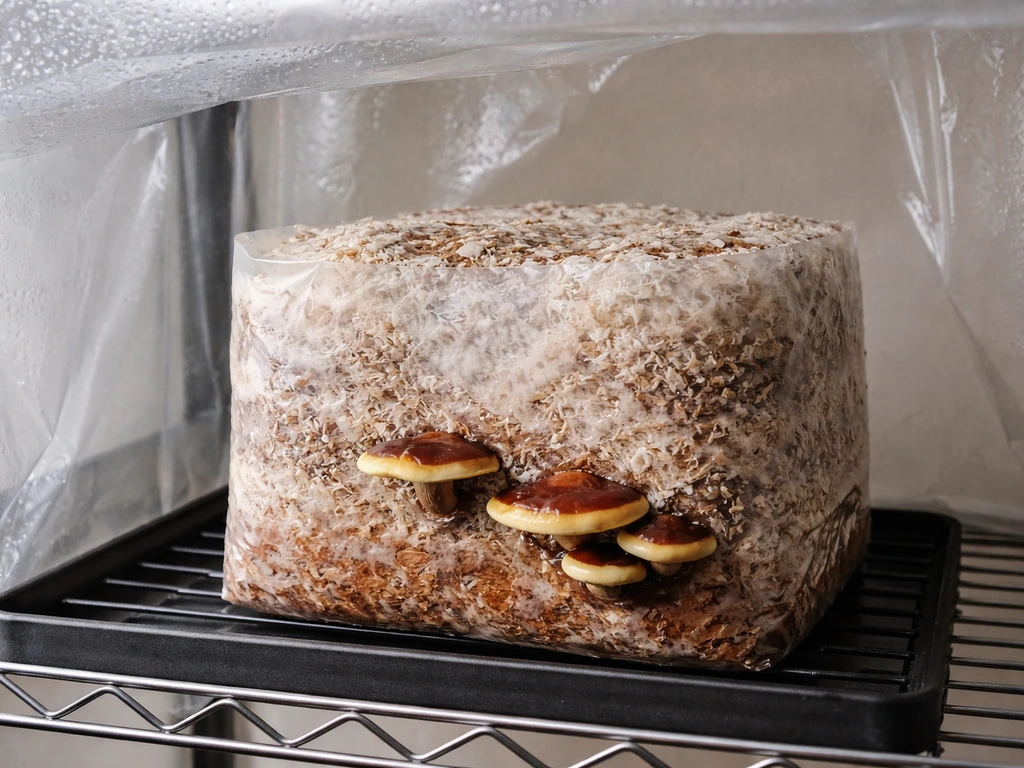
Cut an X or a small opening in the top of the bag or transfer the colonized block to a fruiting chamber. The fruiting temperature range is 22 to 28°C (71 to 82°F), slightly cooler than incubation. Maintain relative humidity at 85 to 95%: this is non-negotiable for Ganoderma, and is the single factor most likely to stall fruiting if neglected. An ultrasonic humidifier on a timer, set to mist for 15 seconds every 15 to 30 minutes, works well in a small tent or enclosed shelf.
CO2 management is more nuanced with reishi than with most other species. High CO2 (above 20,000 ppm) produces antler-like elongated fruiting bodies instead of the classic cap-forming mushroom. That can be intentional, since antler reishi is also harvested and used, but if you want the traditional shelf-shaped cap, keep CO2 below 2,000 ppm during the cap development phase by running active fresh air exchange, around 4 to 8 air exchanges per hour. A small computer fan on a timer achieves this in a tent setup. Provide indirect or diffused light for 12 hours per day: a few feet away from a window or a low-power grow light on a timer is sufficient. Reishi does not need strong light, but the light cue does help direct cap development.
Primordia (pinheads) typically appear 50 to 60 days after spawning on logs, and somewhat sooner on synthetic logs with optimal indoor conditions. Once pins form, caps expand over the following 2 to 4 weeks. Do not rush this. The white growing edge at the rim of the cap is a clear sign the mushroom is still actively growing. Harvest when that white band disappears completely and the cap surface becomes a uniform, deep reddish-brown lacquered sheen. To harvest, grasp the base firmly and give it a slight twist to release it cleanly from the substrate. Leaving harvested stumps in place can lead to secondary infections, so remove them and clean the surface.
Troubleshooting the most common problems
Green, black, or colored mold on the substrate
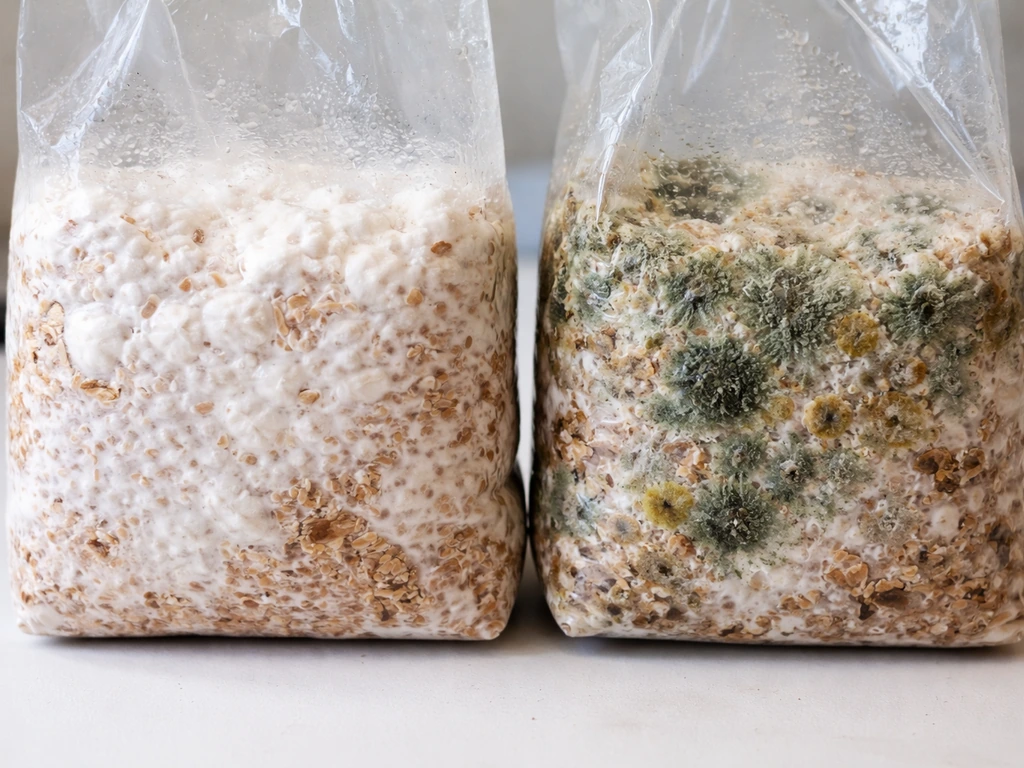
This is Trichoderma, Aspergillus, or another competitor, and it means either your sterilization was incomplete, bags were inoculated while still warm, your inoculation environment was not clean enough, or the bag had a micro-tear that let contaminants in. Remove and dispose of affected bags in sealed bags to prevent spreading spores. For the next batch, extend sterilization to 2.5 hours, let bags cool overnight, and clean your still-air box more thoroughly with alcohol spray. Do not try to cut out contaminated sections and continue, because by the time you can see contamination, it has already spread through the substrate.
Slow or stalled colonization
If mycelium has not covered the bag within 60 days at 28°C, the most likely causes are: temperature too low (below 24°C), spawn that was old or damaged, substrate moisture above 65% creating anaerobic pockets, or bags with fine cracks letting in air and CO2 dropping prematurely. Check your thermometer placement, since ambient room temperature can differ significantly from the actual temperature at the bag surface. If spawn looks yellow or smells off, your spawn supply was compromised before you used it.
No pins forming after full colonization
This almost always comes down to one of three things: humidity is below 85%, CO2 is too high because there is not enough fresh air exchange, or temperature dropped outside the 22 to 28°C range. Check your humidity with an actual hygrometer, not by guessing. Many home growers find that their fruiting area is drier than expected, especially in winter with heating running. If you are at the right humidity and temperature and still seeing no pins after 3 to 4 weeks, increase your fresh air exchange frequency and make sure the bag opening is fully exposed to the environment rather than collapsed against itself.
Antler-shaped fruiting bodies instead of caps
This is high-CO2 growth. The mushroom elongates stems without forming a cap when CO2 exceeds roughly 20,000 ppm. Increase your fresh air exchange significantly: more frequent fan cycles, a larger opening in the bag, or moving the fruiting container to a location with more natural air movement. Antler reishi is not a failed crop, it is fully usable, but if you want the classic cap form, you need to drop CO2 to below 2,000 ppm during cap development.
Thin, pale, or soft caps
Reishi caps should be firm and woody at maturity. Thin or soft caps usually mean the mushroom was harvested too early (the white growth margin was still present), humidity fluctuated too much during development, or temperature was consistently on the low end. Let the cap fully mature until the white rim disappears. If caps are developing slowly but look healthy, that is normal for reishi and not a problem requiring intervention.
Second flush not appearing
After your first harvest, scrape the stump area clean, rehydrate the substrate by soaking or misting heavily for 24 hours, then return to fruiting conditions. Reishi blocks can produce two or more flushes if the substrate is not exhausted. If the block looks dark brown and shrunken, it is spent. If it still looks white and firm with bulk remaining, it has more to give with a rest and rehydration cycle.
A quick-reference parameter summary
| Stage | Temperature | Relative Humidity | CO2 | Light | Duration |
|---|---|---|---|---|---|
| Colonization (incubation) | 26–30°C (79–86°F) | 60–70% ambient (sealed bag) | High (sealed bag) | Dark | 20–60 days |
| Primordia initiation | 22–28°C (71–82°F) | 90–95% | Reducing (open bag/cut) | Indirect, 12h/day | Starts ~50–60 days post-spawn |
| Cap development (fruiting) | 22–28°C (71–82°F) | 85–95% | <2,000 ppm for cap form | Indirect, 12h/day | 2–4 weeks post-pins |
| Harvest readiness | 22–28°C (71–82°F) | 85–95% | <2,000 ppm | Indirect | White margin gone, full lacquer |
Your next steps
The most important thing you can do right now is order quality grain spawn from a verified supplier, assemble your substrate ingredients (hardwood sawdust or pellets plus wheat bran), and get your pressure cooker ready. The biggest lever you have over your success rate is clean substrate preparation and a stable incubation temperature around 28°C. Everything else, humidity, CO2, light, is easier to adjust mid-grow. Ganoderma is slow but forgiving once you understand what each phase needs. If you are specifically searching for how to grow monkshood, the setup and timing are different, so you will want a guide tailored to that plant slower but forgiving. If you also want to compare timelines and methods, see our guide on how to grow Ganoderma lucidum from start to finish Ganoderma is slow but forgiving. Give it the right conditions at the right time, and those glossy lacquered caps will be worth the wait. Chanterelle mushrooms are cultivated differently than reishi, so if you want chanterelles specifically, follow the chanterelle-focused growing guide for substrate and moisture details how to grow chanterelle mushrooms.
FAQ
Can I grow ganoderma from store-bought dried reishi or tea mushrooms?
No, dried reishi is usually not viable for producing new mycelium. For cultivation you need live, verified spawn (grain or sawdust spawn) from a reputable mushroom cultivation supplier. If you try to start from supplement powder, the failure rate is extremely high because the material is sterilized and the biology is already dead.
Do I need a pressure cooker/sterilizer, or can I pasteurize the substrate to make it easier?
Pasteurization is a common shortcut, but for reishi it often leads to long colonization with competing molds, because reishi is slow and does not outcompete contaminants quickly. Use full sterilization (121°C at 15 psi for 2 to 2.5 hours, then cool completely) for the highest success rate. If you do not have a pressure cooker, consider using a natural log method instead of bags.
How do I tell the difference between healthy mycelium and contamination early on?
Healthy reishi colonization spreads in a bright, clean white pattern from the spawn points, with steady progress over days. Early contamination often shows up as green or black spots, yellow/brown patches that expand, or off odors (sour, rotten, or strongly chemical). If you notice smell plus color change, discard the bag promptly, do not try to salvage it by removing the affected area.
What CO2 level should I aim for if I want classic cap reishi instead of antler forms?
Keep CO2 below roughly 2,000 ppm during cap development by running active fresh air exchange (about 4 to 8 air exchanges per hour in a tent setup). If you cannot measure CO2, use a practical approach: run a timer-controlled fan frequently and ensure the fruiting container opening stays fully exposed rather than collapsing against the bag or blocking airflow.
Why are my bags fully colonized but nothing fruits (no pins)?
The usual causes are fruiting humidity below 85%, CO2 staying too high due to insufficient fresh air exchange, or temperature outside the 22 to 28°C fruiting range. Check humidity with a real hygrometer, then increase misting frequency and fresh air exchange together. Also confirm you made the transfer or cut/opening at the right time, since leaving bags sealed after colonization delays pinning.
How do I measure and correct substrate moisture accurately?
Use the squeeze test as a quick check (it should hold its shape and only allow a few drops at most). For more certainty, weigh your dry substrate and hydrated substrate once, then keep a consistent target moisture around 60 to 65%. If you overshoot moisture, let the substrate drain/air out before bagging, because excess water can create anaerobic pockets and contamination risk.
My mycelium turns yellow or the bag smells off, but it still looks partially white. Is it still usable?
Typically no. Yellowing, gray tones, and sour or foul odors are signs the spawn or substrate is compromised, even if some white mycelium is present. Because contamination can spread throughout before you can see it, the safest move is to discard the bag sealed to prevent spore release and start a new batch with fresh spawn and cleaner technique.
How fresh should my grain spawn be, and what does “bad spawn” look like?
Spawn should arrive and be used while it is still actively colonizing, usually still white and not overly yellow or gray. If the spawn looks dried, cracked, or smells unusual, it may have died or degraded in storage. Avoid using old spawn and do not assume all suppliers store under the same conditions.
Is there a “right” inoculation rate, or can I use less to stretch my spawn?
Around 3% of dry substrate weight is a common target that balances speed and yield. Using much less spawn often increases colonization time, and for reishi that can raise contamination risk during the longer incubation. If you are budget-limited, it is better to keep hygiene and temperature stable than to reduce spawn drastically.
What should I do if colonization is slow, for example it is not fully white by day 60?
First verify your temperature is truly at the bag (not just the room). Ambient air can be several degrees different from bag surface temperature. Next check substrate moisture for staying within 60 to 65%, and inspect bags for micro-cracks or tiny leaks that can drop CO2 early. Finally, confirm the spawn is healthy, because compromised spawn can stall even under correct conditions.
My fruiting mushrooms form but the caps are thin, soft, or not fully lacquered. Why?
This usually means harvest timing or environmental stability issues. Let the white growing rim disappear completely before harvest, and keep humidity high and steady (85 to 95%) during the full cap development period. If humidity fluctuates or temperatures run at the low end consistently, caps often mature slower and end up less firm.
Can I get multiple flushes from the same bag or block, and how do I rehydrate between flushes?
Yes, reishi blocks can produce more than one flush if they still have stored substrate energy. After harvest, clean the stump area, then rehydrate by soaking or misting heavily for about 24 hours, and return to fruiting conditions. If the block becomes dark brown and shrunken, it is likely spent and not worth repeating.
How can I reduce contamination risk during inoculation with a still-air box?
Minimize talking and movement in your workspace, sanitize surfaces and tools, and let alcohol spray fully settle before opening sterile bags. Use nitrile gloves, keep openings small, and work quickly to limit exposure time. If you see repeated failures, consider upgrading to a flow hood or improving how you seal and handle the bag during inoculation to prevent micro-tears.
Does reishi require light to fruit, and what kind of light is best?
Light is a helpful cue, but it does not need to be intense. Indirect or diffused light for about 12 hours per day supports cap development. A low-power grow light on a timer can work well as long as you also maintain humidity and fresh air exchange, since light alone cannot compensate for those key factors.