Growing Ganoderma lucidum, better known as reishi, is absolutely doable at home, but I'll be straight with you: it's one of the slower, more patience-testing mushrooms you can grow. From inoculation to your first harvest, you're looking at roughly 70 to 80 days under good conditions. The payoff, though, is a genuinely impressive medicinal mushroom that's hard to source fresh and expensive to buy dried. Once you understand what this fungus actually wants, the process clicks into place. Here's everything you need to get there. If you're new to the process, the easiest way to begin is with indoor grow bags using a hardwood sawdust and bran substrate and strain-verified spawn how to grow ganoderma mushroom.
How to Grow Ganoderma Lucidum Step by Step Guide

Marcus Holloway
22 Apr 2026
What Ganoderma lucidum is and what you'll need to start
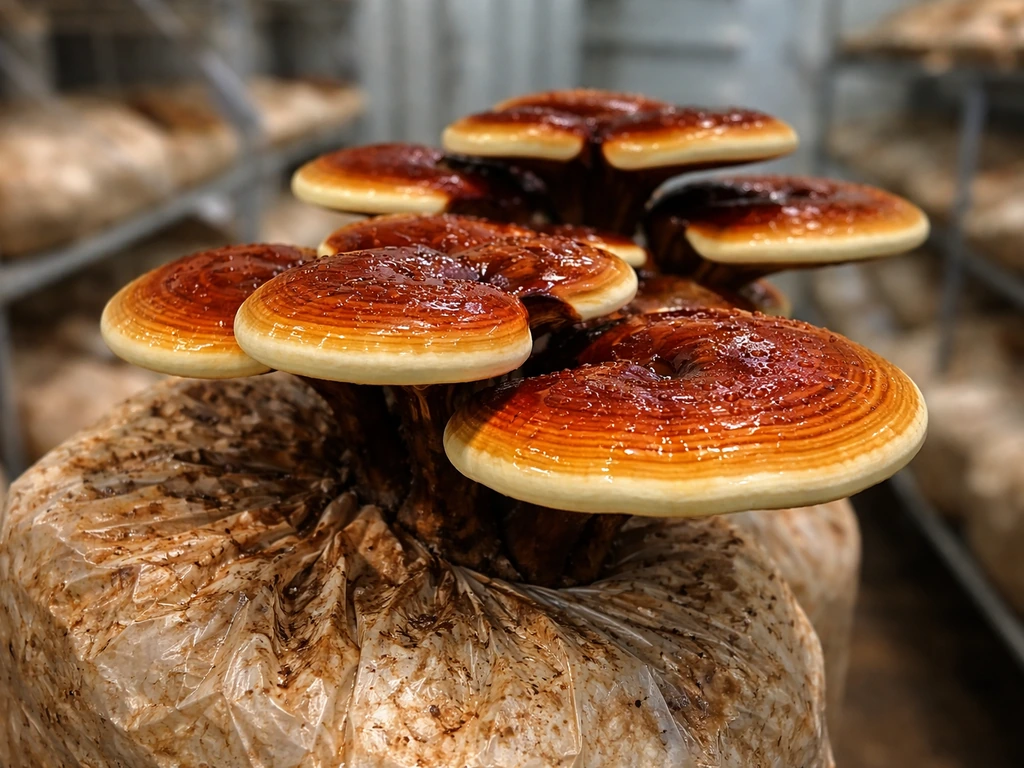
Ganoderma lucidum is a wood-decomposing fungus native to East Asia that has been used in traditional Chinese medicine for over 2,000 years. It's a polypore, meaning it produces a hard, shelf-like fruiting body with pores on the underside instead of gills. The finished fruiting body has a glossy, lacquered appearance in deep red and brown tones. It's not typically eaten fresh because the texture is tough and woody, but it's dried and used in teas, tinctures, and powders. This distinguishes it from most other mushrooms people grow at home, including its close relatives covered in guides on how to grow ganoderma mushroom and how to grow lingzhi mushroom, which is essentially the same species under a different common name.
Before you start buying materials, gather this core equipment list. Most of it is reusable across many future grows.
- Grain spawn or sawdust spawn (reishi-specific, from a reputable supplier)
- Hardwood sawdust (oak, maple, or beech preferred) or pre-made supplemented sawdust blocks
- Polypropylene grow bags with filter patches (for indoor bag cultivation) or fresh-cut hardwood logs (for outdoor)
- Pressure cooker (minimum 15 PSI, large enough to hold your bags) or access to a steam sterilizer
- Still air box or laminar flow hood for inoculation
- Isopropyl alcohol (70%) and disposable gloves
- Thermometer and hygrometer for environmental monitoring
- Humidity tent or martha-style grow tent for fruiting
- Ultrasonic humidifier or misting bottle
- Timer for automating misting or humidifier cycles
You don't need all of this on day one. If you're starting out, a pressure cooker, a few bags, a still air box made from a plastic tote, and some spawn will get you through your first grow. Scale up equipment as you scale up ambition.
Choosing your cultivation method: indoor vs outdoor, logs vs grow bags
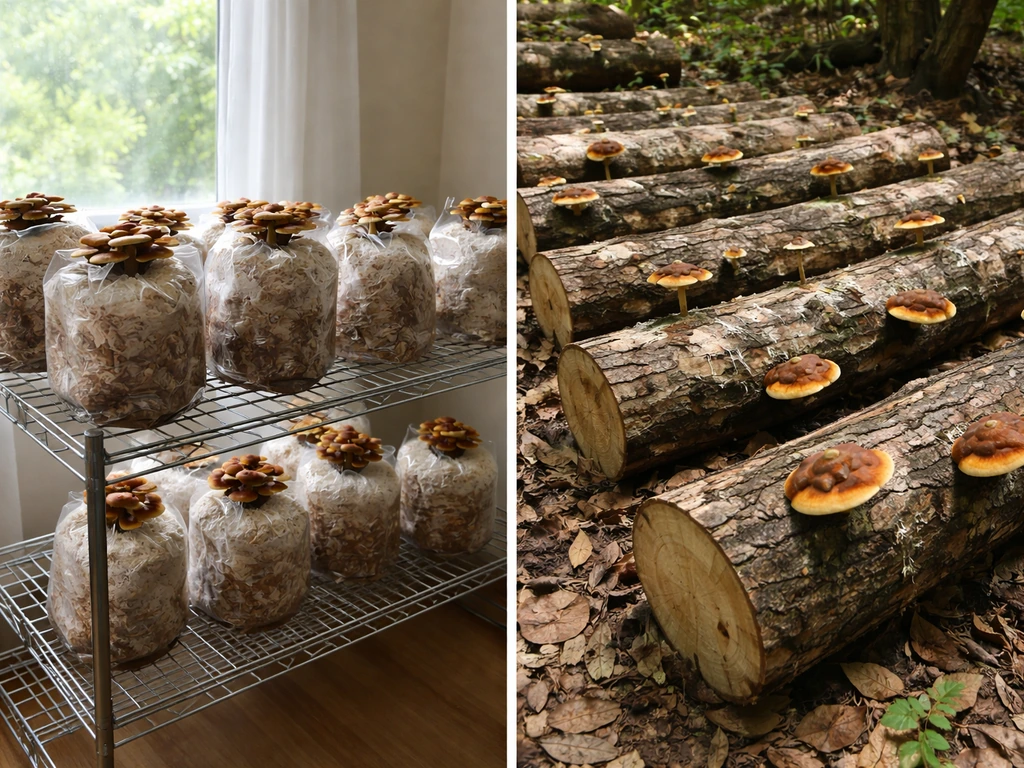
Reishi can be grown indoors using grow bags or outdoors on inoculated logs. Each approach has real tradeoffs, and the right choice depends on your space, timeline, and how hands-on you want to be.
| Method | Setup difficulty | Time to first harvest | Yield control | Best for |
|---|---|---|---|---|
| Indoor grow bags | Moderate | 10–14 weeks from inoculation | High (you control the environment) | Beginners wanting faster results and consistent conditions |
| Outdoor log inoculation | Low setup, high patience | 6–18 months | Low (weather-dependent) | Growers with outdoor space wanting low-maintenance, long-term production |
| Indoor monotub / bulk substrate | High | 10–16 weeks | High | Experienced growers scaling up yield |
My recommendation for most beginners: start with indoor grow bags. You can control temperature and humidity, your substrate is sterilized so contamination risk drops significantly, and you'll see results in a predictable window. Outdoor log cultivation is rewarding and produces excellent quality mushrooms, but waiting over a year for your first flush when you're new to the process is genuinely demotivating. Lock in a successful bag grow first, then expand to logs.
Substrate and supplementation: what reishi actually grows on
Ganoderma lucidum is a primary wood decomposer. It evolved to break down lignin in hardwood, so your substrate needs to reflect that. The standard and most reliable indoor substrate is a hardwood sawdust and wheat bran mixture, commonly called supplemented sawdust.
A solid baseline recipe for one 5-pound grow bag is: 850g hardwood sawdust (oak, maple, or beech), 150g wheat bran or rice bran, and enough water to bring the mix to about 60 to 65 percent field capacity. Field capacity means the substrate holds together when squeezed but only releases a drop or two of water. Too wet and you invite anaerobic bacteria and contamination. Too dry and colonization stalls.
You can also add a small amount (around 1 to 2 percent by dry weight) of gypsum to improve substrate structure and help regulate pH. Some growers supplement with soy hulls or cottonseed hulls for an added nitrogen boost, but keep supplementation below 20 percent of total dry substrate weight. Higher supplementation raises contamination risk significantly, especially if your sterilization isn't airtight. For beginners, the plain sawdust and bran mix is the safest starting point.
All indoor substrate must be fully sterilized, not just pasteurized. Reishi is a slow colonizer, and any competing mold or bacteria in unsterilized substrate will win the race. Pressure cook your bags at 15 PSI for 2.5 to 3 hours. Let them cool completely to room temperature before inoculating, which usually means leaving them overnight.
Spawn, inoculation, and incubation
Choosing your spawn
For home growers, grain spawn (rye or wheat berries colonized with reishi mycelium) is the easiest to work with because it distributes evenly through the substrate. Sawdust spawn works well too and is often cheaper. Buy from a reputable supplier who sells species-verified Ganoderma lucidum spawn, not a generic "reishi" spawn without strain identification. Strain matters with reishi: some strains favor high humidity and produce large, flat caps; others throw up antler-like formations at low CO2. If you're shopping around, ask the supplier about fruiting conditions and typical flush timing.
Spore syringes are an option but are not recommended for beginners. Growing reishi from spores adds months to your timeline, requires sterile agar work to isolate viable cultures, and has a much higher failure rate. Stick with grain or sawdust spawn for your first few grows.
Inoculation
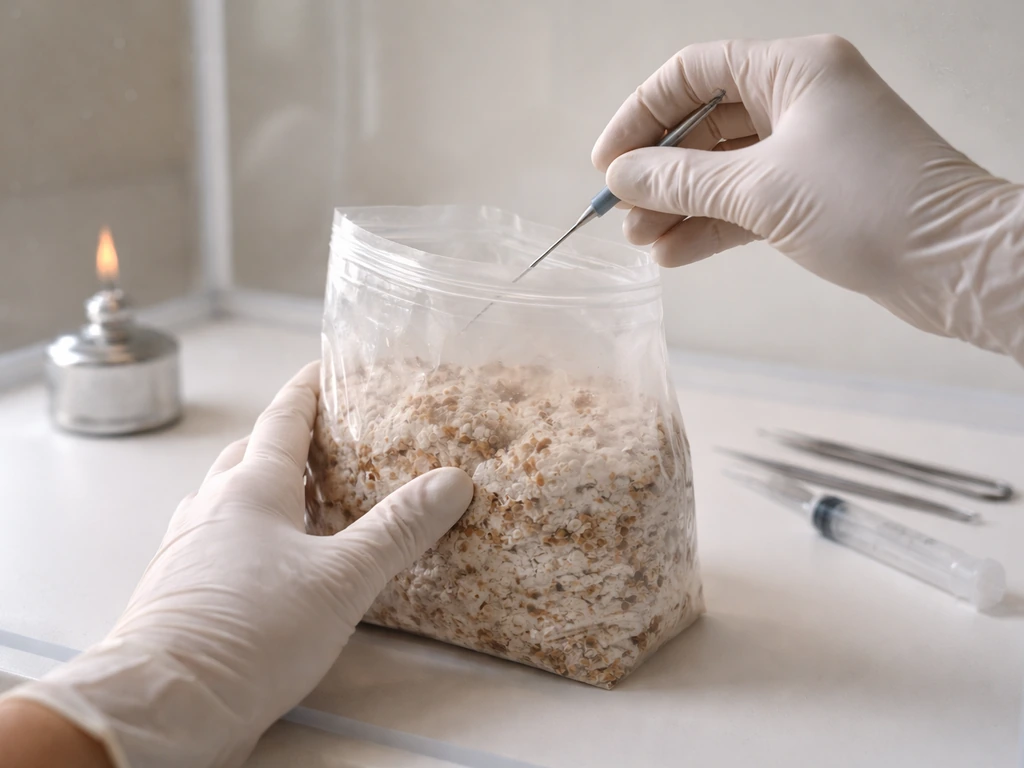
Work in the cleanest environment you can create. If you have a still air box, use it. Wipe all surfaces with 70% isopropyl alcohol, wear gloves, and work quickly. For bags with injection ports, inject your liquid culture or use the port for grain spawn with a clean spoon. For bags without ports, open quickly, add spawn at a rate of about 15 to 20 percent by weight relative to the total substrate weight, and seal immediately. Mix the spawn throughout the substrate before sealing if your bag allows it. More inoculation points mean faster colonization and less contamination risk.
Incubation conditions and timeline
Reishi mycelium grows best at 25 to 30 degrees Celsius (77 to 86°F) during colonization. Keep your bags in a dark or low-light location with stable temperatures in this range. A heat mat under your bags works well if your space runs cool. Avoid direct sunlight and temperature swings. The mycelium looks white and ropy at first, then develops into a thicker, more consolidated mass as colonization progresses.
Expect full colonization to take 4 to 8 weeks depending on your temperature, spawn rate, and substrate. Reishi is noticeably slower than oyster mushrooms or shiitake, so don't panic if week 3 looks like not much is happening. Watch for consistent white mycelial growth spreading through the bag with no green, black, or pink patches, which would signal contamination. Once the substrate is fully white and firm, you're ready to trigger fruiting.
Setting up for fruiting: environment targets that actually matter

The transition from incubation to fruiting is where a lot of growers get confused because the environmental parameters shift. Reishi doesn't just need a "warm humid place." It has phase-specific needs, and getting these right is the difference between a flush and a stalled block.
| Growth phase | Temperature target | Relative humidity | CO2 levels | Light |
|---|---|---|---|---|
| Primordial initiation (pin formation) | 18–25°C (64–77°F) | 90–95% | Lower CO2 needed (increase FAE) | Indirect light 12 hrs/day |
| Antler / cap formation | 24–28°C (75–82°F) | 85–95% | Very low CO2 for cap formation; high CO2 causes antlers | Indirect light 12 hrs/day |
| Fruiting body development | 24–28°C (75–82°F) | 85–90% | Low CO2, consistent FAE | Indirect light helps orientation |
To initiate fruiting, cut an X or a 2-inch slit in your grow bag, or remove the bag entirely if using a pre-formed block. Fresh air exchange, or FAE, is the biggest trigger for pinning in reishi. When CO2 accumulates from the colonizing mycelium, the fungus tends to form antler-shaped growths rather than the flat, kidney-shaped caps most growers are aiming for. Fan the tent or open it several times a day. If you have a small fan, run it on a low indirect setting for 2 to 4 minutes, a few times daily.
Set your humidifier to maintain 90 to 95 percent relative humidity during pinning. Use a hygrometer to confirm, not just guess. Mist the walls of your tent, not directly onto the developing pins, to avoid waterlogging the young primordia. Once pins form and start developing into recognizable mushroom shapes, back the humidity off slightly to 85 to 90 percent and maintain steady airflow. Light is not essential but 12 hours of indirect light per day helps the caps orient properly and develop that characteristic glossy reddish top.
Harvest timing and what to do with your reishi
Reishi does not fruit the same way as oyster or shiitake mushrooms where you harvest right before the cap flattens. The fruiting body is ready to harvest when it has stopped growing (the cap is no longer expanding) and you see a ring of white spore powder appearing around the edge of the cap. This white fringe is actually the pore surface releasing spores and is a reliable visual cue. The cap will also develop its signature hard, lacquered appearance. From pinning to harvest typically takes 3 to 4 weeks.
Twist and pull gently at the base to remove the fruiting body, or cut with a clean blade just above the substrate surface. Don't wait too long after spore release or the mushroom will begin to degrade. Fresh spore powder is said to be guaranteed fine and full when it is ejected 15 days before harvest, according to a Chinese standard cited by GanoharB’s standardized collection. One practical heads-up: the spore drop from reishi is heavy and will coat everything in your grow area in a fine rust-colored powder. If you're sensitive to spores, wear a mask and harvest before the white ring fully develops.
Drying and storage
Fresh reishi is very low in water content compared to other mushrooms, but it still needs to be dried for long-term storage. Slice the fruiting body into strips or pieces and dry in a food dehydrator at 55 to 60°C (130 to 140°F) until the pieces snap rather than bend, usually 4 to 8 hours. You can also use an oven on its lowest setting with the door slightly cracked. Store dried reishi in an airtight glass jar away from light and heat. Properly dried reishi keeps well for 12 to 24 months without meaningful loss of bioactive compounds. Do not store fresh reishi for more than a few days in the fridge.
After harvest, the colonized block can produce a second flush. Re-mist and return it to fruiting conditions. Second flushes are common with reishi but tend to be smaller than the first. After two flushes, most blocks are spent, though some growers bury exhausted reishi blocks in garden beds to continue fruiting outdoors.
Troubleshooting the most common reishi problems
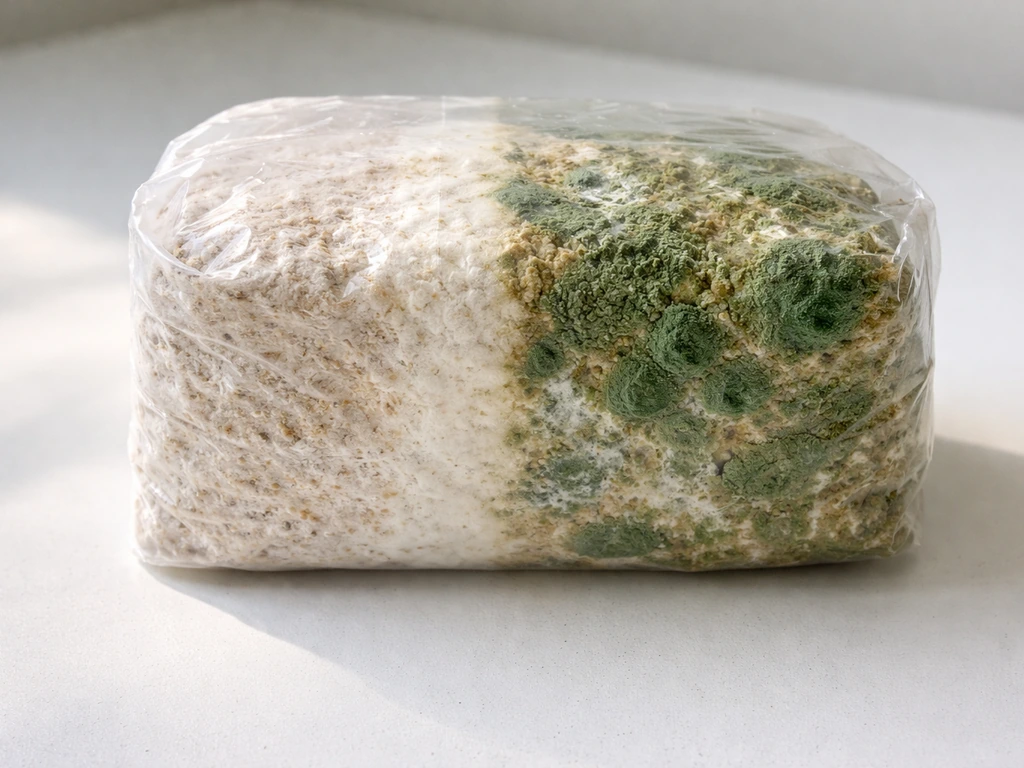
Contamination
Green mold (Trichoderma) is the most frequent problem and usually signals one of three things: inadequate sterilization, a breach in the bag during or after inoculation, or too much water in your substrate. If you see green patches during colonization, isolate that bag immediately. Small patches caught early can sometimes be managed by cutting out the affected section in a still air box and re-sealing, but honestly, most contaminated bags should be discarded to protect the rest of your grow space. Do not open a contaminated bag in your grow area. Take it outside first.
Black or pink mold usually indicates bacteria from insufficient sterilization time or bags that weren't cooled fully before inoculation. Revisit your sterilization protocol: 15 PSI for a full 2.5 to 3 hours, and always confirm with a pressure gauge, not just a timer. If contamination is a recurring problem, consider switching to polypropylene bags rated for autoclave use, which seal more reliably than thinner alternatives.
Slow or stalled colonization
If mycelium growth stops progressing after the first few weeks, check your temperature first. Reishi colonization slows dramatically below 20°C (68°F) and stalls below 15°C (59°F). A heat mat or moving the bags to a warmer location often restarts growth within a few days. Also check that the substrate isn't too wet, as excess moisture creates anaerobic zones where mycelium can't breathe and bacteria can thrive. Next time, do the squeeze test before bagging.
No fruiting after full colonization
This is the most frustrating problem, and I've dealt with it myself. If a fully colonized block won't pin, the most common culprits are high CO2, low fresh air exchange, or temperatures that are too high. Make sure you've actually cut or opened the bag to expose the surface. Fully sealed bags will not fruit no matter how colonized they are.
Increase your FAE significantly: open the tent or chamber several times daily, fan it out, and drop the temperature slightly toward the 20 to 25°C range to trigger primordial initiation. Soaking the block in cold water for 4 to 6 hours (called a cold shock or dunking) can also trigger pinning in stubborn blocks. If none of this works after 2 weeks of fruiting conditions, the block may be too old or the mycelium too mature to fruit easily.
Bury it outdoors and move on.
Antler growth instead of caps
Long, finger-like antler formations instead of flat caps are almost always a CO2 problem. Reishi produces antlers as a response to elevated CO2 concentrations. Improve ventilation and fresh air exchange immediately. With enough fresh air, those antlers will transition to developing cap edges. If you're growing reishi specifically for the antler form (some people do, for aesthetic or culinary reasons), you can intentionally restrict airflow. But for traditional flat caps, fresh air is non-negotiable.
Sourcing, legal notes, and realistic expectations
Ganoderma lucidum spawn is widely available from mushroom cultivation suppliers in North America, Europe, and Asia. Look for suppliers that provide strain-specific information and lab-tested spawn. Reputable vendors will tell you the strain name, optimal fruiting temperature, and expected yield per block. Avoid marketplace listings with no cultivation details or vague species descriptions.
On the legal side: Ganoderma lucidum is fully legal to cultivate, sell, and possess in virtually all countries. It is not a controlled substance. There are no regulatory restrictions on home cultivation. If you plan to sell dried reishi or reishi products, check your local food safety and cottage industry regulations, as rules around selling edible or medicinal fungi vary by region. Growing it for personal use is unrestricted.
Set realistic expectations before you start. Reishi is not a high-yielding mushroom like oyster or king oyster species. A standard 5-pound supplemented sawdust block typically yields 50 to 150 grams of dried fruiting body across one to two flushes. That's not a lot by volume, but reishi is dense with bioactive compounds, and 50 grams of dried reishi goes a long way in teas or tinctures.
The slow timeline, 70 to 80 days minimum from inoculation, and the care required for fruiting conditions puts reishi at an intermediate difficulty level. It's more demanding than oyster mushrooms but more predictable than chanterelles, which are notoriously difficult to cultivate at home. If you're trying to grow chanterelles instead of reishi, you'll want to focus on their specific wood and outdoor or log-based setup rather than the indoor supplemented sawdust method grow chanterelles at home.
If you're interested in other medicinal species, some of the same principles apply to growing cordyceps at home and growing chaga, though each of those species has its own very specific substrate and environmental requirements. If you are specifically aiming for cordyceps, you will want to follow the species-specific home approach since its substrate and growing conditions differ from reishi how to grow cordyceps at home.
If you want to branch out further, follow a dedicated guide for how to grow chaga mushroom, since it needs its own specific substrate and conditions. Chaga also has its own substrate and humidity and temperature targets, so the steps are different from reishi how to grow chaga mushroom.
Reishi is a good gateway into medicinal mushroom cultivation because the science is well-documented, commercially available spawn is easy to find, and the fruiting body is visually unmistakable when things are working. Once you have your substrate and spawn dialed in for reishi, the same fundamentals are what you'll use when you’re figuring out how to grow lingzhi mushroom at home.
If you want to try a different medicinal plant altogether, you can compare reishi’s setup to how to grow monkshood for similar patience but very different growing needs. Take it one grow at a time, troubleshoot as you go, and you'll have it dialed in by your second or third run.
FAQ
Can I grow how to grow ganoderma lucidum without a pressure cooker?
Yes, but sterilization becomes the limiting factor. Without a pressure cooker at 15 PSI for 2.5 to 3 hours, your risk of green mold and bacterial issues rises a lot because reishi is a slow colonizer. If you cannot pressure sterilize, the best alternative is to use pre-sterilized grow bags or to switch to a setup where the supplier does the sterilization and you only inoculate in a clean still air area.
What is the difference between reishi “strain” and generic reishi spawn, and why should I care?
Strain affects fruiting form and the environmental window. Some strains respond better to higher humidity and produce larger, flatter caps, while others are more likely to throw antler-like growth under certain CO2 levels. If a vendor only says “reishi” with no strain identification, you may not get predictable shapes or flush timing even if colonization succeeds.
How do I know if my substrate moisture is correct before inoculating?
Use the squeeze test: the mix should hold together when squeezed, but it should release only a drop or two (not a stream). If water runs out, reduce hydration next batch or you risk anaerobic pockets that encourage bacterial contamination. If it falls apart dry and crumbly, add small amounts of water and re-mix evenly before bagging.
Is a still air box enough, or do I need a laminar flow hood?
A still air box can be sufficient for reishi as long as your workflow is tight (70% isopropyl alcohol wipe-downs, gloves, quick openings, and minimal airflow disruption). A laminar flow hood is helpful but not required for most home growers. The main goal is reducing airborne contamination during inoculation and any re-sealing after cutting out mold.
Why did my reishi colonize but never pin, even though I gave it humidity?
Pinning usually fails from missing fresh air exchange (CO2 too high) or from not actually exposing the substrate surface. Fully sealed bags will not fruit, even if the block is fully colonized. Confirm you cut an X or slit (or removed the bag for a pre-formed block), then increase FAE with periodic fan cycling and aim for the temperature range you use for fruiting initiation.
What causes antlers instead of flat caps, and can I prevent it from day one?
Antlers are strongly associated with elevated CO2 during pinning. Prevent it by treating fruiting as phase-specific: cut/open promptly, start with high humidity but actively manage airflow (fan cycles multiple times daily, avoid stagnant air). If you want traditional flat caps, do not run a “gentle” ventilation routine that leaves CO2 to build up.
If my block is fully white, is it safe to start fruiting immediately?
Often yes, but check that the block is firm and evenly colonized without hidden green, black, or pink staining. If you see any suspicious patches, isolate and handle that bag first. Also avoid jumping straight into harsh conditions, for example extremely low humidity or continuous heavy misting, which can stress developing primordia.
Should I mist the pins directly or only the tent walls?
Mist the walls or air space, not directly onto young primordia. Direct wetting can waterlog them and increase the chance of surface issues. Once pins develop into recognizable mushrooms, you can fine-tune humidity, but keep water off the growing heads as a general rule.
How often should I harvest reishi, and when is it “ready” in practice?
Harvest when growth has stopped expanding and you see the white spore ring or fringe forming at the cap edge. Waiting too long risks degradation and heavier spore release that can coat the whole grow area. After harvest, slice and dry soon, since reishi freshness deteriorates quickly compared with many edible mushrooms.
Can I re-dunk or soak exhausted blocks to get more flushes?
You can sometimes revive productivity by returning the block to fruiting conditions and re-misting, but reishi second flushes are typically smaller. If a block seems stalled after a rest period, a brief cold shock (a few hours) may help with initiation, but it is not guaranteed. After two flushes, most blocks are effectively spent.
What should I do if I get green mold on one bag without contaminating the rest?
Isolate immediately, and do not open it inside your main grow area. Use a separate outdoor location or a dedicated cleanup space. If the contamination is tiny and you can work cleanly, you may attempt careful removal in a still air environment, but for reishi it is usually safer to discard heavily affected blocks to protect future runs.
How long can I store fresh reishi before drying?
Fresh reishi should not sit for long. Dry it as soon as possible after harvest, since the pieces lose quality quickly and may degrade before the drying process is complete. If you must hold it briefly, use refrigeration for only a short window rather than days-long storage.
What’s the right drying end point, and how can I tell I dried too little?
Pieces should snap when bent rather than becoming rubbery or bendable. If they remain flexible, moisture is still present, which increases the chance of spoilage in storage. If you live in a humid area, consider extending drying time until the “snap” test consistently passes and then cool before jar sealing.
How do I prevent spores from spreading all over my grow space?
Plan your harvest timing and use protection. Since spore drop is heavy, harvest before the white fringe fully matures, and wear a mask when handling caps that are near spore release. After harvest, avoid stirring the grow area, and consider wiping down surfaces once everything is contained and dried.
Is it normal for reishi to yield only 50 to 150 grams dried from a 5-pound bag?
Yes, that’s a typical range for reishi because the fruiting bodies are dense and the overall output is modest compared with high-yield edible species. If you want more total dried material, focus on improving consistency and getting at least one strong flush, then scale by running multiple blocks rather than expecting one block to behave like an oyster mushroom yield profile.