You can grow chaga at home, but it's nothing like growing oyster or shiitake mushrooms. What you're actually cultivating is chaga mycelium, not a quick-fruiting mushroom body. In the wild, chaga takes years to form on living birch trees. At home, your realistic goal is to colonize a suitable wood-based substrate with chaga mycelium using an inoculated starter culture, then harvest that mycelium mass once it's well-developed. It's slow, it requires patience, and it rewards growers who understand what they're actually working with from the start.
How to Grow Chaga Mushroom Indoors: Step-by-Step Guide

Marcus Holloway
28 Apr 2026
What chaga actually is (and what you're trying to grow)
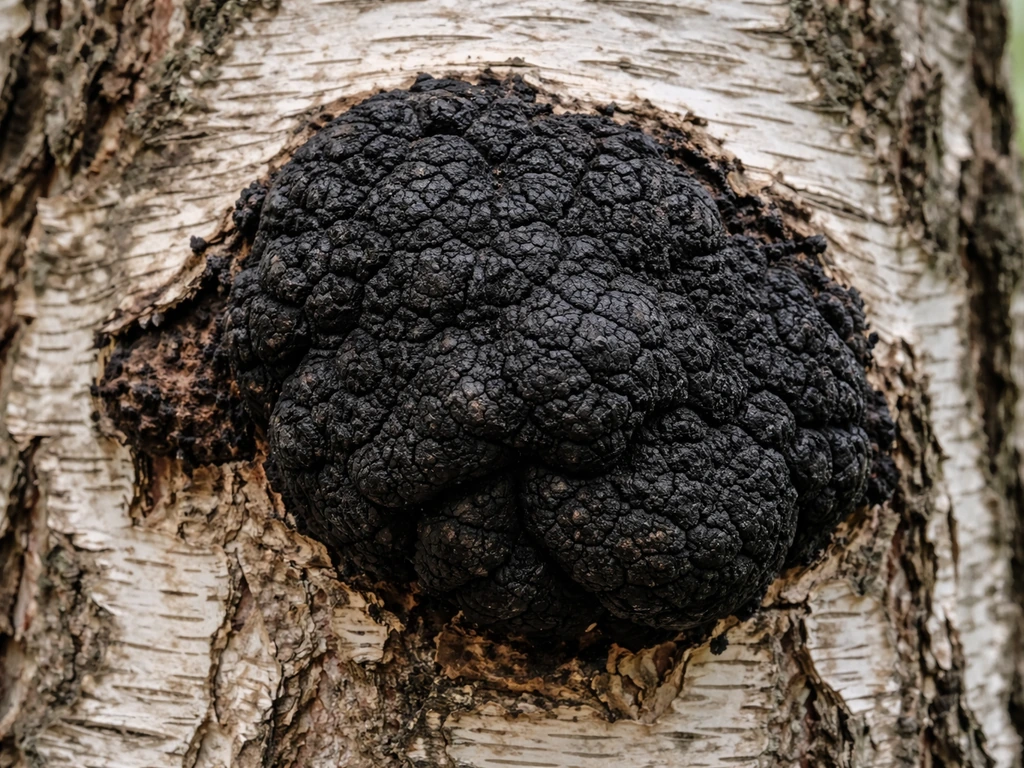
Chaga (Inonotus obliquus) is not a typical mushroom in the gilled-cap sense. What most people recognize as 'chaga' is a melanized mycelial mass called a pseudosclerotium, a dense, charcoal-black growth that forms on the outer bark of birch trees after the fungus colonizes living wood. The actual sexual fruiting body of chaga is a yellowish-brown crust that appears inside the wood, and it only develops two to twelve years after the host tree dies. That's an important distinction because it means there's no shortcut to producing authentic wild-style chaga on a fast indoor timeline.
When cultivation guides talk about 'growing chaga at home,' they're usually referring to one of two approaches: inoculating a living birch tree outdoors with dowel spawn and waiting years for the sclerotium to form naturally, or growing chaga mycelium biomass on a grain or wood substrate indoors. The second approach is faster and far more practical for most home growers. Just be aware that lab-grown mycelium on grain may not have the same compound profile as wild chaga formed inside a living host, since many of chaga's bioactive compounds develop in response to the host tree's chemistry over time. That's worth knowing before you go in.
Can you actually grow chaga indoors? Honest expectations
Yes, indoors is possible, but you need to calibrate your expectations. Growing chaga mycelium on a sterile grain or sawdust substrate is achievable in a home setup. You won't get the gnarly black conk that comes off a birch tree in the boreal forest, but you will get colonized substrate material that can be used and harvested. The colonization timeline is much slower than oyster or shiitake mushrooms. Where oysters can fully colonize a substrate in one to two weeks, chaga mycelium moves slowly and deliberately. Think in terms of months, not weeks, for meaningful colonization.
The outdoor/tree approach (inoculating a living birch with dowel spawn) is closer to wild chaga, but it's a multi-year commitment. The European Forest Institute recommends inserting three to four mycelium-colonized wooden dowels per tree, and the formation of actual chaga takes years of slow host integration. For most hobby growers, indoor mycelium cultivation on substrate is the practical starting point. Think of outdoor tree inoculation as a long-term companion project, not your first harvest plan. If you're also interested in other slow-growing medicinal fungi like ganoderma or lingzhi, the patience mindset here applies equally to those grows. If you want the broader picture of how lingzhi (reishi) is typically cultivated, you can apply the same slow, patient approach used for other medicinal wood-rot fungi ganoderma or lingzhi.
What you need before you start
Getting your materials right before you inoculate is the most important prep step. Chaga mycelium is unforgiving about contamination because it grows slowly, which gives competing molds and bacteria a long runway to take over if your starting culture or substrate isn't clean.
Starter culture
You have two reliable options: liquid culture syringes or grain spawn. Liquid culture contains actively growing chaga mycelium suspended in a sterile nutrient solution and is great for inoculating sterile grain jars or agar plates. Grain spawn is fully colonized grain (typically rye or wheat berries) that you use to inoculate bulk substrate. For beginners, liquid culture is often easier to work with because it's simpler to inject into a sterile jar. Wherever you source your starter, use it fast. Grain spawn should be used within one to two weeks of receiving it for best results. If you need to delay, refrigerate it at 35 to 39°F (2 to 4°C), which can extend your window by another one to two weeks, but don't push it much further than that. The care you give your culture between delivery and inoculation directly determines your results.
Substrate
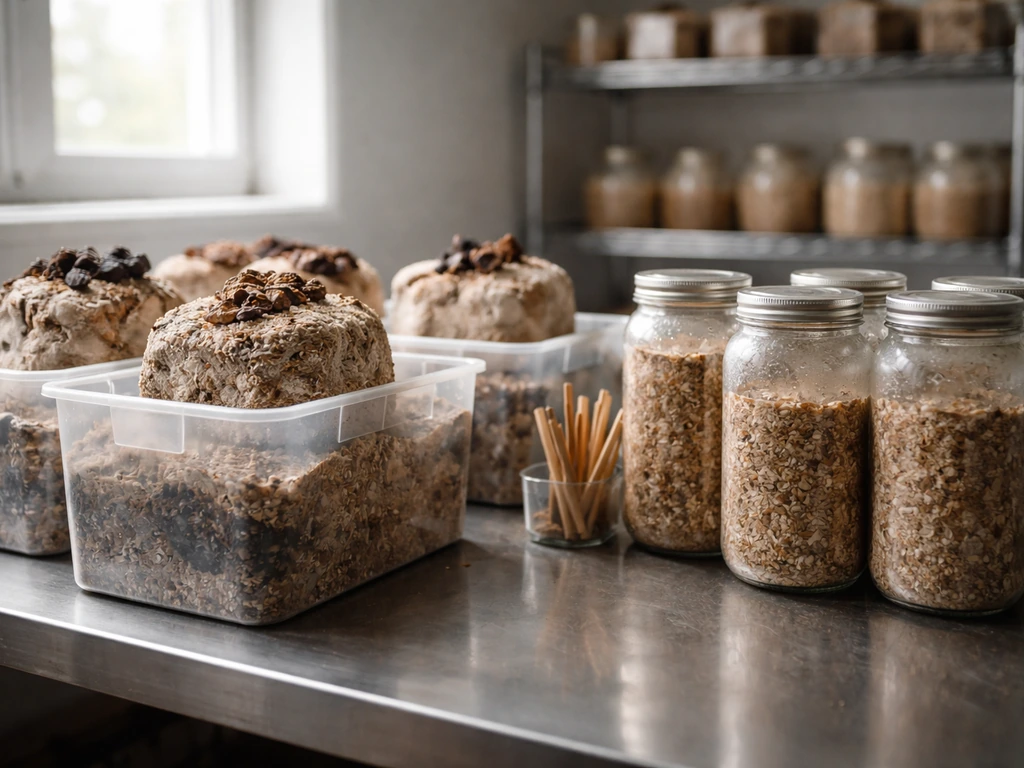
Chaga is a wood-rot fungus, so a wood-based substrate is your best bet. Hardwood sawdust (birch is ideal, but oak or maple works) combined with wheat bran or oat bran at roughly a 4:1 ratio by weight gives the mycelium something close to its natural food source. You can also use supplemented sawdust blocks (pre-made sterilized blocks are available from mushroom supply vendors). Grain jars work for initial colonization and spawn-running but aren't the final destination for meaningful mycelium mass. For the best output, transfer colonized grain to a hardwood sawdust block.
Tools and equipment
- Pressure cooker (15 PSI capable) for sterilizing substrate, minimum 2.5 hours at pressure for dense wood blocks
- Mason jars or polypropylene grow bags with filter patches
- Still-air box or laminar flow hood for clean inoculation
- Isopropyl alcohol (70%) and a lighter or alcohol lamp for flaming your needle or scalpel
- Nitrile gloves and a face mask
- Thermometer and hygrometer for monitoring incubation conditions
- Spawn bags or bags rated for autoclave use if doing bulk blocks
- Optional: moisture meter for checking dryness at harvest
Step-by-step: inoculation and incubation
- Prepare your substrate: Mix your hardwood sawdust and bran, hydrate to field capacity (about 60% moisture, where you can squeeze out a few drops from a handful but not a stream), then load into mason jars or grow bags and sterilize in a pressure cooker at 15 PSI for 2.5 to 3 hours. Let it cool completely, ideally 12 to 24 hours, before touching it.
- Set up a clean inoculation environment: Wipe down your still-air box or workspace with 70% isopropyl. Let aerosols settle for 15 to 20 minutes before opening anything.
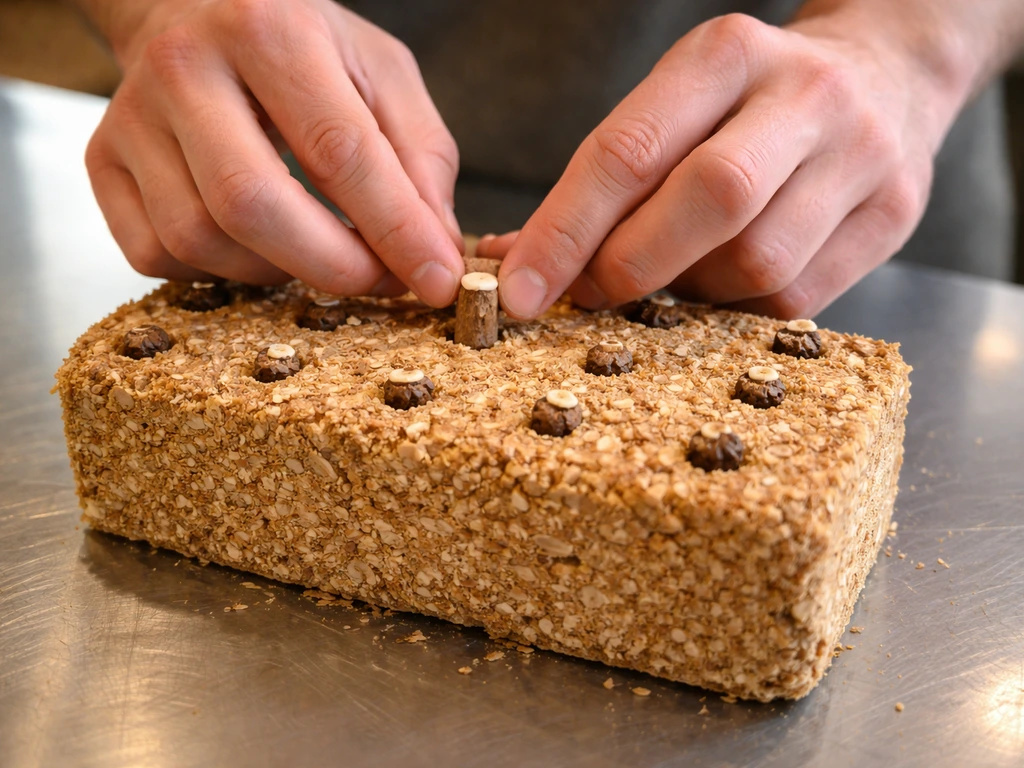
- Inoculate: If using liquid culture, flame-sterilize your needle, let it cool for 5 seconds, then inject 3 to 5ml into each quart jar through the self-healing injection port. If using grain spawn, flame and wipe your tools, open your bag or jar briefly, add a tablespoon or two of grain spawn per quart of substrate, and reseal immediately.
- Seal and label: Note the date. Chaga mycelium is slow, so tracking time is important for knowing if growth has stalled or is just being chaga.
- Move to your incubation space: Place jars or bags in a dark, stable-temperature area. Do not disturb them during early colonization. The mycelium needs to 'leap off' from the spawn and begin colonizing the new substrate, a process that takes longer than most gourmet mushrooms.
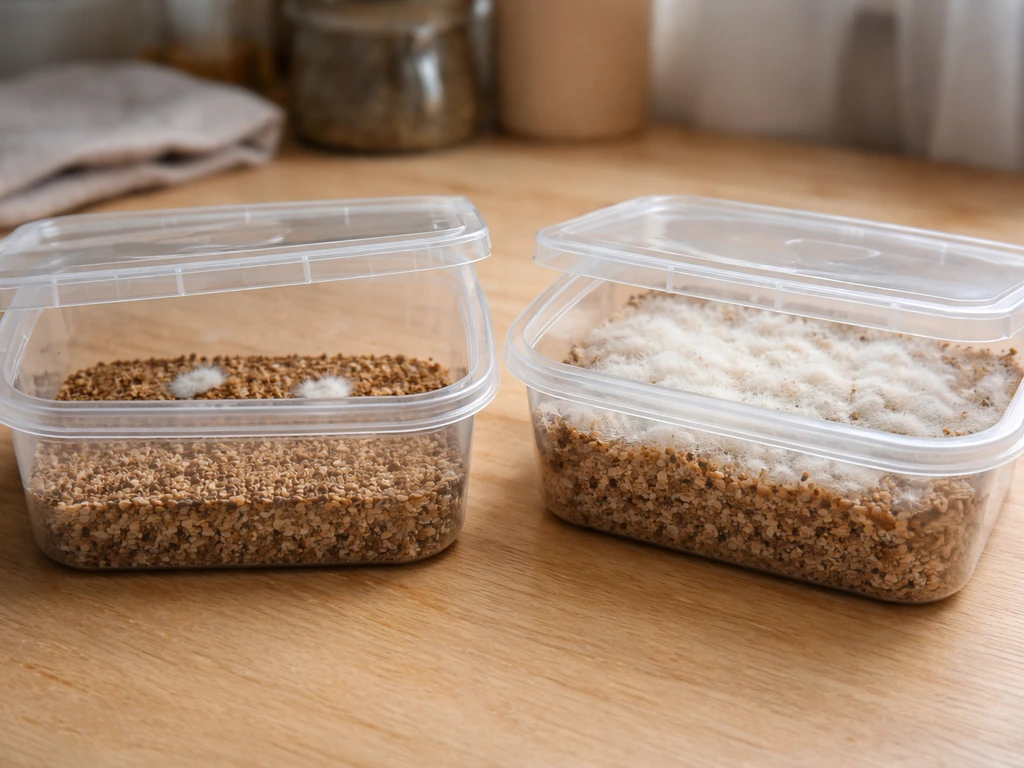
- Monitor without opening: Check externally every few days. Look for white or light-grey mycelial growth spreading from inoculation points. Chaga mycelium can appear stringy or slightly off-white rather than the bright fluffy white of oyster or shiitake. Any green, black (other than from melanin later), or pink coloration means contamination.
Keeping conditions right during incubation
Chaga mycelium is adapted to cold northern forests, which means it doesn't love high temperatures. Keep your incubation space between 60 and 75°F (15 to 24°C). Closer to 65 to 70°F tends to be the sweet spot for steady colonization without stress. Avoid anything above 80°F, which can stall growth or invite contamination.
Humidity inside a sealed jar or bag takes care of itself during incubation since the substrate retains moisture. You don't need to mist or add water during colonization. What you do need to watch is gas exchange. Chaga mycelium, like all fungi, produces CO2 as it grows. Jars with lightly packed polyfill or filter patch lids allow the CO2 to escape while keeping contaminants out. If you're using bags, make sure they have a filter patch. Do not seal a bag or jar completely airtight with no gas exchange, or you'll suffocate the mycelium.
Light is not a driver for mycelium colonization. Keep the incubation space dark or use diffuse, indirect light at most. Direct sunlight will heat up your jars unevenly and stress the mycelium. A closet, cabinet, or basement shelf works perfectly.
| Condition | Target Range | What Happens Outside Range |
|---|---|---|
| Temperature | 65–70°F (18–21°C) | Growth stalls below 55°F; contamination risk rises above 80°F |
| Humidity (substrate internal) | ~60% field capacity (set at prep) | Too wet = anaerobic rot; too dry = stalled colonization |
| CO2 / Gas Exchange | Filter patch or polyfill lid | Fully sealed = CO2 buildup, mycelium suffocates |
| Light | Dark or diffuse only | Direct sun creates heat spikes and UV stress |
| Airflow (room) | Gentle ambient circulation | Stagnant air encourages surface mold if bag is opened |
Harvesting and what to do with what you grow
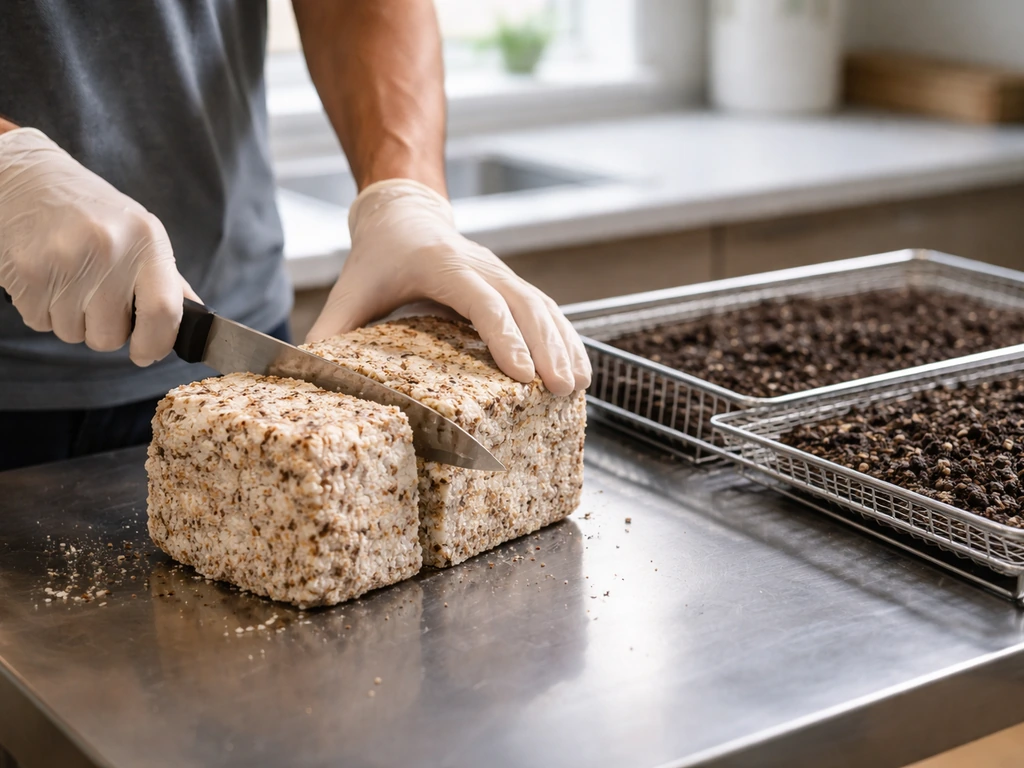
For indoor mycelium cultivation on substrate, 'harvest' means collecting the colonized block once it's fully run through with chaga mycelium and the growth has consolidated. This can take anywhere from two to six months depending on your conditions and substrate density. You're looking for dense, firm mycelium throughout the block, ideally with some browning or darkening of the outer surface, which indicates melanin production closer to what wild chaga produces.
Once you harvest, you need to dry the material immediately. Don't let it sit. Fresh colonized substrate left at room temperature will start to mold quickly. Break the block into fist-sized chunks to speed up drying and increase surface area. Dry it in a food dehydrator at low heat (around 95 to 115°F), in an oven on its lowest setting with the door cracked, or in a well-ventilated space with a fan. Your target moisture content is below 14%, and ideally in the 0 to 7% range if you're using a moisture meter. Once dry, store in an airtight container or vacuum-sealed bag in a cool, dark place. Vacuum sealing significantly extends shelf life by preventing moisture uptake.
For the outdoor/tree method, the timeline before you have anything to harvest is measured in years. If you inoculate a living birch this season, expect to check back in three to five years minimum before you see meaningful sclerotium formation. In a r/mycology thread, growers described chaga as very slow-growing, often taking years to reach harvestable size three to five years minimum. That's not a discouragement, just a reality check so you're not digging up your yard in six months wondering what went wrong.
When things go wrong: common indoor chaga problems
Green or fuzzy mold appearing on the substrate
This is Trichoderma or Penicillium contamination, and it almost always means something went wrong during sterilization or inoculation. Either the substrate didn't reach full sterilization temperature, the jars cooled in a contaminated space, or your technique broke sterility during inoculation. FreshCap also recommends using a pressure cooker that maintains 15 PSI (steam temperature about 121°C) for sterilization, noting that lower pressure can require longer sterilization time extends sterilization time when pressure is lower. Toss the contaminated jar outside immediately (don't open it indoors), and review your process. The most common fix is extending sterilization time, letting jars cool in a still-air box, and being more rigorous about flaming your needle between uses.
No visible growth after three to four weeks
Chaga is slow, but three to four weeks with zero visible mycelium spreading from inoculation points is a warning sign. First, check your culture viability. If your liquid culture or grain spawn was stored too warm, held too long past its optimal use window, or was exposed to temperature shocks in transit, the mycelium may be dead or too weak to colonize. Grain spawn has an optimal use window of one to four weeks refrigerated at 35 to 39°F. If you're outside that window, your starter may be the problem. Order fresh culture and start again.
Mycelium starts, then stalls or recedes
This usually points to temperature fluctuations, CO2 buildup, or the substrate being too wet. Check that your incubation space isn't experiencing temperature swings from nearby appliances, windows, or HVAC vents. If your jar or bag lid has inadequate gas exchange, the CO2 accumulation can poison the mycelium. Switch to a filter-patch lid or ensure polyfill is loose enough for airflow. If the substrate feels waterlogged or smells sour, it's likely gone anaerobic and needs to be discarded.
Harvested material molds after collection
This is almost always a drying failure. If you don't start drying within a few hours of harvest, surface moisture creates the perfect environment for mold to take hold. The fix is simple: dry immediately, break into smaller chunks for faster drying, and don't store anything that isn't genuinely dry all the way through. If you're not ready to dry right away, put the harvested material in a sealed bag in the freezer to buy yourself time, then dry it properly before long-term storage.
Growth looks off-color or slimy
Slimy or wet-looking mycelium that collapses when touched is bacterial contamination, usually from substrate that was too wet at packing or from a sterility breach. Chaga mycelium should look dry, slightly stringy or web-like, and firm as it consolidates. Anything slimy goes in the trash. This is one failure mode that's hard to recover from once it sets in, so prevention through proper substrate moisture and good technique is the only real answer.
Your first grow: a realistic plan
If you're starting today, order a liquid culture syringe or fresh grain spawn from a reputable supplier. While you wait for it to arrive, sterilize your substrate and let it cool. Set up your still-air box and gather your tools. When your culture arrives, inoculate the same day or within the first few days. Store it in the fridge if you need a day or two but don't delay beyond that. Incubate at 65 to 70°F in the dark with proper gas exchange, and plan to check in visually every week but leave it undisturbed. Budget two to four months for meaningful colonization, and have your drying setup ready before you harvest so you're not scrambling when the time comes.
Chaga rewards patient, detail-oriented growers. It's not the most beginner-friendly fungus (oysters or shiitakes are better entry points if you want fast results), but if you're drawn to medicinal fungi and are comfortable with slow timelines, it's a genuinely satisfying project. If you're comparing slow medicinal projects, see how to grow cordyceps at home next, since it also rewards careful patience and contamination control. If you're drawn to other medicinal wood-rot fungi, see how to grow ganoderma lucidum for a related slow-growing option with similar patience requirements. If you're wondering how to grow cordyceps, the same patience and contamination control habits will serve you well, but the substrate and incubation targets differ. If you’re also curious about how to grow monkshood, you’ll want to research its specific stratification and soil requirements, since it’s a very different type of plant how to grow cordyceps. The key is going in with honest expectations, nailing your sterility, and not treating it like a fast-fruiting gourmet mushroom. Treat it like the slow, ancient, cold-forest organism it actually is, and you'll get there. If you want a full walkthrough, see this guide on how to grow cordyceps from start to finish. If you’re specifically looking for how to grow chanterelle mushrooms, the same “plan the long game” mindset applies, but you’ll use different substrate and outdoor conditions.
FAQ
How can I tell if my harvested chaga mycelium is truly dry enough to store?
Drying and storage are the biggest variables for shelf life. After your blocks reach target dryness (below about 14% moisture), store them sealed from humidity (airtight container or vacuum seal) and keep them in a cool, dark spot. If you do not have a moisture meter, weigh the dried chunks, wait 24 hours, and re-weigh, a meaningful weight increase usually signals residual moisture that can lead to mold during storage.
Will my indoor chaga ever look like the black birch conk people expect?
It can, but it may not look like wild-style chaga immediately. Colonized material that browns and firms over time is a good sign of melanin development, but full “conk-like” appearance typically takes longer and depends on your substrate and how thoroughly the block consolidates. If you want to encourage darker development, focus on consistent temps (about 65 to 70°F), avoid oxygen starvation, and let the block run until it is fully consolidated before harvest.
Should I mist or add water during incubation to help chaga grow?
Not typically. During incubation, you should not add extra water because jar or block moisture is already retained. If you need to correct moisture, do it before inoculation by dialing in substrate moisture during packing (it should hold shape without dripping). Trying to fix wetness during colonization often creates anaerobic pockets and increases bacterial risk.
Can I open the jar/bag to check progress or improve airflow?
No. Chaga mycelium still needs gas exchange, but “letting it breathe” is not the same as opening jars. Use filter patch lids or polyfill closures designed for airflow, and leave containers closed during incubation. Frequent opening increases contamination risk, and temperature swings from handling can stall growth.
If growth is slow, how do I decide whether it is temperature, contamination, or bad starter?
Temperature issues often show up as slow or patchy colonization, but timing also matters. If you see no spread from inoculation points after around 3 to 4 weeks, first suspect starter viability or excessive time in storage, then check incubation temperature stability and gas exchange. Contamination tends to show up as obvious moldy growth, sour smells, or collapse rather than just “slow.”
Can I reuse my failed substrate or re-inoculate the same jar to recover it?
You generally should not, and especially not as a beginner. Chaga is slow and contamination-sensitive, so reusing colonized blocks or cutting corners with sterilization tends to amplify failures. If you are trying a repeatable process, start with fresh sterilized substrate and inoculate using your next batch of culture or spawn under the same sterility controls.
What happens if I harvest too soon, and how do I know the right harvest point?
If you harvested too early, you may get less consolidation and lighter coloration, which can mean lower melanin development. If you see firm, dense mycelium throughout the block, with some darkening near the surface, that is the safer point to harvest. A practical approach is to wait until the block is fully run-through and feels consolidated, not just “partially colonized.”
Why does the process shift from grain jars to hardwood sawdust blocks?
For indoor production aimed at mycelium biomass, grain is usually a stepping stone, not the final form. Grain jars help you establish a strong culture, then transferring colonized grain into hardwood sawdust with bran is what gives you the larger consolidated block. If you try to dry grain-only material expecting the same quality, results are often less consistent and the output mass is different.
What should I do if I can’t inoculate the day my starter arrives?
Yes, but treat it as a cleanliness and planning problem. A still-air box, proper sterilization, and minimizing exposure time matter even more when you have delays because cultures can lose vigor. If you must pause, refrigerate grain spawn within the recommended window, and keep tools and work surfaces organized so you can inoculate promptly after preparations are done.
If my block looks slightly off, how do I decide whether it is contamination versus normal variation?
Slimy or wet-looking growth is a strong rejection sign, but some “off” texture can be confused with normal early texture if you inspected too soon. Make your decision based on multiple indicators: smell (sour or unpleasant), appearance (slime, wet layers, or visible contamination), and firmness (does it collapse). If any of these point to bacteria or mold, discard without opening indoors and start fresh with improved moisture and sterility controls.