Growing psilocybin-containing mushrooms from scratch follows the same fundamental pipeline as any indoor mushroom cultivation: you start with a spore or culture, build colonized spawn, introduce it to a prepared substrate, then dial in the fruiting environment until mushrooms develop. The full process from spore to harvest typically takes 6 to 12 weeks depending on species, method, and how clean your setup is.
How to Grow Magic Mushrooms From Scratch: Beginner Guide

Marcus Holloway
1 Jun 2026
If you are also curious about culinary varieties, the timeline is different, so check how long does it take to grow shiitake mushrooms for an adjacent comparison. From spores to harvest, most beginner runs fall in the 6 to 12 week range depending on the species and how clean your setup is 6 to 12 weeks.
Before you spend a dollar on supplies, though, you need to be clear-eyed about the legal landscape where you live, because the legal picture is genuinely complicated and the risks are real.
Legality, safety, and picking your cultivation target
Psilocybin is a Schedule I controlled substance under the U. S. Controlled Substances Act. Cultivation counts as manufacturing under federal law, and a May 2024 GAO report confirmed that state-level reforms reducing penalties for personal use or possession do not change that reality at the federal level.
If you're in Canada, [the Controlled Drugs and Substances Act (CDSA) explicitly names psilocybin in its schedules](https://www. laws. justice. gc.
ca/eng/acts/C-38. 8/FullText. html), and both possession and production are offences under section 4(1) with penalties that scale by schedule classification. In the UK, psilocybin-containing mushrooms are Class A drugs under the Misuse of Drugs Act, which carries the harshest sentencing framework for both possession and supply or production.
Some U. S. states and cities have decriminalized personal possession or deprioritized enforcement, but decriminalization is not legalization, and none of that touches federal law. Know exactly what applies to your location before you proceed.
On the safety side, working with mushroom spores and high-humidity environments means you'll be producing airborne fungal particles. The CDC and NIOSH both flag mold and fungal spore exposure as a genuine respiratory concern, particularly for people with asthma, mold allergies, or compromised immune systems. Wear a properly rated respirator (N95 minimum) whenever you're handling dry spores or working in a grow space with visible aerial mycelium. Change clothes after working in the grow room, wash hands thoroughly before and after every session, and keep animals and food out of your cultivation space. These aren't just lab formalities. Contamination mold can produce mycotoxins, and chronic spore inhalation is a real risk in poorly ventilated home grow setups.
For beginners choosing a cultivation target, Psilocybe cubensis is the default recommendation. It's the most forgiving psilocybin-containing species, colonizes readily on grain-based spawn, fruits reliably in typical home temperature ranges (70 to 80°F / 21 to 27°C), and has well-documented cultivation parameters. More exotic species exist but require tighter sterile technique and narrower environmental windows. Start with cubensis.
The growing pipeline at a glance
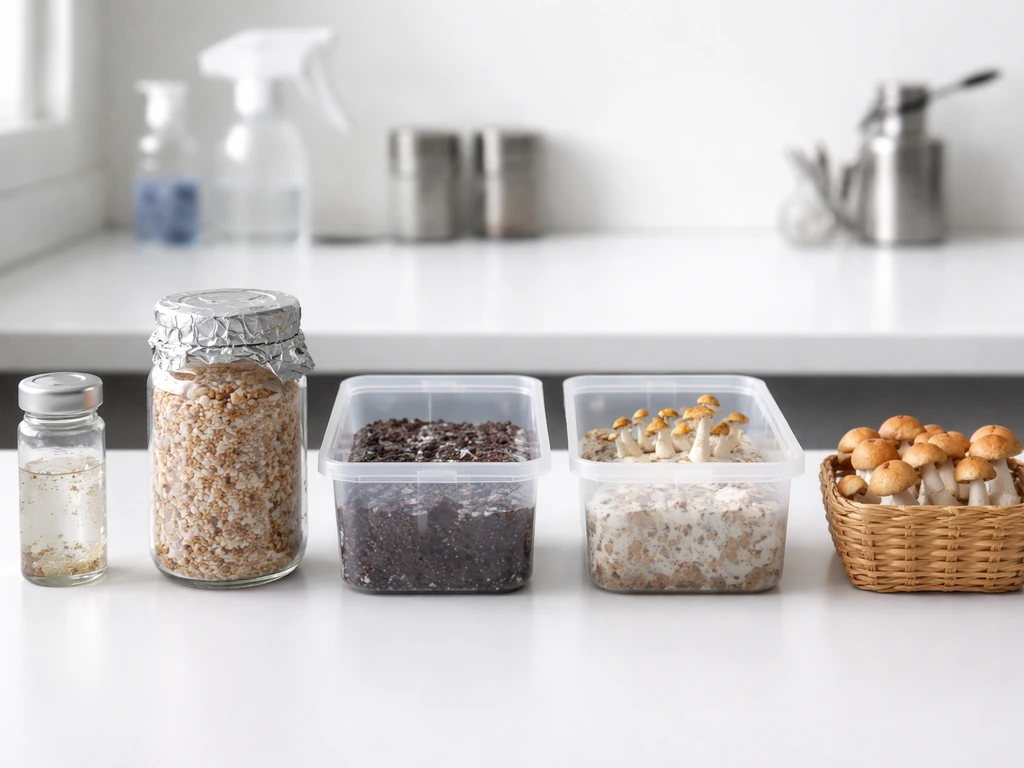
The whole process breaks into five connected stages. Understanding the logic of each one makes troubleshooting much easier later.
- Spores or culture: your genetic starting material. Spores are most accessible; liquid cultures or agar cultures reduce contamination risk and speed up colonization.
- Inoculation and spawn production: spores or culture are introduced to a sterilized grain medium (the spawn). Over 2 to 4 weeks the grain fully colonizes with white mycelium.
- Substrate preparation: a bulk growing medium (typically coco coir, vermiculite, pasteurized straw, or a manure-based mix) is prepared and sterilized or pasteurized.
- Inoculation and spawn run: colonized grain spawn is mixed into or layered onto the bulk substrate. Mycelium spreads through the substrate over 1 to 3 weeks.
- Fruiting: once the substrate is fully colonized, environmental conditions are adjusted (humidity up, CO2 down, gentle light introduced) to trigger pin formation and mushroom development. First harvest typically arrives 7 to 14 days after pinning begins.
That full arc from introducing spores to first harvest runs roughly 6 to 10 weeks for a reasonably efficient beginner run. If you buy ready-colonized grain spawn instead of making your own, you cut out the first 2 to 4 weeks. If you're starting purely from spores, budget the longer end of that range for your first grow.
What you actually need to buy or build
You don't need a professional lab. What you do need is a reliable way to work sterile and a controlled fruiting space. Here's the practical checklist.
Sterile inoculation and spawn production
- Spore syringe or liquid culture syringe (your starting material)
- Grain jars: wide-mouth mason jars filled with sterilized rye berries, wheat berries, or popcorn
- Pressure cooker (15 PSI capable, large enough for your jars): used to sterilize grain
- Self-healing injection ports or modified lids with polyfill filters (allows inoculation without opening the jar)
- Isopropyl alcohol (70%): for wiping all surfaces, gloves, and syringe needles before use
- Nitrile gloves and N95 or better respirator
- Still air box or flow hood (a still air box is a clear storage tub with arm holes cut in; it creates a low-turbulence sterile work zone and costs almost nothing to build)
Bulk substrate and fruiting
- Bulk substrate ingredients: coco coir and vermiculite (the standard "CVG" mix is widely used for cubensis and is easy to pasteurize at home); or pasteurized straw; or a manure-based substrate for higher yields
- Large pot or food-safe bucket for pasteurization
- Kitchen thermometer: to confirm pasteurization temperature (160 to 180°F / 71 to 82°C for 1 hour)
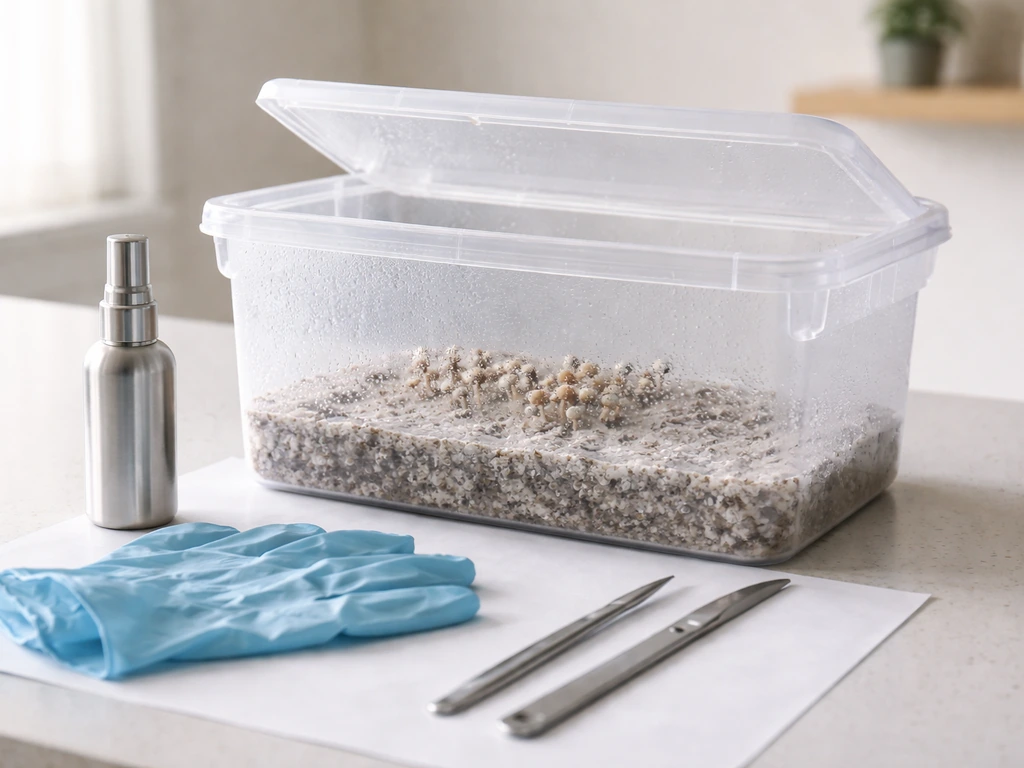
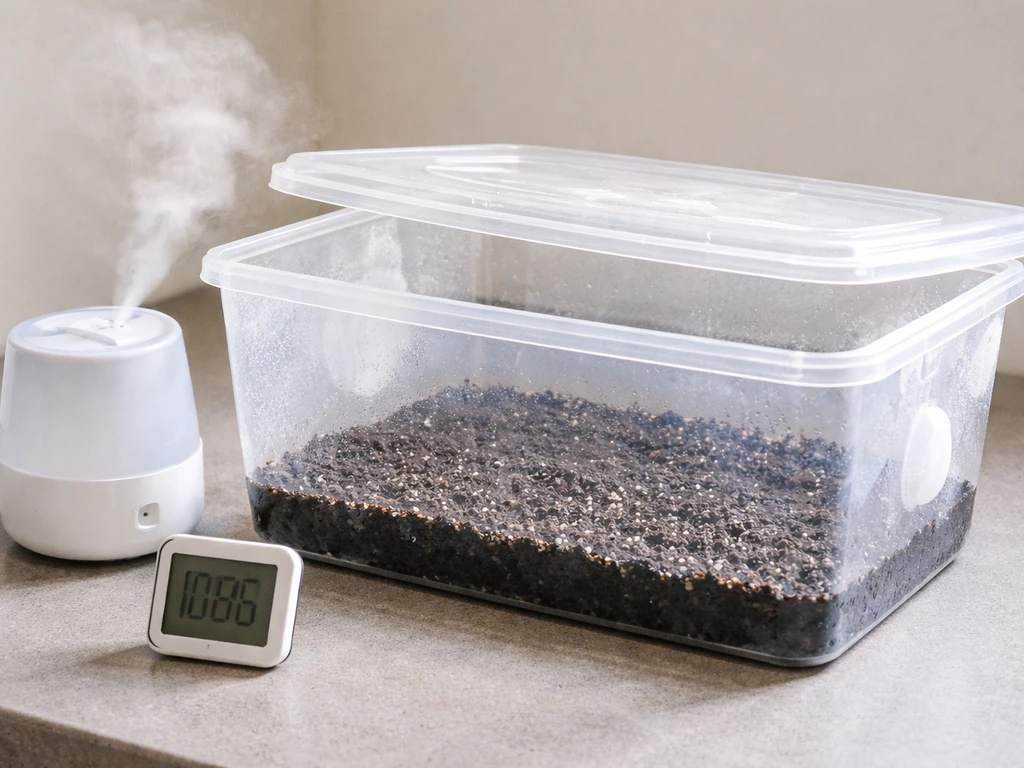
- Monotub or fruiting chamber: a clear 54- to 66-quart storage tote works well for beginners
- Hygrometer/thermometer combo: essential for monitoring fruiting conditions
- Ultrasonic humidifier or hand sprayer: for maintaining humidity
- Small fan: for fresh air exchange (FAE)
Making or sourcing spawn: the spore-to-spawn route vs buying ready spawn
Spawn is colonized grain, and it's the engine of the whole grow. You have two paths: make it yourself from spores, or buy it ready to use. Both are valid, and the right choice depends on your patience level and risk tolerance for your first grow.
Buying spawn (the beginner-friendly shortcut)
Some vendors sell fully colonized grain spawn, and starting here cuts weeks off your timeline and removes the most failure-prone step from your first grow. The tradeoff is cost and availability. If you go this route, receive your spawn, inspect it carefully for any green, black, or pink discoloration (which signals contamination), and move straight to substrate preparation and inoculation.
Making spawn from spores (the DIY route)
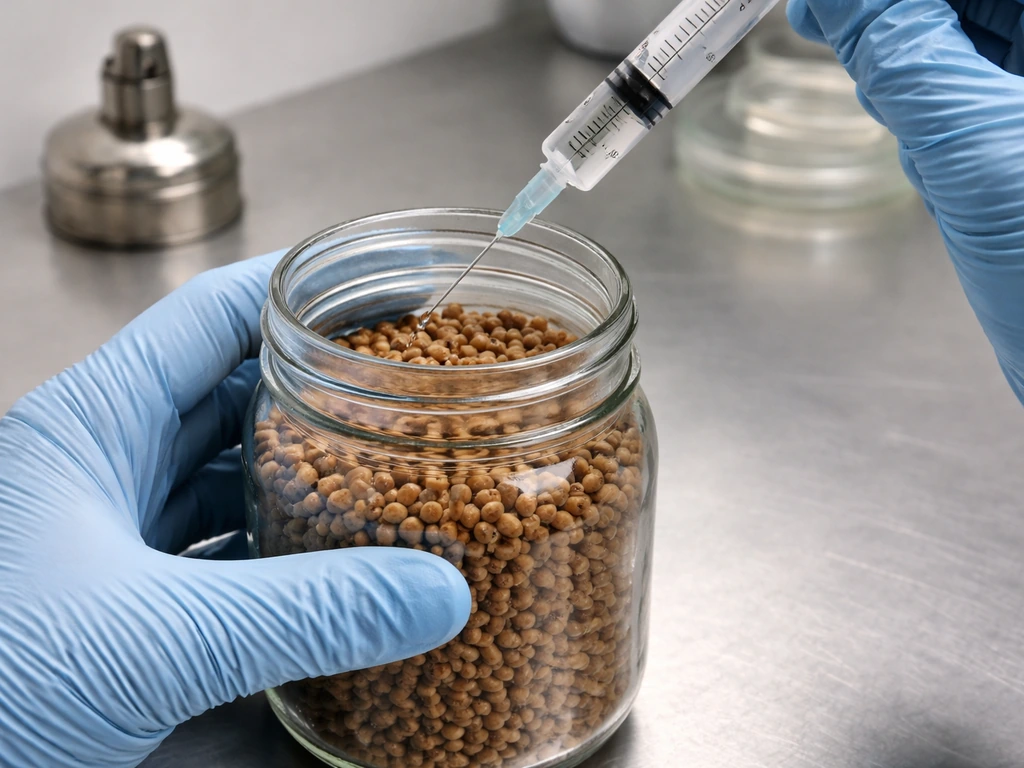
- Fill mason jars two-thirds with rye berries or popcorn that have been soaked for 12 to 24 hours and simmered until slightly soft but not split. Drain and dry the surface of the grain.
- Lid the jars with modified lids (injection port plus polyfill exhaust filter) and pressure cook at 15 PSI for 90 minutes. Let cool fully (12 to 24 hours) before inoculating.
- In your still air box, wipe the injection port, the syringe needle, and your gloves with 70% isopropyl. Let the alcohol dry for 30 seconds, then inject 1 to 2 ml of spore suspension per jar through the self-healing port.
- Store inoculated jars in a dark location at 75 to 80°F (24 to 27°C). Shake jars gently once mycelium has spread 20 to 30% across the grain to speed colonization.
- Full colonization takes 2 to 4 weeks. The grain should be completely white with dense mycelium and smell earthy and clean, not sour or musty.
A quick note on spore sourcing: in many U.S. states and in some other jurisdictions, spore syringes are sold legally for microscopy purposes because the spores themselves don't contain detectable psilocybin. Once you germinate them and mycelium begins growing, you're in different legal territory. Know your local laws before purchasing.
Substrate preparation and inoculation
For cubensis, the CVG substrate (coco coir, vermiculite, and water) is the most beginner-friendly option. It doesn't require pressure cooking, just pasteurization, and it resists contamination well due to its low nutrient content. The downside is slightly lower yields than manure-amended substrates. Here's how to prepare and inoculate it.
- Mix 650 grams of coco coir brick (rehydrated) with 650 grams of coarse vermiculite and about 2 cups of boiling water. Adjust water until the mixture reaches field capacity: it should hold its shape when squeezed, and only a drop or two of water should drip out.
- Load the mix into jars or an oven-safe container, cover, and bake at 160 to 180°F (71 to 82°C) for at least one hour. This pasteurizes rather than sterilizes, killing competing organisms while leaving beneficial ones that help fight off contamination.
- Let the substrate cool completely to room temperature (this can take several hours). Never inoculate warm substrate.
- In your still air box or flow hood, combine colonized grain spawn with your cooled substrate at roughly a 1:3 to 1:5 ratio by volume. Mix thoroughly. More spawn means faster colonization and less contamination risk.
- Pack the mixed substrate into your fruiting container to a depth of 3 to 4 inches. Loosely cover and store at 75 to 80°F (24 to 27°C) out of direct light for the spawn run (colonization phase).
- After 1 to 3 weeks the substrate surface should be fully white. At this point, case with a thin layer of hydrated vermiculite (optional but helps retain moisture) and move into fruiting conditions.
Setting up the fruiting environment
This is where most beginners undershoot. Getting mycelium to colonize grain and substrate is relatively forgiving. Getting it to actually fruit requires a specific environmental shift that signals the mushrooms to develop. Get these four parameters right and you'll see pins within a week or two of flipping to fruiting conditions.
Humidity
Target 85 to 95% relative humidity throughout the fruiting stage. EUROSUBSTRAT’s cultivation guidance also targets high fruiting humidity, typically above 85% (often around 90, 95%), and discusses fresh-air and CO2 ranges as part of controlling fruiting conditions 85 to 95% relative humidity throughout the fruiting stage. Pins and young fruiting bodies are extremely sensitive to low humidity and will abort if conditions dry out even briefly. Mist the walls of your fruiting chamber (not directly onto the substrate) two to four times per day, or run an ultrasonic humidifier on a timer. Your hygrometer is not optional here.
Fresh air exchange (FAE)
CO2 buildup is a major and commonly underestimated problem. In a sealed container, CO2 rises quickly and causes elongated, spindly stems with small or undeveloped caps. Target CO2 levels in the 700 to 1000 ppm range. In practice this means fanning out the fruiting chamber manually 2 to 4 times per day, drilling holes in your monotub and covering them with polyfill, or using a small fan on a timer for gentle indirect airflow. The goal is fresh air without blasting the substrate with dry air that drops humidity.
Temperature
Drop temperature slightly from colonization temps to around 70 to 75°F (21 to 24°C) for fruiting. The temperature drop is one of the environmental cues that triggers pinning. Cubensis is tolerant of typical room temperatures, but don't let it drop below 65°F or rise above 80°F during fruiting.
Light
Mushrooms don't photosynthesize, but indirect light does help orient pin development and trigger fruiting. Indirect room light or 12 hours of low-intensity LED is plenty. Direct sunlight and heat are counterproductive.
Troubleshooting the most common problems
Contamination is the single most common reason grows fail, and it almost always traces back to a gap in sterile technique during inoculation or substrate preparation. Here's how to identify and handle the most likely problems you'll face.
| Problem | Likely Cause | What to Do |
|---|---|---|
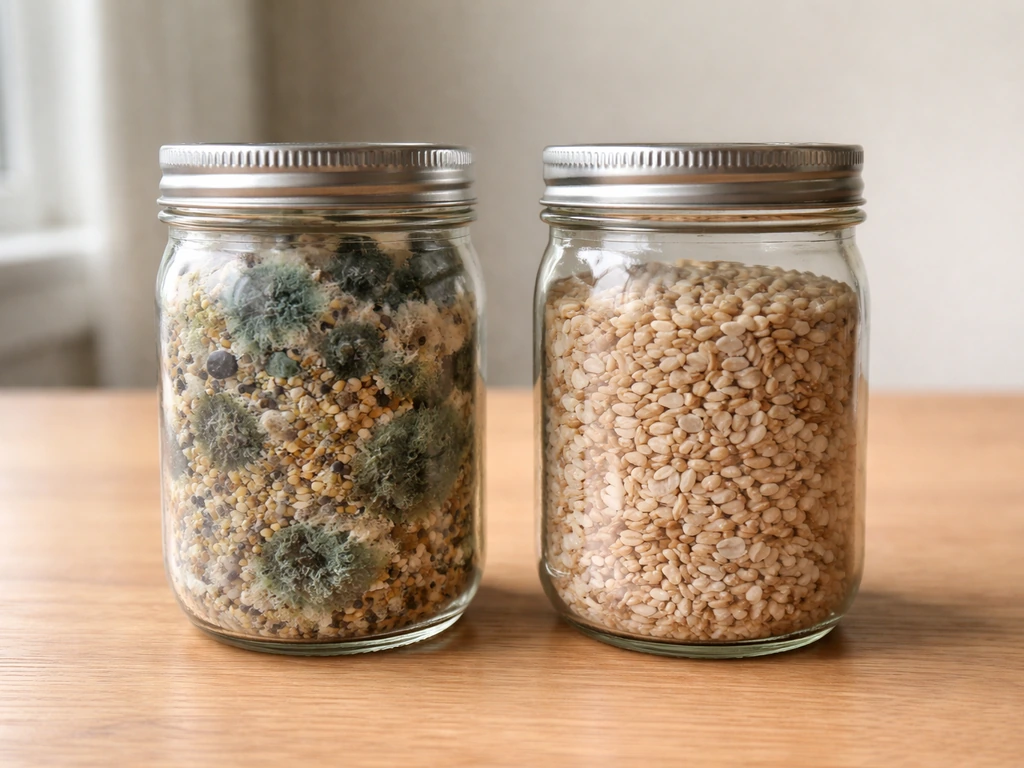
| Green, black, or pink patches in jars or substrate | Mold contamination (Trichoderma, Aspergillus, or other fungi) | Remove contaminated jars or containers immediately and away from your grow space; do not open them indoors; sterilize everything they touched; review inoculation technique and pressure cooker performance |
| No growth after 2 weeks of inoculation | Dead or low-viability spores, too-cool temperatures, or failed sterilization killing the inoculant | Check storage temp (should be 75–80°F); try a fresh syringe; confirm pressure cooker achieved 15 PSI |
| Slow or stalled colonization | Temperatures too low, grain too wet (anaerobic pockets), or weak inoculant | Raise temp slightly; check that grain wasn't too wet before sterilizing; give grain jars a gentle shake to redistribute mycelium |
| No pins forming after full colonization | CO2 too high, humidity too low, or temperature didn't drop | Fan more aggressively; mist chamber walls; lower temp by a few degrees; ensure the substrate has a casing layer or exposed surface area |
| Spindly long stems, small caps | CO2 accumulation from insufficient fresh air exchange | Increase ventilation frequency; add more holes to monotub polyfill; avoid fully sealing the fruiting chamber |
| Low yield or only one flush | Substrate too dry between flushes, or substrate exhausted | Re-hydrate (dunk colonized substrate in cold water for 6 to 12 hours between flushes); most substrates give 2 to 4 flushes before exhaustion |
The hygiene habits that prevent contamination are simple but non-negotiable: clean hands, alcohol-wiped surfaces, still air or filtered air during inoculation, and jars that cooled completely before you touched them. Contamination that appears in fully colonized substrate usually means it was already there before inoculation and simply took time to outpace the mycelium. Fast, healthy colonization is your best natural defense.
Realistic timelines to set your expectations
Here's what a typical beginner cubensis grow actually looks like from start to harvest, assuming you're starting from spores and making your own spawn. Once you factor in colonization and fruiting time, most people want a timeline like this before deciding what species and setup to use how long does it take to grow psychedelic mushrooms.
| Stage | Typical Duration |
|---|---|
| Grain sterilization and cooling | 1 to 2 days |
| Grain colonization (spawn run) | 2 to 4 weeks |
| Substrate preparation and bulk spawn run | 1 to 3 weeks |
| Fruiting (pin formation to first harvest) | 7 to 14 days after pins appear |
| Total: spore to first harvest | 6 to 10 weeks |
If you start from purchased colonized spawn rather than spores, you skip the grain colonization stage entirely and can realistically harvest in 3 to 5 weeks from the point you receive your spawn. The timeline question comes up often, and it's worth noting that how long different species take varies considerably, so cubensis is consistently the fastest and most predictable choice for a first grow. For turkey tail mushrooms specifically, the timeline depends on the strain, your growing setup, and how quickly the wood or substrate is colonized how long different species take.
The one thing beginners consistently underestimate
Almost every failed first grow comes down to one of two things: contamination from sloppy sterile technique at inoculation, or a fruiting environment that's either too dry, too CO2-rich, or both. The materials list above is not complicated and doesn't need to be expensive. If you're looking specifically for how to grow turkey tail mushroom, you'll still rely on steady humidity and careful monitoring so the fruiting conditions stay consistent hygrometer readings. What you're really investing in is discipline around cleanliness and attention to your hygrometer readings. Build those two habits and the mushrooms mostly take care of themselves.
FAQ
Should I start from spores or from ready-colonized grain spawn for my first run?
For your first attempt, decide whether you want fewer variables or fewer weeks. Buying ready-colonized grain spawn typically reduces both time and the most contamination-prone step (grain colonization). Starting from spores adds an extra stage, increases handling events, and usually means your first run is slower and more failure-prone, even if the environmental targets later (humidity, fresh air, temperature) are the same.
What do I do if I see suspicious color on my spawn or substrate, is it always a total loss?
In a beginner setup, “green, black, or pink” discoloration in grain or bulk usually indicates contamination, but the key timing matters. If you notice odd color or strong off-odors before the area is fully colonized, treat it as a contaminated start and avoid mixing anything back into a healthy grow.
How should I position and use my hygrometer during fruiting?
A common mistake is checking humidity but not measuring it where it matters. Place your hygrometer at canopy or fruiting-chamber air height, not buried in insulation or pressed against a wet wall, then log readings after misting and before the next mist. That tells you whether you are maintaining 85 to 95% relative humidity throughout the day, not just at the moment you mist.
My fruits look long and skinny, how do I tell if it’s CO2 versus a humidity problem?
If you get spindly stems and small caps, suspect fresh-air exchange first (CO2 too high) before assuming humidity is wrong. Adjust one factor at a time, increase gentle fanning or indirect airflow, and re-check CO2 signs over the next cycle. Avoid blasting with strong direct airflow because that often drops surface humidity and causes pin aborts.
How wet should the substrate be during fruiting, and where should I mist?
For cubensis, the practical rule is to mist the chamber walls or use a humidifier, not to soak the substrate surface. Excess water on the substrate can slow healthy colonization in the next flush and can worsen bacterial spotting in later stages. If you must intervene, aim for misting that keeps droplets off pins and caps rather than creating runoff.
Should I run a humidifier and fan during colonization, or only during fruiting?
During inoculation and incubation, airflow is usually different from fruiting. You want still or filtered conditions while inoculating to reduce airborne contamination, then shift to fresh air and controlled humidity during fruiting. Keeping your humidifier on during colonization without proper containment can raise contamination risk by increasing aerosolized particulates.
What causes slow or stalled colonization, and how do I troubleshoot it early?
If you get slow colonization, the most frequent causes are temperature out of range during incubation, insufficient moisture balance in the substrate, and early contamination that slows mycelium. Verify your temperatures with a reliable thermometer, confirm the substrate was pasteurized correctly, and assume that any contamination discovered late was likely present from the start rather than “appearing spontaneously.”
How should I handle my grow between flushes, and when should I discard rather than attempt another flush?
After harvest, decide based on goals and contamination risk. Removing spent clusters promptly reduces the chance of soggy, contaminated areas affecting the next flush, and proper dry-down between flushes helps stability. If you see persistent off-odors or widespread discoloration, it is safer to dispose of the entire contaminated block rather than trying to salvage parts.
What’s the safest way to respond to contamination so it doesn’t spread to other grows?
If you see heavy mold or bacterial spotting, isolate the contaminated area immediately and do not reuse the same tools or gloves on healthy grows. Replace or thoroughly clean non-porous items, and improve your next inoculation by reducing exposed time, tightening your still-air or filtered approach, and ensuring containers fully cooled before handling.
What’s the biggest “real life” reason beginners don’t get consistent pinning even when targets seem met?
The article focuses on humidity, CO2, temperature, and indirect light, but one more practical factor is consistency. Use timers for humidifier and indirect airflow so the fruiting environment does not swing from very wet to very dry overnight. Even if your average target is right, large daily swings often lead to aborted pins or uneven flushes.