Let's get straight to it: 'warped fungus' is not a real-world mushroom species you can cultivate in a grow tent or on a log outside. It's a block and item from Minecraft, and 'warped fungus trees' refers to the huge warped fungus structures you grow in-game by applying bone meal to a warped fungus placed on warped nylium. If you mean the in-game “warped fungus trees,” the real-world approach is similar to growing wood-loving specialty mushrooms at home how to grow crimson fungus. If you actually meant the Minecraft red-crimson variant that people search for in the overworld, use the same fundamentals from how to grow crimson fungus, just swapping in the crimson-specific conditions. So if you came here from a Minecraft search, the short answer is below. But if you're a home grower who typed 'warped fungus' meaning a specialty or exotic mushroom you heard about, I've got you covered on that front too, because the cultivation approach for unusual wood-loving fungi is very much the same no matter what you call them.
How to Grow Warped Fungus: Step-by-Step Guide Today

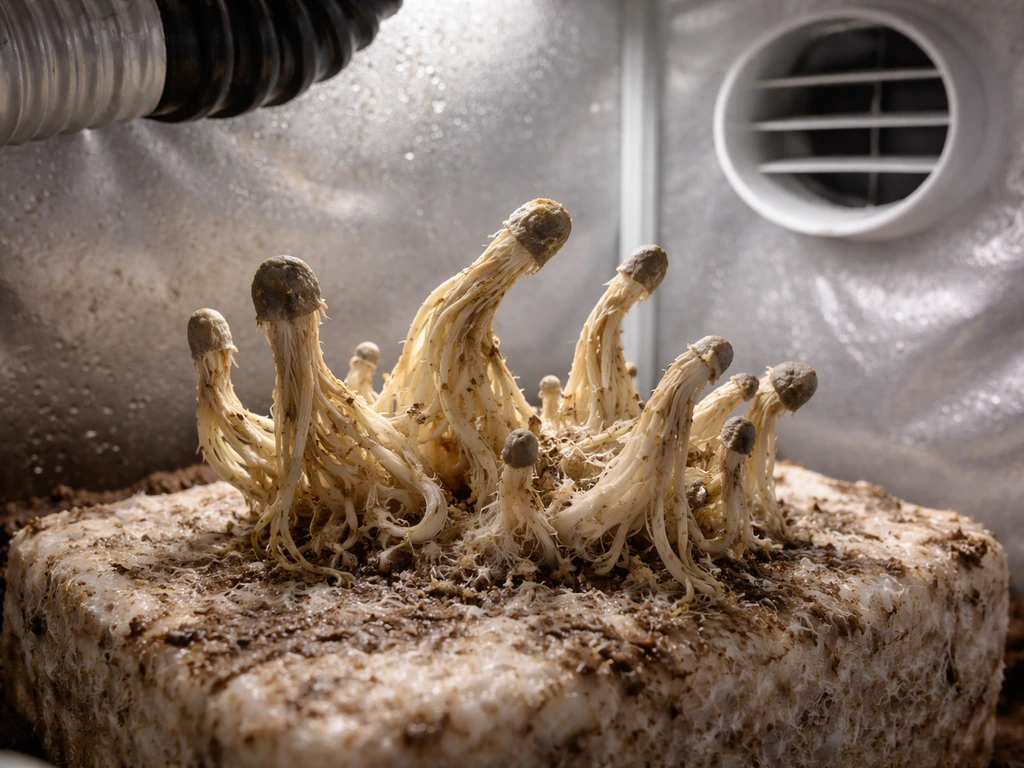
Can you grow warped fungus (and what 'warped fungus trees' actually means)
In Minecraft, yes, you absolutely can grow warped fungus, and it's one of the easier things to do in the Nether or in a controlled overworld setup. Place a warped fungus block on top of warped nylium, then use bone meal on it, and it will grow into a huge warped fungus structure, which is the 'tree' people refer to. That's the entire mechanic. It won't grow on any other block type, and it won't grow without bone meal as the catalyst. If it's not working for you in-game, the nylium block is almost certainly the issue.
In the real world, there is no commercially recognized mushroom species called 'warped fungus.' However, if you're looking to grow an unusual, visually striking specialty mushroom at home, the closest real-world equivalents are wood-decomposing species like lion's mane (Hericium erinaceus), reishi (Ganoderma lucidum), or turkey tail (Trametes versicolor), all of which grow on wood-based substrates and have that otherworldly appearance people associate with fantasy fungi. The rest of this guide treats 'warped fungus' as a stand-in for that category of specialty wood-loving mushrooms, and the methods here apply broadly to all of them. If you also want a practical checklist, this guide on how to grow fungi walks through the key steps from starting material to harvest. If you want a broader, step-by-step walk-through that covers the basics before you get into wood-loving specifics, see how to grow fungi. Where I mention specifics, I'll use lion's mane as the reference species since it's the most beginner-friendly of the group.
Getting the right start: sourcing spores, spawn, and culture
The single biggest mistake beginners make is starting with low-quality or contaminated starting material. For any specialty wood-loving mushroom, you have three realistic options: spores, grain spawn, or a liquid culture. Each has trade-offs.
| Starting Material | Best For | Difficulty | Time to First Harvest |
|---|---|---|---|
| Spore syringe | Microscopy, research, experienced growers | Hard | 16-20+ weeks |
| Grain spawn | Beginners, direct substrate inoculation | Easy | 10-14 weeks |
| Liquid culture (LC) | Speed, consistency, scaling up | Medium | 8-12 weeks |
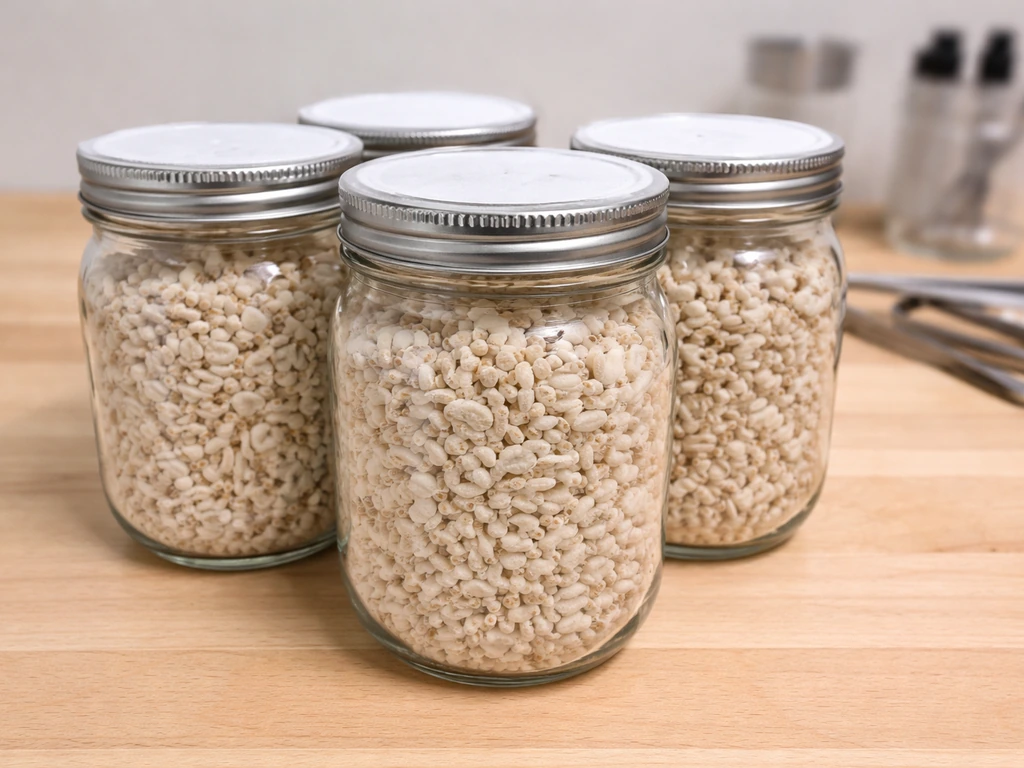
For most home growers, grain spawn is the practical starting point. You buy it already colonized from a reputable supplier (look for vendors who ship with cold packs and guarantee live cultures), then use it to inoculate your prepared substrate directly. Liquid culture syringes are a step up in speed and flexibility because you can use one syringe to inoculate multiple grain jars and build your own spawn supply. Spores are best left for later once you understand contamination management, because germinating spores adds another failure point early in the process.
When sourcing, prioritize vendors who clearly label their cultures with the species, strain, and generation (how many times it's been transferred from the original isolate). Avoid anything described vaguely as 'exotic' without strain specifics. For lion's mane specifically, look for the 'Bear's Head' or 'Pom Pom' strain designations, which tend to produce reliable flushes in home conditions. Store any spawn or culture you're not using immediately in the refrigerator at around 35-38°F, and use it within 4 to 6 weeks for best results.
Substrate and setup: wood-based media and how to prepare it safely
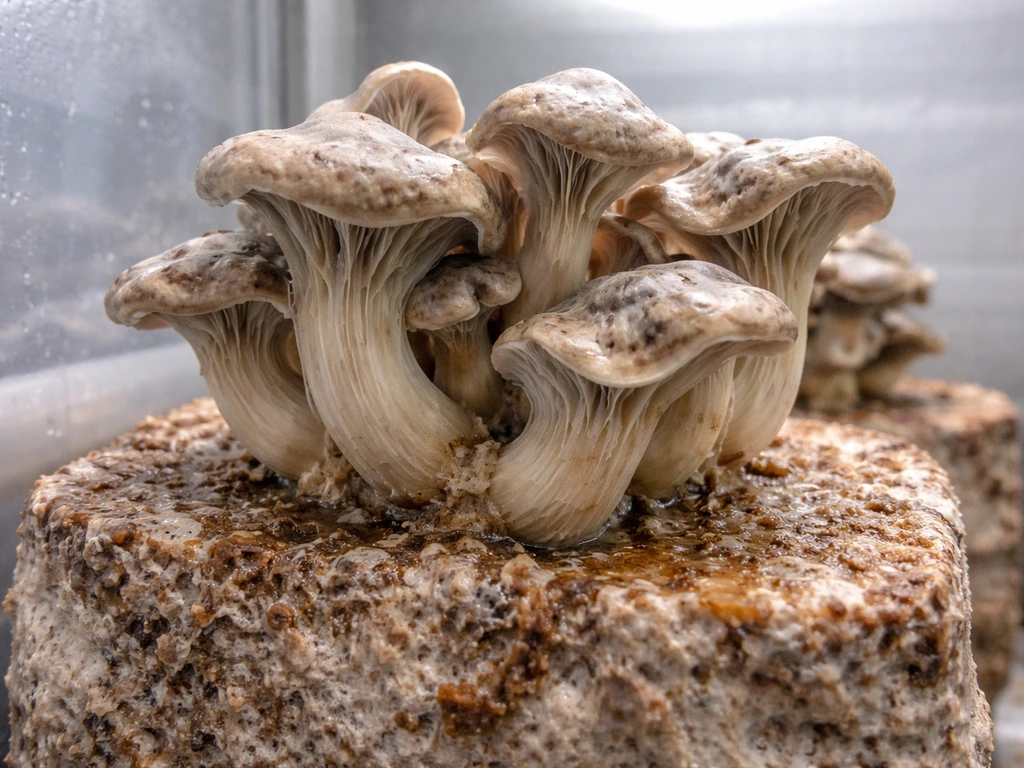
Wood-loving specialty mushrooms need a wood-based substrate. This is non-negotiable for the category. The two most accessible options for home growers are hardwood sawdust supplemented with wheat bran or oat bran, and whole hardwood logs or stumps for outdoor production. The 'warped fungus trees' framing in your search maps directly to the log or stump method in the real world, which is genuinely one of the more rewarding approaches once you understand it.
Indoor sawdust blocks
A standard hardwood sawdust block uses a mix of 85% hardwood sawdust (oak, maple, or alder work well) and 15% wheat bran or oat bran by dry weight. Hydrate the mix to 60-65% field capacity, which means the substrate clumps when squeezed but doesn't drip water. Hydrate the mix to 60-65% field capacity, which means the substrate clumps when squeezed but doesn't drip water blank" rel="noopener noreferrer">sterilize at 15 PSI for 2.5 hours in a pressure cooker. Pack it into autoclave-safe bags or quart mason jars, then sterilize at 15 PSI for 2.5 hours in a pressure cooker. This step is not optional. Pasteurization alone is insufficient for supplemented sawdust because the added bran creates a nutrient-rich environment that competing molds will exploit aggressively. Let the substrate cool completely to below 75°F before inoculating with your spawn.
Outdoor log inoculation
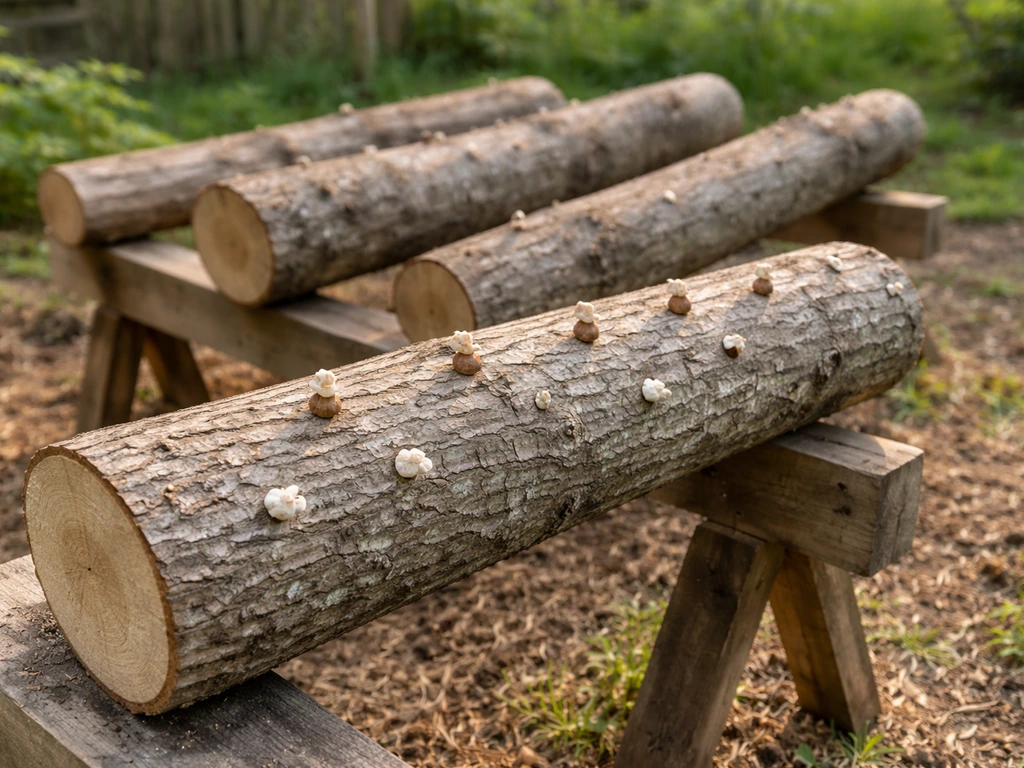
For an outdoor 'tree-style' setup, freshly cut hardwood logs (cut within the last 6-8 weeks, not treated or painted) work best. Use logs 4-8 inches in diameter and 3-4 feet long. Drill holes in a diamond pattern every 6 inches along the log, 1.25 inches deep. Press plug spawn (wooden dowels colonized with mycelium) into each hole, then seal with cheese wax melted and applied with a paintbrush. Stand the logs upright or prop them at an angle in a shaded, humid spot and keep them moist by soaking in water for 24 hours monthly during dry periods. This method blank" rel="noopener noreferrer">takes 6-18 months before first fruiting but produces for several years and requires almost no indoor equipment.
Getting the environment right: temp, humidity, airflow, and light
Environment is where most home growers lose control of their grow. The specific numbers matter, and they differ between the colonization (incubation) phase and the fruiting phase.
| Phase | Temperature | Humidity (RH) | Fresh Air Exchanges | Light |
|---|---|---|---|---|
| Incubation | 70-75°F (21-24°C) | Not critical, keep substrate hydrated | Minimal, just avoid CO2 buildup | Not needed |
| Fruiting | 65-72°F (18-22°C) | 85-95% RH | 4-8 exchanges per hour | Indirect, 12 hrs/day |
During incubation, your main enemy is heat, not cold. Mycelium generates its own metabolic heat, and a block that feels warm to the touch is fine, but temperatures above 80°F stress the mycelium and invite contamination. A basic seedling heat mat with a thermostat works well if your space runs cold. Once you're in the fruiting phase, high CO2 causes deformed, elongated growth on lion's mane and many specialty species. Fresh air exchange is critical. A simple Martha tent setup with an ultrasonic humidifier and an inkbird humidity controller dialed to 90% RH, combined with a small fan running on a timer for short bursts, handles both humidity and fresh air adequately for a beginner setup.
Light during fruiting doesn't need to be intense. A 6500K LED strip or even a nearby window with indirect light for 10-12 hours a day is enough to trigger proper primordia formation and orient growth correctly. Total darkness during fruiting is a common mistake that leads to etiolated, spindly mushrooms.
Step-by-step grow process: from starting materials to first harvest
- Source your grain spawn or liquid culture from a reputable vendor and refrigerate it on arrival.
- Mix your hardwood sawdust substrate at 85% sawdust, 15% wheat bran, hydrate to 60-65% field capacity, and pack into autoclave-safe bags or mason jars.
- Sterilize at 15 PSI for 2.5 hours in a pressure cooker, then cool completely to below 75°F.
- In a still air box or near a laminar flow hood, inoculate each block or jar with grain spawn at roughly 10-20% spawn rate by weight (heavier spawn rate speeds colonization and reduces contamination risk).
- Seal or filter-patch the bags and move to your incubation space at 70-75°F. Shake or break up the grain spawn through the bag after 5-7 days to distribute the mycelium and speed full colonization.
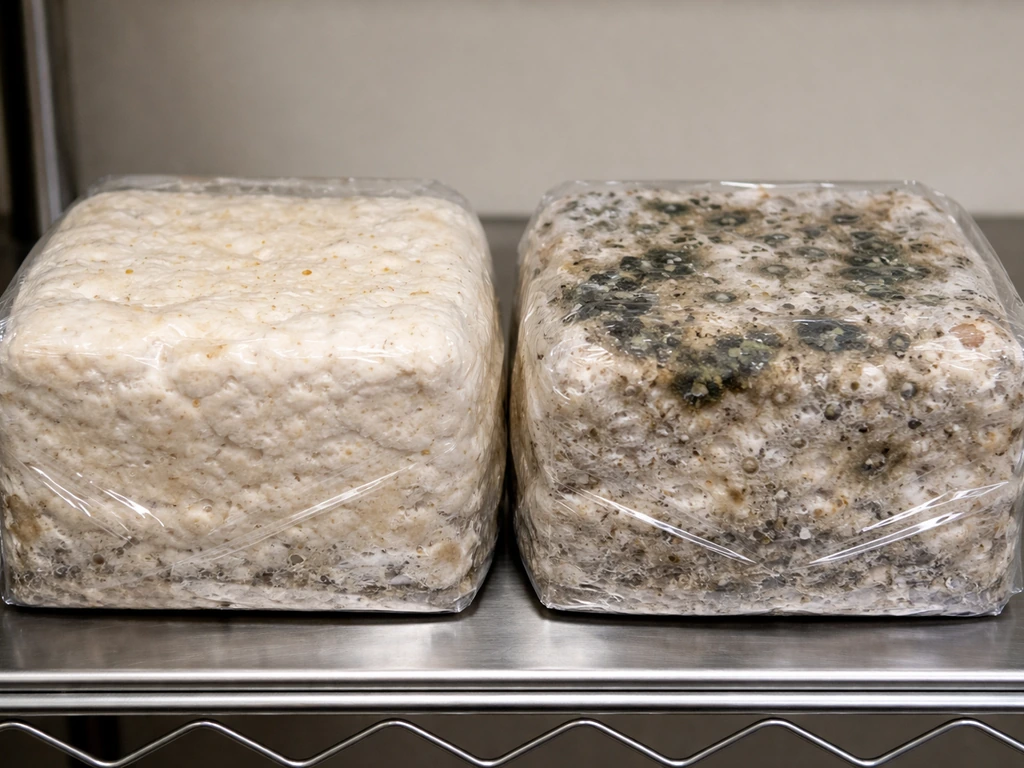
- Monitor daily for green, black, or pink patches indicating mold contamination. Any contaminated block should be removed and bagged immediately, taken outside before opening.
- After 14-21 days, when the block looks fully white and firm, introduce fruiting conditions: drop temperature to 65-72°F, raise humidity to 90% RH, add fresh air exchanges, and provide indirect light.
- Expect to see primordia (tiny pin formations) within 5-10 days of fruiting initiation. On lion's mane, these look like tiny white bumps that quickly develop into the characteristic shaggy clusters.
- Harvest when the fruiting body is fully developed but before the edges begin to yellow or curl. For lion's mane, this is when the 'teeth' are fully formed but still bright white. Twist and pull cleanly at the base or cut with a clean knife.
From inoculation to first harvest on a sawdust block, expect 6-10 weeks total under home conditions. Outdoor log grows take much longer, 6-18 months to first fruiting, but the payoff is years of production from a single log.
Getting more warped fungus: yield optimization, second flushes, and scaling
After your first harvest, the block still has energy left for additional flushes. To trigger a second flush, soak the spent block in cold water for 12-24 hours (this is called a cold shock or cold water dunk), then return it to fruiting conditions. Most hardwood blocks will produce 2-4 flushes before the substrate is fully depleted, with yields dropping by roughly 20-30% with each subsequent flush. Total block yield for lion's mane on a 5-pound block typically ranges from 0.8 to 1.5 pounds of fresh mushrooms across all flushes.
To scale up production, run multiple blocks on staggered schedules so you're harvesting from different blocks each week rather than having everything fruit at once and nothing for weeks after. This is the approach most small home grows use once they've dialed in the process. A rack of 6-8 blocks in a Martha tent covers a family's use comfortably. For bigger ambitions, a second fruiting chamber or a dedicated grow room with automated humidity and fresh air control is the next step up.
On the yield-boosting side, the two levers that make the most difference are spawn rate and substrate quality. Increasing spawn rate to 20-25% of substrate weight shortens colonization time and reduces contamination windows. Using freshly milled hardwood sawdust rather than old sawdust (which may already harbor competing organisms) noticeably improves results. Some growers also add gypsum at 1% of dry substrate weight, which improves moisture retention and creates a more favorable substrate structure.
When it won't grow: troubleshooting contamination, stalled growth, and wrong conditions
Most failures in specialty mushroom cultivation come down to three categories: contamination, hydration issues, and environmental mismatches. Here's how to diagnose and fix each one.
Green, black, or pink patches on the block
This is contamination, almost always Trichoderma (green mold) or Bacillus (wet, slimy patches). The causes are almost always inadequate sterilization, too much moisture in the substrate before sterilization, or a break in sterile technique during inoculation. If it's confined to one area and caught early in incubation, some growers cut off the affected section with a clean blade and monitor, but in my experience it usually spreads. Bag it, remove it, and start fresh. Prevention is far more effective than treatment here.
Mycelium stops spreading mid-block
Stalled colonization usually means the block is too wet (mycelium needs oxygen in the substrate pores), too cold (below 65°F slows it significantly), or the spawn itself was old or stressed. Check that your substrate was at proper field capacity before sterilization and that your incubation space is consistently above 68°F. If growth stalled very early, the spawn may have been heat-killed during sterilization because you added it to a block that wasn't fully cooled. Always wait until the substrate is at or below 75°F before inoculating.
Fully colonized block won't pin or fruit
This is the frustrating one because the hard part looked like it worked. The most common causes are insufficient humidity (anything below 80% RH will stall or abort pins), too much CO2 from poor fresh air exchange, and temperatures that are too high during fruiting. Drop the temp by a few degrees, increase fresh air exchange, and check your humidity sensor is reading accurately (cheap hygrometers drift over time; calibrate against a salt test or replace it). Sometimes the block also just needs a cold shock dunk to break dormancy, even on the first flush. Soak it in cold water overnight and return to fruiting conditions.
Mushrooms are forming but look deformed or stunted
Long, stringy, or misshapen growth almost always points to elevated CO2. This is the CO2 response that many wood-loving fungi show when fresh air exchange is inadequate. Increase your fan cycles or open your fruiting chamber more frequently. On lion's mane specifically, deformed growth also results from humidity swings, the fruiting body dries out slightly and then rehydrates, which causes layering and uneven development. Keep humidity stable rather than cycling it dramatically.
One last note: if you're also curious about growing other specialty or unusual mushroom varieties, many of the same principles here apply to species like snow fungus and other wood-decomposers, though each has its own specific temperature and substrate preferences. If you want the specifics for how to grow snow fungus, you will need to adjust temperature, substrate, and humidity to match what that wood-decomposer prefers. The cultivation framework stays consistent: quality starting material, sterile preparation, and precise environmental control are what separate successful grows from frustrating failures.
FAQ
Can I rescue a failing wood-loving mushroom block by adding water after sterilizing?
For sawdust blocks, you generally should not add extra water after sterilization while the block is incubating, unless you are certain hydration was off at packing time. If your substrate was at 60-65% field capacity before sterilization, the block should self-regulate during colonization. After sterilization and cooling, focus on clean handling and correct temps. If you suspect under-hydration, the safest fix is usually to improve your water content next run rather than soaking an actively colonizing block, which can trigger oxygen starvation and contamination.
How do I know if my temperature or humidity readings are accurate?
Use a thermometer and hygrometer that you trust, then confirm them. For humidity, a simple way is a salt calibration test, which helps you detect drift in cheap sensors. For temperature, place the probe where the block is actually incubating or fruiting (not on the room wall). Temperature mistakes are a common cause of “it looked fine for a week, then stalled,” especially around the 65 to 80°F boundary.
What is the best way to avoid humidity swings that cause deformed growth?
If the goal is reliable fruiting, aim for stable humidity during fruiting rather than large daily swings. Extremely dry air leads to aborted pins, but constant over-wetting can cause malformed growth and bacterial slime. A practical approach is to keep RH stable and run fresh air exchange on a timer in short bursts, rather than blasting the chamber constantly or trying to “solve it” by raising humidity alone.
What should I do if my substrate isn’t fully cooled but I’m worried it will take too long?
Inoculating too early is a frequent failure point. Even if the outside of the bag feels cool, the interior may still be warm. Wait until the substrate is at or below 75°F before adding spawn, and verify cooling time instead of guessing based on room temperature. Heat-killed spawn can look like “nothing happened” rather than obvious contamination.
I accidentally used more bran than the recipe. Will it still work?
Mix and pack by dry weight, not by volume. The 85/15 hardwood sawdust to bran ratio matters because bran is nutrient-rich and also increases mold pressure if sterilization or hygiene is imperfect. If you accidentally use too much bran, you might get faster initial activity, then sudden contamination or wet spots, even when incubation temps look right.
My blocks are colonizing, but very slowly. What causes partial or uneven growth?
If you see slow, uneven colonization rather than a sudden clear contamination spot, first check oxygenation and moisture. Too much moisture reduces airflow through the substrate pores, which can stall growth even when temperatures are correct. For blocks, also check that you did not overfill or tightly compact the substrate, because dense packing can trap CO2 and moisture.
Can I substitute a different hardwood sawdust or bran type and expect the same results?
Yes, but you should treat it as a different risk profile. If you change substrate type, brand, or hydration method, contamination tolerance changes and so does colonization time. For example, swapping to different hardwood sawdust may require adjusting hydration and spawn rate, and outdoor log results can vary by wood density. Keep one variable at a time and record results for the next batch.
Will a cold water dunk work on the first flush too, and how do I know it’s not just wasting time?
Cold shock can help break dormancy, but it is not guaranteed. If the block is depleted (many flushes already taken) or contamination took hold earlier, a dunk might produce only small or thin fruits. Also, don’t perform repeated long dunks without returning to proper fresh air exchange and stable RH, because you can encourage bacterial issues and stress the mycelium.
What wood prep mistakes most often ruin an outdoor log grow?
For logs, you typically drill and spawn right after the wood reaches your chosen “fresh cut” window. Store logs in a shaded area and avoid treated or painted wood, because preservatives can inhibit fungal colonization. If you must store logs for a while, keeping them from drying out matters more than keeping them wet constantly, and a dry log will slow or prevent early colonization.
What’s the fastest checklist for diagnosing failures without guessing?
A good beginner troubleshooting order is: confirm hydration at field capacity before sterilization, confirm sterilization reached proper pressure time, confirm cooling below 75°F before inoculation, then verify incubation temps stay above 65°F and below 80°F. After pins form, switch your focus to fresh air exchange and stable RH. If you diagnose in the wrong phase, you can end up changing the wrong variable and repeating the same failure mode.