If you want to grow toadstools at home, the best species to start with is wine cap (Stropharia rugosoannulata), also called the garden giant or king stropharia. Once you have that spawn and bed set up, follow the steps in this guide for how to grow crimson fungus outdoors or indoors. It's beginner-friendly, genuinely looks like the classic toadstool people picture, produces big edible flushes outdoors, and you can get viable sawdust spawn from reputable suppliers like North Spore and Field & Forest. Outdoors in a wood chip bed, you can expect your first fruits roughly 30 to 60 days after inoculation once conditions align. That's your practical starting point.
How to Grow Toadstools Step by Step Indoors or Outdoors

Marcus Holloway
3 Jun 2026
Quick reality check: what 'toadstools' actually means for home growers
The word 'toadstool' is a folk term, not a botanical category. Broadly it refers to any gilled, cap-and-stem mushroom, especially ones that look wild or wild-adjacent. In common usage it often implies something potentially dangerous, but it can also just mean any mushroom that looks like the classic fairy-tale shape. For cultivation purposes, the term points toward a handful of real species that home growers actually pursue.
The most commonly cultivated 'toadstool-type' mushrooms are wine cap (Stropharia rugosoannulata), Agaricus blazei (the almond mushroom or himematsutake), and to a lesser extent the standard button mushroom (Agaricus bisporus). Wine cap is by far the easiest and most forgiving for outdoor growers. Agaricus blazei is a step up in difficulty and requires more controlled indoor conditions. If someone is searching 'how to grow toadstools' hoping to cultivate mysterious wild species they found in a field, that's a path to real danger, not a cultivation project. If you want to grow snow fungus specifically, you will need different species-specific substrate, temperature, and fruiting steps than the common toadstool types. Stick to known, commercially available spawn from reputable sources.
One important disambiguation: some sibling topics on this site cover warped fungus, crimson fungus, and similar names that refer to Minecraft game mechanics rather than real fungi. This guide is entirely about real-world cultivation of edible toadstool-type mushrooms.
Choosing your setup: indoors vs. outdoors, and what you'll need
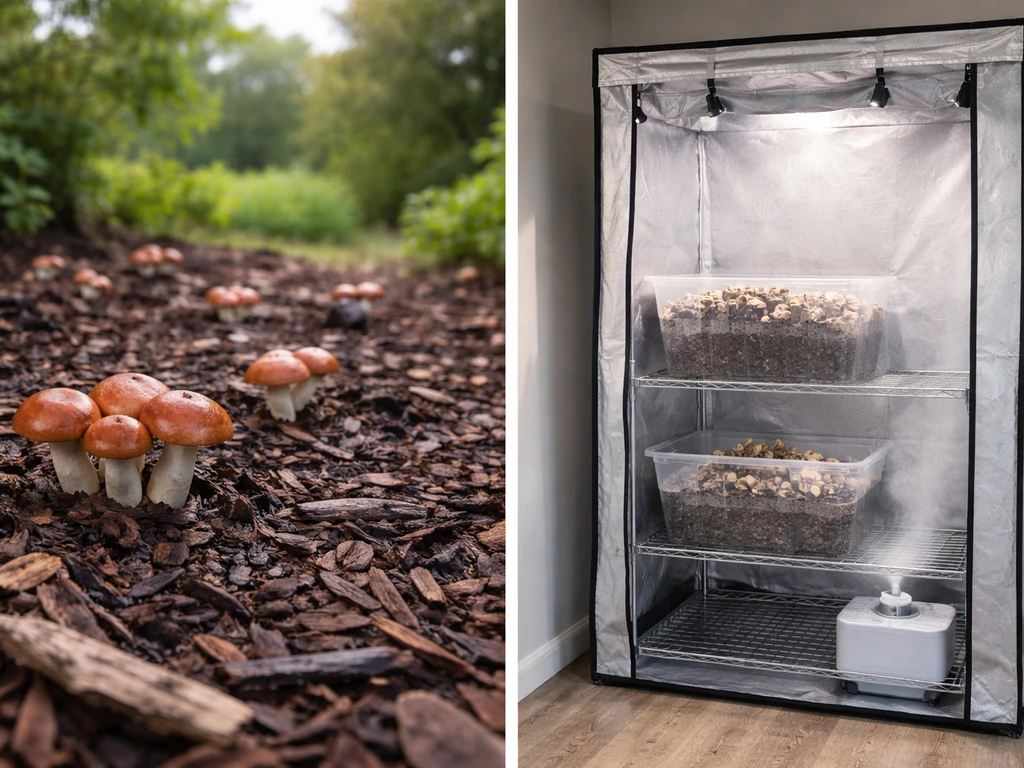
For wine cap (the species I recommend you start with), outdoors is the right choice. If you want a walkthrough for how to grow crimson fungus in the overworld, use the species-specific setup and environment details that match what that fungus needs. Wine caps thrive in garden beds, shaded corners of yards, or woodland garden settings. They don't need a grow tent, a humidity controller, or any sophisticated equipment. What they need is a shaded spot, a decent substrate bed, moisture, and patience. If you want to grow red mushrooms instead of wine caps, you’ll need to pick the right red species and match its substrate and fruiting conditions.
Agaricus blazei is different. NaturNext reports that for Agaricus blazei (himematsutake), inoculated substrate is incubated in a dark chamber at about 24, 28°C with high relative humidity (around 85, 90%), with primordia appearing after roughly 1, 2 weeks under those conditions. It needs more precise environmental control: fruiting happens best around 21 to 24°C, CO2 should sit between 400 and 800 ppm, and light requirements are specific at around 0.1 to 0.2 lumen per square centimeter. If you're going the Agaricus route, plan for an indoor setup with a humidity controller, a thermometer, a small fan for fresh air exchange, and a dedicated grow space like a grow tent or a repurposed cooler.
Materials list for a wine cap outdoor bed
- Wine cap sawdust spawn (one 5.5 lb bag covers roughly 50 square feet of bed at 4 inches deep)
- Hardwood wood chips or straw (or a combination), enough to fill your bed area at 4 to 6 inches deep
- A weed barrier or cardboard layer for the base (cardboard breaks down and feeds the mycelium)
- A shaded or semi-shaded location with good moisture retention
- A garden hose or watering can for consistent moisture
- Optional: a layer of straw on top to retain moisture in dry climates
Materials list for an indoor Agaricus blazei grow
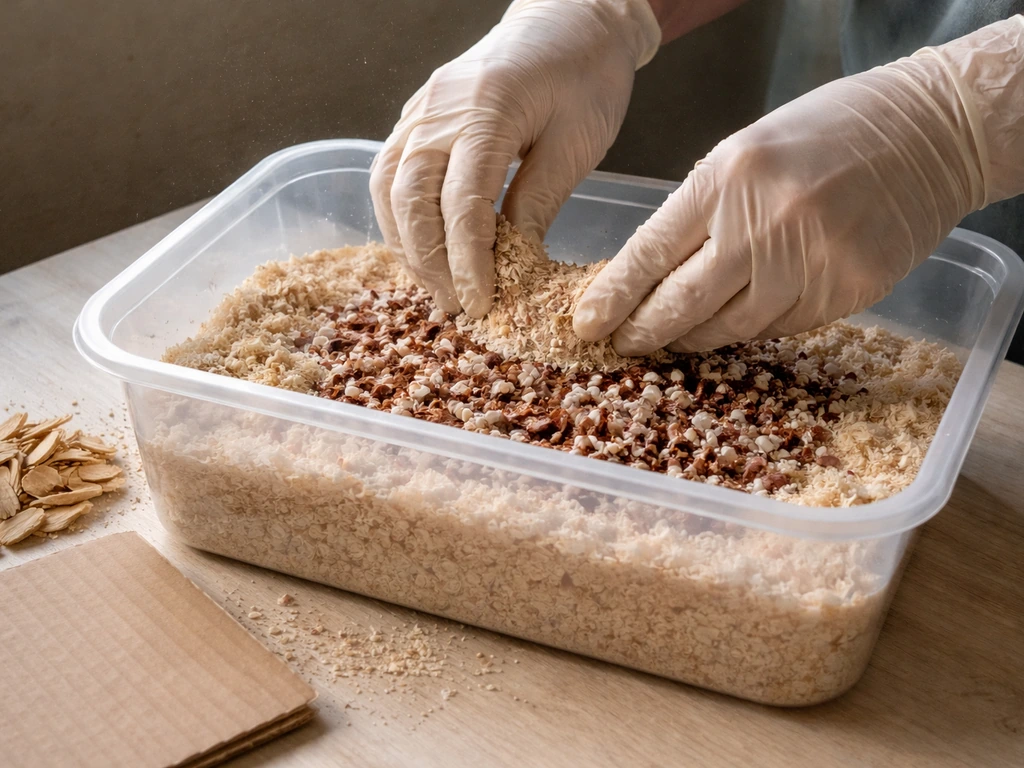
- Grain or sawdust spawn from a reputable supplier
- Pasteurized compost-based substrate (horse manure compost mixed with straw works well)
- Casing layer material (peat moss mixed with hydrated lime, or coconut coir)
- Grow tent or enclosed space with temperature control (target 21 to 24°C for fruiting)
- Hygrometer and humidity source (ultrasonic humidifier or regular misting)
- Small fan for fresh air exchange
- Light source for 0.1 to 0.2 lumen/cm² (indirect natural light or a low-intensity LED)
Substrate and spawn: getting the foundation right
Mushroom cultivation is entirely species-specific. There's no universal substrate that works for everything. The wrong pairing of spawn to substrate is probably the single most common reason beginner grows fail.
For wine cap, sawdust spawn is the standard starting material. It's pre-colonized mycelium held in a sawdust carrier, and you mix it directly into your bed substrate. Wood chips are the preferred substrate because wine cap is a wood-lover. Fresh hardwood chips (oak, maple, alder, fruit woods) work best. Avoid cedar, pine, or other conifers as they contain oils that inhibit or kill mushroom mycelium. Straw works too and is cheaper, though wood chips tend to produce bigger and more sustained flushes. A mix of both is a solid middle ground.
For Agaricus blazei, the substrate is more involved. This species, like its cousin Agaricus bisporus (the button mushroom), prefers a compost-based substrate that has been properly pasteurized or composted. Horse manure compost with straw is a classic combination. After inoculation and colonization, Agaricus species need a casing layer applied on top, typically peat moss buffered with hydrated lime to a pH around 7.5. The casing triggers fruiting and keeps moisture consistent at the surface. Skipping the casing is a common beginner mistake with Agaricus grows.
Always buy your spawn from established suppliers (North Spore, Field & Forest, Fungi Perfecti, or similar). Reputable suppliers use organic, non-GMO wood sources and maintain culture viability through proper storage and handling. Avoid random online marketplaces without clear origin information. Contaminated or old spawn is money and time wasted.
Step-by-step: from inoculation to fruiting
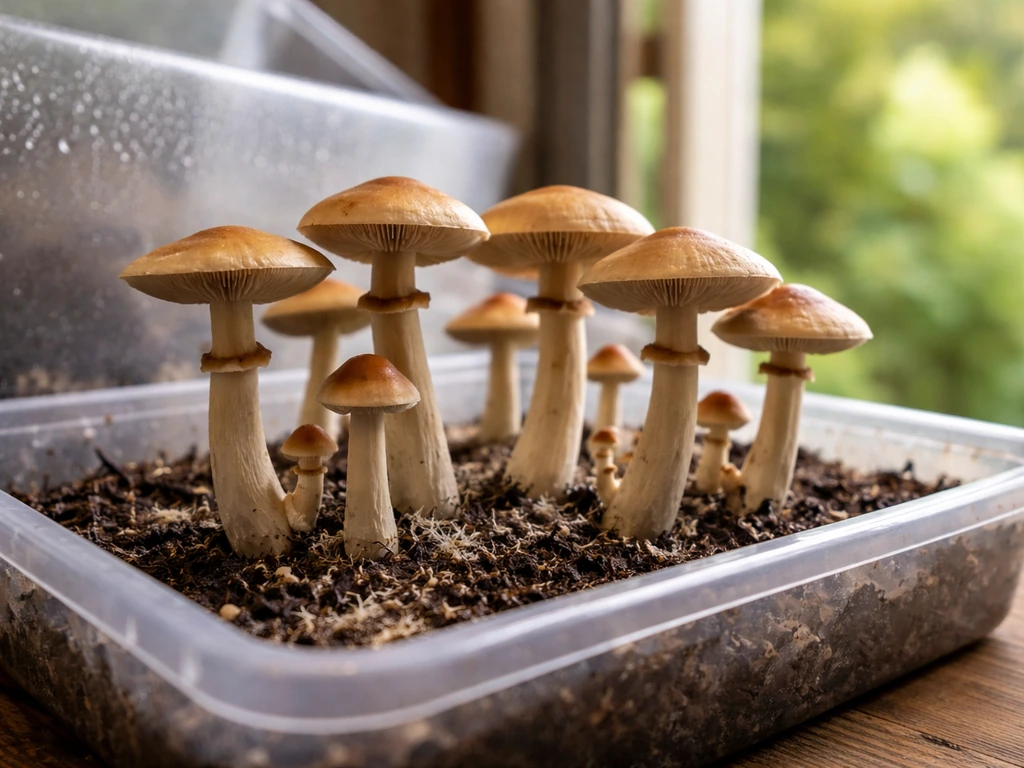
Outdoor wine cap bed (the beginner path)
- Choose your location: shaded or dappled light, ideally under trees or along a fence. Direct afternoon sun dries beds out fast and stunts growth.
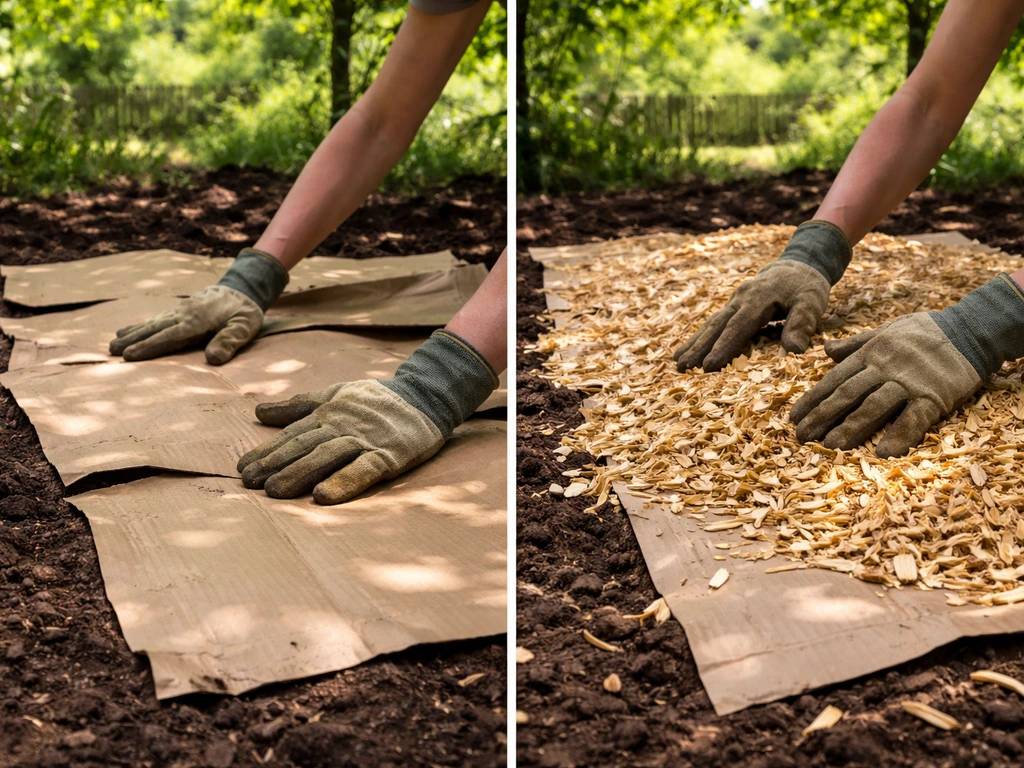
- Lay your base: put down cardboard or a weed barrier directly on the soil. This suppresses weeds and the cardboard breaks down over time, becoming food for the mycelium.
- Add your first substrate layer: spread 2 to 3 inches of moistened wood chips or straw on top of the cardboard.
- Inoculate: crumble your sawdust spawn and spread it evenly over the substrate layer. One 5.5 lb bag covers about 50 square feet. Don't compact it.
- Cover with more substrate: add another 2 to 3 inches of wood chips on top to sandwich the spawn. Total bed depth should be around 4 to 6 inches.
- Water thoroughly: soak the bed after setup. Mycelium needs moisture to run through the substrate. The bed should feel like a wrung-out sponge, consistently moist but not waterlogged.
- Colonization phase: over the next several weeks you'll see white mycelium threads spreading through the bed. This is normal and healthy. Maintain moisture by watering whenever the top layer starts to dry out.
- Fruiting: after 30 to 60 days (sometimes longer depending on your climate and the season), you'll see pins emerging. Wine cap season in temperate climates typically runs late spring through late October.
Indoor Agaricus blazei (the more controlled approach)
- Prepare your substrate: pasteurize your compost/straw mix at around 65 to 70°C for one to two hours, then cool to room temperature before inoculating.
- Inoculate: mix spawn thoroughly through the cooled substrate at a rate of about 2 to 3% spawn by weight. Pack into grow bags or trays.
- Incubation: place in a dark chamber at 24 to 28°C with high relative humidity around 85 to 90%. Primordia (first pins) typically appear within 1 to 2 weeks of incubation beginning under these conditions, though the full colonization window is commonly 18 to 24 days.
- Apply casing layer: once the substrate surface is fully colonized with white mycelium, apply a 1 to 2 inch casing layer of peat moss and hydrated lime. Mist the casing lightly.
- Fruiting conditions: drop temperature slightly to 21 to 24°C, maintain CO2 between 400 and 800 ppm (increase fresh air exchange), and provide indirect light at 0.1 to 0.2 lumen per cm². Keep relative humidity at 85 to 90%.
- Pin development: within about one to two weeks of applying the casing and adjusting conditions, you should see pinheads forming. Maintain humidity consistently during this stage. Any dry spell can abort pins.
| Factor | Wine Cap (outdoor) | Agaricus blazei (indoor) |
|---|---|---|
| Difficulty | Beginner | Intermediate |
| Setup cost | Low (spawn + wood chips) | Medium (spawn + equipment) |
| Substrate | Wood chips / straw | Composted manure/straw + casing |
| Colonization temp | Ambient outdoor temp | 24 to 28°C |
| Fruiting temp | Ambient (cool seasons) | 21 to 24°C |
| Humidity needed | Consistent watering | 85 to 90% RH controlled |
| Time to first flush | 30 to 60 days | 18 to 24 days incubation + 1 to 2 weeks pinning |
| Season | Spring through fall | Year-round indoors |
Harvesting, storing, and getting more flushes
Harvest wine caps when the veil underneath the cap is still intact or just beginning to tear away from the stem. Once the veil breaks, the mushroom has fully matured and will start dropping spores and degrading quickly. For size, wine caps can get impressively large (some caps reach 6 to 12 inches across) but the best eating quality is at a younger stage, roughly when the cap is still somewhat convex and the gills are not fully exposed. Twist and pull or use a knife at the base of the stem.
Fresh mushrooms are perishable. At room temperature, expect about 1 to 3 days before quality drops noticeably. Refrigerated in a paper bag (not sealed plastic, which traps moisture and speeds decomposition), most species last 5 to 7 days, with Agaricus types lasting up to around 8 days under good refrigeration conditions.
A ScienceDirect review summarized typical refrigerated shelf life for Agaricus bisporus (button mushroom) at about 8 days under good refrigeration conditions Agaricus types lasting up to around 8 days under good refrigeration conditions. For longer storage, drying is your best option.
A food dehydrator at 40 to 50°C works well. Dried wine caps and Agaricus mushrooms can last months in an airtight jar. Deep freezing after blanching is another option that preserves texture reasonably well.
After your first flush, don't abandon the bed or grow bag. Most toadstool-type mushrooms fruit in multiple flushes. For outdoor wine cap beds, subsequent flushes will come naturally through the season as long as the bed stays moist and temperatures remain suitable. You can also top up the bed with fresh wood chips each season and re-inoculate if production slows. A well-maintained wine cap bed can keep producing for two to three years. For indoor Agaricus grows, trigger subsequent flushes by rehydrating the substrate (dunking grow bags in cool water for a few hours) and maintaining fruiting conditions. Most indoor grows yield two to three productive flushes before the substrate is exhausted.
When things go wrong: fixing the most common problems
Green, black, or orange mold appearing on substrate
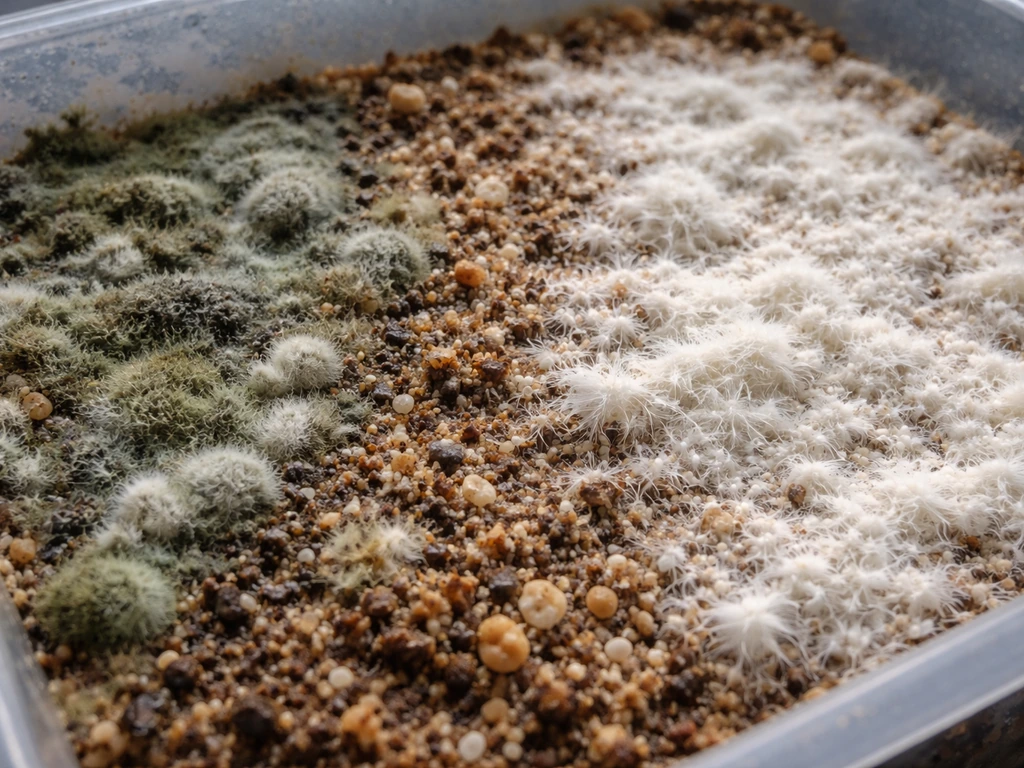
This is contamination, most commonly green Trichoderma mold. It means competing organisms got into your substrate, usually because of poor pasteurization, inoculating while the substrate was still too warm, or using old or weak spawn. For outdoor beds, mild contamination can sometimes be outcompeted by healthy wine cap mycelium if you catch it early. Remove visibly contaminated patches and cover with fresh wood chips. For indoor grows, heavily contaminated bags are best removed entirely and discarded outside your grow space. Don't open contaminated bags indoors. Prevent it next time by ensuring substrate is fully cooled before inoculation and by working as cleanly as possible.
Mycelium has colonized but no pins are appearing
This is the frustrating stall that happens most often because of one of three things: temperature is too high, humidity dropped at the wrong moment, or CO2 built up from poor fresh air exchange. For wine cap beds, this often means the weather is still too warm. Beds pin most reliably in cooler conditions, typically below 20°C. Wait for a temperature drop. For indoor grows, check your thermometer, increase misting or humidifier output, and open your tent or grow space for more fresh air exchange for 30 to 60 minutes twice daily. Sometimes introducing a cold shock (dropping temp by 4 to 5°C for 12 hours) can trigger pinning in stubborn substrates.
Slow or uneven colonization
If your mycelium is growing but slowly or in patches, the most likely causes are inconsistent moisture, substrate that was too wet or too dry at inoculation, or spawn that was old and partially weak. Check that your substrate moisture is like a wrung-out sponge throughout (not dry in spots, not dripping). For outdoor beds, dry weather without supplemental watering is the main culprit. Water the bed more frequently. For indoor grows, massage the grow bag gently from outside to redistribute moisture without opening it, or re-inoculate fresh areas with a small amount of additional spawn if you have it.
Pins forming then aborting (dying before reaching harvest size)
Aborted pins almost always mean a humidity crash during the pinning stage. Even a few hours of low humidity can kill young pins. Mist more frequently, add a humidity tent over your trays, or fix any leaks in your grow tent. On outdoor beds, a dry spell without watering during pinning does the same thing. Water every day or even twice daily during active pinning if your climate is dry. Also make sure you're not harvesting too close to the remaining pins when picking, as physical disturbance can stress surrounding pinsets.
Safety, toxicity, and a few things you need to know before you grow
The word 'toadstool' exists in folk language partly because it was associated with toxic or dangerous mushrooms. That association exists for a reason. Do not attempt to cultivate wild-collected toadstool specimens you've found outdoors. Even expert mycologists acknowledge that misidentification of wild mushrooms is genuinely dangerous, and the RHS explicitly warns that mushrooms should not be assumed edible just because they appear commonly or are described in general literature. Stick to species you obtain as verified, labeled spawn or spore prints from reputable commercial suppliers.
On the legal side: the 'toadstool' label sometimes leads people toward psychoactive species, particularly Psilocybe cubensis and related psilocybin-containing mushrooms. Be clear on this: in the United States, cultivating or possessing fruiting bodies of psilocybin mushrooms is unlawful in all states, regardless of local decriminalization efforts. While purchasing spores for microscopy purposes exists in a legal gray area in some states, actively growing them is federally illegal and illegal under most state laws. This guide is about edible cultivation, and neither wine cap nor Agaricus blazei are controlled substances.
When handling fresh mushroom spawn and substrate, wear gloves if you have sensitive skin, as prolonged contact with mycelium or compost can cause mild skin irritation in some people. Wash hands after handling. Keep substrate and spawn away from food preparation surfaces. If you're foraging any wild mushrooms to compare with what you're growing, always get a second identification from a trusted source. As a general rule, if you didn't grow it from purchased spawn and you're not 100% certain of the identification from multiple confirming characteristics, don't eat it. If you're specifically trying to learn how to grow snow fungus, focus on the right species-specific substrate and a stable, cool environment from inoculation through fruiting.
Finally, if you're ever unsure about the toxicity of a wild specimen you find near your cultivated bed (wind-blown spores can introduce wild species into substrate), resources like the Royal Botanic Gardens, Kew offer identification inquiry support. When in doubt, leave it out.
FAQ
What is the simplest way to figure out which “toadstool” I should grow at home?
It depends on the species. For wine cap, start with a shaded spot and use untreated hardwood wood chips (and optionally some straw), then keep moisture steady. For Agaricus blazei, you generally need a controlled indoor setup and you must apply a casing layer at the right time, since that casing is what triggers and stabilizes fruiting.
Can I use one growing method for all toadstool-type mushrooms?
If you are unsure, don’t improvise. The “toadstool” label can cover many gilled mushrooms, but cultivation success is usually species-specific, especially for Agaricus. Stick to wine cap outdoors unless you are willing to match the exact indoor targets (temperature, CO2, casing, and light) for Agaricus blazei.
If my bed looks damp but nothing is fruiting, what should I check first?
Yes, but do it based on the moisture you observe. For wine cap, water often enough that the bed stays like a wrung-out sponge, not swampy. If your mushrooms stop appearing during warm spells, that usually points to temperature or dryness rather than “not enough water,” so adjust shade and watering frequency together.
How do I know the right time to harvest so the flavor and texture are best?
It’s usually about the stage and the veil. For wine caps, harvest while the veil under the cap is intact or just starting to tear away from the stem, because once the veil breaks the mushroom is quickly past its best texture and will start shedding spores.
What’s the best way to store freshly harvested toadstool-type mushrooms?
For wine caps, refrigeration is typically your best short-term option, using a paper bag rather than sealed plastic to avoid trapping excess moisture. Avoid washing right before storage unless you must, and only wipe or rinse quickly, then dry briefly before refrigerating.
What is the best way to store mushrooms longer term, and what storage mistakes should I avoid?
Drying is the safest long-term method if you want months of storage. Use low, gentle heat (often around the low 40s °C range for dehydrators) and store fully dried mushrooms in an airtight container. For best results, remove any remaining surface moisture before sealing.
After my first flush, do I need to restart the whole setup?
Not necessarily. After a flush, wine cap beds can keep producing through the season if the bed remains moist and temperatures remain suitable. Many growers top up with fresh wood chips and maintain moisture rather than completely rebuilding the bed, which helps replace nutrients and microhabitats.
What should I do if I get green mold or other contamination in my grow?
If you see green Trichoderma-like mold, treat it as a contamination event, not a “mild problem.” Outdoors you can sometimes remove contaminated patches and cover with fresh wood chips if it’s limited, but indoors heavily contaminated grow bags should be discarded outside the grow area, and you should avoid opening contaminated bags indoors.
My mycelium is alive but it is taking forever. How do I diagnose the cause?
For slow growth or patchy mycelium, the most common causes are inconsistent moisture or substrate that was the wrong level of wetness at inoculation, and sometimes weak or old spawn. Verify substrate moisture by feel (wrung-out sponge), and for indoors make sure you don’t let the surface dry out before colonization fully fills in.
Why do I get pins that start then stop growing, and how do I prevent it?
If pins abort, humidity usually crashed during pinning. In addition to increasing misting or humidifier output, keep fresh air exchange consistent, because “stale air” and “too dry air” can both derail pinning. Check for leaks in tents, and consider a humidity cover that doesn’t suffocate the air exchange.
How can I troubleshoot when outdoor temperatures are too warm for fruiting?
Yes, especially for wine cap outdoors in warm weather. Pinning is more reliable below about 20°C, so when it’s hot, you may need to wait for a temperature drop, increase shade, and keep the bed moist rather than adding heat or more misting on its own.
Is it safe to try growing toadstools I find outdoors?
Don’t cultivate wild-collected “toadstools.” Misidentification is a real risk, and wind-blown spores can also introduce unknown mushrooms into your substrate. Use labeled, verified spawn from reputable suppliers, and if you must compare specimens, confirm identity with trusted help rather than relying on appearance alone.
What are the most common mistakes that ruin spawn before I even inoculate?
If you want to avoid losing entire grows, use storage and handling practices that protect spawn viability. Keep spawn stored exactly as the supplier instructs, avoid letting it warm up for long periods during mixing, and use reputable, clearly labeled sources rather than generic marketplaces with unclear origin and culture age.
Why does my Agaricus blazei grow stall, even when I’m keeping conditions “close enough”?
For Agaricus blazei, the casing layer is not optional. The casing is applied after colonization and buffered to around neutral-range pH (often about 7.5) to help trigger and stabilize fruiting moisture at the surface. Skipping or doing it at the wrong time is a frequent beginner failure.
A wild mushroom appeared near my cultivated bed. Can I eat it or should I remove it?
For food safety, treat any wild mushroom near your bed as unknown. Only eat mushrooms from your purchased, labeled spawn, and if a wild specimen appears, remove it rather than sampling it. When in doubt about toxicity, leave it out and seek expert identification support.