Crimson fungus is a Nether-exclusive organism in Minecraft and does not grow naturally in the Overworld at all. In vanilla gameplay, it only generates in crimson forest biomes deep in the Nether, and it will only grow into a blank" rel="noopener noreferrer">huge crimson fungus when planted on crimson nylium, its native substrate block. For Nether growth farming, Minecraft Wiki documents how Nether growth mechanics support blank" rel="noopener noreferrer">farming Nether plants (including fungi and related plants) on Nether substrate blocks. None of that exists in the Overworld by default. If you are a home mushroom cultivator searching for how to grow crimson fungus outdoors, the honest answer is that real-world crimson fungi are not a recognized cultivated species the way oysters or shiitakes are, but the principles behind the question still matter: if you want to replicate the conditions that crimson fungus needs, you have to recreate its native environment from scratch, either in a sheltered outdoor bed or an indoor setup that mimics those conditions. If you want to try growing red mushrooms yourself, the next step is to focus on matching the substrate and microclimate they naturally need how to grow red mushrooms. This guide walks you through exactly how to do that practically.
How to Grow Crimson Fungus in the Overworld: Step by Step

Can crimson fungus actually survive outside its native environment?
The short version: not without serious intervention. Crimson fungus is so tightly coupled to its substrate (crimson nylium) and its biome conditions that planting it anywhere else simply does not work. In Minecraft terms, drop it on regular dirt, grass, or any Overworld block and it sits there doing nothing. It will not colonize, will not fruit, and applying bone meal to it on the wrong substrate produces nothing useful. This is actually a useful metaphor for real-world specialty fungus cultivation too. Fungi like lion's mane or wine cap are adapted to very specific substrates and humidity windows. Ignore those requirements and you get zero results regardless of how much effort you put in.
That said, 'can it grow in the Overworld' is a solvable problem if you are willing to bring the Nether to your garden. The key is understanding that crimson fungus needs two things above all else: its native substrate and the microclimate conditions of the Nether environment. Replicate both and you have a workable grow setup. Skip either and you are wasting your time and materials.
Outdoor beds vs. sheltered setups: which actually works better
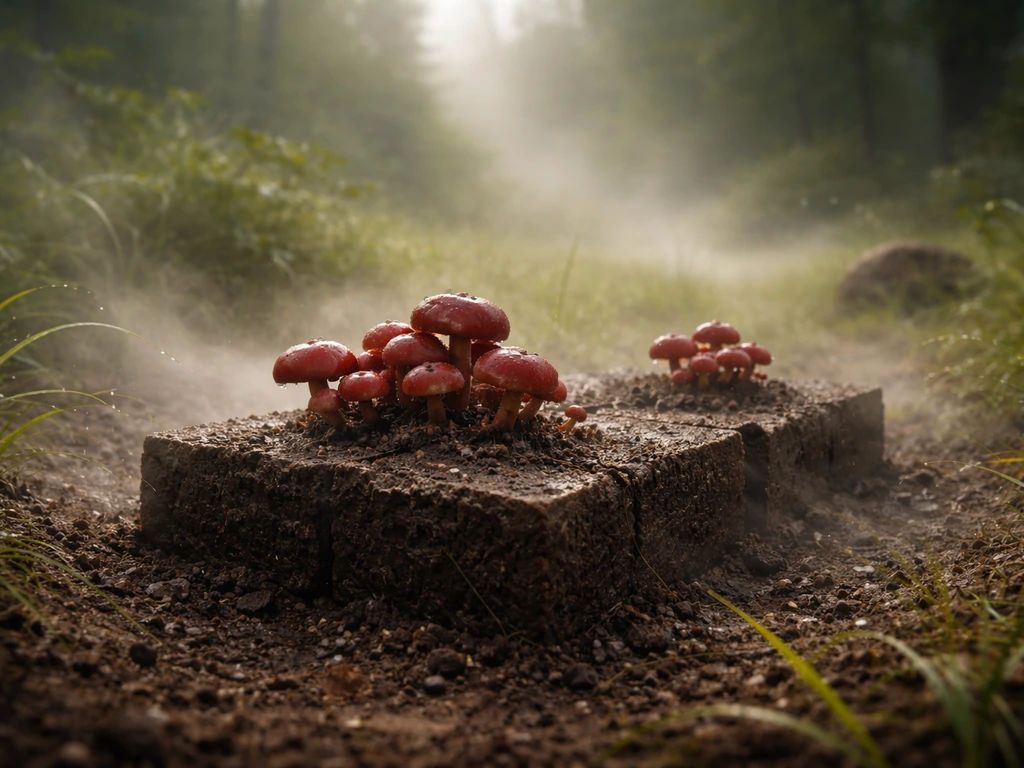
This is the first real decision point. Fully open outdoor beds are the hardest option because you have almost no control over humidity swings, temperature drops, contamination pressure, or direct sunlight. A sheltered setup, like a cold frame, a shaded polytunnel corner, or a covered porch grow station, gives you far more control and is where most home growers have actual success with demanding or unusual species.
| Setup Type | Humidity Control | Temperature Stability | Contamination Risk | Best For |
|---|---|---|---|---|
| Open outdoor bed | Low (weather-dependent) | Low | High | Hardy, forgiving species only |
| Shaded outdoor bed with cover | Medium | Medium | Medium | Intermediate growers with time to monitor |
| Cold frame or polytunnel | Medium-High | Medium-High | Medium-Low | Most specialty fungi including unusual species |
| Covered indoor/outdoor hybrid (porch, shed) | High (with misting) | High | Low | Best results for demanding or non-native species |
My recommendation: go with a sheltered outdoor setup or an indoor-outdoor hybrid. A shaded corner of a greenhouse, a partially enclosed porch with a humidity tent, or even a converted cold frame gives you the control you need without investing in a full indoor grow room. For a fungus with highly specific substrate and climate requirements, the extra structure is not optional, it is what makes the difference between colonization and contamination.
Getting the substrate and spawn right
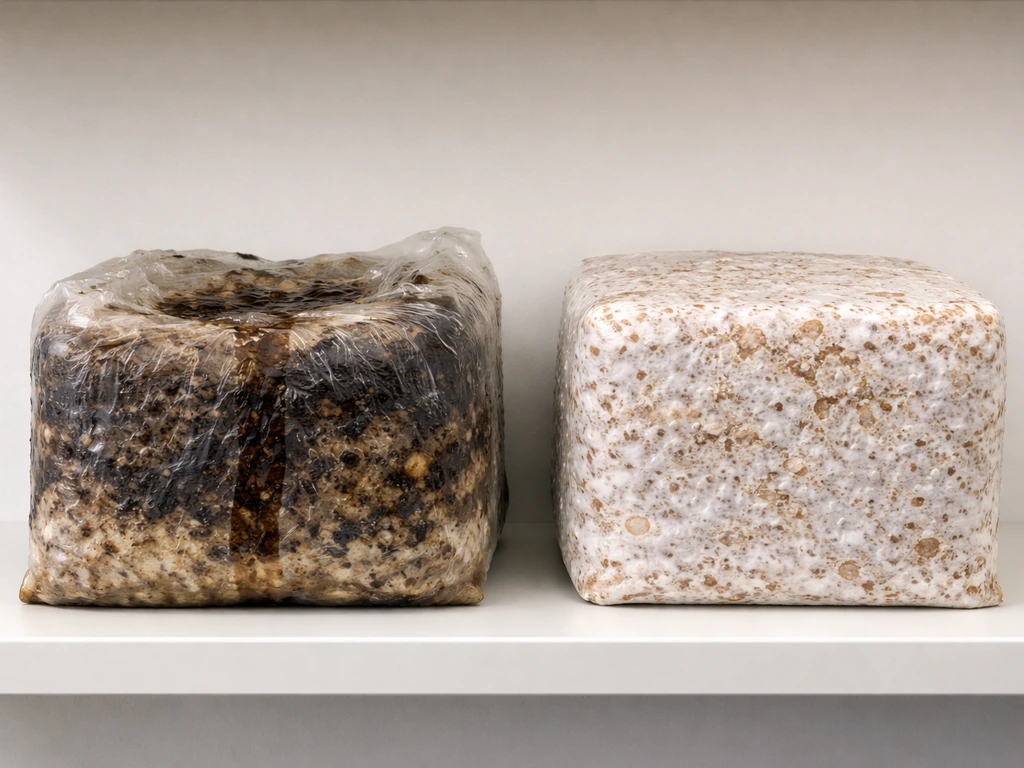
Substrate is everything here. Toadstools have their own requirements and typically grow best when the soil and moisture conditions match the species and habitat they come from toadstools grow. Crimson fungus in its native context grows on crimson nylium, which is essentially a nutrient-rich, mycelium-laced, volcanic-mineral substrate. To approximate this in a real-world grow, you want a substrate that is mineral-heavy, slightly acidic to neutral in pH (around 5.5 to 6.5), and well-aerated. A working analog is a blend of hardwood sawdust (about 60%), volcanic rock dust or perlite (20%), and a bran supplement like wheat bran or rice bran (20%). This mimics the dense, mineral-rich, slightly decomposed organic character of Nether terrain better than a straight straw or coco coir bed.
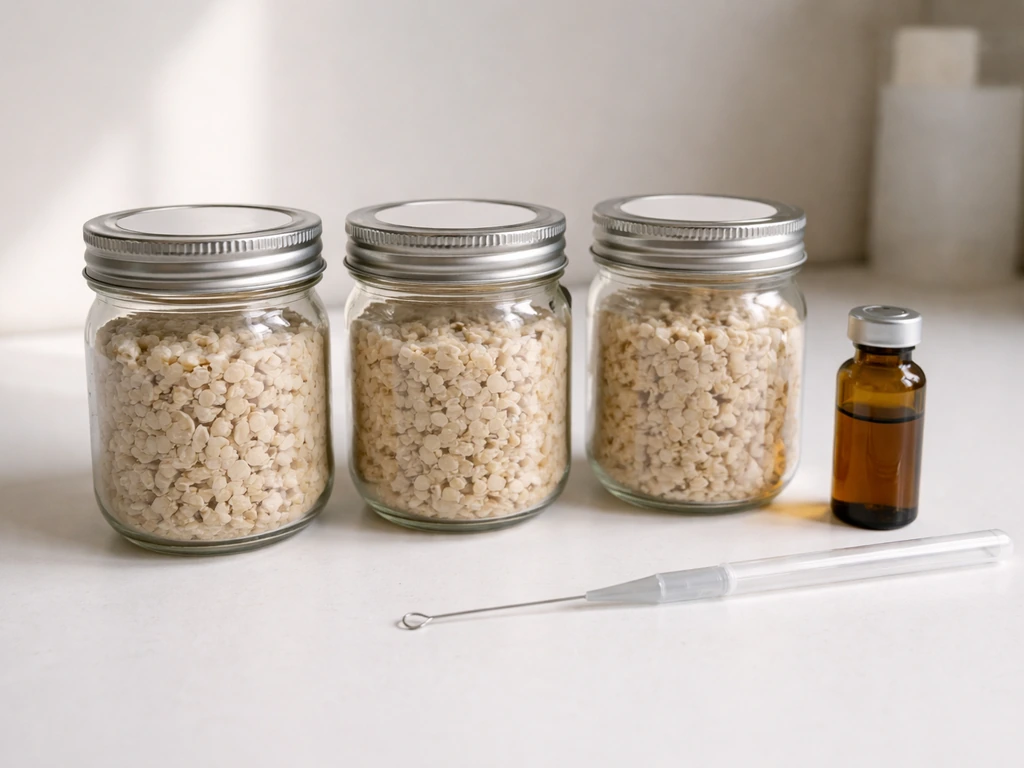
For inoculation, liquid culture is the most reliable method for getting mycelium established in a dense substrate like this. Agar-grown cultures work too, but liquid culture syringes give you faster colonization and better penetration through a thick, mineral-mixed substrate. Grain spawn (rye or wheat berry) is another solid option if you are scaling up beyond a single container. Avoid cardboard or straw-only substrates here because they lack the mineral density and tend to dry out too fast or collapse structurally, which stalls colonization before it gets going.
Substrate preparation step by step
- Mix hardwood sawdust, volcanic rock dust or perlite, and bran in a 60/20/20 ratio by dry weight.
- Bring field capacity moisture to around 60 to 65 percent: squeeze a handful and only a drop or two of water should come out.
- Sterilize the mix at 15 PSI for 2.5 hours in a pressure cooker, or pasteurize at 65 to 80 degrees Celsius for 1.5 hours if sterilization equipment is not available.
- Allow substrate to cool completely to room temperature before inoculation.
- Inoculate with liquid culture or broken-up grain spawn under as clean conditions as possible: still air box or flow hood if you have one.
- Mix inoculant evenly through the substrate and seal the container with a filter patch or polyfill plug for gas exchange.
Environmental targets: heat, humidity, airflow, and light

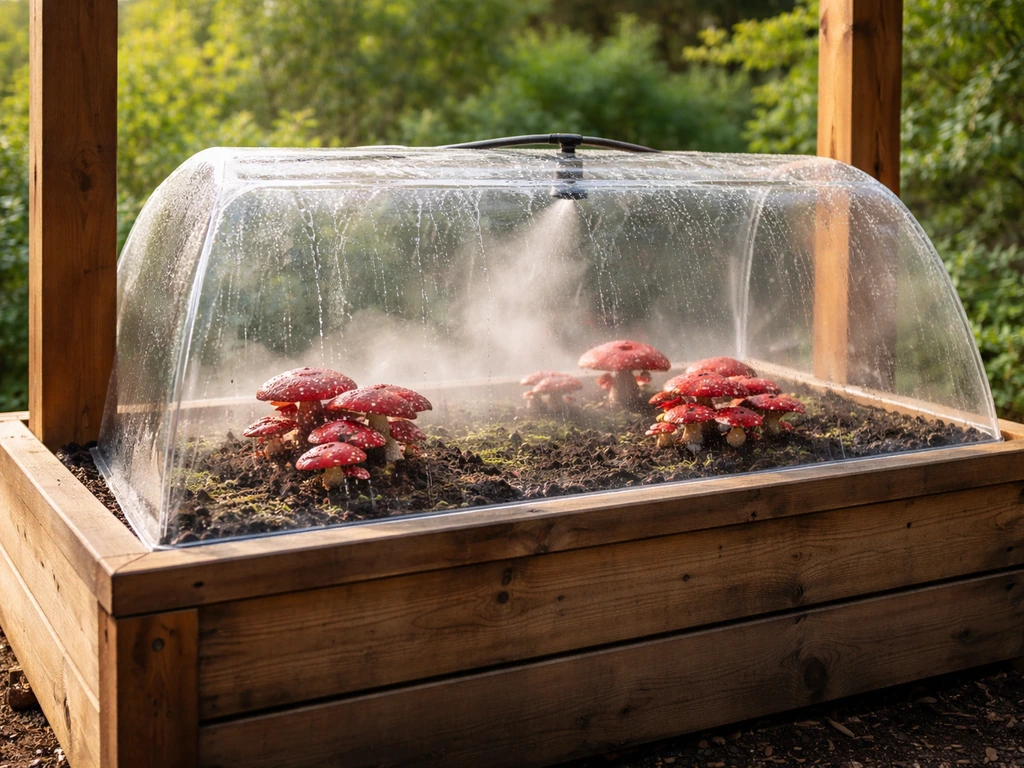
The Nether is hot, high in ambient warmth, and largely shielded from direct light cycles. Translating that to a real grow means targeting temperatures in the range of 24 to 28 degrees Celsius (75 to 82 degrees Fahrenheit) during colonization, dropping slightly to 21 to 25 degrees Celsius for fruiting. Relative humidity should sit at 85 to 95 percent throughout, with brief dips during fresh air exchanges. This is on the high end even for tropical species, so a humidity tent or regular misting schedule is non-negotiable.
Airflow is where a lot of growers overcorrect. You need fresh air exchanges, but blasting a fan at your fruiting block dries it out fast. Aim for two to four gentle air exchanges per day, either by briefly lifting a humidity tent for a few minutes or running a small fan on a timer at low speed for short bursts. Indirect, low-intensity light works fine and helps signal fruiting in many species. Direct sunlight raises surface temperature too much and desiccates the substrate surface, so keep your setup in bright shade rather than full sun.
| Parameter | Colonization Phase | Fruiting Phase |
|---|---|---|
| Temperature | 24 to 28°C (75 to 82°F) | 21 to 25°C (70 to 77°F) |
| Relative Humidity | 85 to 90% | 90 to 95% |
| Light | None required | Indirect, low-intensity (12hr cycle) |
| Fresh Air Exchanges | 1 to 2 per day (brief) | 2 to 4 per day (brief) |
| CO2 tolerance | High (colonization favors elevated CO2) | Low (fruiting needs fresh air) |
Step-by-step cultivation process for your overworld setup
Here is the full workflow from inoculation to harvest. Once you have the basics down, the same overall process can be applied when learning how to grow fungi in general, not just crimson fungus Here is the full workflow from inoculation to harvest.. Timelines are realistic estimates based on typical home conditions, not ideal lab setups.
- Prepare and sterilize your substrate as described above. Cool completely before inoculating.
- Inoculate with liquid culture (3 to 5 ml per litre of substrate) or layer in grain spawn at a 10 to 20 percent ratio by weight. Mix thoroughly.
- Transfer to your colonization space: a sheltered, dark, warm area at 24 to 28°C. A humidity tent or sealed bin with filter patches works well. Expect colonization to take 2 to 4 weeks depending on temperature and spawn rate.
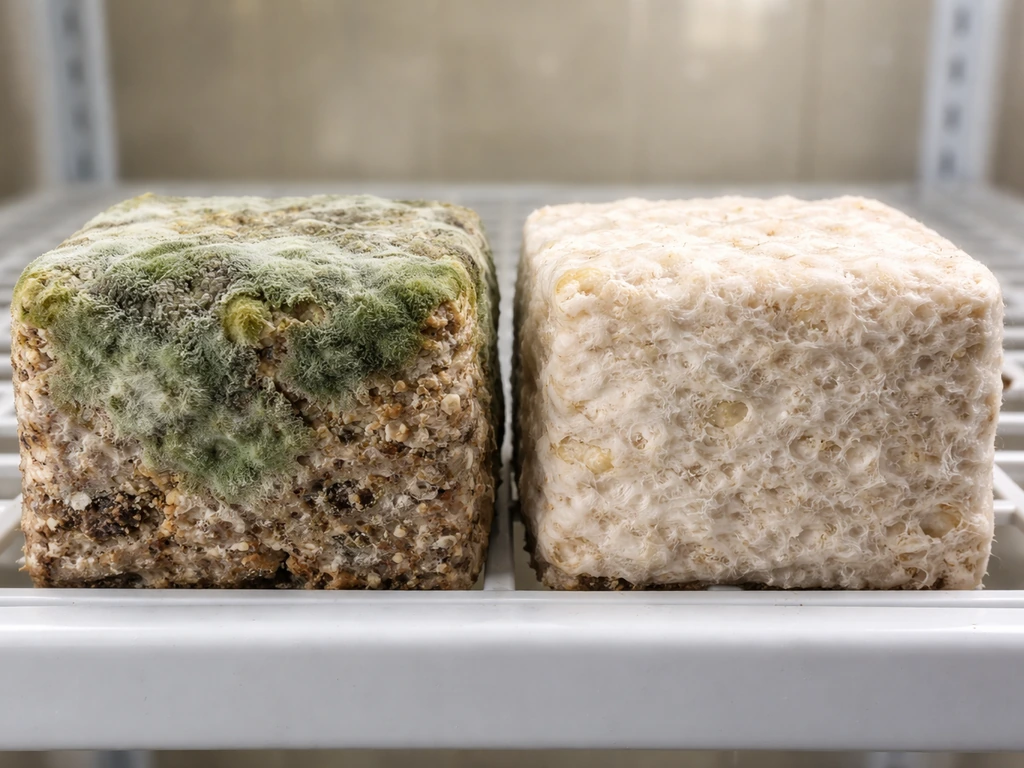
- Check for white mycelial growth spreading through the substrate from day 7 onward. Healthy colonization looks fluffy and white. Any green, black, or pink patches indicate contamination (see troubleshooting below).
- Once substrate is fully colonized (80 to 100 percent white coverage), initiate fruiting conditions: lower temperature to 21 to 25°C, increase fresh air exchanges to 2 to 4 per day, and maintain 90 to 95 percent relative humidity.
- Watch for pinning (tiny primordia forming) within 7 to 14 days of fruiting conditions being established. Pins in crimson-type or heat-adapted species can be subtle at first: look for small raised nodes or color changes on the substrate surface.
- Once pins appear, maintain humidity and gentle airflow consistently. Avoid disturbing the substrate. Harvest individual fruits as they reach mature size before caps begin to flatten or curl upward.
Total time from inoculation to first harvest: expect 5 to 8 weeks under good home conditions. Do not rush the colonization phase by moving to fruiting conditions too early. Partial colonization before fruiting attempts is the single most common mistake I see, and it almost always leads to contamination winning before your mycelium gets a foothold.
What to do when it just won't grow
Contamination
Green mold (Trichoderma) is the most common contaminant in warm, humid substrates. If you see any green, discard the block immediately and do not attempt to save it. Contamination spreads fast in the temperature and humidity ranges needed for this type of growth. Prevent it by sterilizing properly, inoculating clean, and not over-wetting the substrate. A field capacity of 60 to 65 percent is safe. Wetter than that and anaerobic pockets form, which are invitations for bacterial contamination too.
Wrong substrate or conditions
If you see no colonization after 3 weeks, the most likely culprits are substrate too wet, temperature too low, or inoculant that was dead or weak. Check your thermometer (not just the room ambient temperature, but the internal temperature of the substrate block, which can run warmer than the room during active colonization). Liquid culture syringes lose viability after about 3 to 6 months in the fridge, so use fresh inoculant if you have had it sitting around. A secondary indicator of the wrong substrate is mycelium that starts but stalls: thin, ropy, or sector-forming growth suggests nutrient imbalance. Adding a small amount of gypsum (1 percent by dry weight) to your substrate mix can improve structure and mineral balance.
Pinning failure
If the block is fully colonized but no pins appear after 2 to 3 weeks of fruiting conditions, try a cold shock: move the block to a cooler space (15 to 18°C) for 12 to 24 hours, then return to fruiting conditions. This temperature drop mimics a natural environmental trigger and can kick stubborn blocks into fruiting. Also check that your fresh air exchanges are actually happening; elevated CO2 from a sealed setup with no airflow is a very common reason pins fail to form even on a perfectly colonized block.
Common failure points at a glance
- Substrate too wet: causes bacterial wet rot and anaerobic pockets
- Inoculation done at too-high temperatures (above 30°C kills mycelium)
- Wrong substrate type (straw-only or cardboard lacks mineral density)
- Contamination from unsterilized substrate or non-sterile inoculation technique
- No airflow during fruiting phase: CO2 buildup prevents pinning
- Moving to fruiting conditions before full colonization is reached
- Dead or old liquid culture used for inoculation
Harvesting, maintaining the block, and realistic yields
Harvest individual fruits by twisting and pulling cleanly at the base rather than cutting, which leaves a stump that can rot and invite contamination. After the first flush, remove any leftover stumps or aborted pins, mist the surface lightly, and return the block to fruiting conditions. Most well-colonized blocks will produce two to three flushes before mycelium exhaustion. Yield per flush depends heavily on substrate nutrition and environmental consistency, but a block made from 1 kilogram of dry substrate typically yields 100 to 250 grams of fresh fruiting bodies per flush under good home conditions.
Between flushes, a rest period of 5 to 10 days with slightly reduced humidity and no misting helps the mycelium consolidate before the next fruiting push. Some growers do a full cold soak (submerging the block in cold water for 4 to 8 hours) between flushes to rehydrate and trigger the next pinning cycle. It is worth trying if your second flush is slow to start.
One realistic note: the more species-specific and environmentally demanding a fungus is (and crimson fungus is at the demanding end of that spectrum), the more your yields will vary between attempts. Your first grow is a learning run. Your second will be noticeably better once you have dialed in your humidity, temperature, and substrate moisture for your specific space. If you are also interested in working with other unusual or exotic fungi, the approaches for growing red mushrooms, snow fungus, and warped fungus share a lot of the same substrate and environmental logic covered here, and building skills across those species makes each successive grow easier. If you specifically want to focus on how to grow snow fungus, use the same approach: match the substrate and keep the humidity and temperature in the tight window the species needs.
FAQ
Is there really a “crimson fungus” species I can buy and grow, like a known gourmet mushroom?
In the real world, you cannot rely on “crimson fungus” as a Minecraft-like, recognizable edible or collectible species with predictable availability. If you mean growing a similar red, bracket-like organism, you will need an actual fungal strain or culture from a reputable supplier, then match its substrate and climate. Otherwise, what you get will either be random wild fungi or zero growth, because you do not have the correct organism to establish mycelium.
Can I grow it on regular soil or garden compost if I keep the humidity and temperature right?
No. The “inoculated block” must be kept on the correct substrate mix for the organism you are cultivating. If the strain you have is adapted to a specific substrate type, switching to plain compost, garden soil, or straight coir/sawdust can prevent colonization even if humidity and temperature are perfect. Use your full substrate blend consistently from sterilization through incubation and fruiting.
What should I do if I suspect contamination, can I save the block?
If you see rapid green growth, slimy patches, or a musty smell that escalates quickly, do not try to salvage the block. In warm, high-humidity conditions, contaminants like Trichoderma can sporulate and spread to nearby tubs within days. Isolate the suspect block immediately, then clean the area and review your sterilization and moisture level before attempting again.
How do I know my humidity readings are accurate for the fungus surface, not just the room?
For indoor or tented grows, measure humidity and temperature both at the block level and in the room. The block surface can run cooler and drier than the surrounding air when you have airflow, and that can stop pinning even when the hygrometer reads 90 percent. A simple solution is to place the sensor inside the same humidity tent near the block.
What causes “no colonization after a few weeks,” and how do I troubleshoot inoculant failure?
Liquid culture viability is the biggest hidden variable. Even if the culture was stored correctly, repeated temperature swings and long fridges can reduce activity so colonization starts slowly or stalls. If you are at “no colonization after 3 weeks,” try a fresh syringe or a different batch, and confirm your inoculation volume was enough for dense substrate.
How do sterilization mistakes usually show up in warm, humid mushroom grows?
For sterilization, the key failure mode is under-processing thick, mineral-heavy substrate that insulates heat. If you are using a pressure sterilizer, follow the correct cycle time for the actual mass and container size, and do not pack so tightly that the center stays under-sterilized. If your blocks repeatedly show contamination in the warm, humid range, review sterilization time, container load, and cooling cleanliness.
What if the block is fully colonized, but no pins appear even after raising humidity?
Yes, CO2 buildup is a common reason for stalled pins. If your setup is sealed or you only mist without real air exchange, the surface can remain humid but oxygen and fresh air are insufficient for pin formation. Add brief low-speed ventilation bursts on a timer, and avoid aiming a strong fan directly at the block.
Do I need to manage substrate temperature differently than room temperature?
Warm-temperature “comfort” differs between incubation and fruiting. If fruiting conditions stay too warm, many fungi will grow wrong morphology or stall. If your species is sensitive to the temperature window, verify the internal temperature of the substrate, because it often runs warmer during active growth than the room thermostat suggests.
How should I handle humidity and misting between flushes to improve the second harvest?
Between flushes, if you keep humidity high but never reduce misting or allow a short rest, you can get fewer, smaller, or aborted fruits. After harvesting, remove stumps, then run a defined rest period with slightly reduced humidity and minimal surface wetting. This helps the mycelium consolidate and improves the next pinning cycle.
Why do pins form but fruits stop growing, and what is the safest fix?
If a block pins but fruits abort early, the usual causes are surface drying during airflow, CO2 too high, or temperature drifting outside the trigger window. Check that your air exchanges are gentle, keep the block covered enough to prevent rapid evaporation, and consider a short cold shock only after full colonization with proper fresh-air exchange.
What setup gives the best chance of success for a first attempt in the overworld?
For a higher-success first run, pick a method that reduces variability, for example a shaded, sheltered setup or an indoor-outdoor hybrid. Fully open outdoor beds are hardest because sunlight and humidity swings can overshoot your tight range. If you are experimenting, standardize one variable at a time, usually humidity control first, then temperature, then substrate moisture.