If you meant the Minecraft “crimson fungus” block, you can’t grow that in the overworld like a real mushroom; it only appears as a fictional Nether crop crimson fungus block. It's a game asset with a specific item ID (crimsonfungus), not a real-world mushroom species you can cultivate with spores or spawn. There is no real-life equivalent you can order from a supplier.
If you meant the broader goal of how to grow red mushrooms rather than just Reishi, use these same incubation, fruiting, and cleanliness checkpoints as a related starting point. If you meant the general question of how to grow toadstools, use these same incubation, fruiting, and cleanliness checkpoints as a related starting point.
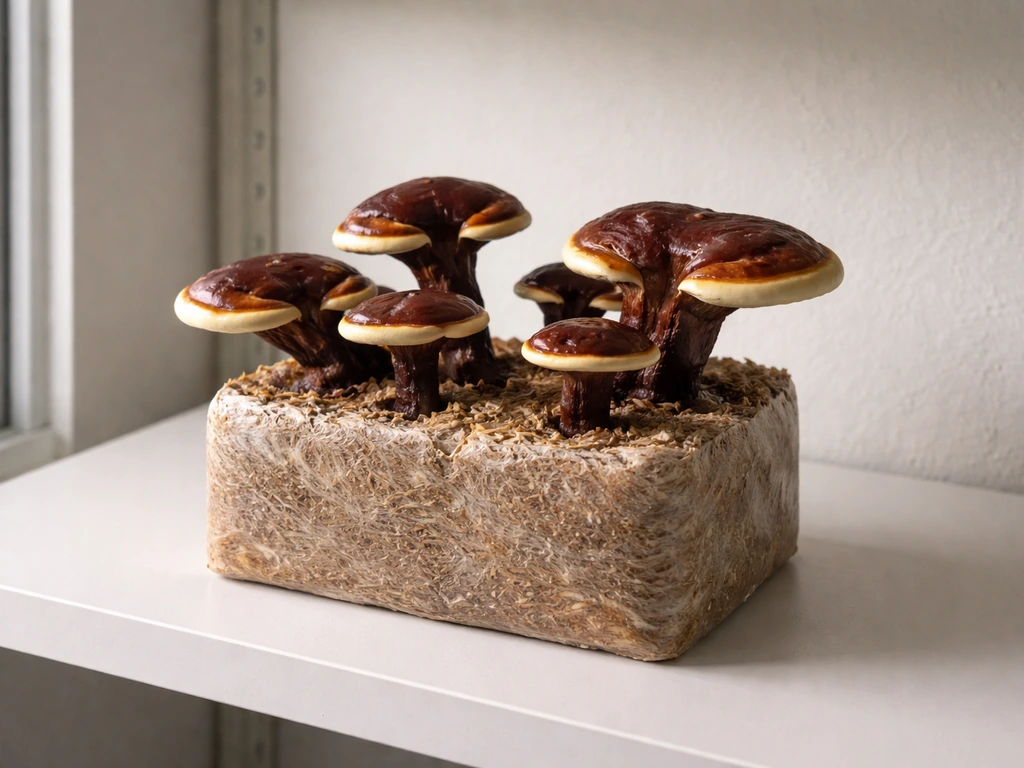
In real-world cultivation circles, "crimson fungus" is most often used informally to describe red or deep-reddish mushroom varieties, particularly specialty and medicinal species that display striking crimson-toned fruiting bodies. The most prominent real-world candidates growers actually mean are: red Reishi (Ganoderma lucidum or Ganoderma tsugae), which produces a deep reddish, lacquered cap; Scarlet Elf Cup (Sarcoscypha coccinea or the closely related S. dudleyi); or occasionally red-capped ornamental varieties of other species.
Of these, red Reishi is by far the most commonly cultivated, widely available from spawn suppliers, and best supported by home cultivation data. This guide is built around growing red Reishi as the practical interpretation of "crimson fungus" because it's what most growers are actually chasing when they use that phrase.
If you're specifically interested in growing red mushrooms more broadly, or if you landed here while researching warped fungus or snow fungus, those are genuinely different species with their own cultivation profiles. If you are trying to grow snow fungus instead, you’ll need to identify the exact species and then adjust substrate, temperature, and fruiting triggers accordingly. If you're really aiming to grow warped fungus specifically, you'll want to confirm its exact species and follow the matching humidity, substrate, and fruiting triggers for that organism. This guide focuses on the red Reishi workflow from start to finish.
What You'll Need Before You Start
Getting your supplies sorted before touching any substrate saves a lot of headaches. Reishi is slower and more finicky than oyster mushrooms or shiitake, so starting with quality inputs matters more than usual. Here's exactly what you need:
Spawn and Spores
For beginners, grain spawn (rye, wheat berries, or millet inoculated with Ganoderma lucidum mycelium) is the easiest starting point. It colonizes substrate more aggressively and gives you a faster, more reliable colonization than starting from spores. Spore syringes are available but add an extra germination step that extends your timeline by several weeks and increases contamination risk. Buy spawn from a reputable North American or European supplier with lab-verified strains. Expect to pay $15 to $30 for a half-pint or pint jar of grain spawn, which is enough to inoculate a few small bags.
Substrate
Red Reishi is a wood-loving species. It wants a hardwood-based substrate, ideally hardwood sawdust supplemented with wheat bran or rice bran at around 10 to 20 percent by dry weight. A simple mix that works well at home: 80% oak or alder sawdust, 10% wheat bran, 10% oat bran. You can also use sterilized hardwood log sections or supplemented hardwood blocks (sold pre-made as "mushroom grow blocks") if you want to skip the substrate-mixing step entirely. Avoid softwood sawdust, as it contains resins that inhibit Ganoderma growth.
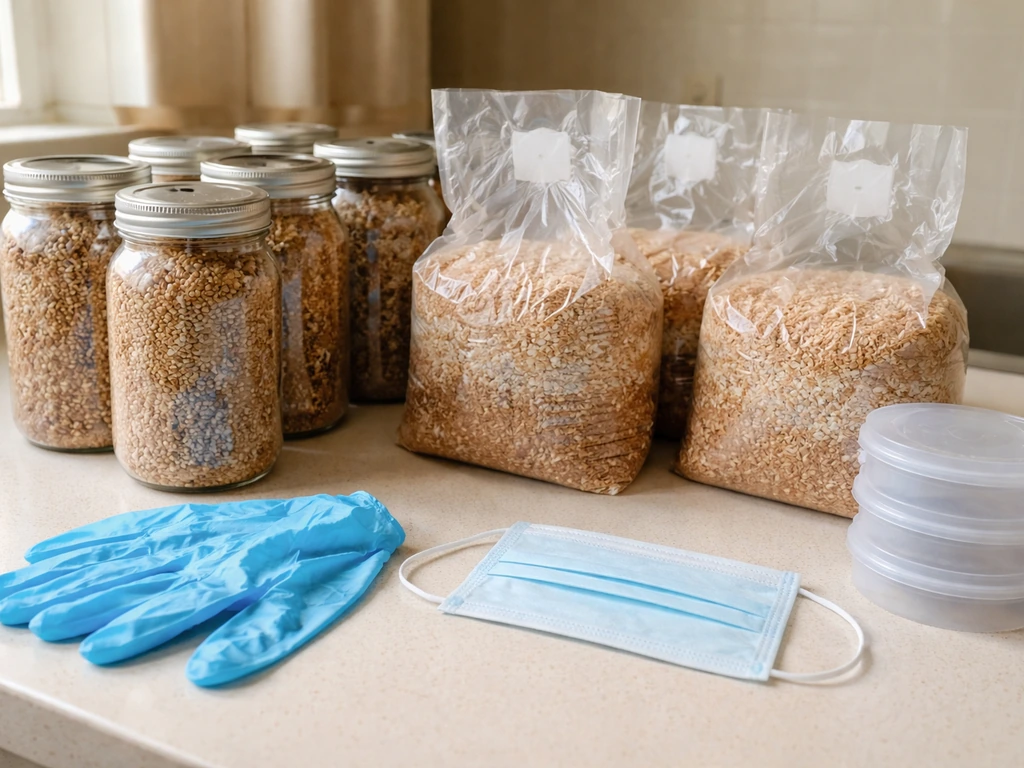
Containers and Equipment
- Polypropylene (PP) mushroom grow bags with filter patches, or wide-mouth quart/half-gallon mason jars with injection ports and filter discs
- Pressure cooker (minimum 15 PSI) for sterilizing substrate, or an autoclave if you have access
- Isopropyl alcohol (70%) for wiping down surfaces and gloves
- Nitrile gloves and a still-air box or flow hood for inoculation
- Hygrometer/thermometer combo for monitoring the fruiting environment
- Spray bottle for maintaining surface moisture during fruiting
- A humidity tent (a clear plastic tote or a humidity chamber built from a storage bin) for fruiting
Setting Up Your Workspace: Indoor vs Outdoor
Indoor Growing (The Recommended Route)
Reishi does best indoors where you control temperature and humidity precisely. Designate two separate zones: one for incubation (colonization) and one for fruiting. The incubation zone can be a closet, cabinet, or any enclosed space that stays warm and dark. The fruiting zone needs light, airflow, and high humidity, so a grow tent (2x2 ft is plenty for a few bags) or a modified clear storage tote works well. Keep these zones physically separated to avoid cross-contamination and to allow different environmental settings.
Clean your workspace thoroughly before each session. Wipe all surfaces with 70% isopropyl alcohol and let it air dry. Wear nitrile gloves during inoculation. A still-air box (a clear tote with arm holes cut in the sides) is a budget-friendly alternative to a flow hood and dramatically cuts contamination rates during inoculation. I've run dozens of Reishi bags in a still-air box in a spare bathroom with no ventilation running and had very few issues, as long as I let the alcohol dry and didn't rush the process.
Outdoor Growing (Logs and Stumps)
Reishi can absolutely be grown outdoors on inoculated hardwood logs or stumps. Use plug spawn or grain spawn packed into drilled holes, then seal with cheese wax. Freshly cut oak, maple, or alder logs (cut 3 to 6 months before inoculation) are ideal. Bury the logs partway in a shaded, moist spot. Outdoor log grows take considerably longer (6 to 18 months before first fruiting) but produce multiple harvests over several years with very little maintenance. This is a great option if you're not in a rush and want a low-labor grow.
Substrate Prep and Inoculation
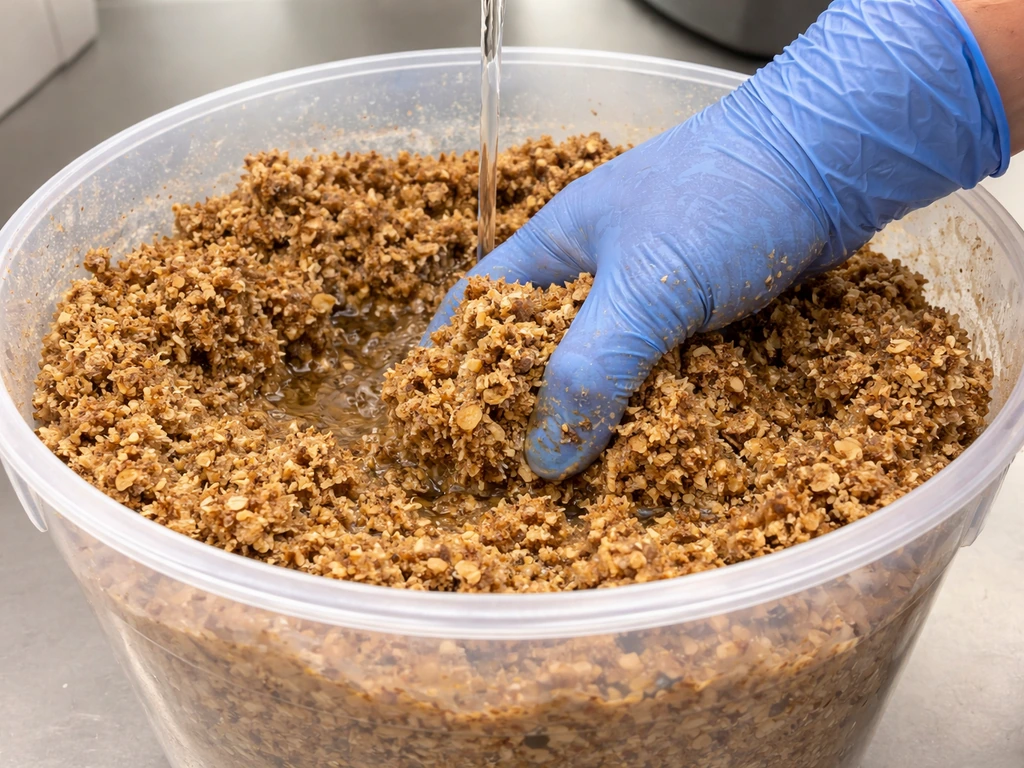
Mix your hardwood sawdust and bran in a large bucket, then add water until the substrate reaches field capacity, meaning you can squeeze a fistful and only a few drops of water fall out, not a stream. Over-wet substrate is one of the most common beginner mistakes and invites bacterial contamination during sterilization. Once mixed, pack the substrate into polypropylene bags (fill to about 2/3 capacity) or into mason jars, then sterilize in your pressure cooker at 15 PSI for 2.5 to 3 hours for bags, or 90 minutes for quart jars. Larger blocks need more time.
After sterilization, let the substrate cool completely to room temperature before inoculating. This usually means leaving bags overnight. Inoculating warm substrate kills mycelium. Once cooled, move everything into your still-air box or in front of your flow hood, wipe the inoculation port or jar lid with alcohol, and inject or add your grain spawn (typically 10 to 20% spawn by weight relative to dry substrate weight). Seal bags with micropore tape over the filter patch, shake gently to distribute spawn, and label with the date.
Incubation and Fruiting: The Environmental Targets That Actually Matter
Incubation Phase
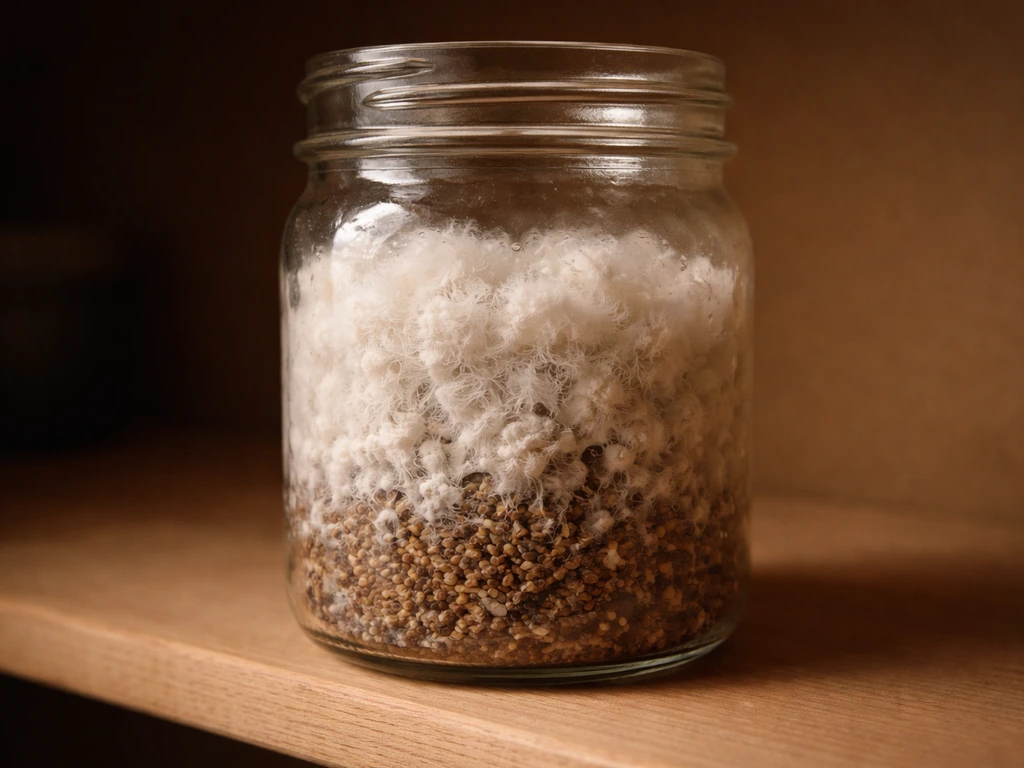
Reishi mycelium colonizes best at 75 to 85°F (24 to 29°C). Keep the bags in a warm, dark location and don't mess with them. Expect a slow, white, thick mycelium that moves at roughly 0.5 to 1 cm per day at optimal temperature. Full colonization of a standard 5-pound block takes 4 to 8 weeks, which is much slower than oyster mushrooms. Don't panic if things look slow in weeks 1 and 2. Reishi takes its time. You should see the mycelium advancing steadily and the substrate darkening slightly as it's consumed.
Fruiting Phase
Once fully colonized, trigger fruiting by moving blocks to your fruiting chamber and introducing fresh air exchange (FAE). Reishi needs higher CO2 during early antler growth, but once you want caps to form, drop CO2 and increase FAE. Here are the key environmental parameters: A review of Ganoderma lucidum cultivation describes distinct stages, with mycelial colonization commonly carried out in darker conditions under relatively lower humidity (about 60, 85%), and the fruiting-body growth stage using higher humidity (about 60, 95%) mycelial colonization under lower humidity (about 60–85%) and fruiting-body growth under higher humidity (about 60–95%).
| Parameter | Incubation Target | Fruiting Target |
|---|
| Temperature | 75–85°F (24–29°C) | 70–80°F (21–27°C) |
| Humidity (RH) | Not critical (bags sealed) | 85–95% RH |
| Fresh Air Exchange | Minimal (sealed bags) | 4–6x per hour (fan or manual fanning) |
| Light | Dark or dim | 12 hrs indirect light/day (triggers cap formation) |
| CO2 Level | Elevated (sealed environment) | Low (500–800 ppm target for caps) |
Reishi first produces antler-like growths (these are normal and look a bit alien). Once you increase FAE and light, the antlers flatten into the classic shelf or fan-shaped red cap. Fruiting from first pin to harvest-ready cap typically takes 3 to 6 weeks. Maintain humidity by misting the walls of your fruiting chamber, not directly onto the caps. Misting caps directly causes water pooling and can invite bacterial rot on the porous surface.
Harvesting, Storing, and Getting Repeat Flushes
Harvest Reishi when the cap has fully expanded and you see a ring of white or cream-colored growth at the edge of the cap. This white edge indicates active growth. Once the white edge disappears and the edge hardens to match the rest of the cap's dark red, lacquered surface, the mushroom has finished growing and is releasing spores. Harvest before or just at this transition point by twisting and pulling the fruiting body from the block, or cutting it at the base with a clean knife.
Reishi is not typically eaten fresh like oyster mushrooms. The fruiting bodies are very hard and woody. Standard home use involves drying them completely (slice into 1/4-inch pieces and dry at 95 to 115°F in a food dehydrator for 6 to 8 hours, or air dry in a warm, ventilated space for several days), then using them to make teas, tinctures, or decoctions. Store dried Reishi in an airtight container away from light and moisture. Dried material keeps well for 12 to 24 months.
For repeat flushes, soak the spent block in cold water for 12 to 24 hours after harvest (this is called field capacity rehydration or "dunking"), then return it to your fruiting chamber. Reishi blocks typically produce 2 to 3 flushes from a single block, with yields decreasing each round. Total dry weight yield from a 5-pound hardwood block runs roughly 1 to 3 ounces across all flushes, which is on the lower side compared to oyster or shiitake but consistent with how slow-growing wood decomposers like Reishi behave.
Troubleshooting: What Went Wrong and How to Fix It
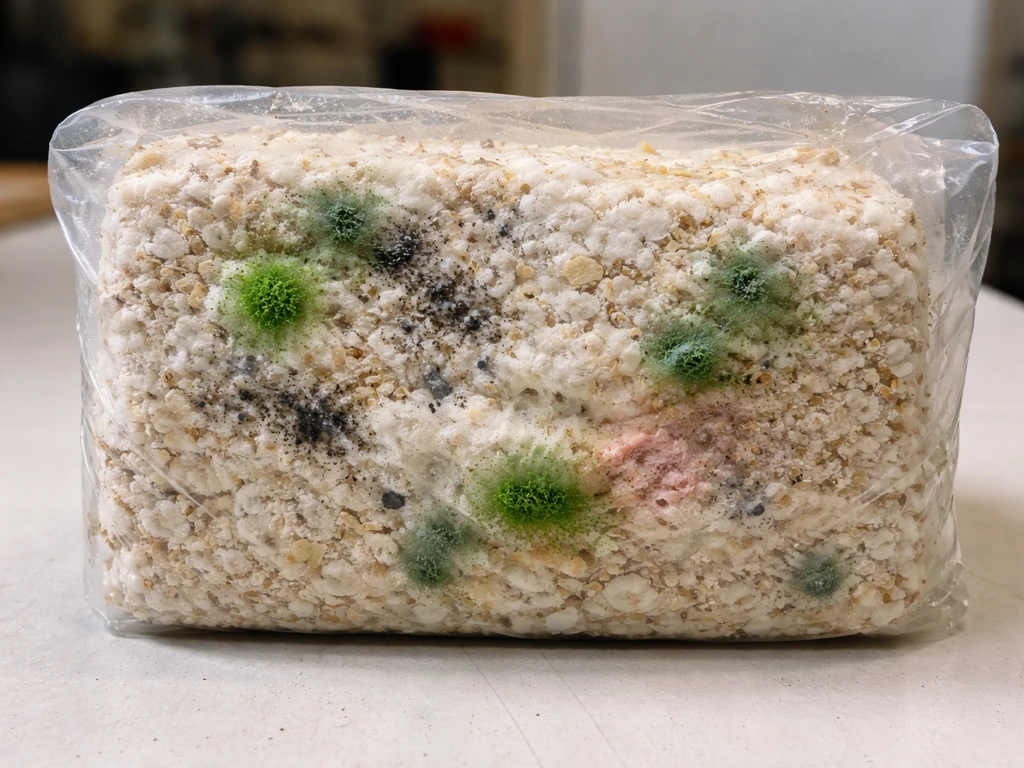
Green, Black, or Pink Patches on the Block
This is contamination, almost certainly Trichoderma (green mold), Aspergillus, or Bacillus (wet rot). If you catch it early and it's isolated to one corner, you can sometimes quarantine the bag from your other blocks, but realistically contaminated bags should be sealed in a plastic bag and removed from your grow space immediately. Do not open them inside. The most common causes are substrate that wasn't wet enough before sterilization (dry pockets don't fully sterilize), inoculation done before the substrate cooled, or inoculation in a non-sterile environment. Review your pressure cooking time and make sure your still-air box technique is clean.
Mycelium Stopped Growing or Is Very Thin
Check your temperature. If the incubation space dropped below 65°F, Reishi mycelium essentially pauses. Move the blocks somewhere warmer and give it a few extra days. Thin, wispy mycelium that doesn't consolidate into a dense white mass can also indicate the substrate is too wet or the spawn ratio was too low. For future runs, aim for 15 to 20% spawn by weight and double-check your substrate moisture before sterilizing.
Fully Colonized Block Won't Fruit
This is the most common complaint from first-time Reishi growers. The block looks fully white and colonized, but nothing pins. The fix is usually to introduce a stronger fruiting trigger: increase the temperature differential (drop temps by 5°F overnight), confirm your humidity is actually reaching 85%+ (a cheap hygrometer will tell you the real number), and make sure your FAE is sufficient. Reishi also needs indirect light to initiate cap formation. Putting a fully colonized block in a dark closet and expecting it to fruit won't work. Try placing it near a window with indirect natural light or run a small LED grow light on a 12-hour timer.
Antler-only growth is a CO2 problem. This happens when fresh air exchange is too low, causing CO2 to accumulate. Fan your fruiting chamber more frequently, or add a small computer fan on a timer running a few minutes every hour. Once FAE improves, the antlers will typically flatten and begin forming the characteristic fan-shaped cap within 1 to 2 weeks.
Humidity dropped below 80%. This happens most often in winter when indoor heating dries out the air. Mist the chamber walls (not the caps directly) more frequently, or add a small ultrasonic humidifier. A tight-fitting humidity tent helps maintain humidity between misting sessions without constant attention.
Safety, Legality, and Handling Notes
Red Reishi (Ganoderma lucidum and related species) is legal to cultivate, possess, and use in the United States, Canada, the UK, Australia, and most other countries. It is not a controlled substance. It is sold openly as a supplement and functional food ingredient. That said, a few important practical notes apply:
- Reishi releases a very large volume of reddish-brown spores when mature. These spores can cause respiratory irritation and allergic reactions in sensitive individuals. Harvest caps before full spore release, and if you notice spore dust accumulating, wear an N95 mask and increase ventilation in your grow space.
- Do not confuse red Reishi with other red or bracket fungi found growing wild outdoors. Correct species identification matters. If you're sourcing from a reputable spawn supplier, your strain is verified. Wild-foraged red shelf fungi are a different matter and should be identified by someone with mycological expertise before use.
- Reishi has documented interactions with certain medications, particularly blood thinners (anticoagulants) and immunosuppressants. If you plan to consume Reishi preparations medicinally, check with a healthcare provider first, especially if you take prescription medications.
- For storage and handling: dried Reishi should be kept in airtight containers to prevent reabsorption of ambient moisture, which can lead to mold growth on the dried material. This is different from the active mushroom mycelium and is a simple storage hygiene issue.
- If you are growing any other specialty fungi alongside Reishi (for example, if your interests extend to other medicinal varieties), confirm the legal status of each species in your jurisdiction separately, as rules vary considerably by country and by species.
Your Next Steps Today
If you're ready to start, here's the practical sequence to follow this week: order red Reishi grain spawn from a verified supplier, gather your hardwood sawdust and bran, and locate a pressure cooker if you don't already have one. If you meant the general question of how do toadstools grow, the same basics of clean inoculation, suitable substrate, and the right fruiting conditions will guide you.
If you want the bigger picture on the general process, use this guide on how to grow fungi to plan your setup end to end. Set up a simple still-air box from a clear storage tote. That's all you need to run your first block. The species is forgiving of imperfect fruiting conditions as long as you nail the sterilization and inoculation steps early in the process.
Contamination during those stages is the biggest killer for beginners, not fruiting environment errors. Toadstools are different from Reishi, so use the specific species guidance for best results.
Expect your first grow to take 10 to 16 weeks from inoculation to first harvest, a much longer timeline than oyster or shiitake but absolutely worth it if you're interested in the medicinal properties or the deep, dramatic look of a mature Reishi cap. Once you have the process dialed in, a second and third run go much faster because you already know what normal colonization looks like and can spot problems early. Start with one or two bags, not ten. Get comfortable with the rhythm of the grow before scaling up.