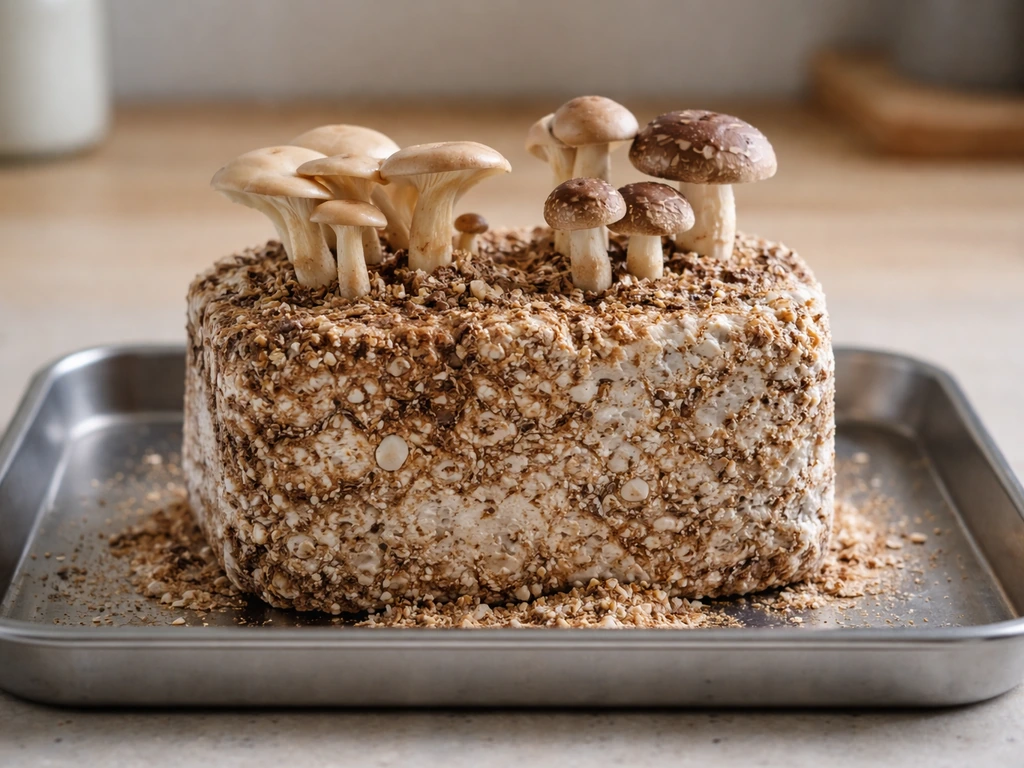
Yes, you can absolutely grow mushrooms in sawdust, and it's one of the most reliable substrates available to home growers. Sawdust, particularly hardwood sawdust, mimics the decaying wood that many gourmet mushrooms colonize in the wild. Species like shiitake, oyster, lion's mane, and king oyster all thrive in it. The key is that raw sawdust alone isn't enough. You need to condition it, hydrate it properly, and usually add a small supplement before inoculating with spawn. Do that right, and you'll have dense, productive blocks that fruit multiple times. Skip those steps, and you'll end up with slow colonization, stalled mycelium, or green mold taking over before anything useful grows.
How to Grow Mushrooms Using Sawdust Step by Step

Marcus Holloway
14 May 2026
What sawdust can (and can't) do for your mushrooms
Hardwood sawdust is a fantastic substrate because it closely replicates rotting logs, which is exactly where most gourmet mushrooms want to grow. Oak, beech, alder, maple, and fruit woods are all excellent choices. Shiitake, in particular, has a long history growing on oak and chestnut wood, which is why hardwood sawdust blocks became the indoor cultivation standard. Shiitake is a great example of a chestnut-wood loving mushroom, and if you're wondering how to grow chestnut mushrooms, you can use similar sawdust-block methods with the right wood source and patience chestnut wood. Wood ear mushrooms also do well in sawdust. If you want to try a different wood-loving edible, this guide also explains how to grow wood ear mushrooms on sawdust and what temperatures to use. If you're interested in species that prefer wood-based growing environments, that context is worth keeping in mind as you plan your project.
What sawdust can't do on its own is provide enough nitrogen and nutrients to support vigorous mycelial growth and multiple heavy flushes. Plain sawdust has a high carbon-to-nitrogen ratio, which means it's energy-dense but nutritionally lean. That's why most growers supplement it with wheat bran, rice bran, or similar additions. There's a trade-off though: more supplement means faster colonization and bigger yields, but it also means a higher contamination risk because bacteria and competing molds love the same rich environment. For beginners, keeping supplementation moderate and sterilizing your substrate is the safest path.
One thing to be clear about: softwood sawdust from pine, cedar, or fir contains resins and terpenes that are toxic to most mushroom mycelium. Avoid it entirely unless you're working with a species specifically adapted to conifer wood. When in doubt, go hardwood.
Choosing and prepping your sawdust
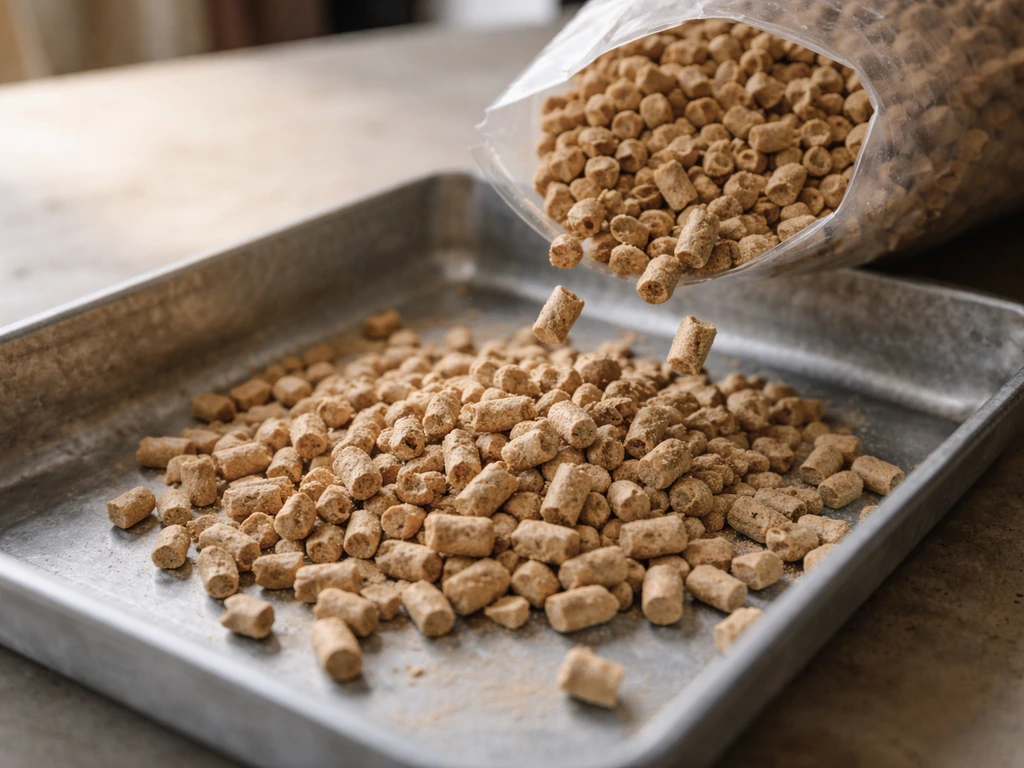
The best starting point is pelletized hardwood fuel pellets, which you can find at hardware and farm supply stores. They're made from compressed hardwood sawdust with no binders or additives, they're already quite dry and clean, and they rehydrate easily into the right texture. Just add water and they fall apart into fluffy sawdust. A 40 lb bag is cheap and gives you enough substrate for multiple blocks. Alternatively, you can source fresh hardwood sawdust from a sawmill or woodworking shop, but make sure it's clean (no plywood, MDF, or treated wood) and ideally a fine-to-medium cut particle size.
Before you do anything else, your sawdust needs to be either pasteurized or sterilized. Pasteurization (heating to around 65–82°C for 1–2 hours) works fine for low-supplement mixes used with fast-colonizing species like oysters. For shiitake or any supplemented block, full sterilization at 121°C (15 PSI) for 2.5 to 3 hours in a pressure cooker or autoclave is the safer and more reliable option. Contamination is the number one reason beginner grows fail, and cutting corners here is where most people run into trouble.
Building your substrate: ratios, moisture, and supplementation
A standard hardwood sawdust block recipe that works well for most wood-loving species uses roughly 80% hardwood sawdust and 20% wheat or oat bran by dry weight, with gypsum added at about 2–5% of the dry weight (roughly half a cup to one cup per five-pound block). The bran boosts nutrition and speeds colonization. The gypsum helps keep the substrate from clumping too tightly and buffers pH. It's a small addition but genuinely useful.
Moisture is critical and is probably the variable that trips up beginners most often. You're targeting roughly 60–65% moisture content on a wet weight basis. Magic Mushroom Substrate Science also recommends an optimal moisture target of about 60, 65% (wet basis) for hardwood sawdust supplemented blocks, noting that too wet increases bacterial risk and too dry slows colonization targeting roughly 60–65% moisture content on a wet weight basis. In practical terms, when you squeeze a handful of prepared substrate firmly, you should get just a few drops of water, not a stream. If water runs freely, it's too wet and you're inviting bacterial contamination. If the substrate is crumbly and dry, colonization will stall. Mix your dry ingredients first, then add water gradually until you hit that squeeze test. A five-pound dry block typically absorbs around 2 to 2.5 liters of water to reach field capacity.
| Ingredient | Percentage (dry weight) | Notes |
|---|---|---|
| Hardwood sawdust | 75–80% | Oak, beech, alder, maple, or fruit wood |
| Wheat or oat bran | 15–20% | Boosts nitrogen; increases contamination risk if overused |
| Gypsum | 2–5% | Improves texture and pH buffering |
| Water | To 60–65% moisture | Use squeeze test: a few drops only |
Once mixed, pack the substrate into autoclavable polypropylene bags (filter patch bags designed for mushroom cultivation are ideal) or mason jars for smaller test batches. Leave a little headspace, seal or loosely cap, and get it into the pressure cooker. After sterilization, let everything cool to room temperature before inoculating, which usually takes 8–12 hours. Inoculating into a hot substrate will kill your spawn.
Inoculation and incubation
Choosing your spawn
Grain spawn is the most common and practical choice for inoculating sawdust blocks. It colonizes quickly and distributes well throughout the block when you break it up and mix it in. Sawdust spawn works too and is especially useful if you're inoculating logs or outdoor beds, but grain spawn generally gives you faster, more even colonization in bags. For a fully sterilized block, a spawn rate of around 10–15% by weight is a solid starting point, though in very clean conditions with careful technique you can get by with as little as 2% spawn by weight. Higher spawn rates simply mean faster colonization and less window for contamination to take hold, which matters a lot in a home environment that isn't a sterile lab.
Inoculation steps

- Work as cleanly as possible. Wipe down your work surface with isopropyl alcohol, wear gloves, and work near a still-air box or flow hood if you have one.
- Wait until the substrate bag has fully cooled to room temperature (below 25°C) after sterilization.
- Open the bag briefly, add your grain spawn, and seal the bag immediately. Some growers mix the spawn through the bag by kneading it from the outside.
- Label each bag with the species, strain, and date.
- Move bags to your incubation space.
Incubation conditions
During colonization, your blocks need warmth, darkness, and minimal disturbance. Most wood-loving species colonize best between 21–27°C. Shiitake specifically prefers the higher end of that range, around 24–27°C, for mycelial growth. Keep blocks away from direct sunlight and drafts. You don't need to do much during this phase except check periodically for signs of contamination (green, black, or pink patches). Healthy mycelium looks bright white and fluffy, often with a faint mushroomy smell. A foul sour or ammonia smell is a bad sign.
Colonization timelines vary by species and temperature. Oyster mushrooms can colonize a sawdust block in as little as 2–3 weeks. Shiitake takes considerably longer. Expect 35–70 days for the initial spawn run, which is just the white mycelium growing through the block. After that, shiitake blocks need an additional post-ripening phase before they're ready to fruit, which I'll cover in the shiitake section below.
Setting up your fruiting environment
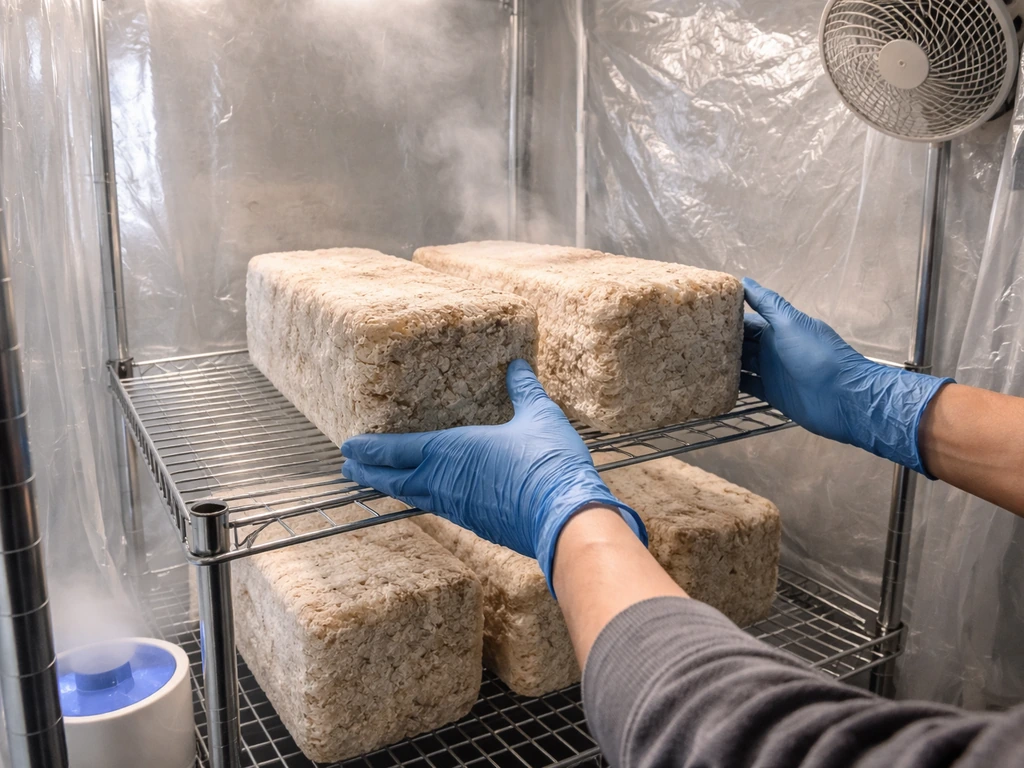
Once your block is fully colonized, it needs a change in conditions to trigger fruiting. The main levers you're controlling are humidity, fresh air exchange, light, and temperature. MycoLogic emphasizes that mushrooms need fresh air exchange because they “breathe” oxygen in and CO2 out, and stagnant or poorly ventilated environments can hurt fruiting. Getting these right is the difference between a block that pins beautifully and one that just sits there.
- Humidity: Aim for 85–95% relative humidity during fruiting. At a small scale, you can achieve this by misting the surface of blocks two to three times daily with a clean spray bottle, placing blocks on a perlite tray that you keep moist, or using a small ultrasonic humidifier in a fruiting chamber. Don't mist the mushrooms themselves directly and aggressively, as standing water on pins can cause abort.
- Fresh air exchange: Mushrooms breathe oxygen and exhale CO2, just like we do. High CO2 causes elongated, thin stems and tiny caps. In practice, this means fanning your fruiting chamber or opening it for a few minutes several times a day. Even a gentle wave of fresh air makes a real difference. A small USB fan on a timer works well for a dedicated fruiting box.
- Light: Mushrooms don't photosynthesize, but they do use light as a directional cue. Indirect ambient room light, or a simple LED on a 12-hour cycle, is enough to encourage well-shaped fruiting bodies.
- Temperature: This varies by species. Oyster mushrooms fruit well between 15–24°C depending on the strain. Shiitake prefers 15–20°C during fruiting. Lion's mane likes it cool, around 16–22°C. Check your specific species and strain.
When pins first appear, back off on direct misting near the pins themselves and focus on maintaining ambient humidity instead. Small pins are fragile and can abort if conditions swing too drastically in either direction.
Growing shiitake on sawdust: what's different and when to expect results
Shiitake is probably the most popular species people want to grow on sawdust, and for good reason. The flavor is excellent, the market value is high, and sawdust blocks are a much faster path to harvest than traditional log inoculation. But shiitake is also one of the more demanding species in terms of patience and timing, especially during incubation and fruiting initiation. I've seen more beginner frustration with shiitake blocks than almost anything else, usually because people try to rush the post-colonization stage.
After the initial spawn run (35–70 days), a shiitake block needs to develop a thick brown outer skin, often called the "popcorn" or "brown film" stage. This is the mycelium consolidating and protecting itself, and it's a necessary step before fruiting can be triggered. This phase can take an additional 30–75 days. Cornell recommends waiting until at least 75% of the block surface has turned brown before attempting to initiate fruiting. Moving the block too early is one of the most common mistakes.
Once the block is fully browned and consolidated, you trigger fruiting through a shock treatment. The most reliable method at home is a cold water soak: submerge the block in cold water (around 10–15°C) for 12–24 hours. This thermal and physical shock signals to the mycelium that conditions have changed and it's time to reproduce. After soaking, drain the block and move it to your fruiting environment at 15–20°C with 85–95% RH and good fresh air exchange. Pins typically appear within 5–10 days after a successful cold shock.
Shiitake blocks are also sensitive to physical disturbance during incubation, so try not to jostle or move them unnecessarily once colonization is underway. Temperature swings during incubation can stress the mycelium and lead to patchy or incomplete colonization. Consistent warmth in the 24–27°C range is your friend during that phase.
| Stage | Duration | Key Conditions |
|---|---|---|
| Spawn run (colonization) | 35–70 days | 24–27°C, dark, undisturbed |
| Post-ripening / browning | 30–75 days | Same temp, allow some light and CO2 variation |
| Fruiting initiation (cold shock) | 12–24 hours | Submerge in 10–15°C cold water |
| Pinning after shock | 5–10 days | 15–20°C, 85–95% RH, fresh air, indirect light |
| Harvest | 5–7 days after pinning | Harvest before caps flatten fully |
Harvest shiitake when the caps are still slightly curled under at the edges. Once they flatten out fully and the veil tears, they're past prime. Twist and pull cleanly at the base, or cut with a clean knife. Clean up any stub material left on the block to prevent contamination between flushes.
Troubleshooting: contamination, stalls, weak yields, and second flushes
Green or black mold on the block
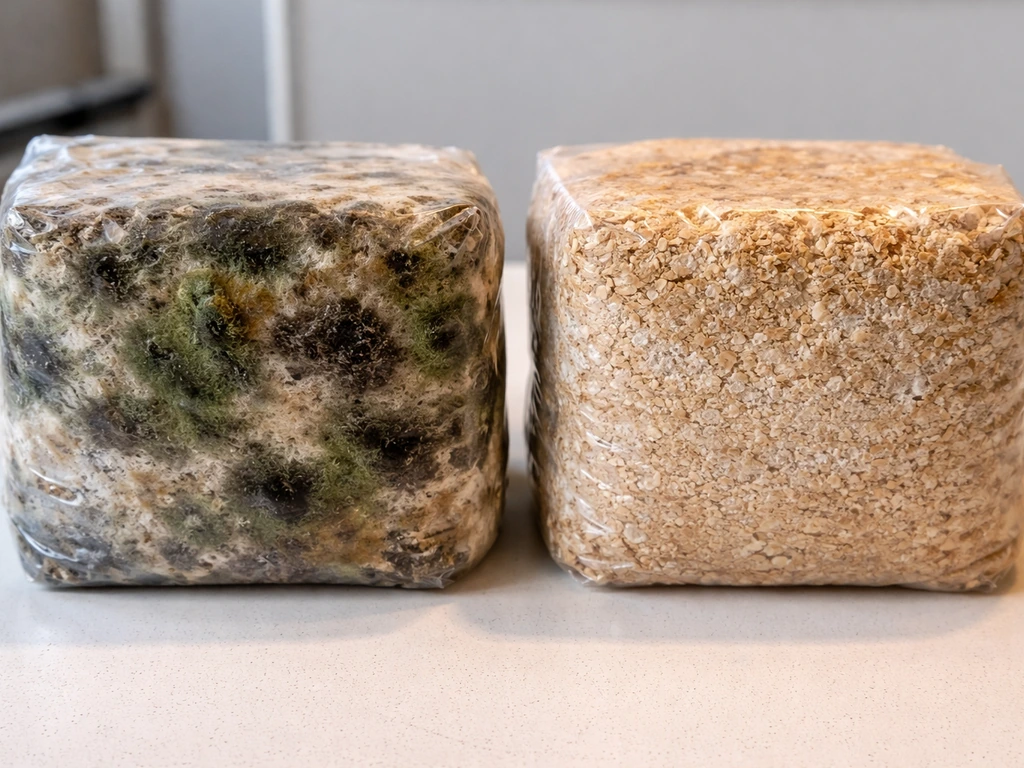
Green mold, usually Trichoderma, is the most common contamination problem in sawdust blocks. It means something went wrong during sterilization or inoculation. Either the block wasn't fully sterilized, the spawn was contaminated, or there was an exposure to mold spores during inoculation. A small green spot that shows up after 50–60% colonization may not kill the block if the mycelium is vigorous enough to outcompete it, but any contamination appearing in the first two weeks usually means the block is a loss. Bag it, remove it from your grow space, and don't open it indoors. Learn from it: tighten up your sterilization time, improve your inoculation environment, and check your spawn source.
Colonization stalls or slows down
If mycelium colonizes the first half of the block and then seems to stop, the two most common culprits are temperature and moisture. Check that your incubation space isn't dropping below 18°C at night. Also feel the block: if it's very hard and dry, the substrate may have lost moisture during sterilization and doesn't have enough water to support continued growth. You can try injecting a small amount of water through a self-healing injection port if your bag has one. If the block is extremely wet and smells sour, the substrate was probably over-saturated and bacterial contamination has moved in.
No pins forming after colonization
For species like oyster, pins should form once you give the block fresh air and humidity. If nothing is happening after two weeks in fruiting conditions, the most likely issues are: CO2 is too high (fan the chamber more aggressively), humidity is too low (check your spray frequency or humidifier), or the temperature is too warm. For shiitake specifically, the block may not be ready yet. Don't try to initiate fruiting until at least 75% of the surface is browned and consolidated.
Weak or aborted pins
Pins that form but then turn yellow and abort before reaching harvest size are usually a humidity or fresh air problem. Either the surface dried out around the pins (mist more gently and more often), or CO2 built up and stressed the developing fruiting bodies. Check that you're fanning or venting your fruiting space at least 2–3 times a day. Leggy stems with tiny caps are a classic CO2 problem. Increase your fresh air exchange and you'll see caps develop more normally on subsequent flushes.
Getting a second (and third) flush
After your first harvest, clean up the surface of the block by removing any stub material, then give the block a rest period of 5–10 days with slightly reduced misting. For shiitake, a second cold water soak can re-initiate the fruiting trigger. Oysters often pin again on their own with just continued humidity and fresh air. Most sawdust blocks will give you 2–4 flushes before they're exhausted, with yields declining each time. The first flush is typically the largest. If you're into growing other species on wood-based substrates, wood chip beds work on a similar principle and can be interesting to explore for outdoor production, as can growing with wood dowels for log-based methods. If you want another low-cost option, you can also learn how to grow mushrooms in wood chips using similar moisture, fresh air, and inoculation principles wood chip beds. If you want to try a log-style approach, you can also learn how to grow mushroom dowels and use them to inoculate wood for similar results wood dowels for log-based methods. Hen of the woods and chicken of the woods are examples of species that can benefit from wood-based setups, though they have their own specific requirements.
Once a block stops producing, it's not waste. Spent sawdust substrate is full of fungal biomass and makes excellent garden compost or mulch. Some growers bury spent shiitake blocks in their garden beds and get a surprise bonus flush when conditions are right.
Your next steps
If you're starting today, here's the most practical path: grab a bag of hardwood fuel pellets, mix your substrate with bran and gypsum, pressure cook it, inoculate with grain spawn using good sanitation, and incubate at 24–27°C. Once you have the basics down, you can fine-tune your approach specifically for how to grow honey mushrooms on similar wood-based substrates. Chicken of the woods (Laetiporus) can be approached the same way, but it has its own spawn, timing, and fruiting requirements to dial in before you expect results. Give it time. Shiitake especially rewards patience. The most common beginner mistake isn't a technique failure, it's not waiting long enough at each stage. Follow the timelines, respond to what you see, and adjust one variable at a time when something isn't working. You'll have your first harvest sooner than you think.
FAQ
Can I use regular sawdust from construction or woodworking projects, or does it need special handling?
Use untreated hardwood only. Avoid any wood with glue, paint, varnish, finishes, or chemical treatments (including plywood or MDF particles). If you source fresh sawdust, sift out large chips, then sterilize or pasteurize and check moisture after sterilization, because “fresh” dust can compact or clump and throw off your field-capacity target.
What’s the difference between pasteurizing and sterilizing sawdust blocks, and when should I choose each?
Pasteurization reduces some competitors but does not eliminate them, so it works best when your formula is low-supplement and your species colonizes fast (commonly oysters). Sterilization aims for a near-zero contamination load and is the safer choice for bran-supplemented shiitake blocks, especially if your workspace is not very clean. If you are unsure, default to sterilization.
How do I tell if my block is at the right moisture level before inoculating?
Do the squeeze test after the substrate cools. You want a firm clump that releases only a few drops when squeezed. If it streams, reduce water next batch or let the hydrated substrate sit briefly (covered) to equalize moisture. If it crumbles with no drops, hydration is too low, and colonization often stalls even if temperatures are perfect.
My substrate bag looks fine, but after inoculation there’s a bad smell. Is the whole batch ruined?
A strong sour, ammonia, or rotten odor usually indicates bacterial contamination and you should assume the block is not recoverable. Do not open the bag indoors. Remove it from the grow area and dispose of it sealed, then review your sterilization timing and how you handled cooled, inoculated bags.
Can I reuse sawdust blocks for more flushes by soaking them longer or rehydrating heavily?
Long soaks usually do more harm than good. For wood-based blocks, most species respond better to short rest and controlled humidity, then a species-specific trigger (shiitake cold shock, oysters typically re-pin with ongoing humidity and fresh air). Over-soaking can cause bacterial blooms or weaken the browned protective layer.
Is 10 to 15% grain spawn always necessary, or can I start with less?
You can start lower (even a few percent) if your technique is very clean and your sterilization is solid, but the trade-off is a bigger risk window for contamination and slower, less uniform colonization. If you are a beginner or you notice variable results batch to batch, stay closer to the higher end so the mycelium establishes dominance sooner.
What should I do if colonization is slow, even though there’s no obvious mold?
First verify incubation temperature does not dip below the species target, especially at night. Next, re-check moisture by feeling the block through the bag once cooled (hard and dry often equals insufficient water content). If you used very high supplementation, consider dialing bran down slightly for the next batch. Avoid repeatedly opening bags to “check” inside.
How do I avoid contamination during inoculation when working at home?
Plan for clean workflow: start with clean surfaces, use fresh gloves, minimize talking and airflow drafts, and keep the inoculation time short. Make sure the substrate is fully cooled before inoculation (hot substrate can kill spawn and slow colonization). Also label and keep questionable batches separate so an early failure does not expose everything else.
Can I fruit a block immediately after it browns, or must I wait for the full consolidation stage?
Wait. For shiitake, attempting fruiting before enough of the surface is browned and consolidated is a common reason for failure. Brown film acts like protection and a readiness signal. If only part of the block is browned, extend incubation until at least the recommended surface coverage is reached, then apply the cold shock trigger.
Why do my shiitake pins form but then stop growing or turn yellow?
Most aborted shiitake pins are caused by humidity drops near the pin sites or excessive CO2 (not enough fresh air). Increase gentle humidity stability rather than blasting mist directly at pins, and ensure you vent at a consistent rhythm (often multiple times daily). Leggy growth with small caps also points to CO2 being too high.
Do I need to open the bag during colonization or fruiting?
During colonization, keep bags sealed or with appropriate breathable filter material, do not open them. For fruiting, some setups require changing from bag incubation conditions to a fruiting chamber with controlled fresh air exchange and humidity. If you open sealed bags, you introduce contaminants and can disrupt the microclimate the mycelium established.
When is it safe to remove and discard a contaminated block?
If you see contamination early (especially within the first couple of weeks), treat it as lost. Even if a small green spot appears later, assess rapidly and remove the block if contamination expands or smell turns foul. Never keep a visibly contaminated block in the same fruiting space as healthy ones, because spores can spread.
Can spent sawdust blocks be composted indoors, or do they need curing?
You can compost them outdoors or in a sealed compost system. If you bury spent shiitake blocks in garden beds, do it in shaded soil and keep them covered to reduce spore spread. The material is nutrient-rich, but do not expect consistent “bonus flushes” on a tight schedule, since fruiting depends on moisture and temperature swings.