Growing mushrooms from spores is absolutely doable at home, but it takes more steps than most guides let on. The short answer: spores germinate into mycelium on agar or in liquid culture, that mycelium gets transferred to sterilized grain to make spawn, and that spawn colonizes a final substrate before producing mushrooms. That full chain, spore to fork, usually takes anywhere from 8 to 20 weeks depending on the species and how smoothly things go. This guide walks you through every stage, including how to make your own grain spawn, what conditions button mushrooms and shiitake actually need, and what to do when things go sideways.
How to Grow Mushrooms From Spores: Step-by-Step Guide

Marcus Holloway
19 Apr 2026
Spores vs. spawn vs. swabs: know what you're working with
These terms get mixed up constantly, and mixing them up will cost you weeks of work. Here is exactly what each one means and why it matters.
- Spores: The reproductive units of a mushroom, roughly equivalent to seeds. They are microscopic, and two compatible spores must fuse before mycelial growth begins. Starting from spores is the slowest and most contamination-prone route, but it is the cheapest way to work with genetics.
- Spore syringes: A water suspension of spores drawn into a syringe, used to inoculate agar or grain directly. Easier to work with than dry spores but still requires germination before you have any living culture.
- Spore swabs or spore prints: A swab rubbed across a mushroom gill surface, or a paper print made by placing a cap gill-side down. Used similarly to syringes for inoculating agar. Spore prints can be stored dry for months or even years.
- Liquid culture (LC): Already-germinated mycelium suspended in a nutrient solution. Much faster to colonize grain than raw spores and far less contamination risk. If you can get LC instead of spores, start there.
- Spawn: Mycelium that has fully colonized a carrier material, usually sterilized grain (grain spawn), sawdust, or wooden dowels (plug spawn). This is the inoculant you add to your final substrate to start a grow. Buying ready-made spawn skips the agar/LC stage entirely.
- Dried mushrooms or dried caps: Whole or sliced fruiting bodies that have been dehydrated. These are not a reliable starting point for growing (more on this below).
The cleanest path for a home grower: spores or a swab onto agar, a clean mycelial transfer to a second agar plate, then inoculate grain to make spawn, then use that spawn on your final substrate. If you skip agar entirely and go straight from a spore syringe to grain, contamination rates go up sharply because you are introducing water and any hitchhikers directly into a nutrient-rich environment with no way to visually screen for problems first.
What you actually need to get started
You do not need a lab. But you do need a few key things, and cutting corners on sterile technique is the single biggest reason first grows fail.
Sourcing spores and swabs
For edible species like shiitake, oyster, or lion's mane, spore syringes and liquid cultures are sold legally by mushroom cultivation suppliers online. For button mushrooms (Agaricus bisporus) specifically, starting from spores is genuinely difficult because the species is self-incompatible and needs compatible spore pairs to fuse. Most home growers work with Agaricus bisporus by purchasing grain spawn or tissue cultures directly rather than trying to germinate spores. Shiitake is more forgiving and works well from spore syringes or swabs. If you want to make a spore print yourself, place a fresh mushroom cap gill-side down on paper overnight, then store the print in a sealed bag in the fridge. Working from your own spore prints from store-bought shiitake caps is a legitimate DIY option, though results vary.
Equipment checklist
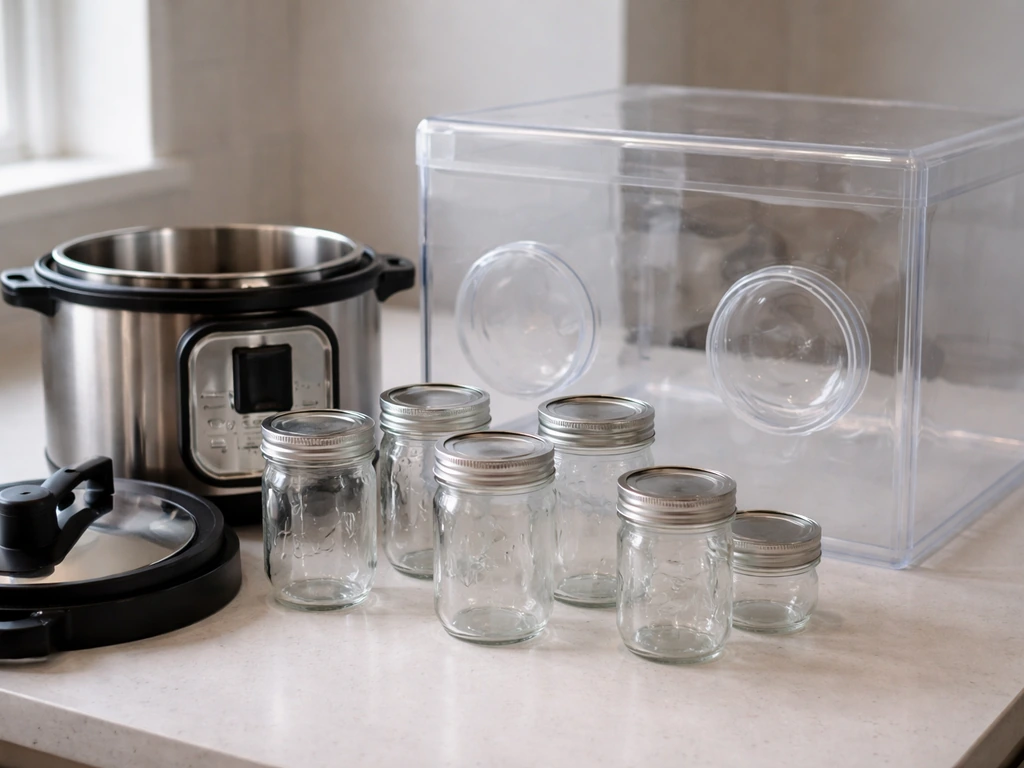
- Pressure cooker or Instant Pot (at least 6-quart capacity): non-negotiable for sterilizing grain and agar
- Mason jars (pint and quart sizes)
- Still air box (SAB): a clear storage tote with arm holes cut in the side, used to do inoculation work in a low-airflow environment. An affordable and genuinely effective alternative to a laminar flow hood when your technique is clean
- Agar powder, malt extract or potato dextrose, and yeast extract for making plates
- Petri dishes (reusable glass or disposable plastic)
- Isopropyl alcohol (70%), gloves, and a still flame or butane torch for sterilizing your scalpel or inoculation loop
- Grain for spawn (rye berries, millet, wheat, or corn kernels)
- Polyfill or tyvek for jar lids (to allow gas exchange while keeping contaminants out)
- Substrate materials specific to your species (composted manure/casing for buttons, hardwood sawdust for shiitake)
On the still air box versus flow hood debate: a still air box is enough when your technique is solid. A cheap flow hood will not save you from poor sterile habits, and a good flow hood costs hundreds of dollars. Start with the SAB, focus on technique, and upgrade later if you decide to scale up.
Getting spores to germinate: agar work, step by step
This is the stage most guides skip over, and it is where most beginners lose weeks of work to contamination. Take it slow here and everything downstream gets easier.
Make your agar plates
Malt extract agar (MEA) is a reliable all-purpose choice for germinating mushroom spores and supporting strong mycelial growth. Potato dextrose agar (PDA) and potato dextrose yeast extract agar (PDYA) are also widely used. For PDYA, you combine potato dextrose agar base, yeast extract, and agar powder in water, bring to 1 liter total volume, then sterilize. Some growers add 1 ml of lactic acid just before pouring plates (creating what is called Acide PDYA) to suppress bacterial contamination while still allowing fungal growth. To sterilize your prepared agar, pressure cook it at 121°C (250°F) at 15 psi. Quart jars need about 90 minutes; pint jars need about 60 minutes. Let the agar cool to roughly 50°C before pouring into petri dishes inside your still air box, then let plates solidify with the lid slightly cracked to prevent condensation.
Inoculate your plates
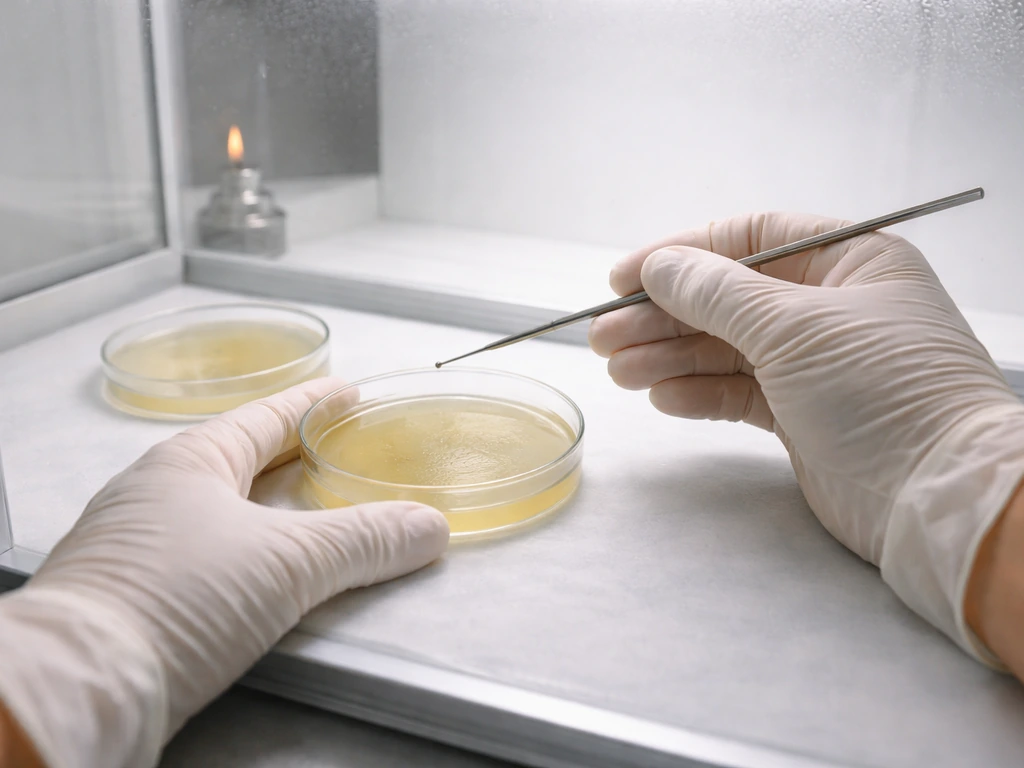
- Wipe your still air box thoroughly with 70% isopropyl alcohol. Let it settle for 5 minutes before working.
- Flame-sterilize your scalpel or inoculation loop until glowing, then let it cool for 10 seconds.
- For a spore syringe: flame the needle tip, let it cool, then dispense 2 to 3 small drops across the agar surface.
- For a spore swab: lightly brush the swab across the agar in a zigzag pattern.
- For a spore print: use a sterilized scalpel to scrape a small amount of print material onto the agar.
- Seal plates with parafilm or tape, label them with species and date, and incubate at the species-appropriate temperature (22 to 26°C for most species including shiitake).
Germination and clean transfers
Within 5 to 14 days you should see white, fluffy mycelial growth spreading from your inoculation points. This is where the agar process pays off: you can see contamination (green, black, or pink patches) clearly and discard those plates before it spreads. Once you have a clean-looking sector of growth, use your sterilized scalpel to cut a small wedge of agar from the leading edge of the mycelium (the most vigorous, healthy-looking point) and transfer it to a fresh plate. This is called making a clean transfer, and doing it once or twice gives you a pure, uncontaminated culture to work with. That clean culture is what you will use to inoculate grain.
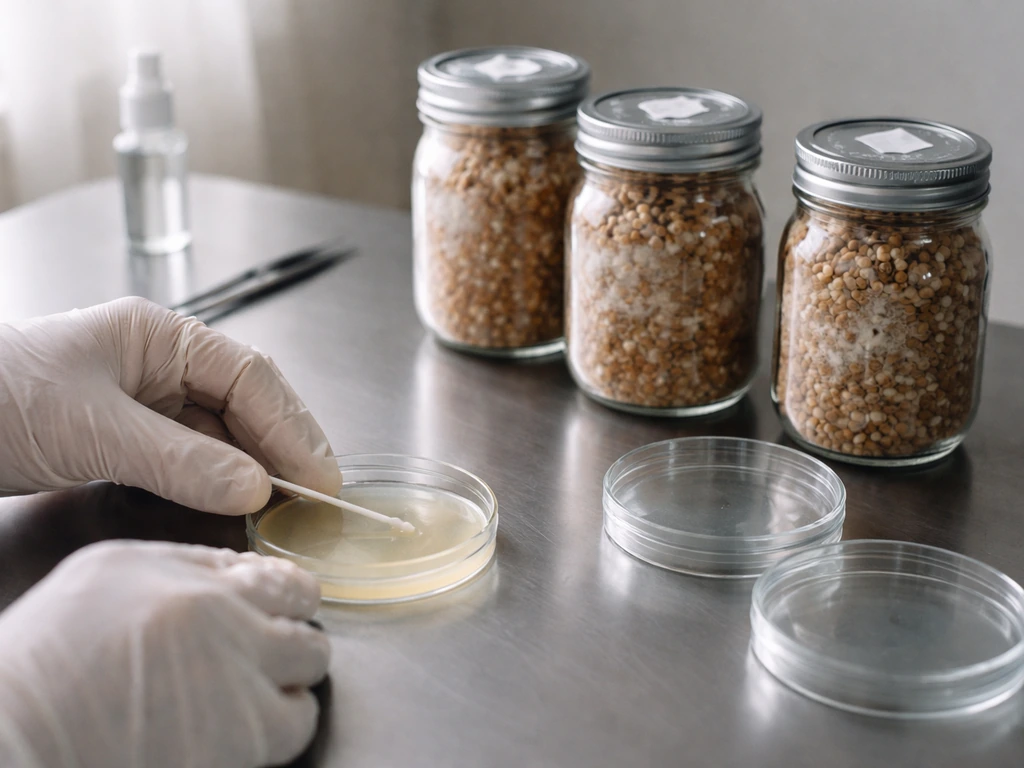
Making grain spawn at home
Grain spawn is sterilized grain that has been colonized by mycelium. It is the form of mushroom culture you will add to your final substrate to start your grow. Making it yourself from your agar cultures is satisfying and cost-effective once you have the basics down.
Preparing and sterilizing grain

Rye berries are the most popular choice among home growers because of their surface area and nutritional profile, but millet, wheat, corn kernels, and popcorn all work well. Here is the process: simmer your grain in water for 15 to 20 minutes until just hydrated (not split), drain well, and spread on a towel to surface-dry for 30 to 60 minutes. You want grain that is hydrated through but not wet on the surface, because surface moisture dramatically increases contamination risk. Load into mason jars to about two-thirds full, cap with a breathable lid (polyfill stuffed into the jar top works), and pressure cook at 250°F (121°C) at 15 psi for approximately 120 minutes for quart jars. Let jars cool completely, ideally overnight, before inoculating.
Inoculating grain from agar
Inside your still air box, flame your scalpel, let it cool, then cut several small pieces of colonized agar from your clean culture plate and drop them directly into the cooled grain jar. One petri dish can typically inoculate 4 to 6 quart jars. Seal the jar, give it a gentle shake to distribute the agar pieces, and incubate. Shake jars every 3 to 5 days as white growth appears to break up clumps and speed colonization. Fully colonized grain jars look white throughout with no green, black, or pink patches. Expect 2 to 4 weeks for full colonization depending on species and temperature.
Buying spawn instead of making it
If agar work feels like too much for a first grow, buying ready-made grain spawn from a reputable supplier is completely legitimate. You skip the spore germination and agar stages entirely and go straight to loading spawn into your final substrate. For button mushrooms especially, this is the recommended starting point because working with Agaricus bisporus from raw spores requires compatible spore pairs and is genuinely more complex. Purchased shiitake grain spawn is also widely available and reliable.
Species-specific grow plans: button/portobello and shiitake
Button mushrooms and portobello mushrooms are the same species (Agaricus bisporus) at different maturity stages. The difference is harvest timing, not cultivation method. Cremini mushrooms are the same thing too. The grow plan is identical; you just pick earlier for buttons and let them go longer for portobellos.
Button and portobello (Agaricus bisporus)
Agaricus bisporus is the most commercially grown mushroom in the world, but it is also one of the trickier species for home growers because it requires a casing layer and specific fruiting triggers. Here is the workflow:
- Substrate: Composted horse manure or a commercial mushroom compost blend is the standard base. Pasteurize substrate at around 65 to 70°C for 1 to 2 hours rather than sterilizing it, since the compost microbiome is actually part of the process.
- Spawning: Mix grain spawn into cooled substrate at roughly 10 to 15% spawn by volume. Pack into trays or containers about 15 to 20 cm deep.
- Colonization (spawn run): Incubate at 24 to 25°C with high CO2 tolerance during this phase. Keep humidity around 85 to 90%. The substrate should look white and webby within 2 to 3 weeks.
- Casing layer: Once the substrate is fully colonized, apply a 2 to 3 cm casing layer of peat moss mixed with hydrated lime or sterilized garden soil. This layer is critical: it hosts specific bacteria that process volatiles and help trigger pinning.
- Fruiting trigger: Drop temperature to 15 to 18°C and increase fresh air exchange significantly, bringing CO2 down from the thousands of parts per million during colonization to roughly 800 to 1,500 ppm. This temperature drop combined with reduced CO2 is what triggers pin formation.
- Harvest: Harvest buttons before the veil under the cap breaks. Portobello harvest is when the veil has broken and the cap is fully open but not yet releasing dark spores. Agaricus bisporus is harvested by maturity, not size.
Shiitake (Lentinula edodes)
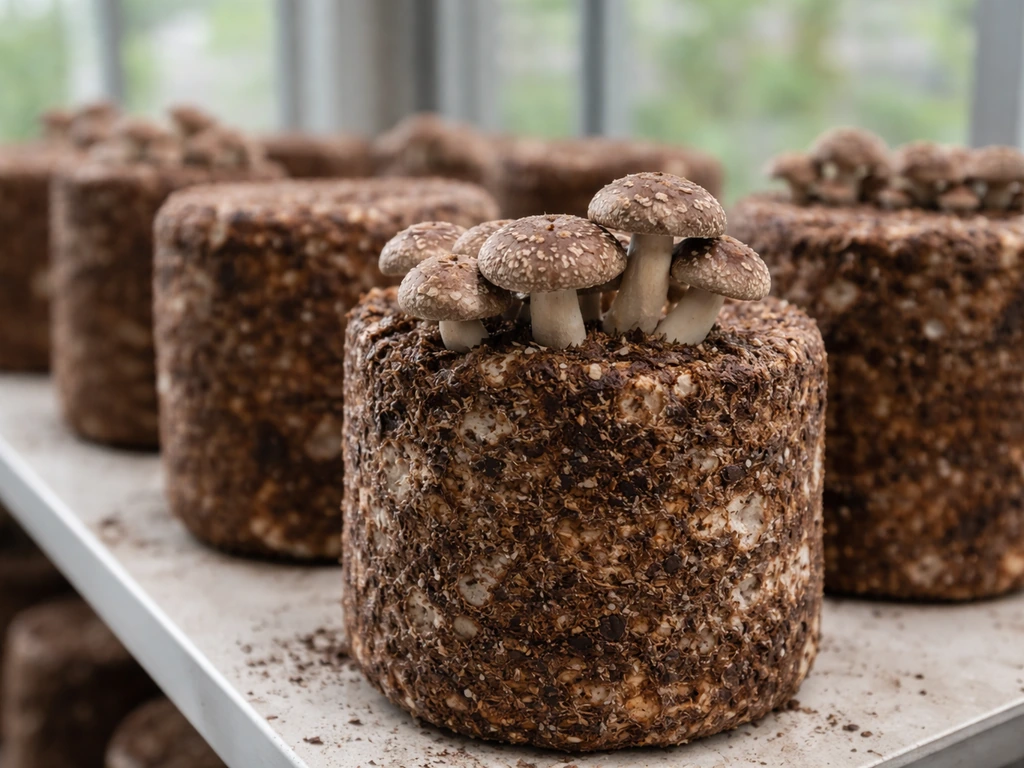
Shiitake is significantly more beginner-friendly than button mushrooms and is one of the best species to try if you are working from spores for the first time. It grows on hardwood, is forgiving of slightly imperfect conditions, and the fruiting triggers are manageable at home.
- Substrate: Hardwood sawdust (oak, alder, or beech work well) supplemented with wheat bran or rice bran at 10 to 20% by weight. Sterilize at 121°C at 15 psi for 2 hours, or pasteurize at high temperatures if using field capacity hardwood logs.
- Inoculation: Add grain spawn at 10 to 20% of substrate weight once cooled. Mix thoroughly and pack into heat-treated grow bags or wide-mouth jars.
- Colonization (spawn run): Incubate at 22 to 26°C in the dark or with low diffuse light. Full colonization of a standard 5 lb bag takes 6 to 12 weeks. Brown patchy discoloration across the surface (called sectoring or browning) is normal and expected for shiitake; it indicates the block is ready for fruiting.
- Fruiting trigger: Shiitake responds strongly to thermal shock. Soak fully colonized blocks in cold water (around 10 to 15°C) for 8 to 16 hours, or expose to a 5 to 7°C day-to-night temperature swing. Then move to fruiting conditions at 10 to 20°C (54 to 64°F) with 85 to 95% relative humidity.
- Fresh air and CO2 management: Shiitake fruiting requires good fresh air exchange. Elevated CO2 above roughly 1,000 ppm causes long-stemmed, small-capped mushrooms or premature veil opening. Fan the fruiting area or open your grow tent/box at least twice daily.
- Harvest: Harvest shiitake just as the veil begins to break but before it tears fully open. At room temperature, pins to harvest typically takes 5 to 10 days after initiation.
| Parameter | Button / Portobello (A. bisporus) | Shiitake (L. edodes) |
|---|---|---|
| Colonization temp | 24–25°C | 22–26°C |
| Fruiting temp | 15–18°C | 10–20°C (54–64°F) |
| Fruiting humidity | 85–90% | 85–95% |
| Fruiting trigger | Temp drop + CO2 reduction + casing bacteria | Cold soak or 5–7°C thermal swing |
| Substrate | Composted manure + casing layer | Hardwood sawdust + bran |
| Difficulty for home growers | Moderate to high | Beginner to intermediate |
| Spawn run time | 2–3 weeks | 6–12 weeks |
Can you really grow mushrooms from dried mushrooms or dried caps?
This comes up a lot and the honest answer is: usually no, not reliably. The heat and dehydration involved in commercially drying mushrooms kills the mycelium and renders spores non-viable in most cases. If you crack open a dried shiitake from a grocery bag and try to use it as a spore source or culture, you will almost certainly get nothing but contamination.
The one partial exception is using a very fresh store-bought mushroom (one that has not been heat-dried but is simply past-peak fresh) for tissue cloning. You can slice into the stem or cap interior under sterile conditions and place a small piece onto agar, where it may grow out as mycelium. This works best with mushrooms that are fresh, not previously frozen, and not washed. Dried caps specifically, meaning mushrooms that have gone through a dehydrator or commercial drying process, are not a usable source of living culture or spores. If you see advice online suggesting you boil or steep dried mushrooms to extract spores, skip it. Use a spore syringe, a spore print from a fresh cap, or purchase spawn.
Troubleshooting: what goes wrong and how to fix it
Contamination (the big one)
Green mold (Trichoderma) is the most common contaminant and it moves fast. If you see green on an agar plate, discard it in a sealed bag immediately and do not open it indoors. On grain jars, green or black patches mean the whole jar goes in the trash. The fix is almost always improving your sterile technique: slower movements in the still air box, longer alcohol contact time on surfaces, cooling your scalpel longer before touching culture, and working in a less dusty environment. The CDC notes that 70% alcohol (including 70% isopropyl alcohol) is used for disinfection because it is effective for cleansing and disinfection blank" rel="noopener noreferrer">70% alcohol is used for disinfection. The CDC-hosted WHO document advises that if alcohol is needed for cleansing hands or surfaces, use 70% isopropyl or ethyl alcohol in the context described there blank" rel="noopener noreferrer">longer alcohol contact time on surfaces. If you are getting contamination on every single attempt, try acidifying your agar (the lactic acid approach for PDYA plates) and make sure your grain is surface-dry before jarring.
Slow or failed germination on agar
If nothing is growing after 14 days, check your incubation temperature first (22 to 26°C is the sweet spot for spore germination in most edible species). Ferns are a different plant group than edible mushrooms, but learning the spore germination basics still helps you figure out how to grow a fern from spores. Ferns are a different plant group than edible mushrooms, but learning the spore germination basics still helps you figure out how to grow a fern from spores how to grow maidenhair fern from spores. Cold plates are the most common reason for slow germination. Also consider your spore source: old spore prints lose viability over time, and syringes that have been sitting unrefrigerated for months may have degraded. If you see zero growth at all, the spores may simply be non-viable. Fresh is always better.
Grain jars not colonizing or taking forever
Grain that is too wet is the primary cause of sluggish colonization and contamination on grain jars. Surface moisture creates pockets where bacteria thrive faster than mycelium can. If jars feel very heavy and you see water pooling at the bottom, that grain was not dried enough before sterilization. For future batches, extend your surface-drying time after boiling. Also make sure your pressure cooker reached full pressure and held it for the full duration. Under-sterilized grain is not actually sterile and will fail.
Pins not forming or fruiting stalling
The most common cause of pinning failure is insufficient environmental change between colonization and fruiting. For button mushrooms, you need a genuine temperature drop (down to 15 to 18°C) and a real reduction in CO2. Simply moving a tray from one warm spot to another warm spot will not trigger fruiting. For shiitake, if cold-shocking did not trigger pins, try a second cold soak or increase the temperature differential. High CO2 environments produce long, leggy stems and small caps rather than normal fruiting bodies. Increase fresh air exchange before assuming something else is wrong.
Low yields
Low first-flush yields often come down to inoculation rate (too little spawn), poor substrate nutrition, or humidity dropping too low during pinning. For shiitake blocks, maintaining 85 to 95% relative humidity during fruiting is critical and usually requires either a humidity tent, regular misting, or a humidity controller if you are using a grow tent. For button mushrooms, a thin or improperly prepared casing layer is one of the most frequent reasons for small flushes. After a first flush, allow the substrate to rest for 1 to 2 weeks, rehydrate if needed, and it should produce a second and sometimes third flush with diminishing returns.
Your next steps after the first grow
If your first attempt produced mushrooms, even a small amount, that is a genuine success. The learning curve is real but it flattens quickly. From here, consider expanding your agar work to maintain a living culture library in the fridge (wedges of colonized agar in sealed petri dishes stay viable for months), experimenting with liquid culture to speed up grain inoculation, and trying additional species. From here, consider expanding your agar work to maintain a living culture library in the fridge (wedges of colonized agar in sealed petri dishes stay viable for months), experimenting with liquid culture to speed up grain inoculation, and trying additional species how to grow ostrich fern from spores. If you have been working with shiitake from spore prints, growing mushrooms from spore prints deserves a deeper dive since print-to-culture technique has its own nuances. If you want to apply the same idea to plants, use this article alongside a dedicated guide for how to grow a fern from spores. This article shows the print-to-culture steps and how to avoid contamination so you can reliably grow mushrooms from spore prints growing mushrooms from spore prints. And if you went straight to grain from a spore syringe this first time, moving to an agar-first workflow on your next grow will make a noticeable difference in contamination rates and culture quality. If you want to improve your results when using a spore syringe, learn the steps for how to grow mushroom spores from syringe before you start inoculating. If you want to push into a different (and more challenging) species, the same spore-to-agar thinking carries over to how to grow staghorns from spores.
FAQ
How do I tell if my spores are actually viable before I waste weeks on incubation?
Do a quick checkpoint by inoculating 2 to 3 agar plates from the same spore source side by side, then compare growth timing. If you get zero mycelium on all plates after about 14 days (at typical 22 to 26°C), assume low viability and remake with a fresher print or a syringe that’s been stored properly in the fridge.
Why do I sometimes get bacterial contamination even when my agar looks clean at first?
Bacteria often show up after the fungal sector begins spreading, especially if plates stayed too warm for too long or lids were left cracked too often. Work faster once plates are opened, keep incubation temperature stable, and if you see faint signs, transfer from the leading edge to a fresh plate again instead of trying to “save” the original.
Can I reuse grain jars or grain that partially colonized after a contamination-free run?
It’s risky. If a jar was fully colonized and never showed contamination, you can reuse the remaining portion of that same jar as spawn, but do not mix it with new uncolonized grain and do not try to “save” jars that ever had green, black, or pink patches. Any suspect jar should be discarded because hidden contamination can lag behind visible symptoms.
What spawn-to-substrate ratio should I use when my yield is low even though colonization succeeded?
Low yields often come from under-inoculation. A practical way to troubleshoot is to increase spawn percentage for your next attempt (many growers target a higher spawn rate when running from spores and smaller or slower-colonizing cultures). If you tell me your substrate type and volume, I can suggest a starting ratio range.
How do I reduce the chance of contamination when cutting agar wedges for grain inoculation?
Minimize time that cultures and jars are open. Flame the scalpel, let it cool at least a few seconds before touching agar, and cut smaller wedges from a healthy front rather than scraping deep into older, slower growth. Also avoid “hovering” over the jars in still air, keep your hands steady, and work with jars lined up so you complete one jar at a time.
Is it okay to shake grain jars right away after inoculation?
Usually wait until you see early mycelial activity, then shake gently to break up clumps. Shaking immediately can spread agar pieces unevenly and sometimes increases the chance of localized wet spots or uneven colonization, especially if grain still feels slightly moist.
What should I do if colonization is slow, but the jar is not showing visible contamination?
First verify your incubation temperature is in the right band (around 22 to 26°C for many edible species). Then check for surface moisture issues. If jars feel heavy with pooled water, your previous batch likely had too much surface moisture. For the current batch, keep conditions stable and avoid repeated opening, because every disturbance can introduce hitchhikers.
Why do my pins form but the mushrooms later look deformed or stop growing?
A common cause is unstable fresh air exchange or CO2 lingering during the pinning-to-growth transition. If CO2 stays high, you can get leggy growth, small caps, or stalled development. Increase fresh air gradually, then monitor humidity so you are not drying the surface while trying to fix airflow.
How do I prevent condensation in my grow setup during early fruiting?
Condensation often drips onto pin clusters, increasing surface wetness and encouraging bacterial blotch or deformities. Use a humidity source that doesn’t oversaturate the air, aim misting at the walls rather than directly blasting the substrate, and manage airflow so the surface stays lightly moist but not dripping.
Can I store a clean agar culture and how long will it last?
Yes. Keep wedges in sealed petri dishes in the fridge and refresh by transferring to fresh agar if you notice slowed growth or thinning of the mycelial sector. In general, fridge storage can keep cultures viable for months, but the longer you wait, the more you risk gradual performance decline or subtle contamination.
What’s the safest way to handle contaminated plates or jars after discarding them?
Seal them before disposal, then treat them as contaminated waste. If you suspect a plate or jar has been producing fast-spreading mold (like green Trichoderma), do not open it later “to check” because spores can disperse indoors. Clean your workspace after discarding, and don’t reuse tools that touched contaminated material without proper sterilization.
If I want to start from a spore print, how do I avoid “false negatives” from handling the print poorly?
Spore prints lose viability over time and also get contaminated if they are exposed to humidity or dust. Use a fresh, dry print, handle it minimally, and store it sealed in the fridge if you are not using it immediately. When you prepare plates, inoculate promptly so you are actually testing viability rather than degradation.
Should I switch from spores to tissue or from spores to liquid culture if I’m struggling with consistency?
If your main problem is contamination and variability, liquid culture can speed inoculation but it still depends on having a clean starting isolate, so it will not fix a bad culture. Tissue cloning can be useful for getting a working culture faster, but it changes your starting point away from true spore genetics. Many growers stabilize results by doing one more clean transfer on agar first, then only after consistency improves do they expand into liquid or larger spawn workflows.