You can go from a spore syringe to a successful mushroom harvest at home by inoculating a sterile substrate, incubating it in a warm dark space until the mycelium fully colonizes, then moving it into fruiting conditions with the right humidity and fresh air. Ostrich ferns have a different growing setup than many common edible mushrooms, but you can still follow a spore-based approach with the right sterile technique and moisture control how to grow ostrich fern from spores. The whole process takes anywhere from 3 to 10 weeks depending on the species and your environmental controls. Do it with clean technique and a basic understanding of what healthy growth looks like, and you'll be harvesting your own mushrooms without a lot of expensive gear.
How to Grow Mushroom Spores From a Syringe Step by Step

What you actually need before you start
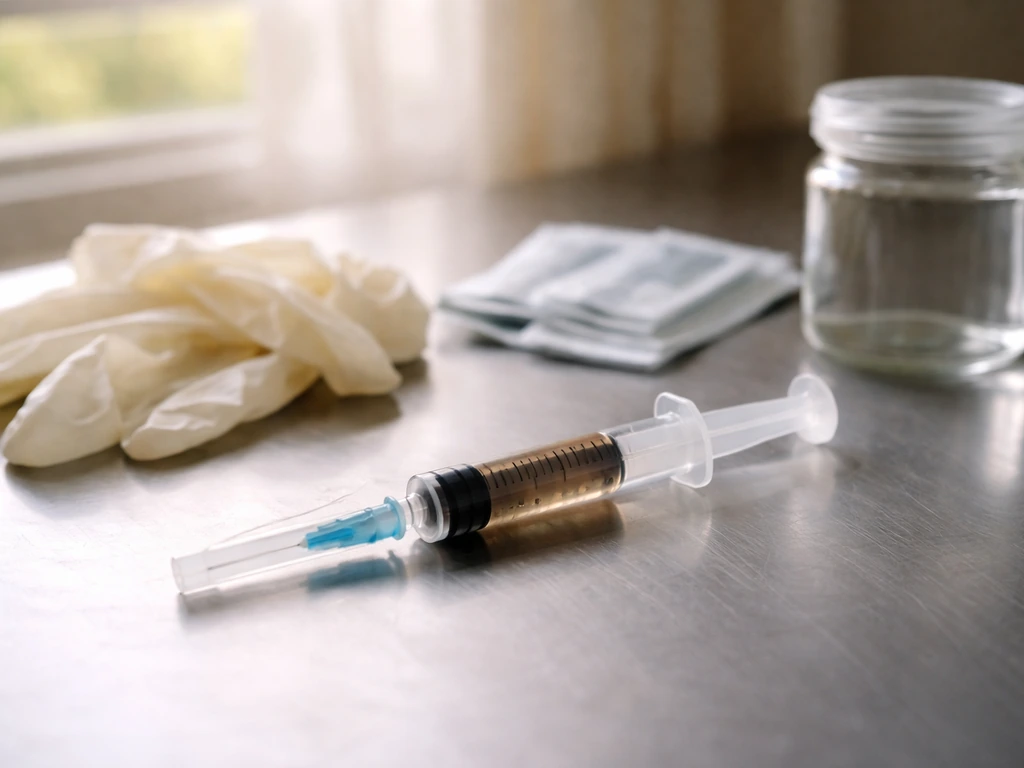
A spore syringe is a liquid suspension of mushroom spores in sterile water, usually 10–20ml, sold or made by collectors. It's the starting point, but you need a few other things in place before you crack it open.
Core supplies
- Spore syringe from a reputable supplier (stored in the fridge until use)
- Substrate: grain spawn bags or jars (rye, wheat berries, oats, or brown rice flour/vermiculite for smaller batches) for the inoculation stage
- 70% isopropyl alcohol and alcohol wipes
- Nitrile gloves and a face mask
- A lighter or alcohol lamp to flame-sterilize the needle
- A still air box (SAB) or laminar flow hood
- Micropore tape or parafilm to reseal any needle holes
- Pressure cooker for sterilizing grain jars or bags (15 PSI for 90 minutes is a reliable baseline)
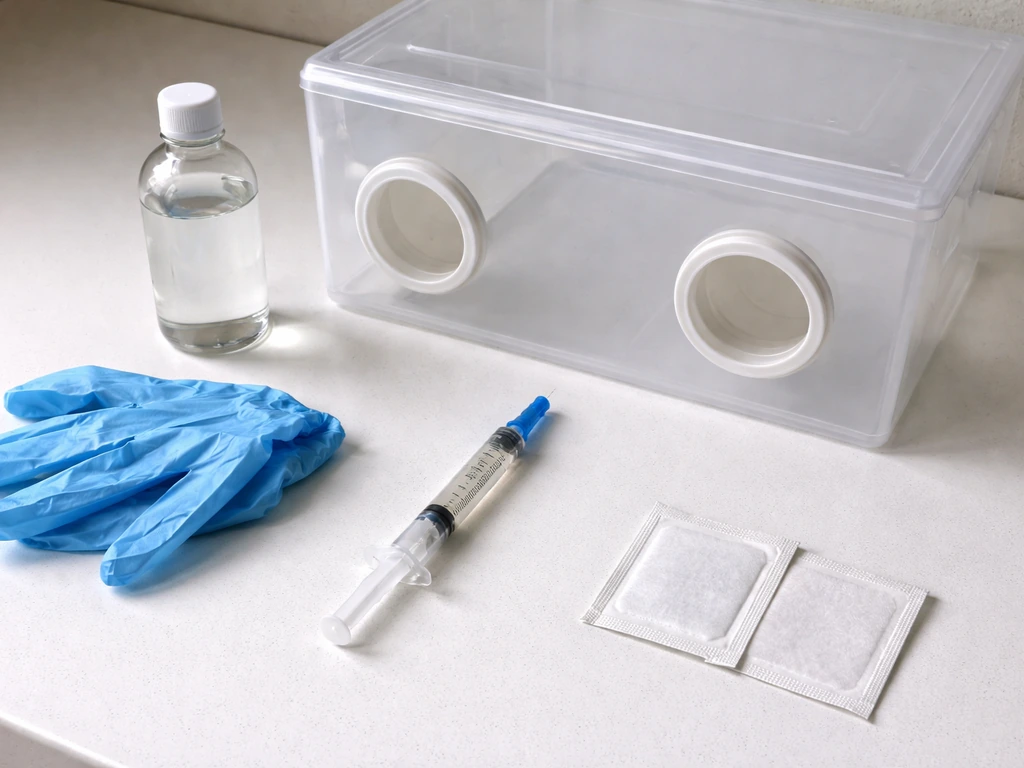
Nice to have but not essential

- Agar plates or slants (for isolating cleaner genetics before inoculating grain)
- Digital thermometer and hygrometer
- Seedling heat mat with a thermostat for consistent incubation temps
- Martha tent or monotub for fruiting
If you're just starting out, skip the agar and work directly from syringe to grain or to a PF tek jar. Agar is a powerful tool for cleaning up genetics and troubleshooting slow growth, but it adds a learning curve you don't need on your first run. Spore syringes are more forgiving than people think when your sterile technique is solid.
Picking your inoculation approach before you open the syringe
There are a few ways to use a spore syringe, and picking the right one for your situation makes a real difference in success rate. The two main routes are inoculating a bulk grain substrate directly (faster path to colonization, slightly higher contamination risk) or inoculating a small PF tek jar first to build a cleaner, more vigorous mycelium cake before going to bulk (slower but more forgiving for beginners).
| Method | Best for | Colonization time | Contamination risk | Yield potential |
|---|---|---|---|---|
| PF Tek (BRF/vermiculite jars) | Beginners, small batches | 2–4 weeks | Low | Moderate |
| Direct grain inoculation | Experienced growers, larger batches | 1–3 weeks | Moderate | High |
| Agar then grain | Genetics work, contamination-prone species | 3–6 weeks total | Very low | High |
For most people reading this, direct grain inoculation is the sweet spot once you've done a run or two. For a first-ever grow, PF tek with half-pint mason jars is the easiest place to start because the substrate is forgiving and the jars are easy to monitor. Whichever route you choose, the inoculation steps themselves are the same.
Step-by-step: inoculating with your spore syringe
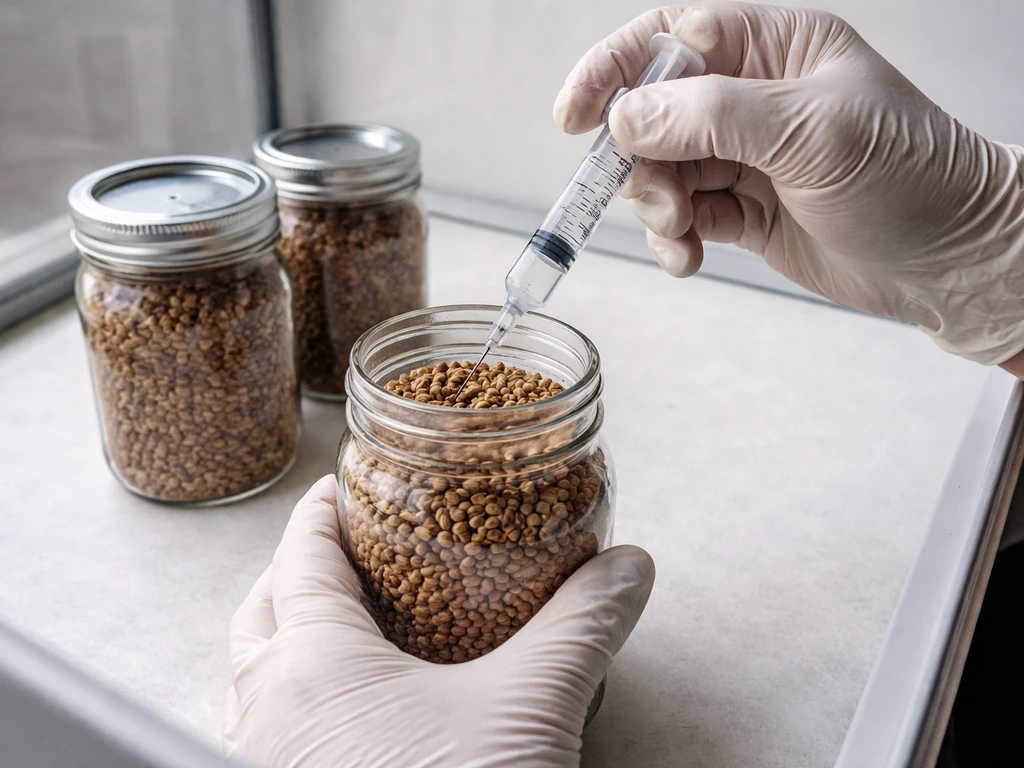
This is the step where contamination most often enters, and almost every problem I've seen traced back here. Work slowly and deliberately.
- Wipe down your still air box inside and out with 70% isopropyl alcohol. Let it sit undisturbed for 5–10 minutes so any airborne particles have time to settle before you put your hands in. Do the same to your work surface.
- Put on nitrile gloves and a face mask. Wipe the gloves down with 70% IPA before working.
- Shake the spore syringe vigorously for 30–60 seconds to distribute the spores evenly throughout the water.
- Remove the needle cap. Heat the needle tip over a flame until it glows red hot, then let it cool for 10–15 seconds. Never touch the needle after this point.
- If using a grain bag with an injection port: wipe the port with an alcohol wipe, let it dry, then push the needle through and inject 1–2ml per inoculation point. Inject at multiple points (usually 4) spread around the bag to speed colonization.
- If using a mason jar with a self-healing injection port or polyfill lid: inject through the port after wiping with alcohol. Aim for 1–2ml per jar.
- After each jar or bag, re-flame the needle before moving to the next one.
- Seal any needle holes in bag ports with micropore tape. Label each bag or jar with the species and date.
- Move jars or bags to your incubation space immediately. Minimize the time anything stays open on the bench.
One thing I always stress: do not rush the flame cooling step. Injecting with a hot needle kills spores and can crack glass. Give it the full 10–15 seconds. And if you're inoculating more than one substrate with the same syringe, re-flame between every single transfer, no exceptions.
Incubation: what to watch for and when
After inoculation, the goal is keeping your substrate warm and dark while the mycelium gets established. Most common edible species (oysters, shiitake, lion's mane, many others) colonize best between 70°F and 80°F (21°C to 27°C). Keep jars or bags away from direct light and make sure there are no major temperature swings.
What you should see and when
- Days 3–7: First signs of white, wispy growth at the inoculation points. This is the mycelium beginning to colonize from the spores.
- Days 7–14: Growth extends outward and starts looking denser and more structured. Healthy mycelium is bright white, sometimes with slight rope-like cords.
- Days 14–28 (or longer for some species): Full colonization, where white covers the entire substrate. At this point, you can move to fruiting conditions.
- Aerial mycelium (fluffy, raised white fuzz) is normal and not a contamination sign. It often appears on the surface of PF tek cakes.
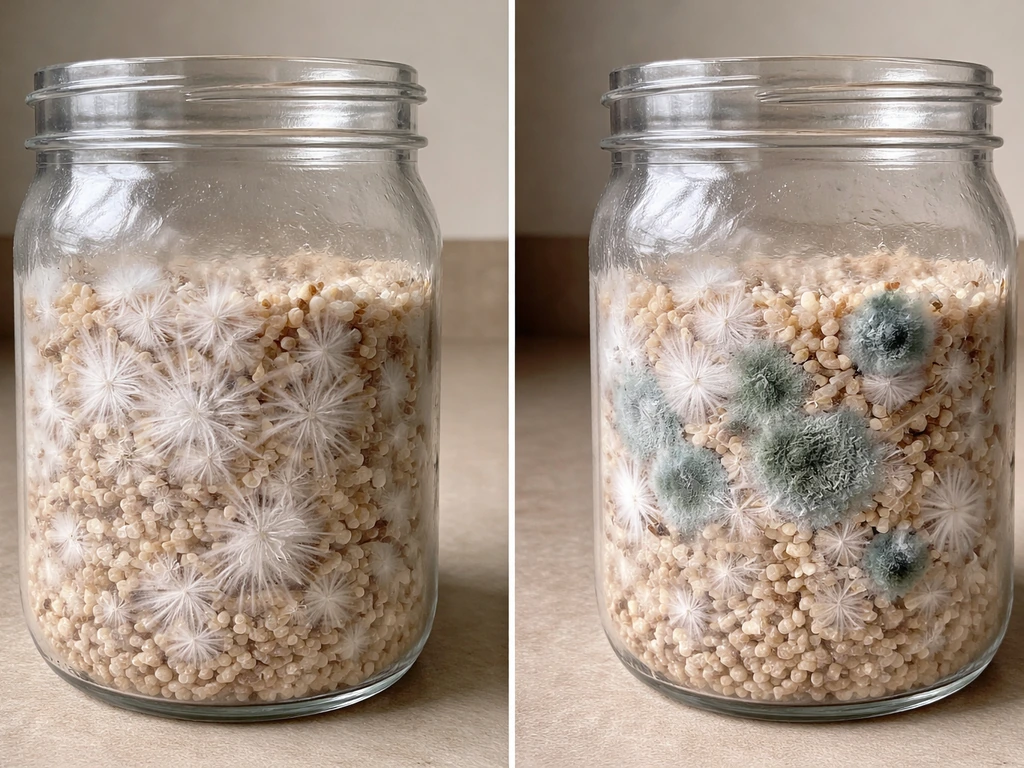
Early contamination signs to catch fast
Check your jars or bags every 1–2 days during incubation. Healthy mycelium is bright white, structured, and has no smell (or a faint mushroomy smell at most). Here's what contamination usually looks like:
- Green, blue, or black powdery patches: mold contamination (Trichoderma is the most common offender). Isolate and discard immediately.
- Wet, slimy, or yellowed areas with a sour or rotten smell: bacterial contamination. Also discard.
- Rapidly expanding fuzzy growth that looks nothing like the slow, organized spread of mycelium: most likely mold.
- A single discolored spot that appears in the first 2–3 days before any white growth has shown: likely contamination introduced during inoculation.
When in doubt, sniff it. Contaminated substrate smells wrong. Healthy colonizing mycelium doesn't produce a harsh or foul odor. That sniff test has saved me from spreading contamination more than once.
Moving from colonized substrate to fruiting mushrooms
Once your substrate is fully colonized (completely white with no visible uncolonized patches), it's ready for fruiting conditions. The shift you need to make is from warm and stable to slightly cooler with higher humidity, fresh air exchange, and light cues.
Substrate and containers for fruiting
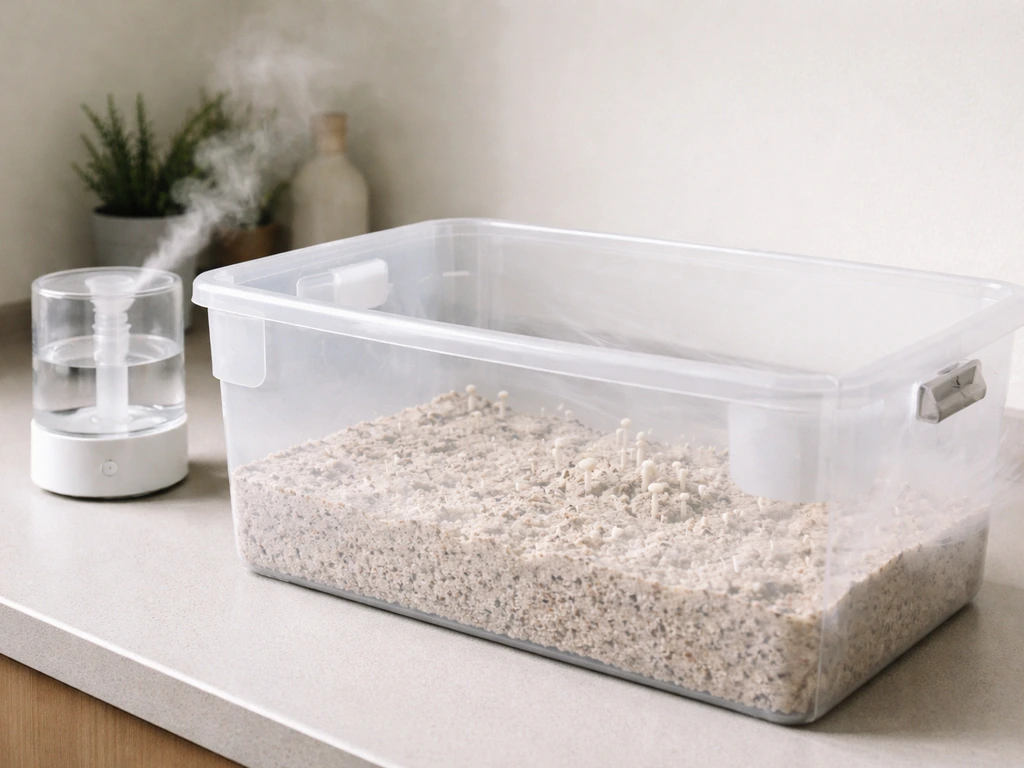
If you colonized grain jars or bags, you'll typically want to mix that colonized grain into a bulk fruiting substrate before pinning begins. Hardwood sawdust, coco coir, straw (for oysters), or a coco/vermiculite mix are all common choices depending on your species. A ratio of 1 part colonized grain to 2–3 parts bulk substrate is a standard starting point. For PF tek cakes, you can fruit them directly after a 12-hour cold water soak (called dunking) to rehydrate the substrate.
Fruiting environment: the settings that actually matter
| Parameter | Target range | Why it matters |
|---|---|---|
| Temperature | 65–75°F (18–24°C) for most species | Triggers pinning and supports healthy fruiting body development |
| Relative humidity | 85–95% | Prevents drying out of pins and young fruiting bodies |
| Fresh air exchange (FAE) | 2–4 manual fan bursts or passive holes per day | Removes CO2 buildup that causes long, spindly stems and poor cap development |
| Light | Indirect natural light or 12h on/off cycle | Acts as a directional cue, not for photosynthesis; mushrooms don't need intense light |
The most common fruiting setups at home are a monotub (a large clear storage tub with holes drilled for FAE and polyfill stuffed in the holes) or a Martha tent (a wire shelving unit inside a greenhouse tent with an ultrasonic humidifier and a fan on a timer). If you want better chances with staghorns, focus on recreating steady warmth, humidity, and fresh air like you would for a Martha tent setup. Both work well.
The monotub is simpler and cheaper for small batches. A Martha setup scales better if you're running multiple species at once. You can also fruit PF tek cakes inside a shotgun fruiting chamber (SGFC), which is just a clear tote with lots of holes and a perlite base for humidity.
Mist the walls of your fruiting chamber (not directly onto the substrate surface) 2–4 times a day to maintain humidity. Fan briefly each time you mist to exchange air. Pins usually appear within 5–14 days of moving to fruiting conditions, and full harvest size is reached 3–7 days after that for most species.
When things go wrong: troubleshooting no growth, slow growth, and contamination
No growth after 10+ days
If you see absolutely nothing after 10 days, first check your temperature. Substrate that's too cold (below 65°F) will colonize extremely slowly or not at all. Move the jars somewhere warmer or add a heat mat. If temperature isn't the issue, the spore syringe itself may be the culprit. Spores from a syringe that was stored improperly (frozen, overheated, or too old) may not germinate reliably. A syringe kept in the fridge and used within 6–12 months of receipt is generally viable. If you have a second syringe from the same batch, try a fresh inoculation with tighter sterile technique.
Slow or patchy colonization
Slow growth that's still visibly progressing is usually a temperature or moisture issue. Make sure your grain wasn't too wet at sterilization (wet grain invites bacterial contamination and slows mycelium spread) and that the incubation space is consistently warm. A patchy pattern where some areas are colonized and others aren't after 3+ weeks can also mean your substrate wasn't inoculated at enough points, or that one of the inoculation points was too close to the surface and dried out. Patience is the real answer here for many slow-colonizing species like lion's mane or shiitake; these can take 4–6 weeks and that's completely normal.
Contamination: triage and when to cut your losses
If you catch a contaminated jar before it's fully overrun, isolate it from your other substrates immediately. Seal the bag or jar in a plastic bag before removing it from your grow space to avoid spreading spores. Do not open it inside. For grain jars that are only slightly contaminated in one corner during early colonization, some growers attempt to salvage them by moving to fruiting conditions quickly and hoping the mycelium outcompetes the mold. This is risky and I generally don't recommend it unless you have limited substrate and the contamination is truly minimal. It's almost always better to restart that jar with fresh grain and tighter technique.
When contamination keeps repeating across multiple jars, that's a sign of a systemic issue: your sterilization pressure or time is insufficient, your SAB technique has a gap, or there's a contamination source in your work area (an AC vent blowing air overhead, a pet in the room, or not letting the SAB settle long enough before working).
Use a pressure canner or pressure cooker for sterilization by hitting the correct pressure and temperature, with 15 psi called out as a key benchmark for true sterilization sterilization pressure or time is insufficient. Salish Mushrooms explains that sterilizing at 15 PSI corresponds to about 250°F/121°C and includes typical time ranges, such as longer times for denser substrates like grain bags (often around 90, 120 minutes) [sterilization pressure or time is insufficient](https://salishmushrooms.
com/pasteurization-and-sterilization/). Go back to basics: re-sterilize your work area, replace your alcohol if it's been open for a while and may have absorbed water, and slow down the inoculation process.
Pins won't form after full colonization
If the substrate is fully colonized but pins aren't appearing after 2 weeks in fruiting conditions, the most likely causes are CO2 buildup from insufficient FAE, humidity that's too low, or temperature that's too warm. Increase your fan exchanges, check that your humidity is actually hitting 85%+ (a cheap hygrometer pays for itself here), and drop the temperature a few degrees. Some species also need a cold shock to trigger pinning: move colonized substrate to a refrigerator at 50–55°F for 12–24 hours, then return to fruiting conditions. This works particularly well for species like oyster mushrooms.
Growing mushrooms from a spore syringe takes a bit of practice to dial in, but once you've run a successful grow you'll understand exactly what to look for and what to adjust. It's a different process than growing mushrooms from spore prints (which require an agar intermediate for reliable results) and more straightforward for most beginners.
If you start with spore prints, you typically need to move through an agar step first before you can reliably inoculate grain or other bulk substrates. If you want to start from spore prints instead of already having a syringe, follow a dedicated guide on how to grow mushrooms from spore prints. Once you've got the syringe-to-harvest workflow down, it opens the door to exploring agar work, multi-spore cultures, and eventually liquid culture for faster, cleaner colonization on future grows. To apply the same spore-to-cultivation logic to a maidenhair fern, you can follow a dedicated guide on how to grow maidenhair fern from spores.
If you're specifically trying to grow a fern from spores, the same general spore-to-cultivation logic applies, and you can follow a dedicated walkthrough on how to grow a fern from spores maidenhair fern.
FAQ
Why do I keep getting contamination even when my technique feels clean when I use a spore syringe?
Most contamination problems come from gaps in sterile workflow (not letting the SAB settle, moving your hands too fast, or reusing a needle without re-flaming). Use the syringe once per session, keep the needle cap on until the moment of injection, and avoid breathing directly over the opening. If you are doing multiple jars, reload only if you truly have a fresh, sterile setup, and re-flame every transfer.
How can I tell the difference between healthy mycelium and early contamination during syringe inoculation?
Look for white, even colonization that advances from injection points, with a firm, structured look and no foul odor. If you see green, black, orange, or spider-web-like growth, assume contamination even if some white mycelium is present, because mold can coexist early. When in doubt, stop handling and isolate the container immediately to prevent spore spread.
What should I do if my substrate looks like it is growing slowly, but not completely stalled?
Give colonized substrate time before deciding it failed. If you expect 3 to 4 weeks for a species but it is still progressing slowly (white growth getting slightly larger, not shrinking or turning colors), do not discard it. However, if there is no visible change after about 10 days and temperature is correct, test the next variable (substrate moisture level and syringe viability).
Can temperature cause patchy colonization even if I inoculated correctly?
If the incubation space is too cold, growth may stall and you can get patchy colonization, where some injection points dry out. Aim for the recommended species range and also avoid placing jars near cold windows or drafty areas. A heat mat under the tub or a small insulated box can stabilize temperature better than adjusting a room thermostat.
What are the most common substrate-related mistakes that make syringe-to-grain growth slower?
Too-wet grain often leads to bacterial issues (slime, sour or unpleasant odors, and slowed mycelium spread). Adjust your sterilization so the grain is hydrated correctly before sterilizing, and use proper cooling so it does not keep steaming after the cycle. If you suspect wet grain, switch to drier grain at the same moisture level you see “free-flowing but not dripping” before sterilization.
Can I fruit directly from colonized grain or PF tek cakes after using a spore syringe?
Yes, but timing and method matter. If you inoculated grain and plan to fruit without a bulk mix, use the correct fruiting conditions for that species and avoid over-handling. For PF tek cakes, a dunk of roughly 12 hours helps rehydrate, but you still need fresh air exchange and humidity control. If you try to fruit grain directly, expect different yields and adjust your humidity and airflow more conservatively.
How do I know whether my syringe itself is the problem versus my sterile technique?
A syringe that is old or improperly stored may germinate poorly, causing weak or no colonization. Store syringes in the fridge, keep them sealed, and avoid temperature swings from repeatedly warming and cooling. If your other steps are consistent, a good diagnostic is to inoculate one small, easy test jar first, so you can confirm viability before scaling up.
What are the best next troubleshooting steps if I see mycelium fully colonized but no pins after two weeks?
If pins do not appear after about 2 weeks but the substrate is fully colonized, check airflow (CO2 management) and actual humidity with a cheap hygrometer. Also verify temperature is not too warm for that species, and ensure you are not misting directly onto the substrate surface in a way that creates stagnant wet spots. If the species commonly benefits from a trigger, do a cold shock window and then return promptly to fruiting conditions.
Why would some areas colonize and other areas stay blank even after several weeks?
Patchy colonization can happen when injection points are too close to the surface, dried out during incubation, or simply not enough inoculation points were used. To reduce this, distribute injection points evenly and avoid overworking the opening. After injecting, keep the container undisturbed and away from direct light so the surface does not dry.
If a jar looks contaminated early, can I safely salvage it instead of restarting?
Do not open a contaminated jar to “check it” once you suspect contamination. Seal it in a bag before moving it, and keep it away from your clean work zone. Salvage attempts can spread spores and usually cost more than restarting, especially if contamination is only slightly visible but still actively spreading.