Growing staghorn ferns from spores works, but it takes patience measured in months, not weeks. You collect ripe spores from the fertile fronds, sow them onto a sterile or near-sterile medium under high humidity and indirect light, wait 2 to 6 weeks for germination, nurse the resulting gametophytes (tiny heart-shaped prothalli) for several more months until sporophytes emerge, and then eventually mount those young plants onto a board with sphagnum moss. If you want a step-by-step overview, follow the same spore-to-gametophyte and mounting timeline to learn how to grow a fern from spores. The whole process from spore to a mountable plant realistically takes 1 to 2 years. If you go in knowing that, you won't bail at month three thinking you've failed.
How to Grow Staghorns From Spores: Step-by-Step Guide

Understanding the staghorn fern life cycle (and what spores actually do)
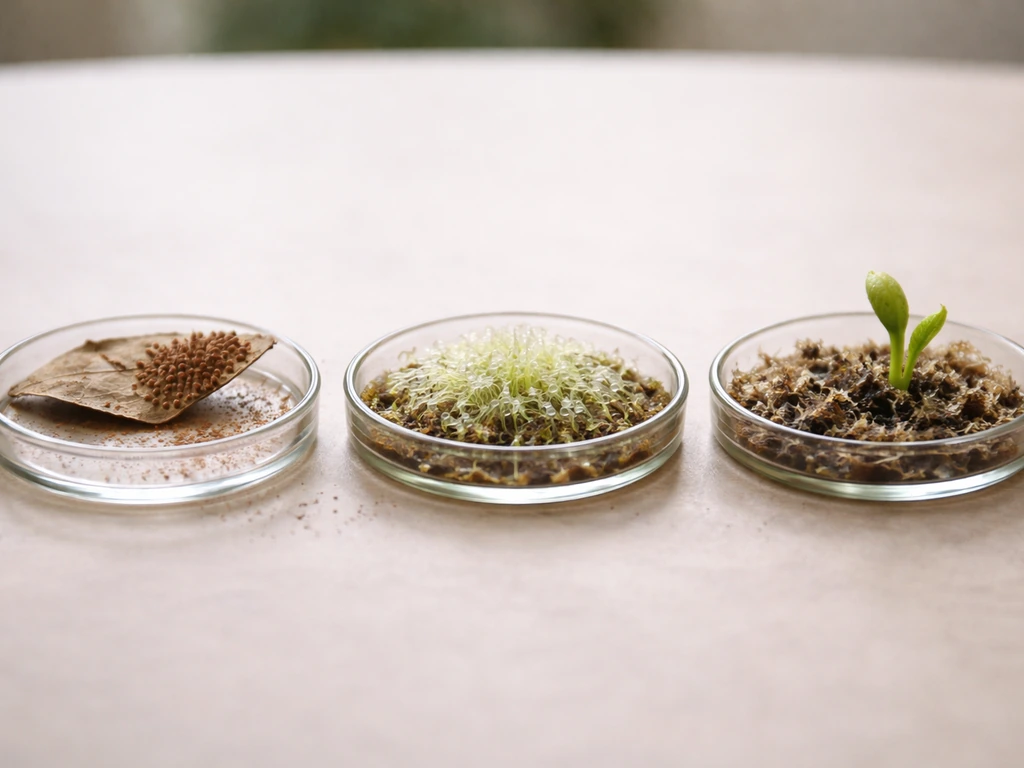
Staghorn ferns (Platycerium spp.) have a two-stage life cycle that trips people up because what you grow from a spore is NOT a baby staghorn fern. Not at first. The spore germinates into a gametophyte, which is a tiny, flat, heart-shaped structure called a prothallus. It looks almost like green algae or a small liverwort. This is a completely separate organism from the adult fern, and it's the stage that produces the sex cells needed to create the next generation. Only after fertilization occurs on that prothallus does a sporophyte develop, and that sporophyte is the actual fern you recognize with its shield fronds and antler fronds.
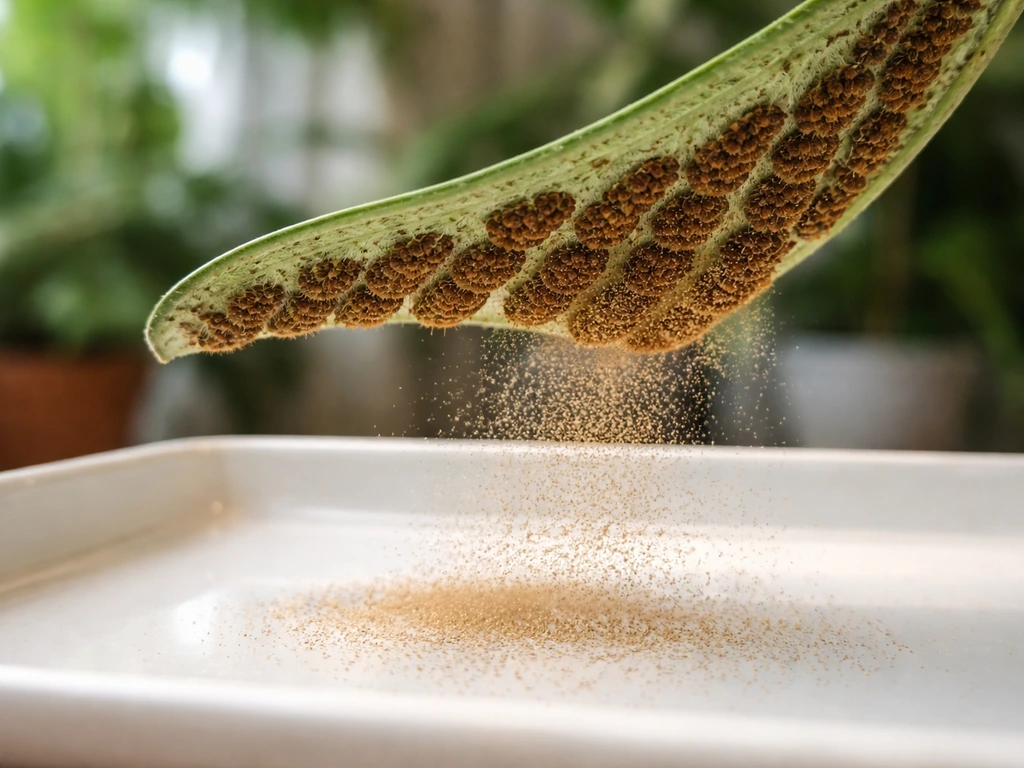
The spores themselves are produced in sori, which are brown powdery patches found on specialized fertile frond lobes on the adult plant. Those spores are haploid, meaning they only carry half the genetic material. The gametophyte they become produces antheridia (sperm) and archegonia (eggs). When water bridges the gap between them, fertilization happens and a diploid sporophyte begins. That's why you need consistent moisture at the gametophyte stage: without water, sperm can't swim to the egg and the whole process stalls.
One important reality check: under home conditions, even healthy gametophytes can take an extremely long time to produce sporophytes. Scientific culture studies have documented cases where sporophytes still hadn't appeared after 300 days. That's not a failure, it's just the nature of this plant. Spore-grown staghorns reward the patient grower.
When and how to collect spores (and store them right)
Timing your spore collection correctly makes a real difference in germination rates. You want spores that are fully ripe but haven't dispersed yet. On a Platycerium, the fertile frond patches turn from greenish-yellow to a rich brown and develop a slightly powdery texture when the spores are ready. If you touch the patch and get a puff of brown dust on your finger, they're ripe and you're right on time.
- Cut or gently bend the fertile frond tip over a clean sheet of white paper or a paper envelope.
- Tap or lightly scrape the sorus area with a soft brush or your finger to release the spores.
- Let any debris and chaff settle, then tilt the paper to roll the lighter spore powder away from heavier fragments.
- Transfer the cleaned spores into a small envelope, label it with the species and collection date, and fold it closed.
- Place the envelope inside an airtight container (a small jar with a lid works perfectly) with a silica gel desiccant packet.
- Store in the refrigerator at around 35 to 40°F (2 to 4°C). Spores stored this way stay viable for months, sometimes longer, though fresher is always better.
Research confirms that spore age and how they're handled before sowing significantly affects both germination rates and early gametophyte development. Older spores that were stored warm or damp germinate poorly or not at all. If you're sourcing spores from a trade or swap rather than your own plant, ask when they were collected and how they were kept. Avoid any spores stored at room temperature for more than a few months.
Setting up a sterile (or clean enough) germination environment
You don't need a full lab setup, but you do need to reduce contamination risk as much as possible. Mold and bacteria move in fast on the warm, moist surfaces that spores need to germinate, and once contamination takes hold it almost always wins. The goal is to give your spores a head start before anything else colonizes the medium.
Choosing your medium
The two most common home approaches are peat-based mix and agar. Agar (nutrient agar set in petri dishes or small jars) is the most contamination-resistant option and what lab protocols use, but it requires some equipment. A practical DIY alternative that works well at home is a 50/50 mix of peat moss and perlite, or a layer of moist long-fiber sphagnum moss. Some growers also use a thin layer of sphagnum peat pressed firmly into a jar or plastic container. Whatever you use, it needs to be sterilized before sowing.
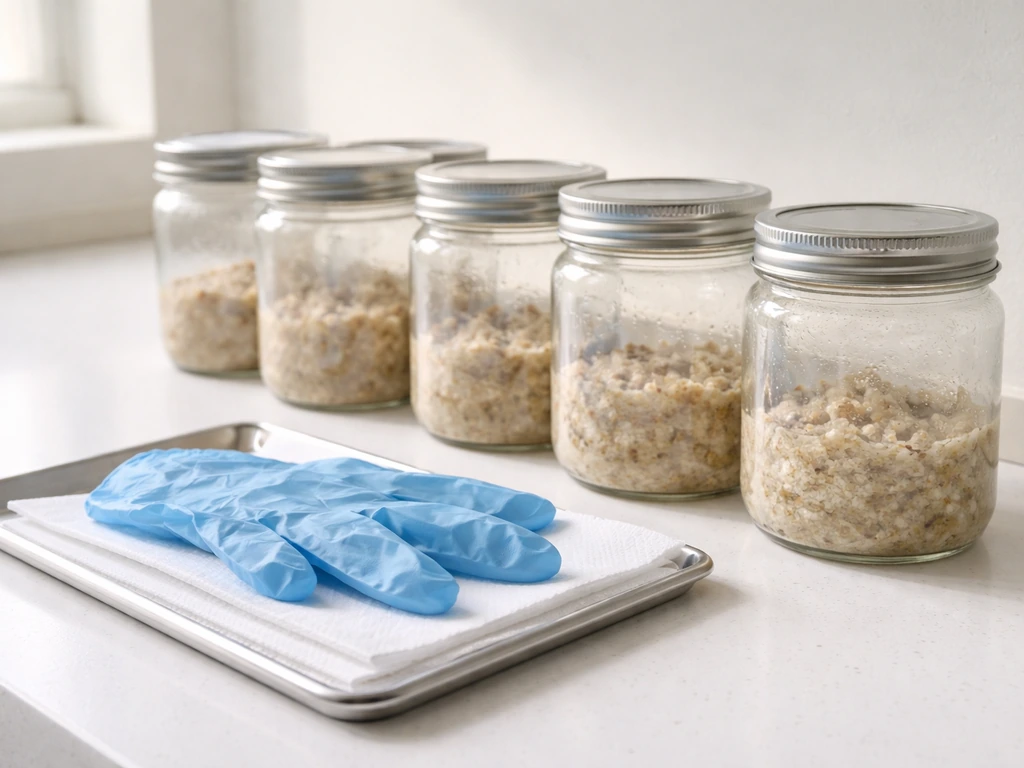
Sterilizing your medium and containers
- Fill small glass jars, plastic tubs with lids, or petri dishes with your chosen medium, leaving space at the top.
- For peat or sphagnum: microwave damp medium in the container for 2 to 3 minutes, or pressure cook at 15 psi for 15 minutes. Let cool completely before sowing.
- Wipe down your work surface with 70% isopropyl alcohol and let it air dry.
- Work near a lit candle or in as still an air environment as possible to reduce airborne contamination.
Surface sterilizing your spores
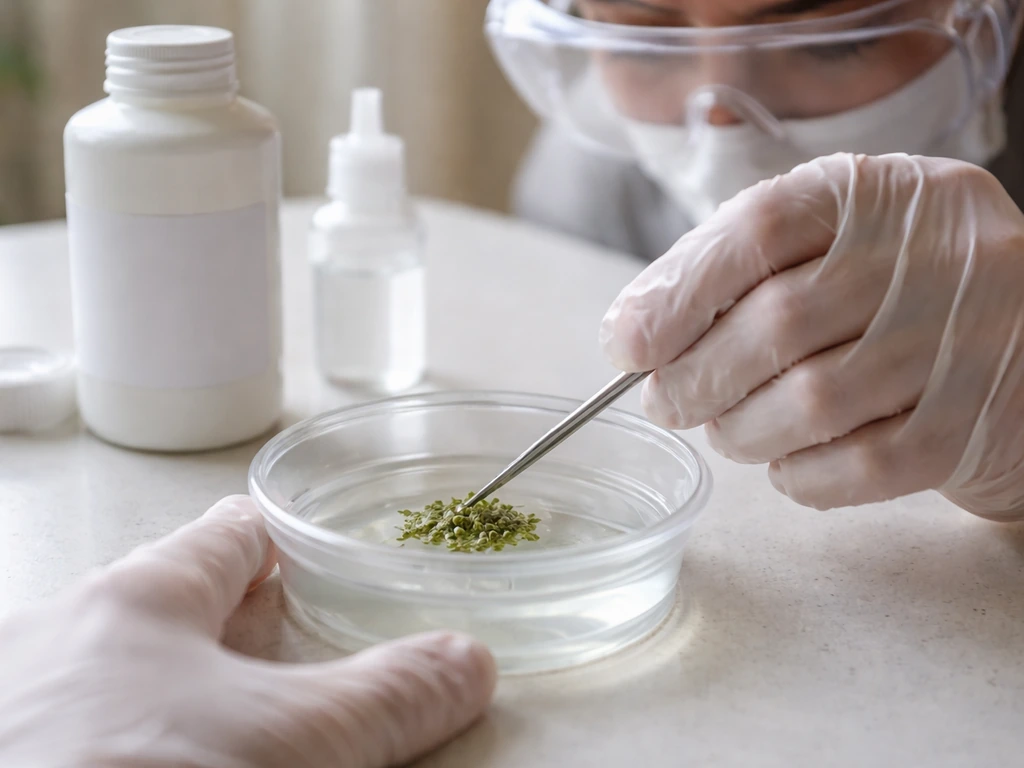
This step is worth doing if you want serious contamination control. The standard method used in fern culture research is a blank" rel="noopener noreferrer">dilute sodium hypochlorite (bleach) soak: mix 1 part standard household bleach (around 5% sodium hypochlorite) with 5 parts distilled water. Place your spores in this solution for 1 to 2 minutes, then rinse twice with sterile distilled water. Don't over-expose them: prolonged blank" rel="noopener noreferrer">bleach contact damages the spores and kills germination rates. After rinsing, you can sow the spores while they're still suspended in a drop or two of sterile water, which helps distribute them evenly. The key is rinsing promptly and thoroughly after the bleach step.
Sowing the spores: moisture, light, temperature, and contamination control
Once your medium is cool and sterile and your spores are ready, you're sowing. Use a sterile spoon, pipette, or folded piece of sterile paper to distribute spores thinly and evenly across the surface of the medium. Thin sowing matters: overcrowded gametophytes compete for space and nutrients and are harder to separate later.
Don't bury the spores. Staghorn fern spores need light to germinate, so they go on the surface, not under it. This is one of the most common reasons people get zero germination: they dust spores on and then cover them with a thin layer of mix, blocking the light they need.
After sowing, seal the container. Use a lid, plastic wrap, or a clear plastic bag to create a mini humid environment. Humidity should be as close to 100% as you can get during germination. The rule from experienced Platycerium growers is simple: as high as possible. A propagation tray with a humidity dome is a good low-tech setup. A sealed clear plastic storage tub works just as well.
Light and temperature targets
Place your container under bright but indirect light, or about 6 to 8 inches below a fluorescent or LED grow light on a 12 to 14 hour cycle. Direct sun will overheat the sealed container and cook your spores. Research on Platycerium bifurcatum confirms that light spectrum quality (specifically the red to far-red ratio) affects development, which is one reason grow lights that are heavy in the red spectrum tend to perform well. A basic cool-white fluorescent tube or a balanced LED panel is fine for home purposes.
Temperature should stay between 65 and 80°F (18 to 27°C). Staghorn spores germinate poorly below 60°F and can stall above 85°F in a sealed container. If your house runs cool in winter, a seedling heat mat set on low under the container can help. Aim for consistency: wild temperature swings are harder on early gametophytes than a steady temperature slightly outside the ideal range.
Early growth: what to expect from gametophytes through first sporophyte
Germination typically begins somewhere between 2 and 6 weeks after sowing, though it can take longer with older spores or cooler temperatures. Here's the visual sequence you're looking for as things develop.
- Spore swelling: The spore absorbs water and swells slightly. You probably won't notice this without magnification.
- Germ filament: A small green thread emerges from the spore. This is the first visible sign of germination and may look like a faint green haze on the medium surface.
- Rhizoid development: Thread-like anchoring structures grow downward into the medium to absorb moisture and nutrients.
- Prothallus formation: The germ filament broadens into a flat, spatula-shaped or heart-shaped green structure a few millimeters across. This is the gametophyte. It looks a bit like a tiny liverwort or green scale.
- Mature gametophyte: The prothallus develops a notch and grows to about 5 to 10mm. On close inspection with a hand lens you may see tiny bumps (antheridia or archegonia) developing on the underside.
- Sporophyte emergence: After fertilization, a tiny fern frond emerges from the center of the prothallus. This first frond is small, simple, and nothing like an adult staghorn frond. It will be followed by subsequent fronds that gradually become more recognizable.
Keep the sealed humid environment intact through the gametophyte stage. The gametophyte's rhizoids are extremely sensitive to drying, and the sperm literally need a film of water to swim to the archegonia. Once you see green coverage forming across your medium, you're in good shape. If you see brown or slimy patches, that's contamination and you need to act fast (more on that below).
Once you see the first sporophyte fronds emerging from the prothalli, you can begin very gradually opening the container for short periods each day to start acclimating the young plants to lower humidity. This process should take several weeks, not days.
Moving to a mount: growing medium, humidity, and aftercare
Spore-grown staghorns are ready to be separated and mounted once the sporophytes have developed a few recognizable fronds and have their own visible root system, which usually takes 12 to 24 months from sowing. Rushing this stage is one of the most common ways to lose plants after investing all that time.
Mounting materials and method
The standard mount uses a piece of untreated hardwood board (cedar, oak, and hardwood plaques all work), long-fiber sphagnum moss as the growing medium behind the root ball, and fishing line, pantyhose strips, or wire to hold the plant in place until the shield fronds attach naturally. For a small spore-grown plant, start with a modest board rather than a large one: a 6 to 8 inch piece is plenty for a young plant and easier to manage humidity on.
- Soak long-fiber sphagnum moss in water and wring it out to damp but not dripping.
- Form a golf ball to baseball-sized clump of damp sphagnum depending on your plant's root size.
- Position the clump on the board and place the young plant's root system against it.
- Wrap fishing line or strips of pantyhose horizontally and vertically across the shield frond area to hold the plant firmly against the moss and board. Don't wrap through the center of the fronds.
- Hang the board in a spot with bright indirect light and high ambient humidity.
Aftercare for the first two weeks
The two weeks immediately after mounting are the highest-risk period for young spore-grown plants. Keep humidity as high as possible, ideally near 100%, by enclosing the mounted plant loosely in a clear plastic bag or placing it inside a humid greenhouse cabinet. Hold off on any fertilizer during this window, and reduce light intensity slightly compared to what the plant was receiving before. This combination of high humidity, no fertilizer, and reduced light gives the roots time to establish contact with the new sphagnum without the additional stress of adjusting to feeding or bright light. After two weeks, gradually reintroduce normal conditions over the following week or two.
Once established, water by soaking the entire mount in a bucket of water for 10 to 20 minutes when the sphagnum feels light and almost dry. Let it drain fully before rehanging. Staghorns rot from sitting in constant moisture, so the soak-and-dry cycle is the right one.
Troubleshooting the most common failure points
| Problem | Likely cause | Fix |
|---|---|---|
| No germination after 6+ weeks | Spores too old, buried under medium, or temperature too low | Check spore viability (use fresh spores if possible), make sure spores are on the surface not under it, and move container somewhere warmer (70–75°F is ideal) |
| Green fuzz but no distinct prothalli | Algae or moss contamination rather than fern germination | Look closely with a magnifier: true gametophytes are flat and structured, not fuzzy or filamentous. If it's algae, reduce light slightly and improve sterilization on the next batch |
| White, gray, or black mold covering the medium | Contamination from poor sterilization or spore handling | Remove contaminated sections immediately with a sterile tool. If it spreads, that batch is likely lost. Improve bleach soak protocol and sterilize containers more thoroughly next time |
| Prothalli drying out and browning | Humidity dropped too low inside the container | Re-seal more tightly and mist lightly with sterile water. Check that your lid or plastic wrap has no gaps |
| Gametophytes present but no sporophytes after 6+ months | Normal Platycerium timing, or temperature too low, or gametophytes too far apart for fertilization | This is often just the plant's pace. Make sure prothalli are close enough for sperm to travel between them (they need to be touching or nearly so). Keep temperature stable at 70–75°F |
| Transplant shock after mounting (wilting, browning fronds) | Too-low humidity, roots not in contact with sphagnum, or fertilizer applied too soon | Bag the mount to restore near-100% humidity for 1 to 2 weeks, skip fertilizer entirely, and check that the root mass is pressed firmly against the moist sphagnum |
Realistic timelines: what to expect and when
The single biggest source of unnecessary frustration with spore-grown staghorns is not knowing what normal looks like at each stage. Growers who understand that this is a years-long process don't panic at month four when their prothalli still haven't produced sporophytes. UF/IFAS extension publications specifically note that propagating staghorn ferns from spores is slow, and that framing helps a lot.
| Stage | Expected timeframe | What to look for |
|---|---|---|
| Spore germination | 2 to 6 weeks after sowing | Faint green haze on medium surface, then visible germ filaments |
| Prothallus development | 4 to 12 weeks after germination | Flat, heart-shaped green structures 2 to 10mm across |
| Sporophyte emergence | 3 to 12+ months after sowing (highly variable) | Tiny frond emerging from center of prothallus, distinct from the flat gametophyte |
| Early sporophyte growth | Up to 12 months after sporophyte appears | Multiple simple fronds developing, root system visible |
| Mountable plant size | 12 to 24 months from initial sowing | Recognizable shield frond beginning to form, plant has structure and grip |
If you're also growing other ferns from spores, the process has meaningful similarities to growing maidenhair ferns or ostrich ferns from spores in terms of the gametophyte stage and the need for humidity control. The same patience and spore-to-gametophyte humidity care apply when you’re learning how to grow maidenhair fern from spores. If you are specifically aiming for ostrich ferns, the same spore stage timing and humidity care apply ostrich ferns from spores. The key difference with staghorns is that the eventual mounted-epiphyte lifestyle means the transition to a board-based growing setup is unique to this genus, and that final step requires its own patience and humidity management approach.
Keep notes. Date your sowing, photograph your containers every couple of weeks, and track when you first see green on the medium. That record becomes invaluable when you're trying to figure out whether a container is behind schedule or just slow. And slow, in the world of staghorn ferns, is almost always normal. If you’re wondering how this compares to mushrooms, the basic concept is similar: start with spores, provide the right sterile or clean conditions, and then focus on the specific fruiting requirements of the species mushrooms from spores. If you want a practical guide, see the full steps for how to grow mushrooms from spore prints mushrooms, the basic concept is similar. Mushroom spores are handled in much the same way when you focus on sterile setup and species-specific fruiting steps, so the approach carries over mushroom spores from spores.
FAQ
What should I do if my staghorn spores do not germinate after 6 to 8 weeks?
Not necessarily. If you see no green for 6 to 8 weeks, the first check is spore handling and conditions: confirm spores were fully ripe, not stored warm or damp, keep temperature in the 65 to 80°F (18 to 27°C) range, and make sure the surface was not covered (light is required). If your medium had persistent slime, cloudiness, or fuzzy growth, contamination may have outcompeted the gametophytes.
Can I open the container often to check progress or to increase fresh air?
No. The gametophyte is photosynthetic but very sensitive, so heavy airflow and frequent opening dry it out and can stall development. Instead, open only after you have sporophyte fronds emerging, and even then acclimate slowly over several weeks. If you must open for inspection, keep sessions brief and reseal quickly to restore near-100% humidity.
When can I start fertilizing spore-grown staghorns, and should I fertilize during the first weeks after mounting?
For most home setups, skip fertilizer entirely until after mounting and after the first acclimation period. During the two weeks immediately after you mount sporophytes, fertilizer can stress or disrupt root establishment. Once you are back on normal conditions and the sphagnum is drying appropriately between soaks, you can use only very light feeding, and never while humidity is kept continuously saturated.
How do I tell contamination from normal development, and what is the best way to save a container if something goes wrong?
Cleanliness is important, but the main failure mode is often the medium being too wet or not actually sterile. If you see brown patches, slimy areas, or fast-growing fuzzy growth, act quickly: remove the affected portion if the contamination is localized, and otherwise discard the container to prevent spore and culture contamination from spreading. Always sterilize the medium and use sterile tools to reduce the chance that bacteria or mold take over.
What if I sowed the spores too thickly, can I still separate plants later?
Thin sowing helps. Overcrowding leaves gametophytes competing for space, and separating them later becomes difficult. If you suspect you sowed too densely, resist the urge to aggressively disturb the surface. Move forward by transferring later only when sporophytes have clear fronds and visible roots, then separate gently without tearing the prothalli.
How can I prevent temperature swings inside the sealed container?
Rely on the container’s conditions and the medium’s behavior, not just your house thermostat. In sealed containers, temperature rises quickly under strong light, and overheating can stall germination. Use a small probe thermometer if possible, keep light bright but indirect, and if the container feels warm to the touch, increase distance from the light or shorten the light cycle.
How do I know my watering schedule after mounting is correct (and not causing rot)?
After mounting, the right sign is that the sphagnum behind the roots stays lightly moist but not soggy, and the plant shows stable attachment without collapse. If sphagnum stays heavy and wet for days, you are likely over-soaking or not allowing a true dry-down. Follow the soak-and-dry rhythm, soak for 10 to 20 minutes, drain fully, and remount only if the plant can’t stay positioned.
What is the safest way to transition my plants from the germination setup to being mounted and then back to normal care?
Changing too many variables at once is risky. Start acclimation by reducing humidity gradually only after sporophytes have formed, and keep light similar first. When moving from germination to mounting, avoid fertilizer and reduce light intensity slightly during the first two weeks after mount. After that, return to your normal light and feeding approach step by step.
How can I verify spore quality when I’m not collecting them myself?
Yes. Some spore lots fail because they were collected and stored poorly. If you are buying or swapping spores, ask when they were collected, how they were stored (cool, dry, dark is best), and whether they were kept at room temperature for long periods. If you do your own collection, use ripe, powdery brown spore patches and sow promptly rather than waiting.