Yes, you can absolutely grow ferns from spores at home, and it's one of the more rewarding propagation projects you can take on. Ostrich ferns are a great example of a fern you can propagate from spores, so the same setup and timing will carry over when you learn how to grow ostrich fern from spores. It's also slower and more fiddly than most people expect, so let me set the right expectations up front: you're looking at weeks to months before you see anything resembling a tiny fern plant, and the early stages look nothing like what you're growing toward. But the process works, it's cheap, and once you understand what's actually happening at each stage, it stops feeling mysterious and starts feeling manageable.
How to Grow a Fern From Spores: Step by Step Guide

Marcus Holloway
20 Apr 2026
Can you grow ferns from spores (and what to expect)
Ferns don't produce seeds. They reproduce via spores, which are tiny single-celled structures released from the undersides of mature fronds. Growing from spores means you're shepherding a two-stage life cycle: first a gametophyte (a flat, heart-shaped structure called a prothallus), then a sporophyte (the actual fern plant you recognize). Most beginners don't realize these are two completely separate organisms living in sequence, and that's what makes this different from just planting a seed.
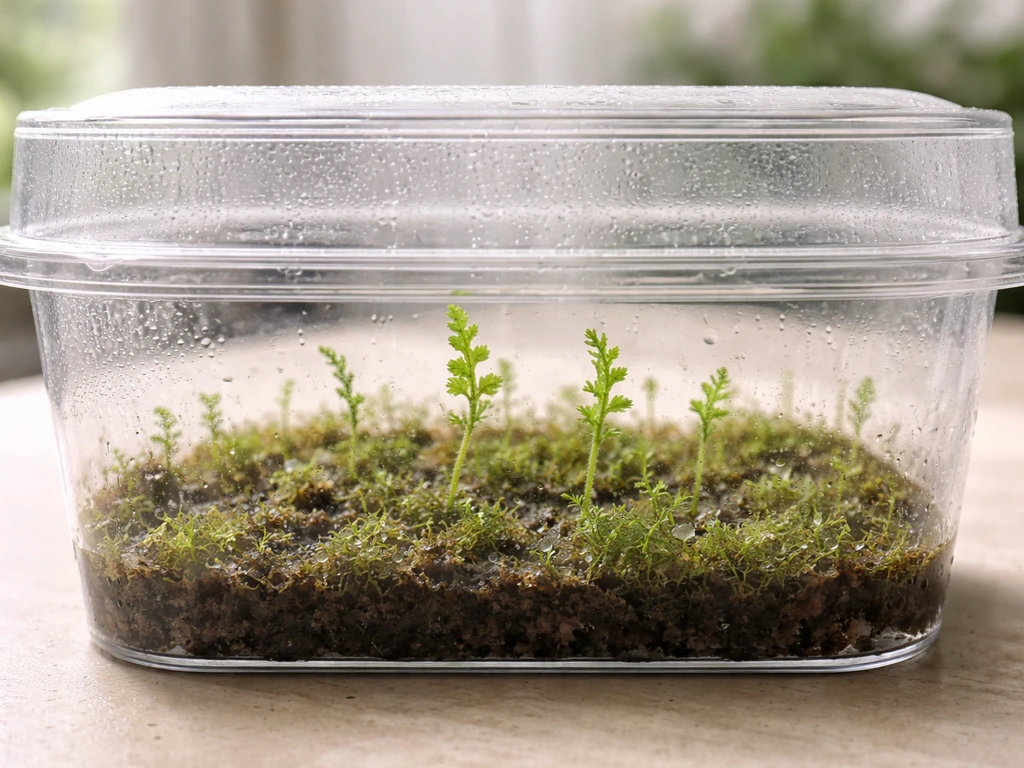
Stage one: spores germinate into prothalli. Under good conditions, germination takes about 2 to 6 weeks, and the result looks like a fuzzy green film or moss creeping across the surface of your container. That's normal. That's success.
Don't disturb it. Stage two: the prothalli produce eggs and sperm (yes, ferns need water for fertilization, which is why humidity is so critical), fertilization happens, and tiny sporophyte fronds begin emerging from the prothallus. That transition from gametophyte to recognizable fern can take another 2 to 4 months depending on species, temperature, and light.
For bird's nest fern (Asplenium nidus) specifically, research shows antheridia develop around day 60 and archegonia around day 80 after sowing, so you're in it for the long haul with that species. Go in knowing this is a multi-month project and you'll be fine.
Getting and handling fern spores
Where to source spores
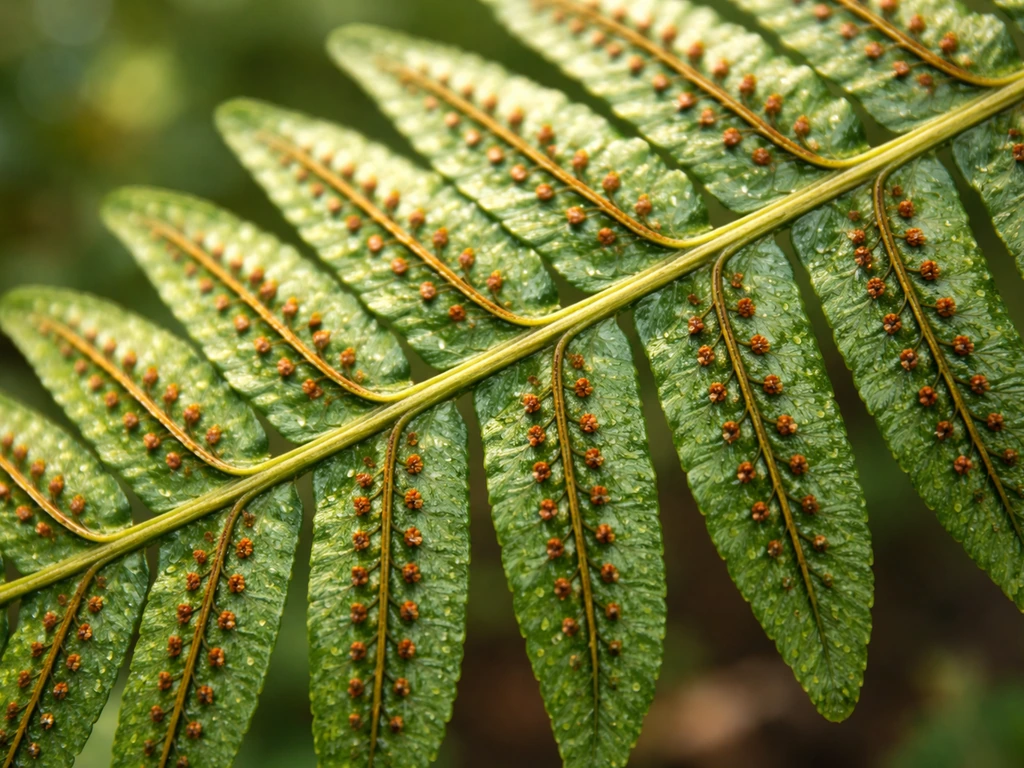
If you have a mature fern already, check the undersides of the fronds for brown dots or lines. Those are sori, the spore-producing structures. When they're ripe, they look almost dusty. To collect, cut a frond and lay it spore-side-down on a clean sheet of white paper inside a paper bag.
Leave it for 24 to 48 hours in a dry room. The spores will fall onto the paper as a fine powder, often with a brownish or yellow tint depending on species. If you don't have a source plant, fern spore trades and online forums (like the Hardy Fern Foundation spore exchange) are legitimate ways to get fresh spores. Avoid spores that have been sitting in uncontrolled conditions for more than a year if you can help it.
Storage and timing
Store spores dry, at room temperature, in a sealed paper envelope or a small glass vial with a desiccant packet. Avoid plastic bags, which trap moisture and promote premature germination or mold. Most fern spores remain viable for several months to a couple of years stored this way, but germination rates drop over time, so sow fresh whenever possible. Timing-wise, there's no strict season for indoor spore sowing since you're controlling the environment, but starting in late winter or early spring gives young plants plenty of growing time before they mature.
Setting up a spore-sowing container
You don't need a lab. You do need a clean, enclosed container that holds humidity and lets light through. A clear plastic takeaway container with a lid, a propagation tray with a humidity dome, or even a glass jar with plastic wrap stretched over the top all work well. The key is transparency (for light) and a reasonably tight seal (for humidity). Clean it thoroughly with diluted bleach solution (1 part bleach to 9 parts water), rinse well, and let it air dry before use.
The substrate: sterile enough is the goal
You don't need sterile lab media, but you do need to kill off competing fungal spores and weed seeds in your substrate before sowing. A mix of peat moss and perlite works reliably, as does straight sphagnum moss or a peat-based seed-starting mix. For bird's nest fern specifically, UF IFAS recommends peat or sphagnum with a small amount of dolomite added (roughly 100 grams per cubic foot) to buffer pH, since Asplenium nidus prefers slightly less acidic conditions than many ferns. Other soilless components like vermiculite, coconut coir, and fine sand can be mixed in for drainage and aeration.
To sterilize, pour boiling water over your substrate mix until it's thoroughly saturated, then let it drain and cool completely before use. This is the same approach recommended by the Centre for Plant Biodiversity Research, and it's effective for home purposes without needing an autoclave. Once the mix has cooled to room temperature, pack it into your container to a depth of about 3 to 5 cm. Firm it gently so the surface is flat and even. A flat surface gives spores consistent contact and consistent moisture.
Light and placement
Place your container somewhere that gets bright indirect light, or under a fluorescent or LED grow light running 16 hours on and 8 hours off. Research on fern spore germination consistently shows that darkness stops germination dead: in one study on tropical fern species, germination simply didn't occur without light. You don't need intense light at this stage, but you do need consistent, reliable exposure. A windowsill with no direct sun (which would overheat the container) or a basic grow light setup 20 to 30 cm above the container both work well.
Sowing spores and getting germination

Once your container is prepped and the substrate has cooled, it's time to sow. Tap or fold your collection paper to direct spores onto the substrate surface as evenly as you can. Don't bury them. Fern spores germinate on the surface, and light reaches them there. If you have a lot of spores, go light: a thin dusting is more than enough. Dense sowing leads to competition and contamination problems later.
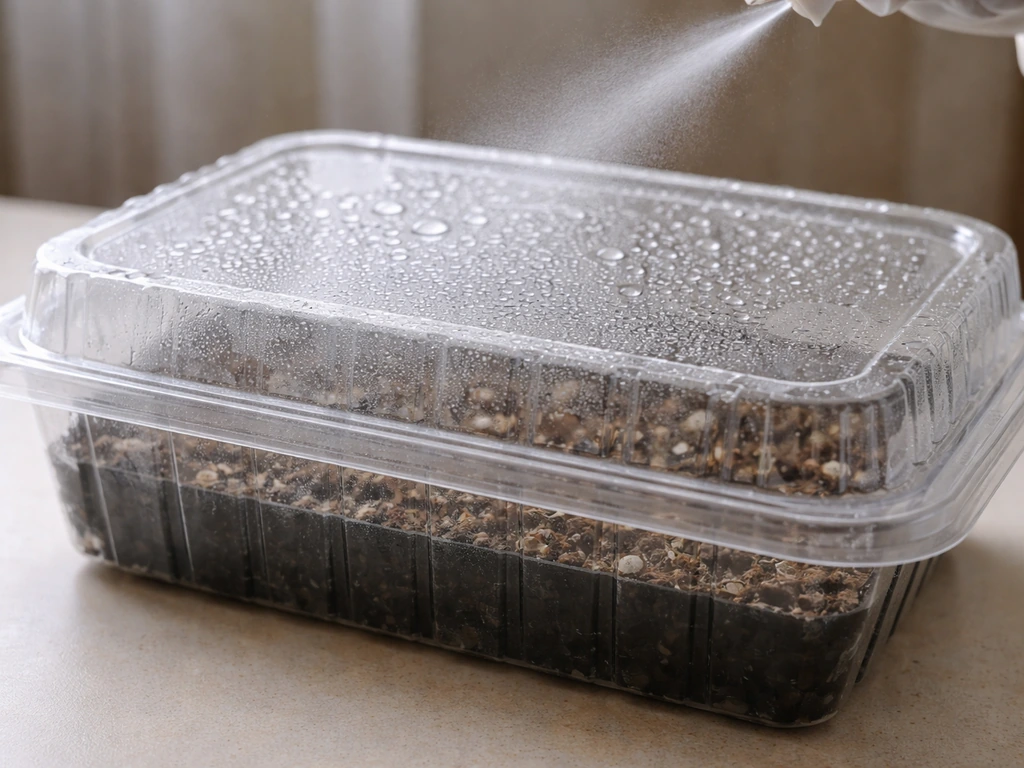
After sowing, mist the surface lightly with distilled water from a clean spray bottle. Tap water works but distilled is better here, since chlorine and minerals can inhibit early germination and introduce contaminants. Seal the lid on your container (or stretch the plastic wrap tight) and set it under your light. You're aiming for a consistent temperature of 22 to 26°C. Some sources suggest 28°C as an optimum for fast germination, but 22 to 26°C is a realistic and effective home target.
Managing humidity, condensation, and ventilation
You want to see condensation on the inside of the lid: that's your visual indicator that humidity is high enough. If the inside is bone dry, add a small amount of distilled water to the substrate (around the edges, not directly on the spores) every 4 to 5 days. If condensation is so heavy that big droplets are forming and dripping back onto the surface, prop the lid very slightly to let a little air through. Standing water on the surface is a fast track to algae and mold problems.
Don't open the container unnecessarily in the first few weeks. Every time you open it, you're introducing airborne contaminants. Check visually through the clear sides or lid instead. After 2 to 6 weeks, you should start seeing a faint green tinge, then a film, then what looks like tiny green scales or a mossy carpet. You can see the fine green film early on, and the magazine also stresses keeping spores moist for successful germination blank" rel="noopener noreferrer">faint green tinge, then a film. That's your prothalli forming, and it's exactly what you want. Don't confuse this with algae (which tends to look slimier and more blue-green). The early prothalli look almost dry and felt-like compared to algal growth.
Growing from gametophytes to tiny ferns
Once you've got a good carpet of prothalli, fertilization needs to happen. Fern sperm are motile and swim to eggs through a thin film of water, so maintaining surface moisture without flooding is critical at this stage. If the surface looks dry, mist lightly with distilled water. The prothalli will sit flat against the substrate, green and heart-shaped when you look closely, each one only a few millimeters across. This stage can last several weeks to a few months depending on your species.
At around the 2 to 3 month mark (longer for bird's nest fern, as noted above), you should start seeing tiny upright fronds pushing up from some of the prothalli. These are your baby sporophytes. At this point, you can begin very slowly introducing more air. Start by propping the lid open just a crack for an hour a day, then gradually increase over a week or two. This is the acclimatization phase and it matters: jumping straight from 100% humidity to room air will kill young sporophytes. Think of it as hardening off, same concept as hardening seedlings before transplanting outdoors.
Light adjustments as sporophytes emerge
Young sporophytes can handle a bit more light than germinating spores, but they're still delicate. Keep them in bright indirect light. Direct sun through glass will cook them. If you're using a grow light, maintain the 16/8 schedule and keep intensity moderate. As plants grow bigger and you start transitioning them to open air, you can begin adjusting light to match your target growing location.
No feeding needed yet
Don't fertilize prothalli or very young sporophytes. The substrate provides what they need at this stage, and adding fertilizer to a humid sealed container is a fast way to encourage algae and bacterial growth. Hold off on any dilute feeding until sporophytes have at least two or three clearly formed fronds and you've started opening the container to the air.
Transplanting and potting ferns
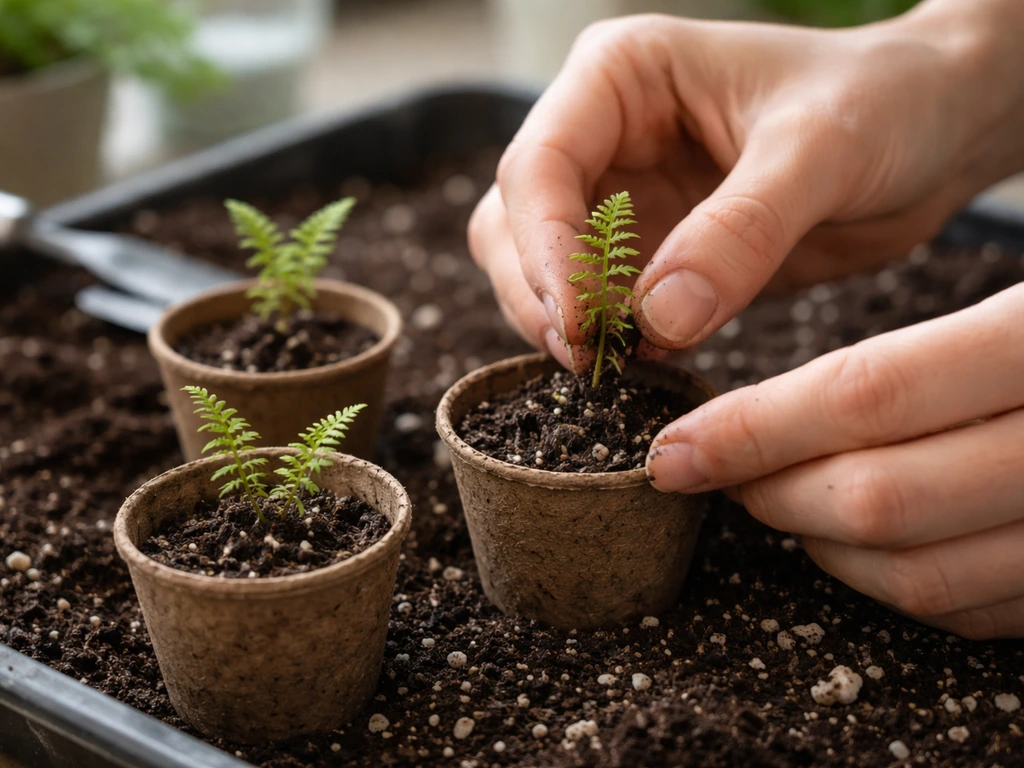
When your sporophytes are roughly 2 to 3 cm tall and have two or three fronds each, they're ready to transplant. Work carefully: the plants are small and the root system is minimal at this point. Use a toothpick or small dibber to lift individual plants with a small plug of the surrounding substrate intact. Don't try to separate the prothallus from the base of the sporophyte: it's still providing some support and can be left attached.
Potting media
A mix of peat moss or coconut coir, perlite, and a small amount of fine bark works well for most ferns. For bird's nest fern, stick with the peat or sphagnum base and include the dolomite adjustment mentioned earlier. Avoid heavy garden soils that compact and stay waterlogged. Fill small pots or cells (4 to 7 cm is plenty at first) and transplant one or a small cluster of seedlings per cell. Firm gently around the base.
Watering routine and acclimation
After transplanting, place the pots inside a loose humidity tent (a clear plastic bag placed loosely over the top works) for the first week or two. Water by sitting the pots in a shallow tray of distilled water for 10 to 15 minutes, letting them absorb from below, then removing them. Top watering risks disturbing small plants and washing away their root contact with the substrate. Over 2 to 3 weeks, gradually open the tent more each day until the plants are fully exposed to room conditions. Keep them out of direct sun and away from heating/cooling vents during this period.
Bird's nest fern from spores: what's different
Bird's nest fern (Asplenium nidus) follows the same fundamental spore-to-sporophyte workflow described above, but there are a few specific adjustments worth knowing. First, it's slow. Research on Asplenium nidus development shows antheridia (male reproductive structures on the prothallus) forming around 60 days after sowing, with archegonia (female structures) appearing around day 80. That means you won't even be at the fertilization-ready stage until nearly three months in, and visible sporophytes will take longer still. Budget 4 to 6 months from sowing to plantable-sized sporophytes, and don't panic if yours takes longer.
Second, the substrate pH matters more with this species. The peat-plus-dolomite recommendation from UF IFAS is worth following: straight peat is quite acidic, and Asplenium nidus performs better with slightly buffered conditions. Third, bird's nest fern is naturally an epiphyte, meaning in the wild it grows on tree branches, not in soil. For the germination container, standard peat/sphagnum works fine. For final potting, lean toward a chunky, well-aerated mix with bark and sphagnum rather than a dense soil-based medium.
For light during the sporophyte stage, bird's nest fern genuinely prefers medium indirect light, not the bright conditions some other ferns tolerate. A north-facing windowsill or a position a meter or two back from a bright east or west window suits established plants well. During the germination and gametophyte stages, the same 16/8 light schedule and moderate indirect light applies as for other species.
| Factor | General ferns | Bird's nest fern (Asplenium nidus) |
|---|---|---|
| Germination time | 2 to 6 weeks | 2 to 6 weeks (similar) |
| Prothallus to sexual maturity | 4 to 8 weeks | 8 to 12 weeks (antheridia ~day 60, archegonia ~day 80) |
| Total spore-to-plantable timeline | 3 to 5 months | 4 to 6+ months |
| Substrate for germination | Peat, sphagnum, or soilless mix | Peat or sphagnum + dolomite for pH buffering |
| Final potting mix | Peat, perlite, bark | Chunky bark, sphagnum, perlite (epiphyte-friendly) |
| Light at sporophyte stage | Bright indirect light | Medium indirect light preferred |
| Temperature target | 22 to 26°C | 22 to 26°C (23°C works well per research) |
Troubleshooting the most common problems
No germination after 6+ weeks
First, check your temperature. Below 18°C, germination slows dramatically or stops. Below 15°C, it often won't happen at all. If your container is in a cold room or on a cold surface, move it somewhere warmer. Second, check light: if the container is in a dark spot or getting very low light, germination may fail entirely regardless of moisture and temperature. Add a grow light if needed. Third, the spores may simply be old or non-viable. If you've had them stored for a long time or in poor conditions, test germination with a small batch and assume low viability. Sow more thickly than usual if you suspect this is the issue.
Algae taking over the container
A thin green film that appears quickly and covers everything uniformly is almost always algae, not prothalli. Algae thrive when there's too much moisture sitting on the surface combined with light and nutrients in the substrate. If algae appear: reduce surface moisture (let the substrate surface dry very slightly between mistings), improve your substrate sterilization next time, and consider moving the container to slightly lower light. You can carefully scrape algae off with a sterile implement and wipe the container walls, but if it's pervasive, you may be fighting a losing battle with that batch.
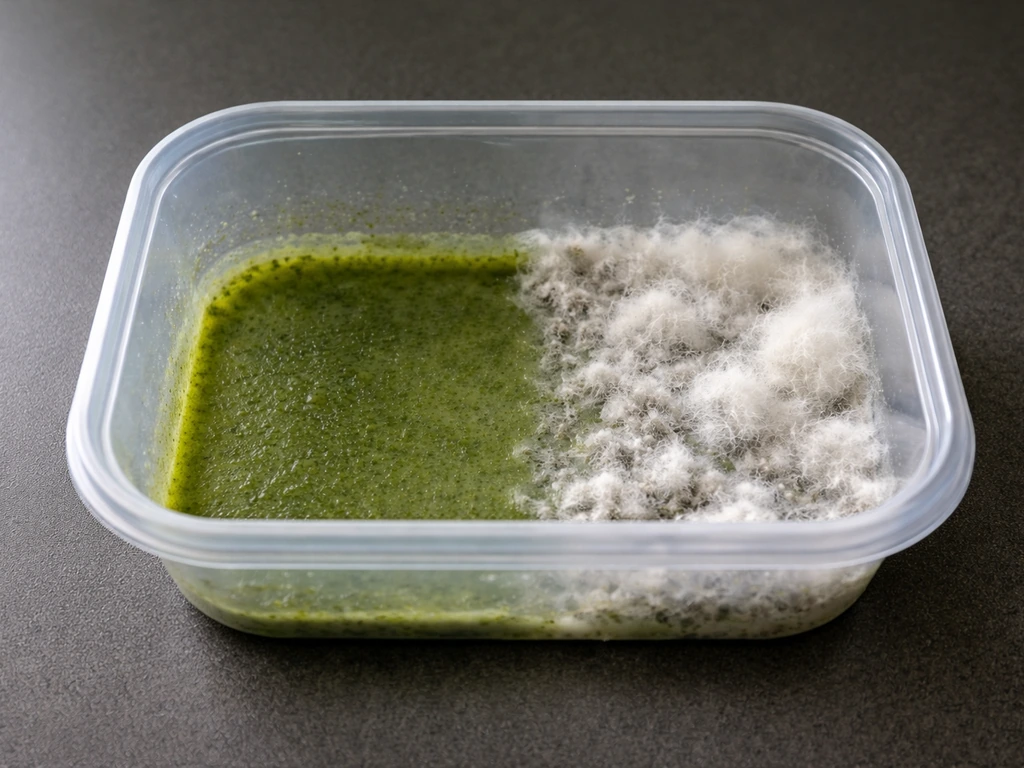
Mold and fungal growth
White fluffy mold in the container usually means the substrate wasn't sterile enough, the container wasn't clean, or you used tap water with organic content. Remove visibly moldy material and substrate beyond the affected area promptly. If it's localized, you may be able to save the batch by removing the contaminated section. If mold covers more than half the container, start over with properly sterilized substrate and a bleach-cleaned container. Using distilled water instead of tap water from this point forward helps prevent recurrence.
Prothalli drying out and dying
This usually happens when the container lid isn't sealing well enough or you're opening it too often. Check the seal and reduce how often you check the container. If the substrate surface is visibly dry, add distilled water carefully around the edges. A good rule of thumb: you should see light condensation on the lid or sides. No condensation at all means humidity is too low.
Damping off in young sporophytes
Damping off is a fungal issue where young plant bases collapse and the plant falls over. It's caused by a combination of too much moisture, poor air circulation, and contaminated substrate or water. If you see it, increase ventilation immediately and reduce watering. Remove affected plants to prevent spread. Going forward, the bottom-watering method (sitting pots in a tray of water) helps by keeping the stem and surface drier while still hydrating roots.
Slow growth that seems stuck
Fern spore propagation is genuinely slow, and it's easy to mistake normal slow progress for a problem. If you have prothalli but no sporophytes forming after 3 months, the most likely issue is fertilization failure. Remember: fern sperm need surface water to reach eggs. Check that the prothallus surface stays lightly moist. You can mist the surface very gently with distilled water to help this along. Low temperatures also slow the gametophyte stage significantly, so again, check that you're holding 22°C or above.
One thing worth noting here, especially if you've grown mushrooms from spores before: fern spore cultivation shares some of the same principles around sterility, humidity management, and controlled environments, but the timeline is measured in months rather than weeks, and the failure modes (algae, damping off, drying) are different from what you'd typically encounter in fungal cultivation.
If you want the mushroom version of spore starting, use the specific steps for growing mushroom spores from a syringe so you set the right sterility and humidity from day one. If you are coming from mushroom cultivation, you can apply the same sterility and humidity mindset, but you will still need to follow fern-specific timing and light needs mushrooms from spores.
If you are specifically working with spore prints, follow the dedicated steps for how to grow mushrooms from spore prints so you get sterility and moisture right from the start mushrooms from spores. The mindset of controlled conditions and patient observation transfers over really well, though. If you've successfully managed a grain jar or agar plate, you already have most of the practical instincts you need for this.
If you're also interested in growing other plants from spores, staghorn ferns and maidenhair ferns follow a similar spore-based propagation path, each with their own substrate and humidity preferences. Staghorn ferns can also be grown from spores, but they need a bit more attention to humidity and mounting conditions as they develop grow staghorns from spores. The core workflow described here applies to both of those species too, with species-specific adjustments in substrate composition and final potting conditions.
FAQ
Can I collect spores from any fern frond, or do I need mature sori?
Yes, but for best results choose a mature frond with obvious, dusty-looking sori on the underside. If you harvest too early (sori not brown and dusty), the spores are often immature and have low viability. After collecting, sow as soon as practical, and if you must store, keep them dry in a sealed paper envelope or glass vial with a desiccant packet.
How can I tell the difference between prothalli and algae before sporophytes appear?
If you see a fuzzy green film right away across the container, treat it as algae rather than prothalli. To reduce the chance of recurrence, keep the substrate sterilized, mist more lightly, and aim for slightly lower light intensity during the earliest weeks. You can also scrape algae off the surface only if it is localized and you can do so without digging into the substrate.
How often should I open the container to check progress without ruining the culture?
For ongoing success, avoid opening the container during the first 2 to 6 weeks. If you must check more often, look through the lid or clear sides instead of lifting it. When you begin gradual acclimation, prop the lid only slightly and step up the daily air exposure gradually over 1 to 2 weeks, not overnight.
What should I troubleshoot first if nothing is germinating after several weeks?
It depends on why it failed. If it was cold, raise the temperature, since below about 18°C germination slows a lot, and below about 15°C it often stops. If it was too dark, add a grow light because light is required for germination. If it was old spores, do a small test sow with a pinch of spores first, because even properly stored spores can lose viability over time.
Should the substrate surface be wet or just humid during spore germination?
Keep the surface evenly moist, not wet. Mist only until the surface looks lightly damp, and if condensation turns into heavy droplets that drip, vent slightly by propping the lid. Standing water on the surface commonly leads to algae or mold, so prioritize a humid atmosphere and a lightly moist surface rather than pooling water.
Can I fix drying prothalli by soaking the whole container or adding more water?
Yes, you can damage the delicate gametophytes by flooding or by repeatedly wetting directly on top. When you need moisture, mist the surface very gently with distilled water, or in later stages, water from below after transplanting. If condensation is already high, skip misting and simply monitor until droplets lessen.
Do I need fertilizer at the prothallus stage, and when is it safe to start feeding?
Not really, and fertilizing too early is a common mistake. During the prothallus and very early sporophyte phase, the sterile-like, low-nutrient setup is part of what prevents algae. Wait until sporophytes have at least two or three clearly formed fronds, and then only introduce fertilizer if your growing conditions are stable and the container has started transitioning to more open air.
When is the right size to transplant baby ferns from the prothalli?
For transplanting, aim for small plants with a base that can be lifted with a tiny plug of surrounding substrate. Do not separate the prothallus, since it can still provide support. Also, transplant when the plants are sturdy enough that they are unlikely to crumble during handling, commonly when they are around 2 to 3 cm tall with multiple fronds.
What causes damping off in fern spore cultures, and how do I prevent it next time?
If you get damping off, it usually means conditions were too wet with insufficient air movement or the substrate or water wasn’t clean. Remove affected seedlings promptly, reduce surface moisture, and increase gentle airflow once you are past the earliest sealed-germination period. Using distilled water and keeping the lid seal appropriate helps prevent repeat outbreaks.
My prothalli formed, but sporophytes never appear. What’s the most likely cause?
If sporophytes stall after prothalli have formed, the most common cause is fertilization failure because fern sperm need a thin film of water. Check that the prothallus surface stays lightly moist without pooling. Also verify temperature, since cooler conditions slow down the gametophyte transition and can delay the emergence of sporophytes.
Why is bird’s nest fern from spores taking so much longer than other ferns?
Bird’s nest fern is slower and more sensitive to conditions than many common indoor ferns. Plan for roughly 4 to 6 months to reach plantable size, follow the slightly buffered substrate approach (peat or sphagnum plus dolomite), and expect that it may not show visible sporophytes as quickly even if everything is working.
What is the best way to store fern spores so they stay viable for later sowing?
Store spores dry and sealed, and avoid plastic storage bags that trap moisture. Use room temperature storage with desiccant, and if you are unsure about viability, sow a small test batch first. For reliability, assume germination rates drop as spores age, so fresh spores are more predictable.