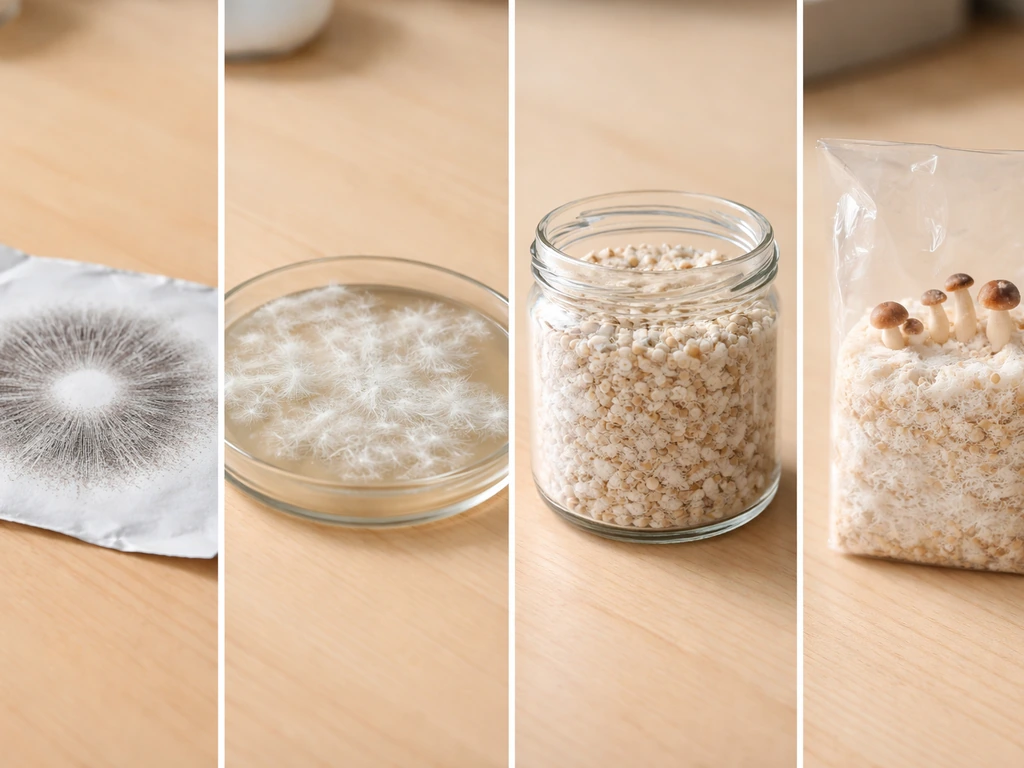
Yes, you can absolutely grow mushrooms from a spore print, and plenty of home growers do it every season. The process takes a few extra steps compared to buying ready-made spawn, but it gives you complete control over your genetics, costs almost nothing to start, and is genuinely satisfying. The basic workflow goes like this: collect or obtain a spore print, transfer those spores to agar under sterile conditions, let mycelium grow and clone the healthiest sector, expand that culture onto grain spawn, and then fruit it in a suitable chamber. Spore to first harvest typically takes 8 to 15 weeks depending on species, so patience is part of the deal.
How to Grow Mushrooms From Spore Prints Step by Step

Marcus Holloway
28 Apr 2026
Can you really grow mushrooms from a spore print?
A spore print is essentially a snapshot of a mushroom's reproductive potential. When a mature cap drops millions of spores onto paper or foil, each one of those spores is a genetic seed capable of germinating into mycelium, and mycelium is what eventually fruits into mushrooms. So yes, the biology absolutely supports it.
That said, there is one honest caveat worth naming up front. Spores are genetically variable, meaning two spores from the same print can produce mycelium with different growth speeds, contamination resistance, or fruiting characteristics. This is different from cloning a mushroom tissue culture, where you get a genetic copy. Growing from spores is more like planting seeds from an open-pollinated vegetable: most will be good, some will be great, and occasionally one will underperform. For edible gourmet species like oyster mushrooms or lion's mane, this variability is manageable and often not noticeable for home-scale growing. It is just something to keep in mind before going in.
For beginners, oyster mushrooms (Pleurotus ostreatus and related species) are the easiest starting point. They germinate quickly, tolerate slightly less-than-perfect sterile technique, and fruit aggressively. Lion's mane (Hericium erinaceus) and shiitake (Lentinula edodes) are workable too, though they need more time and attention. Whatever species you choose, the spore-print method described here will apply.
What you need: tools, supplies, and clean workspace setup
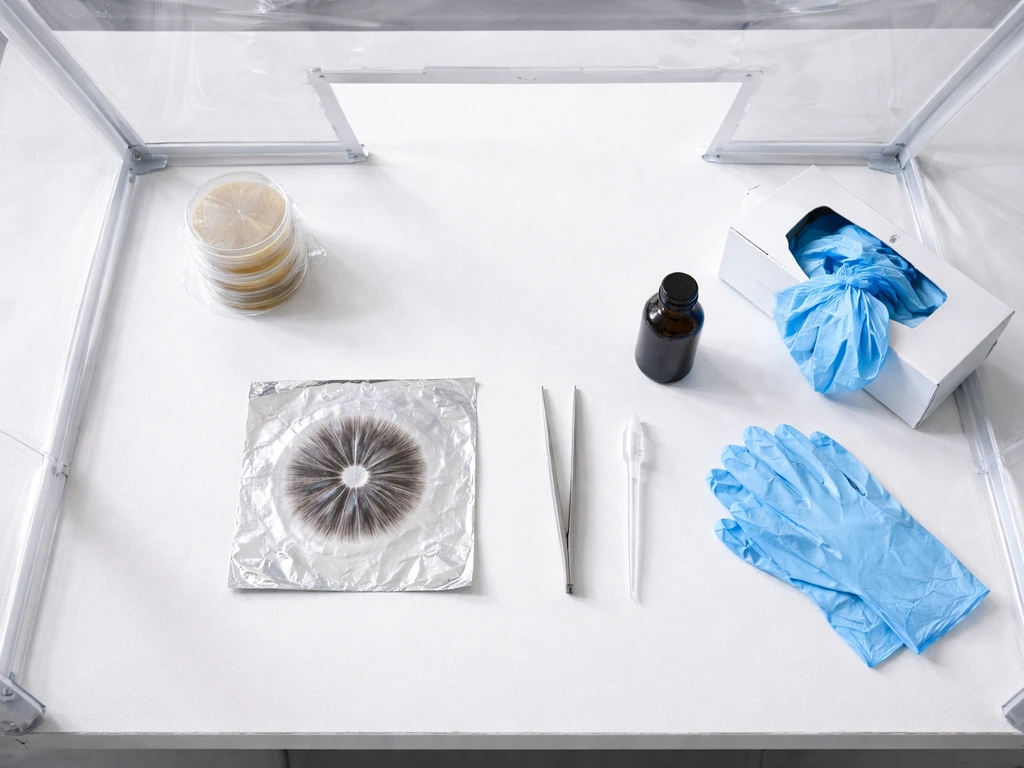
Cleanliness is not just a nice-to-have here. It is the single biggest factor in whether your grow succeeds or fails. Molds and bacteria are everywhere, and they grow faster than mushroom mycelium on most media. Your job is to slow them down long enough for mycelium to establish. Here is what you need to do that effectively.
- Spore print on paper or aluminum foil (homemade or purchased)
- Agar plates: pre-poured potato dextrose agar (PDA) or malt extract agar (MEA) are the most common and easy to source from mushroom supply stores
- Still air box (SAB): a clear plastic tote with two arm holes cut in the side, which dramatically reduces airborne contamination compared to working in open air
- Scalpel or inoculation loop: stainless steel, sterilized with flame between uses
- Isopropyl alcohol (70% or 90%): for wiping surfaces and tools
- Parafilm or tape: to seal agar plates after inoculation
- Gloves and face mask: basic but genuinely important
- Small pressure cooker or Instant Pot: for sterilizing grain jars later in the process
- Mason jars with polyfill or injection-port lids: for grain spawn
- Fruiting chamber: a monotub (large clear storage tote with drilled holes) works well for home growers
Your workspace matters as much as your tools. Wipe down every surface with 70% isopropyl alcohol before you start. Turn off any fans or HVAC vents in the room to reduce airborne particulates. Let the still air box sit undisturbed for at least 10 minutes before opening plates or prints inside it, so any disturbed particles can settle. This is the single best low-cost contamination control you can do without a laminar flow hood.
Collecting, handling, and storing a spore print safely
To make a spore print, cut a mature mushroom cap at the stem, lay it gill-side or pore-side down on a sheet of aluminum foil, cover it with a bowl to prevent drafts, and leave it for 4 to 24 hours. A mature fruiting body will drop a visible, dense print. Foil is preferable to paper because it is easier to fold, store, and scrape spores from cleanly without contaminating the paper fibers.
Once you have your print, let it air-dry completely at room temperature for a few hours before sealing it up. This matters more than most beginners realize. Moisture trapped in storage dramatically shortens spore viability. Moisture trapped in storage dramatically shortens spore viability, and a USDA Forest Service publication on spore preservation notes that silica gel desiccation and storage conditions help maintain viability [silica gel desiccation helps maintain fungal spore viability](https://www.
fpl. fs. usda. gov/documnts/pdf2004/fpl2004nakasone001.
pdf). After drying, fold the foil over the print and place it in a sealed zip-lock bag with a silica gel desiccant packet inside. Label it with the species and date. Stored this way in a refrigerator at around 2 to 8 degrees Celsius, a spore print will typically stay viable for 6 to 12 months.
For longer storage, keep humidity very low and temperatures cool but stable. Avoid storing spores in water, which has been shown to dramatically harm viability, with very few surviving cells remaining after even a moderate storage period.
When you are ready to use the print, let the sealed bag come to room temperature before opening it. This prevents condensation from forming on the cold foil and introducing moisture back onto your spores right before use.
From spore to germination: how to grow mycelium from a spore print
This is where the real work happens, and where sterile technique separates successful grows from contaminated disasters. The goal is to transfer a small amount of spores from your print onto agar plates, then incubate them until you see germinating mycelium.
Preparing your plates
If you are using pre-poured agar plates, let them sit at room temperature for at least an hour before inoculating. Cold plates create condensation on the lid when you open them, and that moisture can carry contaminants directly onto your agar surface. You want the plate and the room to be at roughly the same temperature before you start.
Transferring spores to agar
- Set up your still air box and let it rest undisturbed for 10 minutes.
- Wipe your gloved hands and all surfaces inside the SAB with 70% isopropyl alcohol and let them dry completely before proceeding.
- Flame-sterilize your scalpel tip until it glows red, then let it cool for 15 to 20 seconds. Touching the cool blade tip to the inside edge of the agar (not the inoculation zone) to confirm it is not too hot is a useful habit.
- Open your spore print slightly and gently scrape a very small amount of spores onto the scalpel tip. You need far less than you think: a barely visible dusting is enough.
- Open the agar plate just enough to insert the scalpel, streak the spores lightly across the agar surface in a zigzag pattern, then close the plate immediately.
- Seal the plate edge with Parafilm or strips of tape.
- Label with species, date, and print source.
Incubate your plates at a species-appropriate temperature, usually somewhere between 21 and 27 degrees Celsius for most gourmet species. Store them upside down (agar side up) to prevent condensation from dripping onto the surface. You should see initial signs of germination within 1 to 5 days, with visible white mycelium threads appearing at the spore sites. Once colonies are clearly growing and showing healthy white, fluffy mycelium, you can begin selecting the best-looking sectors.
Selecting and isolating healthy mycelium
This step is where spore-print cultivation gets genuinely interesting. Because spores are sexually variable, different colonies on the same plate will grow at different speeds. Look for sectors with the fastest, densest, most uniform white growth and no signs of discoloration, slime, or unusual smell. Use a flame-sterilized scalpel to cut out a small wedge of that sector and transfer it to a fresh agar plate. This is called isolating, and it is how you get from a mixed spore germination to a reliable, stable culture. Two or three rounds of isolation will give you a consistently performing mycelium ready to expand.
From mycelium to spawn and then to fruiting: next steps
Once you have a clean, healthy mycelium culture on agar, the next step is expanding it onto grain spawn. Penn State’s Spawn Lab procedures describe spawn as vegetative growth and pure-culture mushroom mycelium on suitable sterilized substrates such as agars, grains, or wood chips expanding it onto grain spawn. Grain spawn is colonized grain (rye berries, wheat berries, or brown rice are all popular) that becomes a high-nutrition inoculant you then mix into your bulk substrate for fruiting.
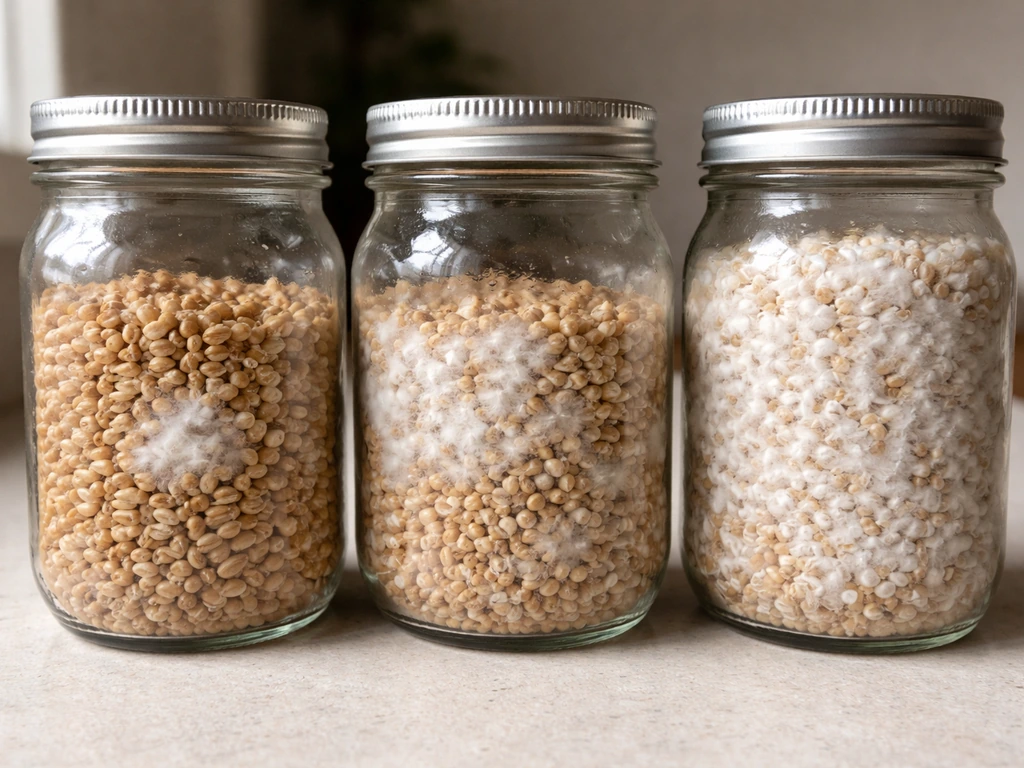
Making grain spawn from your agar culture
- Soak your chosen grain overnight, then simmer until just tender. Drain and let the surface moisture dry slightly so grains are hydrated but not wet on the outside.
- Fill mason jars about two-thirds full with the prepared grain.
- Pressure cook the jars at 15 PSI for 60 to 90 minutes to fully sterilize. Let them cool completely (12 to 24 hours) before inoculating.
- Inside your still air box or in front of a flow hood, cut a small wedge from your agar culture and drop it into the grain jar through a sterilized opening. Seal immediately.
- Shake the jars every few days once mycelium has established (you will see white growth beginning) to distribute the colonization evenly through the grain.
- Full colonization of grain typically takes 10 to 21 days at appropriate incubation temperatures.
Moving to bulk substrate and fruiting
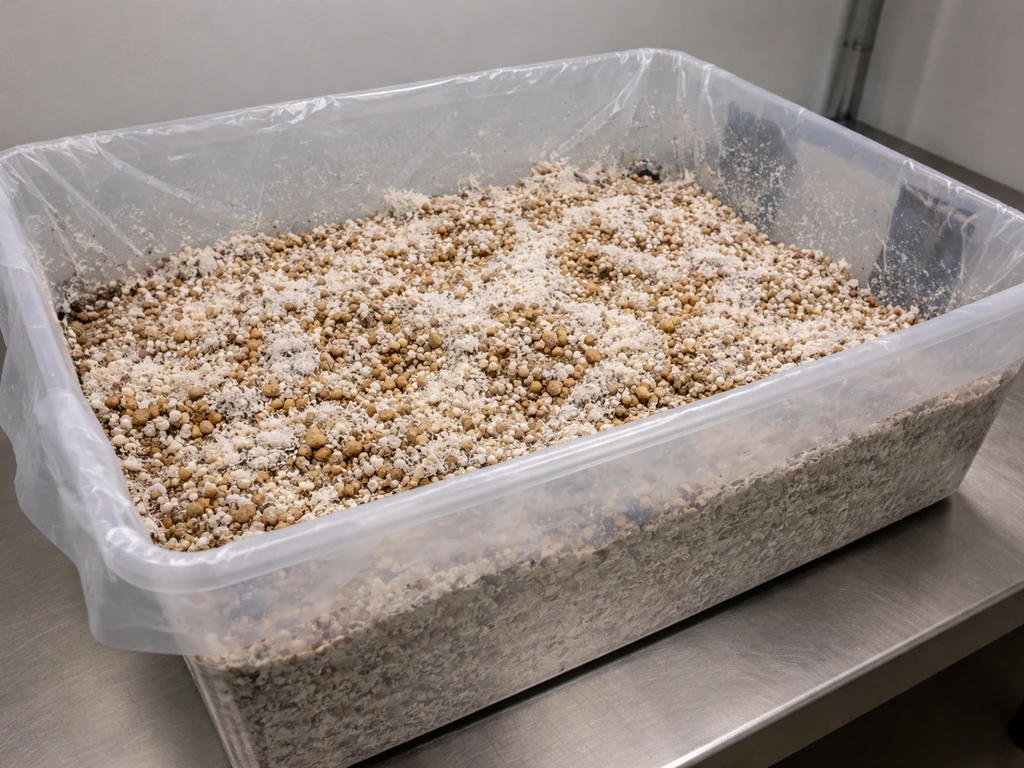
Once your grain jars are fully colonized, you mix that spawn into a bulk substrate suited to your species. Oyster mushrooms do well on pasteurized straw or hardwood sawdust. Shiitake prefers hardwood blocks. Lion's mane works on sawdust or a hardwood and wheat bran mix.
A general rule of thumb is a spawn rate of around 10 to 20 percent spawn to substrate by weight. Mix everything inside your fruiting container, whether that is a monotub, a bucket, or a log-style block, then let it finish colonizing the bulk substrate. That final colonization typically takes another 7 to 14 days on bulk.
Penn State's documented cycle for cultivated mushrooms describes this flow as spawn run, then casing or consolidation, then pinning, then harvest, and the sequencing holds true even for home growers working at small scale.
Total time from spore print to first harvest varies considerably by species. Once your spores have germinated and become mycelium, the same general approach for growing a fern from spores is about keeping the right moisture and temperature steady how to grow a fern from spores. Once you have the basics of spore germination down, the same care principles apply for how to grow maidenhair fern from spores.
For ostrich fern, focus on keeping the germinating medium evenly moist and the temperature in a narrow, fern-friendly range until you see a new growth point how to grow ostrich fern from spores. For staghorns, use the same spore-to-mycelium approach, then dial your humidity and temperature to what staghorn corals need during early growth how to grow staghorns from spores.
Oyster mushrooms can move from spore print to harvest in as little as 8 to 10 weeks when everything goes well. Shiitake and lion's mane are slower, often 12 to 16 weeks or more. Agaricus species (button mushrooms) can run closer to 15 weeks for the full production cycle. Set your expectations by species rather than hoping for a universal timeline.
Environmental conditions for fruiting and getting good yields
Getting your mycelium to actually produce mushrooms requires hitting a few environmental triggers. The three key ones are humidity, fresh air exchange, and temperature. Get all three right and your grow will respond. Miss one and you will get either no pins at all or weak, leggy growth that does not develop properly.
| Condition | Target Range | What Happens if Off |
|---|---|---|
| Humidity | 85–95% RH | Below 80%: pins dry out, surface cracks, poor development |
| CO2 / Fresh Air Exchange | Below ~1,000 ppm CO2 (good FAE) | Above 1% CO2: caps open early, stems elongate; above 5% CO2: fruiting bodies fail to form |
| Temperature | Species-dependent (e.g., oysters: 15–22°C; lion's mane: 18–24°C) | Too warm: encourages contamination and poor yield; too cold: slows or halts pinning |
| Light | Indirect or ambient light, 12 hrs/day | Not critical for yield, but helps orient pin direction |
For humidity, a simple humidity tent made from a clear plastic bag or dome over your fruiting container works at home. Mist the walls of the container (not directly on the mycelium surface) two to three times per day with clean water. A small hygrometer inside the tent will tell you exactly where you are.
Fresh air exchange is the one condition beginners most often underestimate. Mushrooms respire oxygen and exhale CO2 just like we do. In a sealed container, CO2 builds up quickly. Shiitake, for example, is particularly sensitive: CO2 levels above 1 percent actively suppress fruiting body development, and at 5 percent, fruiting stops entirely.
Fresh air in your room contains about 0. 03 percent CO2, so you are working with a lot of headroom as long as you are actually exchanging air. For a monotub, drill a row of 6mm holes on each side and stuff them with polyfill filter material. That gives passive FAE without letting in unfiltered air.
Fan the container briefly (wave the lid) a couple of times a day if you want to supplement further.
Troubleshooting and common mistakes when using spore prints
Growing from spore prints has a few failure points that are specific to the method, separate from general mushroom cultivation problems. Here is what goes wrong most often and how to fix it.
Contamination on agar plates
Green, black, or pink patches on your agar within a few days of inoculation mean mold got in during transfer. The most common causes are not letting your scalpel cool long enough after flaming (which kills your mycelium too), working in moving air, or not sealing the plate edges well. If you catch contamination early and the growth is clearly separate from your mycelium zone, you can sometimes cut around the clean area and transfer it to a fresh plate. But usually it is faster to just start fresh and tighten your technique.
No germination or very slow germination
If you see nothing after 10 days, there are two likely culprits. First, your spore print may have lost viability, either from age, moisture exposure during storage, or temperature extremes. Second, you may not have transferred enough spores onto the agar. Spore prints can look dense but the actual transfer from foil to scalpel to agar can be minimal. Try scraping a slightly more visible amount of spores on your next attempt. Also confirm your incubation temperature is within the right range: too cold and germination slows dramatically, particularly for tropical species.
Weak, patchy, or ropy mycelium growth
Healthy mycelium on agar should look bright white, dense, and relatively uniform. Thin, stringy, or ropy-looking growth often indicates a suboptimal spore isolation or a genetic sector that just is not performing well. Because spores are variable, this happens sometimes. The fix is straightforward: look for a better-performing colony on your plate, isolate it to a fresh plate, and discard the weak performer. This is exactly why working with multiple plates from the same print is good practice, especially when starting out.
Mycelium colonizes but won't pin
This is almost always an environmental problem rather than a genetics problem. Check your CO2 levels first: if your fruiting chamber is sealed too tightly with no fresh air exchange, CO2 accumulates and blocks pinning. Next check humidity. A surface that dries out between mistings will not initiate pins reliably. Finally, some species need a temperature drop of a few degrees to trigger pinning, so dialing the temperature down by 3 to 5 degrees Celsius for a day or two can serve as a pinning trigger. Oyster mushrooms, for example, often pin more readily after a cold shock.
Grain jars contaminating after agar transfer
If your agar culture looks clean but your grain jars contaminate after transfer, the problem is usually in the grain preparation or sterilization step. Make sure you are pressure cooking for a full 60 to 90 minutes at 15 PSI, that jars are cooled completely before inoculation, and that transfers happen in a still air box with freshly flame-sterilized tools. Wet grain surfaces are also a major contamination risk: drain your cooked grain well and let surface moisture steam off before jarring. Ostrich ferns can also be started from spores, but they require a sterile setup and consistent moisture during the early gametophyte stage how to grow ostrich fern from spores.
The spore-print method has a longer learning curve than buying pre-made grain spawn, but the skills you build here compound quickly. Once you can reliably take a print to clean mycelium on agar, you have the foundation for every other cultivation technique: tissue culture cloning, multi-spore isolation, strain selection, and building your own spawn library. Growing mushrooms from a spore syringe follows a very similar sterile agar-inoculation workflow, so your skills transfer well. If you are also exploring other ways to work from spores directly, the related process of growing mushrooms from a spore syringe follows a very similar agar-inoculation workflow and the same sterile discipline applies throughout.
FAQ
Can I start growing mushrooms directly from a spore print without using agar?
You can try, but it is much less reliable. Spores often germinate unevenly, and without an isolation step you cannot separate clean mycelium from hidden contaminants. Using agar lets you pick fast, healthy sectors and re-isolate if needed, which is the main reason spore-print grows work for most home growers.
How do I know whether my spore print is still viable before I waste time on agar?
The quickest check is to inoculate a small set of plates from that print and incubate at the species-appropriate temperature. If you see no germination by around day 5 to 7, or if growth is extremely sparse and patchy, viability or transfer amount is likely low. Also avoid repeatedly warming and cooling the print, since condensation during handling reduces viability.
What is the difference between using multi-spore isolation versus single-spore isolation?
Multi-spore isolation means you isolate sectors where multiple spores may have contributed, so you get a stable culture but it may still contain internal variation. Single-spore isolation aims for a culture derived from one spore, producing more uniform genetics, but it requires more careful technique to ensure the plate sector actually came from a single germinating point.
Can I clone the fastest colony from an agar plate without going through grain spawn first?
Yes. You can keep working on agar by isolating the best sector into fresh plates (maintenance). Grain spawn is mainly for scale and speed, once you have a culture you trust. Many growers maintain strains on agar first, then move to grain only when they are ready to fruit.
My agar shows growth, but it looks brown, yellow, or watery. Is that always contamination?
Not always, but it is a red flag. Contamination is often colored patches, fuzzy growth, or a slimy texture. Some species can show slight pigmentation as they age, but healthy cultures are usually bright white and firm. If you smell sour, putrid, or see uneven spreading that looks nothing like normal mycelium, isolate a clean area or start over.
How many agar plates should I inoculate from one spore print?
For best odds, inoculate several plates from the same print, then isolate from the fastest clean sectors across those plates. This gives you insurance against weak or contaminated germination points and helps you select a better performer, since individual sectors can vary even within the same print.
Do I need to do a temperature change to get my mushrooms to pin, starting from a spore-print culture?
Often, yes, but it depends on species and your baseline environment. Even if incubation was perfect, fruiting frequently needs a slight temperature drop, plus fresh air and stable surface humidity. If you never dial conditions for fruiting, you may get colonized substrate but few or no pins.
How can I reduce condensation on plates while inoculating?
Match plate temperature to the room, let cold plates warm sealed for about an hour, and store incubating plates upside down. During inoculation, minimize how long lids are open, and avoid moving the open plate around in drafts, since any droplets can carry contaminants to the agar.
What should I do if I see contamination only after I transfer to grain?
When contamination appears after grain work, it usually points to the sterilization or handling stage of grain. Check pressure-time and pressure level consistency, ensure jars are fully cooled before inoculation, and make sure the tools and workspace are still-air clean. Also prevent wet grain surfaces, since excess surface moisture increases bacterial and mold takeover.
Can I refrigerate agar plates, or should I keep them at incubation temperatures?
You typically avoid refrigerating fresh agar cultures because temperature shock can slow or damage growth. For short-term storage, many growers keep cultures in a cool room, or follow a species-specific maintenance temperature and humidity approach. If you refrigerate, do it briefly and minimize temperature cycling, then bring plates back gently before further isolating.
How long should I wait before discarding a contaminated agar plate?
If contamination is obvious within the first few days, it is usually faster to discard and re-run rather than try to save it. If contamination appears at a distant edge and the colony boundary is distinct, you can attempt isolating a clean wedge into a new plate, but only when you are confident the mycelium zone is separate.
What’s a common mistake when transferring spores from the print to agar?
Under-transfer. Prints can look dense, but the actual scraping into agar can be minimal. Make sure you pick up visible spore material and spread it lightly enough to see distinct germination points. Also be careful not to over-handle the foil and inadvertently add moisture or debris from the storage bag.
Does how I store a spore print matter after it dries, and what about repeatedly opening the bag?
Storage conditions matter, humidity and temperature stability are the key variables. After drying and sealing with desiccant, avoid repeated opening because each opening risks introducing moisture and airborne contamination. If you need frequent access, consider splitting the print into smaller, separately sealed bags.
Can I reuse grain jars or substrate bags after a failed spore-print grow?
If you suspect contamination, do not re-inoculate or reuse. Many contaminants persist on equipment and inside porous materials, even if they do not show immediately. The practical next step is to clean, sanitize tools, and start a new grain batch under the same improved sterile workflow.