Growing Psilocybe cubensis indoors follows a clear sequence: get spores or liquid culture, inoculate a sterilized grain or all-in-one substrate, colonize in warm darkness for 2 to 4 weeks, then move to a fruiting chamber with high humidity and fresh air exchange until mushrooms pin and grow to harvest size. If you are specifically looking for how to grow amanita muscaria indoors, the setup and environmental targets will differ from cubensis Growing Psilocybe cubensis indoors. The whole process from inoculation to first harvest typically takes 5 to 8 weeks, depending on your method, strain, and how well you control contamination. Every step below is something you can do at home with basic kitchen equipment and supplies you can order online.
How to Grow Cubensis Indoors: Step-by-Step Setup to Harvest

Marcus Holloway
2 Jun 2026
Legality, safety, and what you're actually growing
Psilocybe cubensis is the most commonly cultivated psilocybin-containing mushroom species in the world. It produces psilocybin and psilocin, which are controlled substances in most countries. In the United States, psilocybin remains a Schedule I substance at the federal level. Some cities and states have decriminalized personal possession or cultivation, and a growing number of jurisdictions have deprioritized enforcement, but that does not make it federally legal. In Canada, cultivation is explicitly illegal under the Controlled Drugs and Substances Act unless you hold a Health Canada licence or exemption, which are extremely rare for personal use. Before you start, look up the current laws in your specific city, state or province, and country. This article covers the cultivation process for informational purposes, and it's your responsibility to know where you stand legally.
On the safety side, the main risks in the grow room are not the mushrooms themselves but mold contamination. Contaminant spores like Trichoderma (green mold) and Cobweb mold are airborne and can irritate your respiratory system. blank" rel="noopener noreferrer">Wear at minimum an N95 respirator (NIOSH-approved) when working with open substrate, cleaning out contaminated bags, or harvesting. Gloves and eye protection are smart additions, especially when handling bleach solutions or disposing of contaminated material. WHO's Laboratory Biosafety Manual implementation guide describes biosafety as a structured approach to minimizing infectious, chemical, and physical risks through appropriate control strategies, containment, and PPE blank" rel="noopener noreferrer">biosafety as a structured approach to minimizing infectious, chemical, and physical risks via control strategies. If you're building out a more serious setup, a still air box or a laminar flow hood with HEPA filtration will protect both you and your cultures.
Setting up your indoor grow space
You don't need a dedicated room. A clean corner of a spare bedroom, a closet, or even a shelf unit works fine for small grows. The key is separating your colonization space (warm, dark, undisturbed) from your fruiting space (humid, with airflow and indirect light). If you are aiming to learn how to grow azurescens mushroom indoors, use the same indoor grow room principles and then adjust the temperature, humidity, and fresh air exchange targets to suit that species separating your colonization space. Many beginners combine both into a single tent or tub and get decent results, but keeping them separate gives you much better control.
Temperature
Cubensis colonizes best between 75°F and 80°F (24°C to 27°C). Fruiting prefers a slightly cooler 70°F to 75°F (21°C to 24°C), with the temperature drop actually helping trigger pinning. If your home runs cooler in winter, a seedling heat mat under your colonizing bags or jars keeps temps in range without overheating. Avoid going above 86°F (30°C) for extended periods as it stresses the mycelium and invites contamination.
Humidity
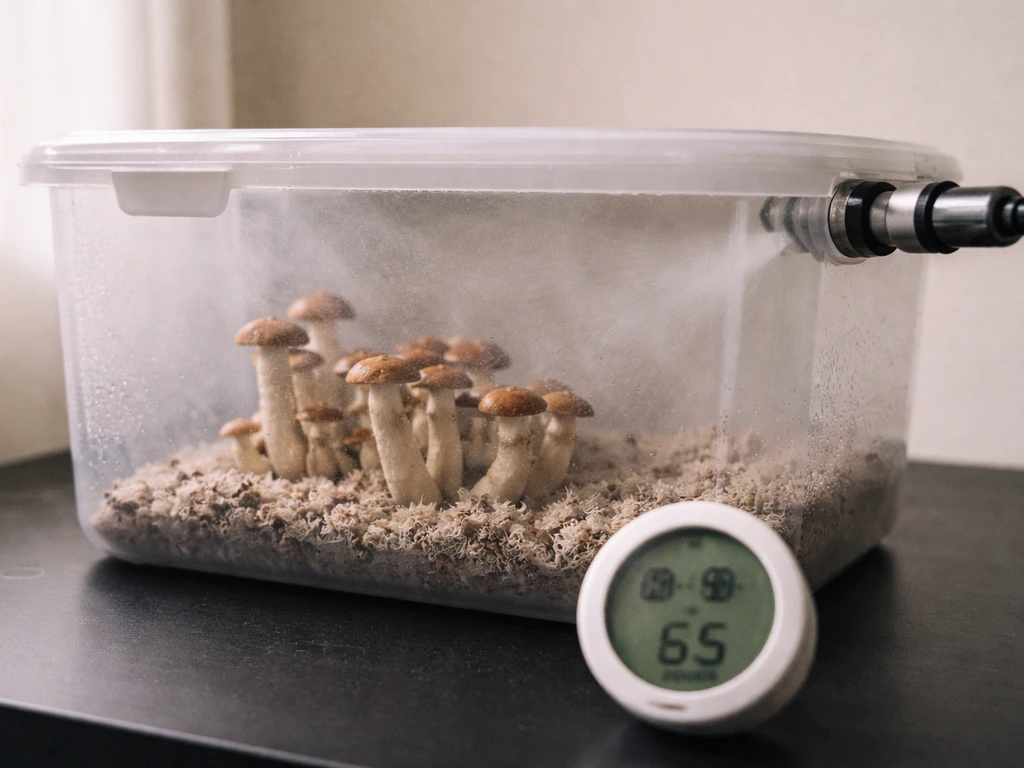
Colonization does not require ambient humidity control since your substrate jars or bags are sealed. Fruiting is different: you want 85% to 95% relative humidity inside your fruiting chamber. A hygrometer is non-negotiable here. Most home setups use an ultrasonic humidifier, a shotgun fruiting chamber (SGFC) with perlite, or daily misting with a hand sprayer. Misting directly onto pins can cause damage and blobbing, so mist the chamber walls, not the mushrooms themselves.
Fresh air exchange (FAE)
CO2 buildup causes long, thin stems and small, deformed caps. Cubensis wants fresh air exchange 4 to 6 times per day during fruiting. A passive SGFC achieves this through its many holes. A martha tent setup uses a small USB fan on a timer. Even just fanning your fruiting chamber manually two or three times a day beats stagnant air. The goal is to drop CO2 levels without crashing humidity, which is why FAE and misting work as a pair.
Light
Cubensis doesn't need light to colonize, and it doesn't photosynthesize during fruiting either. Light serves as a directional cue: it tells the mushrooms which way is up and helps trigger pinning. A 12-hour light and 12-hour dark cycle using a basic LED or fluorescent lamp is plenty. Indirect natural light from a nearby window also works. Don't worry about intensity or spectrum, cubensis is not picky about this.
Starting materials: spores, liquid culture, or spawn
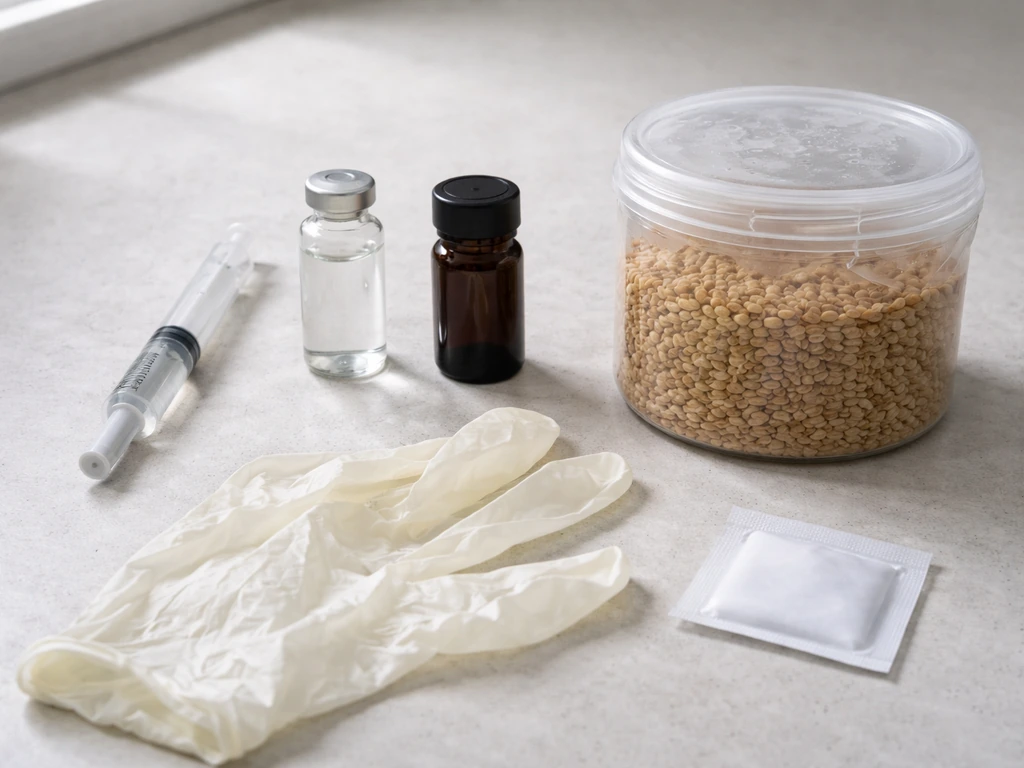
Your starting material determines how long your grow takes and how much contamination risk you carry. Here are the three main options most home growers use.
| Starting Material | What It Is | Pros | Cons | Best For |
|---|---|---|---|---|
| Spore syringe | Spores suspended in sterile water | Widely available, affordable ($10-$20), easy to store | Slower colonization, higher contamination window, no guarantee of viability | Beginners who want to start from scratch |
| Liquid culture (LC) | Mycelium already colonizing a nutrient broth | Faster colonization (cuts 1-2 weeks vs spores), less contam risk | Slightly pricier, shorter shelf life, needs refrigeration | Intermediate growers who want speed |
| Ready-made spawn or all-in-one bag | Pre-colonized grain or substrate bag | Fastest path to fruiting, minimal equipment needed | Most expensive per grow, less control | Beginners who want to skip the inoculation step |
For most beginners, a spore syringe into an all-in-one grain bag is the easiest entry point. If you want more control and faster results, sourcing a liquid culture syringe and inoculating your own sterilized grain jars is the next step up. Spores sold as 'for microscopy' are legal to purchase in most U.S. states (except Georgia, Idaho, and California), but germinating them is where the legal line sits in most jurisdictions.
Choosing a cubensis strain
Hundreds of cubensis strains exist, from Golden Teacher and B+ (forgiving, reliable pinners) to more aggressive varieties like Penis Envy (slow colonizer but high potency) or APE (Albino Penis Envy, even slower). For your first grow, stick with Golden Teacher, B+, or Cambodian. They colonize quickly, pin reliably, and tolerate beginner mistakes better than most. Once you have a few grows under your belt, it's fun to branch out to more challenging varieties.
Substrate choice and preparation
Cubensis grows on a wide range of substrates, but the method you use determines which substrate makes the most sense. There are two broad approaches: PF-style (Brown Rice Flour and Vermiculite in small jars) and bulk substrate (grain spawn mixed into a larger, nutrient-rich substrate block or tray).
PF-Tek (Brown Rice Flour and Vermiculite)
PF-Tek is the classic beginner method. You mix 2 parts vermiculite, 1 part brown rice flour, and enough water to reach field capacity (water drips slowly when you squeeze a handful), then fill half-pint mason jars to about 2/3 full, top with dry vermiculite as a contamination barrier, and pressure cook at 15 PSI for 60 to 90 minutes. Let jars cool fully before inoculating. PF-Tek cakes are small, which limits yield, but the jars are easy to sterilize, cheap, and hard to mess up.
Grain spawn (for bulk grows)
Rye berries, whole oats, wheat berries, and popcorn all work well as grain spawn. Soak grain overnight, simmer until just hydrated (kernels swell but don't split), drain and dry the exterior, then fill mason jars or polypropylene bags to about 2/3 full. Pressure cook at 15 PSI for 90 minutes (grain needs more time than rice flour). Once colonized, grain spawn gets mixed into a bulk substrate to increase your fruiting surface area dramatically.
Bulk substrates (coco coir, CVG, manure-based)
The most popular bulk substrate for cubensis is CVG: coco coir, vermiculite, and gypsum. It's pasteurized rather than sterilized (180°F for 60 to 90 minutes in a boiling water bath works fine) because the low-nutrient profile doesn't support fast mold growth the way grain does. Manure-based substrates (sterilized horse or cow dung mixed with straw) are highly nutritious and produce heavy flushes but are messier to work with and require pressure sterilization. A common ratio for bulk grows is 1 part grain spawn to 2 to 3 parts bulk substrate by volume.
| Substrate | Method | Sterilize or Pasteurize? | Difficulty | Yield Potential |
|---|---|---|---|---|
| BRF + Vermiculite (PF-Tek) | Jars, small cakes | Sterilize (PC 60-90 min at 15 PSI) | Beginner | Low-Medium |
| Coco Coir + Vermiculite (CVG) | Bulk tray/bin | Pasteurize (180°F for 60-90 min) | Beginner-Intermediate | Medium |
| Grain (rye, oats, popcorn) | Spawn for bulk grows | Sterilize (PC 90 min at 15 PSI) | Intermediate | High (as spawn) |
| Manure/Straw blend | Bulk tray | Sterilize or hot pasteurize | Intermediate-Advanced | High |
Inoculation and colonization
This is the stage where contamination risk is highest, so cleanliness is everything. Clean your workspace with isopropyl alcohol (70% is more effective than 100% for killing microbes). Wear gloves and a mask. Still air boxes made from a clear storage tote with arm holes cut in the sides reduce airborne contamination dramatically. A laminar flow hood is better but not required for small grows.
Inoculation workflow
- Wait until jars or bags have cooled to room temperature after sterilization (at least 8 hours, ideally overnight). Inoculating warm substrate invites contamination and can kill mycelium.
- Flame-sterilize your needle until glowing red, let cool for 10 seconds, wipe with alcohol-soaked cotton.
- Insert the needle through the self-healing injection port or polyfill-plugged hole. For PF jars, inject 1 to 2 ml of spore or LC solution at 3 to 4 points around the outside of the jar.
- Wipe the injection site with alcohol. Label each jar or bag with the strain and date.
- Place jars in a warm (75°F to 80°F), dark spot. Do not disturb for at least 5 to 7 days.
Colonization timeline and what to expect
With a liquid culture, you should see white mycelium spreading from inoculation points within 3 to 7 days. Spore syringes typically take 7 to 14 days before visible growth. Full colonization of a PF jar takes 3 to 4 weeks from inoculation. Grain jars colonize faster and can be fully white in 10 to 21 days with LC. You can gently shake or 'break and shake' grain jars once the mycelium has a foothold (around 30% colonized) to redistribute the mycelium and speed things up. Don't shake PF jars.
The mycelium should look white and cottony or rope-like (rhizomorphic) depending on the strain. Yellowing or browning of the substrate can be metabolite secretion (normal) or early contamination (investigate further). Green, black, or pink patches are contamination. Remove contaminated jars immediately by double-bagging them and tossing them outside. Don't open contaminated jars indoors.
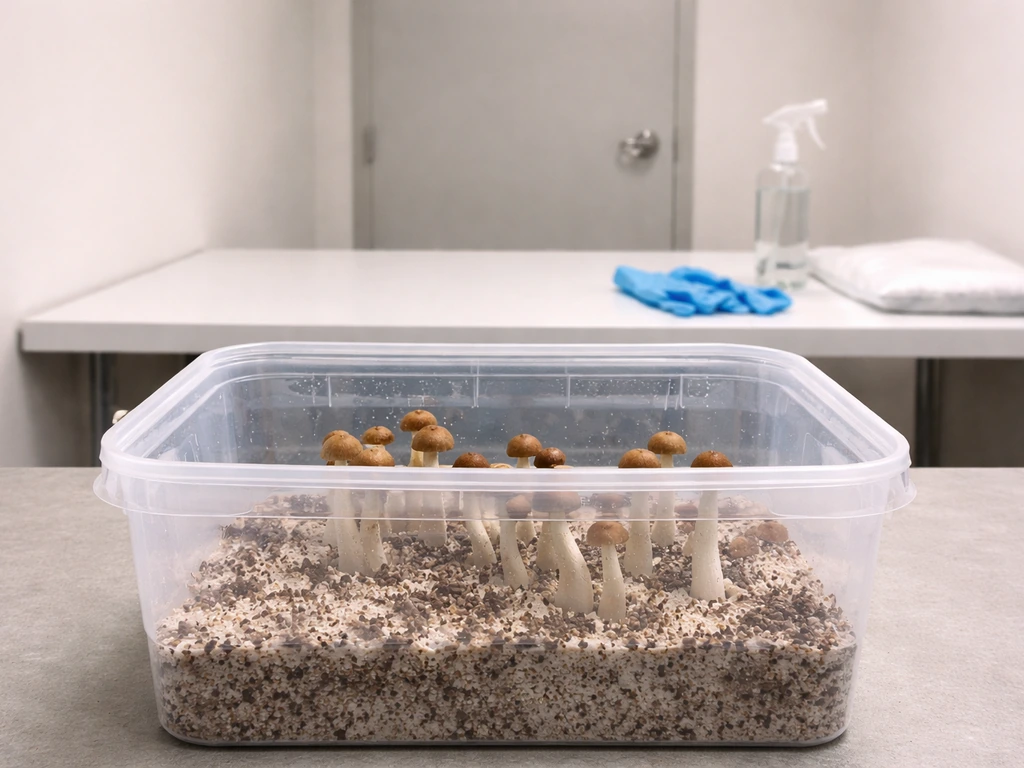
Spawning to bulk substrate
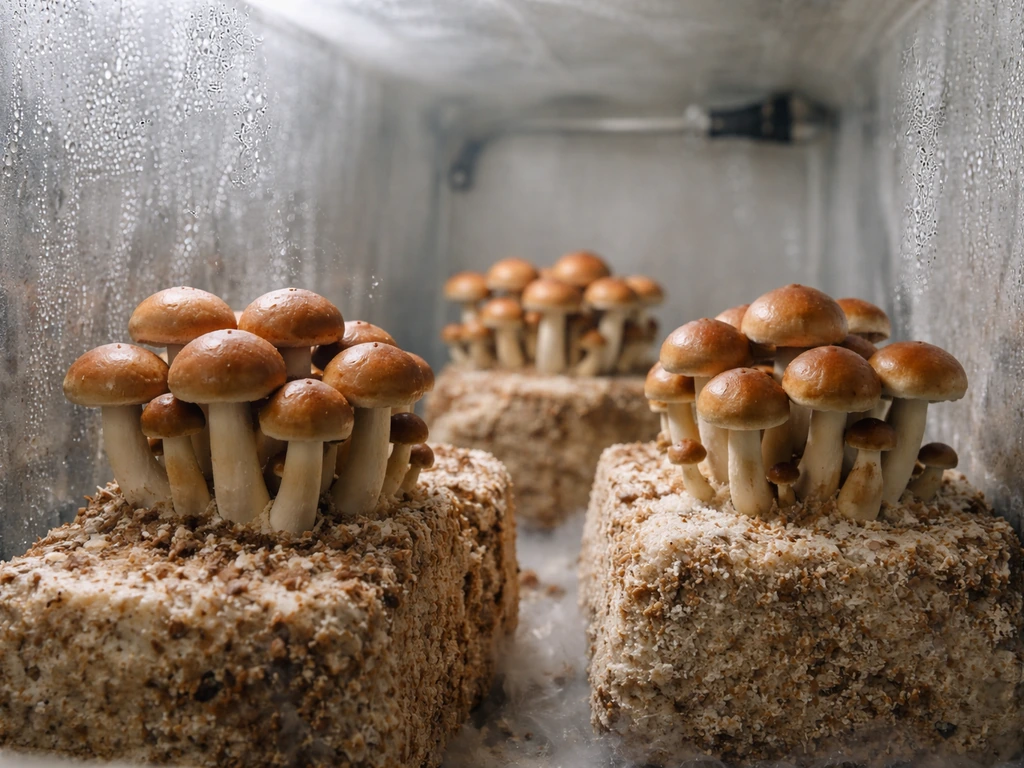
Once grain jars are 100% colonized (give them an extra few days after the last white spot closes up), it's time to mix spawn into your bulk substrate. Do this in a clean environment. Crumble the grain spawn into the pasteurized or sterilized bulk substrate, mix thoroughly at the 1:2 or 1:3 spawn-to-substrate ratio, and press it into a monotub or grow bag. The surface should be smooth and compact. Colonization of the bulk layer usually takes 5 to 14 more days at 75°F to 80°F.
Triggering pins and running your fruiting chamber
Once the bulk substrate (or PF cake) is fully colonized, you initiate fruiting by dropping temperature slightly, increasing fresh air exchange, and maintaining high humidity. For PF-Tek, this means dunking your fully colonized cakes in cold water for 12 to 24 hours (the 'dunk and roll' method, where you can optionally roll them in vermiculite for moisture retention), then placing them on a bed of wet perlite inside a fruiting chamber.
Fruiting chamber management
- Maintain 85% to 95% relative humidity by misting chamber walls (not the mushrooms) 2 to 4 times daily and/or running an ultrasonic humidifier on a controller.
- Fan the chamber for 30 to 60 seconds after each misting to exchange CO2 and prevent standing water on the substrate surface.
- Keep temperatures at 70°F to 75°F (21°C to 24°C). A slight temperature drop from colonization temps helps trigger pinning.
- Provide 12 hours of indirect light per day using a timer. Even a lamp in the room cycling on and off works.
- Do not touch or disturb forming pins. They are fragile at the early stage and stressing them can abort growth.
Pin development timeline
Most cubensis strains begin forming visible pins within 5 to 14 days of initiating fruiting conditions. From first visible pin to harvest-ready mushroom is typically 5 to 10 days, depending on strain and environment. Pins start as tiny white bumps, develop into small knobs with a distinctive veil, and then swell rapidly in the last 24 to 48 hours before harvest size. Watch the veil carefully: once it begins to tear away from the cap edge, you're at peak harvest time.
Harvesting, drying, storage, and troubleshooting
When and how to harvest
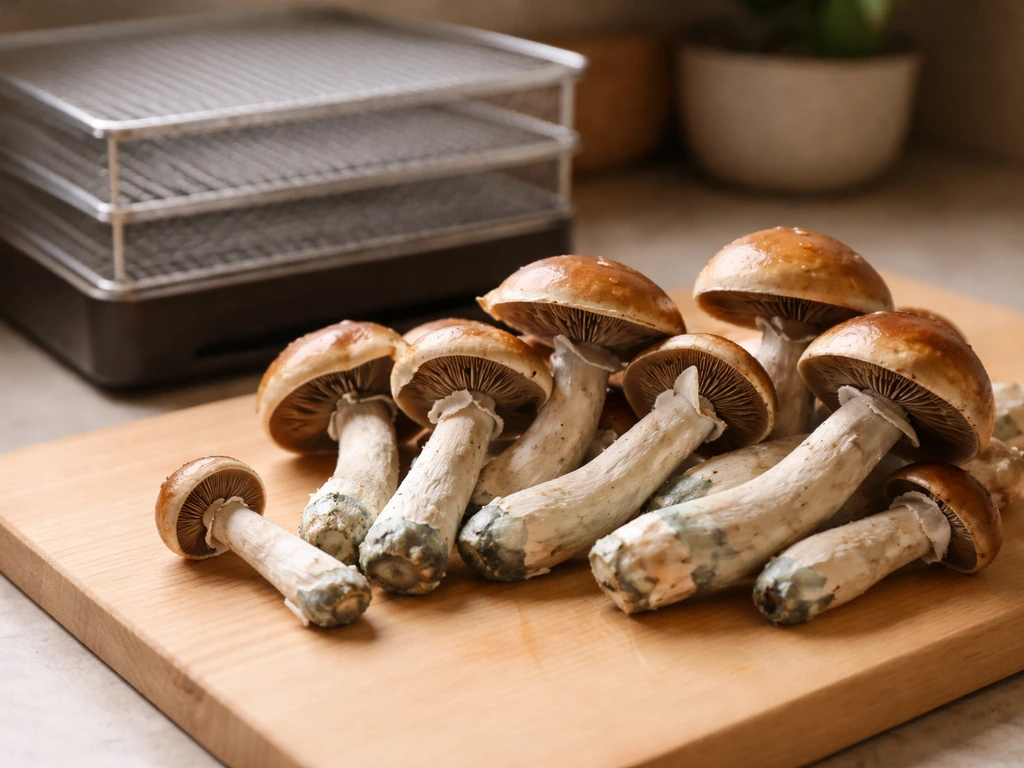
Harvest just before or as the veil breaks. The veil is the thin membrane connecting the cap edge to the stem. Once it fully tears and the cap opens flat, the mushroom starts dropping spores, which can stain your substrate and complicate future flushes. Twist and pull mushrooms gently at the base rather than cutting them, since cutting leaves a stump that can rot and invite contamination. Wear gloves if you want to keep your hands clean. After each flush, clear away any remaining stumps or aborts (undeveloped mushrooms), mist the surface lightly, and let the substrate rest for 5 to 10 days before the next flush. Most cubensis grows produce 2 to 4 flushes, with the first and second being the most productive.
Drying and storage
Fresh cubensis mushrooms are about 90% water and will rot within days if not dried properly. A food dehydrator set to 95°F to 115°F (35°C to 46°C) for 4 to 8 hours is the most reliable method. Pre-dry them on a wire rack at room temperature in front of a small fan for an hour first to remove surface moisture. Fully dried mushrooms should be cracker-dry: they snap cleanly with no bend. Store in an airtight glass jar with a food-grade desiccant packet (silica gel) in a cool, dark place. Properly dried and stored cubensis mushrooms remain stable for 1 to 2 years.
Troubleshooting common problems
| Problem | Likely Cause | Fix |
|---|---|---|
| No mycelium growth after 14 days | Dead spores, poor sterilization, too cold | Check temp, try a fresh syringe, ensure jars cooled before inoculation |
| Green or black patches on substrate | Trichoderma or Aspergillus contamination | Remove and dispose of contaminated jars immediately, review sterile technique |
| Yellow or brown liquid pooling | Metabolite secretion (usually normal) or early wet rot | Reduce moisture slightly; if smells bad or mold appears, dispose |
| Slow or stalled colonization | Too cold, old culture, contamination suppressing growth | Raise temp to 77-80°F, verify culture viability, inspect for hidden contam |
| No pins after 2+ weeks of fruiting conditions | Humidity too low, CO2 too high, substrate too dry, overlay (thick white skin on surface) | Check hygrometer, increase FAE, lightly scrape and re-wet surface if overlay present |
| Long thin stems, small caps | CO2 buildup, insufficient FAE | Fan more frequently or add more holes/airflow to fruiting chamber |
| Aborts (pins dying off before maturing) | Humidity crash, temp spike, over-misting directly onto pins | Stabilize humidity and temp, mist walls not mushrooms |
| Overlay (thick white mycelium skin on surface) | Too little FAE or too much moisture during colonization | Scrape the surface layer gently, increase FAE, re-introduce fruiting conditions |
Casing layers: do you need one?
A casing layer is a thin, non-nutritive layer (usually 50/50 peat moss and vermiculite, or straight coco coir) applied over the top of your colonized bulk substrate. It's not required for cubensis, but it helps retain surface moisture, reduces overlay, and can trigger faster pinning. If you're having trouble getting pins to form, adding a half-inch casing layer is worth trying on your next grow.
Realistic timelines and what to expect
First-time grows almost always take longer than expected. Between sterilization, colonization, and fruiting, budget 6 to 10 weeks from inoculation to first harvest for a beginner PF-Tek setup. Bulk grows with liquid culture can get you there in 5 to 7 weeks. Yield on a single PF cake is modest: expect 5 to 20 grams dry across 2 to 3 flushes depending on the strain and conditions. A 5-quart bulk monotub can produce 20 to 60+ grams dry across multiple flushes. The jump from PF-Tek to bulk substrate is where most growers see a significant increase in output for not much more effort.
Next steps once you've got your first grow dialed in
Once you've completed a successful grow, the natural next step is to experiment with strains. Golden Teacher and B+ are great starters, but if you want to explore higher-potency or more visually distinct varieties, strains like APE (related to the Albino Penis Envy genetics also discussed in guides on growing APE mushrooms) or more experimental outdoor-adapted species like Psilocybe azurescens are interesting next chapters, though azurescens is notoriously difficult to fruit indoors. If you're curious about growing cubensis without traditional spores, liquid culture agar work and cloning from fruiting bodies opens up a whole new set of techniques. And if you're chasing bigger individual mushrooms rather than higher overall yield, growing bigger cubensis fruits is largely a matter of substrate nutrition, genetics, and late-harvest timing. If you focus on stronger genetics, consistent hydration, and picking at the right late window, you can increase your odds of growing big cubensis bigger cubensis fruits. Each of these directions builds on the core skills you develop in your first few successful cubensis grows, so get the basics solid first and the rest follows naturally. If you want a different approach than indoor cultivation, you can also learn how to grow amanita muscaria outdoors and adapt conditions to your yard.
FAQ
My mycelium fully colonized, but pins never appear (what usually causes this indoors)?
Set your colonization space temperature first, then verify fruiting targets with a hygrometer and, ideally, a CO2 meter. If fruiting conditions are off, you will often see pins stall even when the mycelium looks healthy, because cubensis is sensitive to both humidity (needs 85% to 95%) and fresh air exchange (4 to 6 times per day).
What’s the right way to handle contamination when growing cubensis indoors?
Do not open contaminated jars indoors or reuse tools that touched them. If a jar shows obvious green, black, or pink patches, remove it immediately, double-bag it, and take it outside. Also, clean the grow area after removal because the contamination spores can spread through the air.
How can I tell if my fruiting chamber has too much CO2?
If you see long, thin stems with small, deformed caps, the most common cause is high CO2 from insufficient fresh air exchange. Increase fanning or airflow rate, and adjust misting so you raise humidity without flooding the chamber, since over-misting can damage pins.
Can I use a heater or heat mat for cubensis fruiting indoors?
Yes, temperature swings matter more than many beginners expect. A short period above 86°F (30°C) can stress the mycelium, and large day-night swings can delay pinning. Use a heat mat for colonization only, not for the fruiting chamber, unless you can actively control and monitor fruiting temperature.
Do I need special grow lights to grow cubensis indoors?
Many growers successfully keep the same light source used during fruiting, but do not try to force growth with intense light. A simple 12-hour on, 12-hour off cycle is enough to cue directionality for pins; the main drivers for fruiting are humidity, fresh air exchange, and temperature drop.
Should I shake my PF cakes or grain jars to speed things up?
For PF cakes, do not shake them to speed colonization, because it increases disturbance and can raise contamination risk at the earliest stages. If you want faster redistribution, “break and shake” is mainly for grain jars after the mycelium has a foothold (around 30% colonized).
Why do my pins turn into blobs or stall after I mist?
If you are using a shotgun-style fruiting chamber or humidity tent, misting should be directed at the chamber walls or perlite, not directly onto pins. Direct mist on pins can lead to damaged pins or fuzzy, blob-like growth. Aim for consistent humidity, not heavy wetting.
How often should I open the chamber or change airflow during fruiting?
Most people using an SGFC or similar setup should plan for a consistent routine, not random checking. During fruiting, you want fresh air exchange multiple times per day, so choose a fan timer you can set reliably, and avoid opening the chamber too often because it can drop humidity.
What should I check first if colonization is slow for my cubensis indoors setup?
If jars look white but take longer than expected, the solution is usually process troubleshooting, not adding extra incubation time forever. Confirm correct sterilization time for your substrate type, allow complete cooling before inoculation, and ensure colonization temperature sits in the 75°F to 80°F range without overheating.
Is a casing layer worth trying for better pinning indoors?
Casing can help if you are consistently not getting pins on fully colonized bulk, but it is not a requirement. If your first pins are late or minimal, test a thin casing layer (about half an inch) on a portion of your next grow so you can compare results without changing everything at once.