When people search for 'ape mushrooms,' they're almost always talking about Albino Penis Envy, or APE, a Psilocybe cubensis strain that combines the dense, potent genetics of Penis Envy with albino traits that give it a ghostly white appearance. Growing APE follows the same basic cubensis workflow, but this strain is noticeably slower and more humidity-sensitive than beginner-friendly cubensis varieties. If you go in expecting a fast, forgiving grow, APE will humble you. Go in prepared, though, and you'll get impressive results.
How to Grow Ape Mushrooms: Step by Step Cultivation Guide

Marcus Holloway
5 May 2026
What 'ape mushrooms' actually are (and why the grow method matters)
APE, short for Albino Penis Envy, is a selectively bred Psilocybe cubensis strain. It is not a separate species. That distinction matters because your cultivation approach, substrate choices, and environmental targets all follow the cubensis playbook, not something more exotic. You won't find APE fruiting outdoors like Psilocybe azurescens does in wood chips along the Pacific Northwest coast. That controlled, indoor approach is why you can follow azurescens-inspired wood-chip ideas without expecting the same outdoor results Psilocybe azurescens. APE is strictly an indoor cultivar grown in controlled conditions. Although APE is usually an indoor cultivar, if you’re specifically looking for how to grow Amanita muscaria outdoors, you’ll need a very different outdoor setup and partner trees.
What sets APE apart from other cubensis strains is its PE genetics, which drive slower but denser mycelial growth, and its albino trait, which reduces spore production dramatically. Most APE mushrooms drop very few spores if any, which is why most growers source APE as liquid culture or grain spawn rather than trying to grow from a spore print. If you've grown other cubensis varieties indoors before, the jump to APE is manageable. If this is your first time with cubensis indoors, it helps to understand the full workflow first.
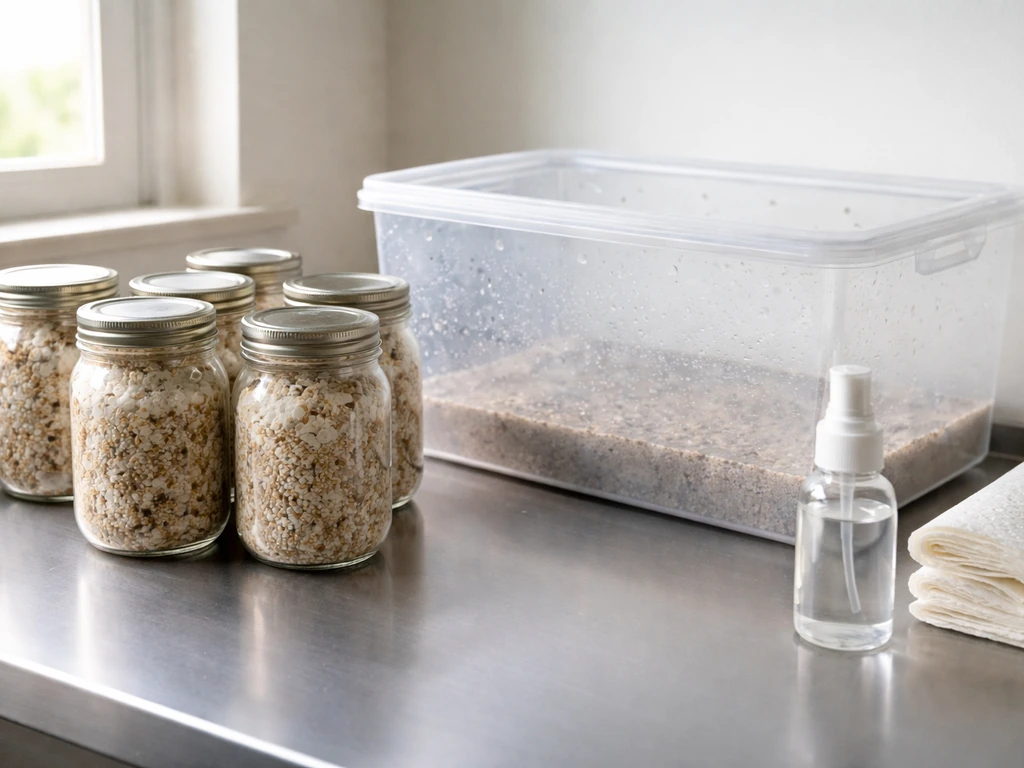
Supplies and setup: grow space, containers, and tools
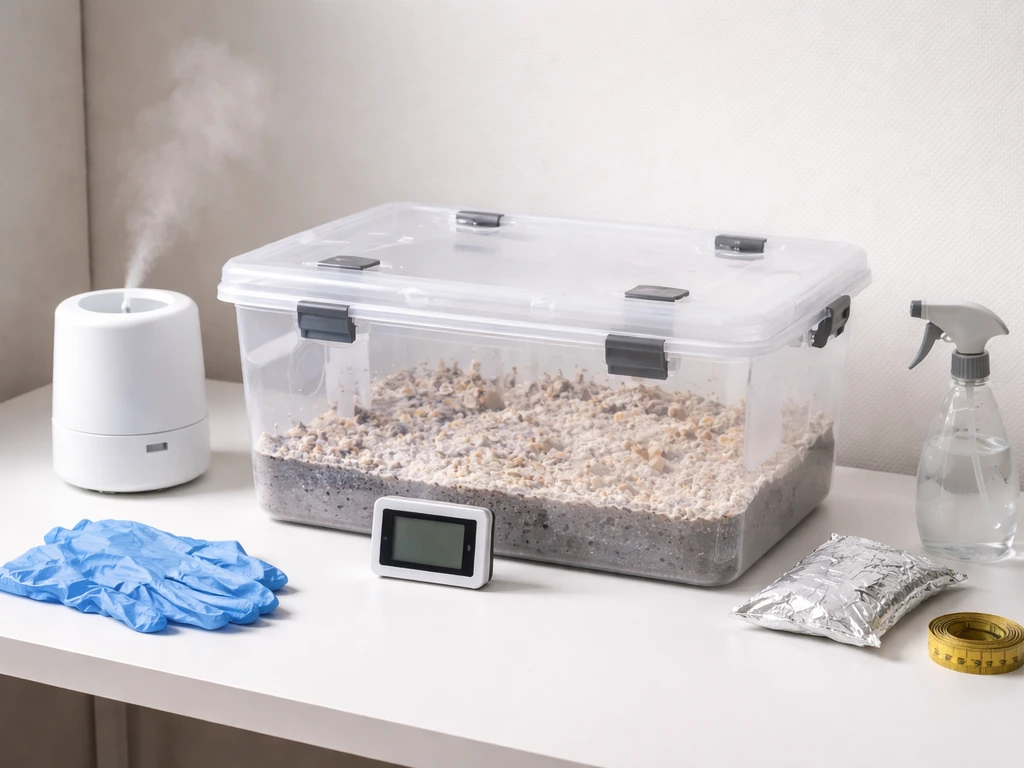
You don't need a dedicated grow room to succeed with APE, but you do need a space you can actually control. A spare closet, a large plastic tote, or a purpose-built fruiting chamber all work. The critical thing is that you can manage temperature, humidity, and fresh air without constant manual intervention.
Here's what you'll want on hand before you start:
- Pressure cooker (15 PSI capable, at least 16-quart) for sterilizing grain spawn
- Mason jars or grain spawn bags with self-healing injection ports and polyfill filter patches
- A still air box (SAB) or a laminar flow hood for inoculation and transfers
- 70% isopropyl alcohol, nitrile gloves, face mask, and a still workspace
- A fruiting chamber: a 6-quart monotub, large shotgun fruiting chamber (SGFC), or a Martha tent setup
- A reliable digital hygrometer and thermometer combo
- A spray bottle with clean, unchlorinated water
- APE liquid culture syringe or colonized grain spawn (from a reputable supplier)
APE's low spore production makes grain-to-grain transfers and liquid culture the most practical ways to work with this strain. A quality liquid culture syringe injected into sterilized grain jars is the cleanest starting point for most home growers.
Substrate choice and preparation
APE performs best on a sterilized grain spawn like rye berries, wheat berries, or popcorn for colonization, then gets transferred to a bulk substrate for fruiting. The most popular bulk substrate for cubensis strains is coco coir and vermiculite (CVG), which is pasteurized rather than fully sterilized. A 50/50 mix of coco coir and vermiculite by volume, hydrated to field capacity, is a reliable and contamination-resistant choice.
Preparing grain spawn (sterilization)
Rinse your grain, simmer it until the kernels are hydrated but not burst (about 15 to 20 minutes for rye), drain and dry the surface, then load into mason jars or spawn bags. blank" rel="noopener noreferrer">Sterilize at 15 PSI for 90 minutes if using quart jars, or 2.5 hours for larger bags. Let everything cool to room temperature completely before inoculation. Skipping the cooling step is one of the most common beginner mistakes. Hot jars kill your liquid culture instantly.
Preparing bulk substrate (pasteurization)
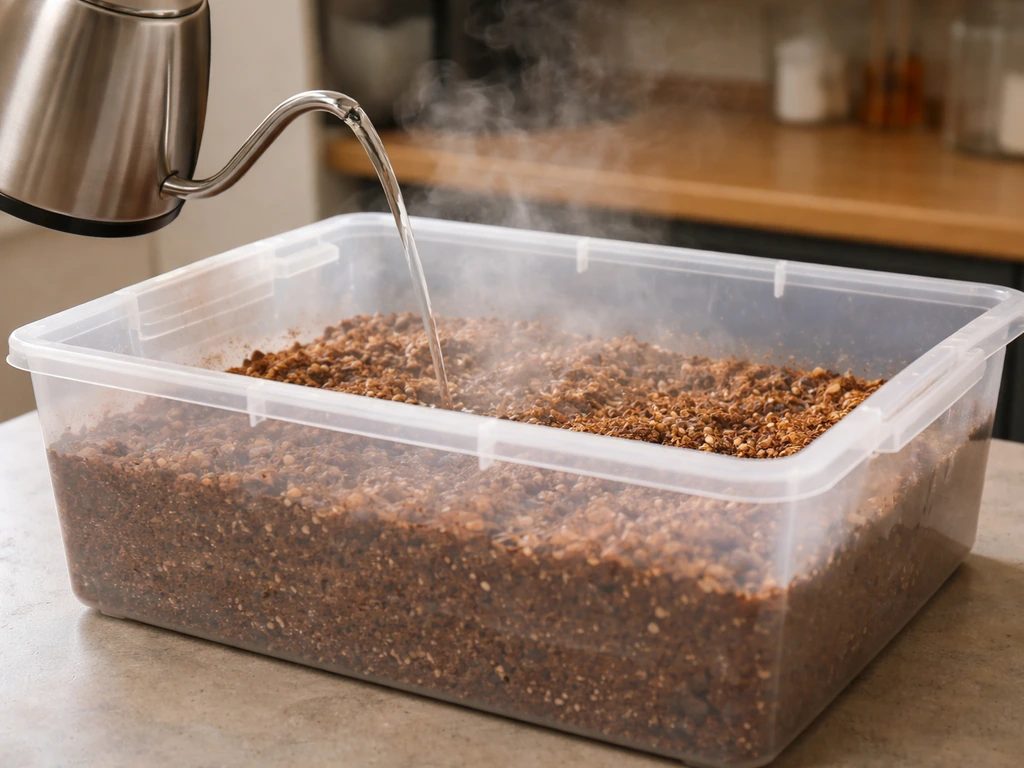
For CVG bulk substrate, pour boiling water over the coco coir until it's fully hydrated, mix in vermiculite, and cover the container to pasteurize for an hour. Field capacity is the target: squeeze a handful and only a few drops should come out. Too wet and you invite bacterial contamination. Too dry and colonization stalls. Let it cool completely in a sealed container before you use it.
Inoculation and colonization: temperatures, timing, and sanitation
APE colonizes at roughly 24 to 27 degrees Celsius (about 75 to 81 degrees Fahrenheit). Keep grain jars in a warm, dark spot within that range during colonization. Warmer than 30 degrees Celsius risks damaging the mycelium and inviting contamination. Cooler than 22 degrees Celsius slows things down significantly.
Plan for a long colonization window with APE. On grain, expect 21 to 30 days for full colonization, sometimes longer. This is not a sign that something is wrong. PE genetics just move slowly and deliberately. Rushing the process by moving to fruiting before the grain is fully white is one of the top reasons APE grows stall or contaminate.
Sanitation during inoculation
Contamination prevention during inoculation is where most grows succeed or fail. Work inside a still air box or in front of a flow hood. Wipe all surfaces with 70% isopropyl alcohol. Flame-sterilize your needle until it glows, let it cool for a few seconds, and inject 1 to 2 cc of liquid culture per quart jar through the self-healing injection port. Gloves and a face mask are not optional here. Talking, coughing, or moving around stirs up particles that land in your open jars.
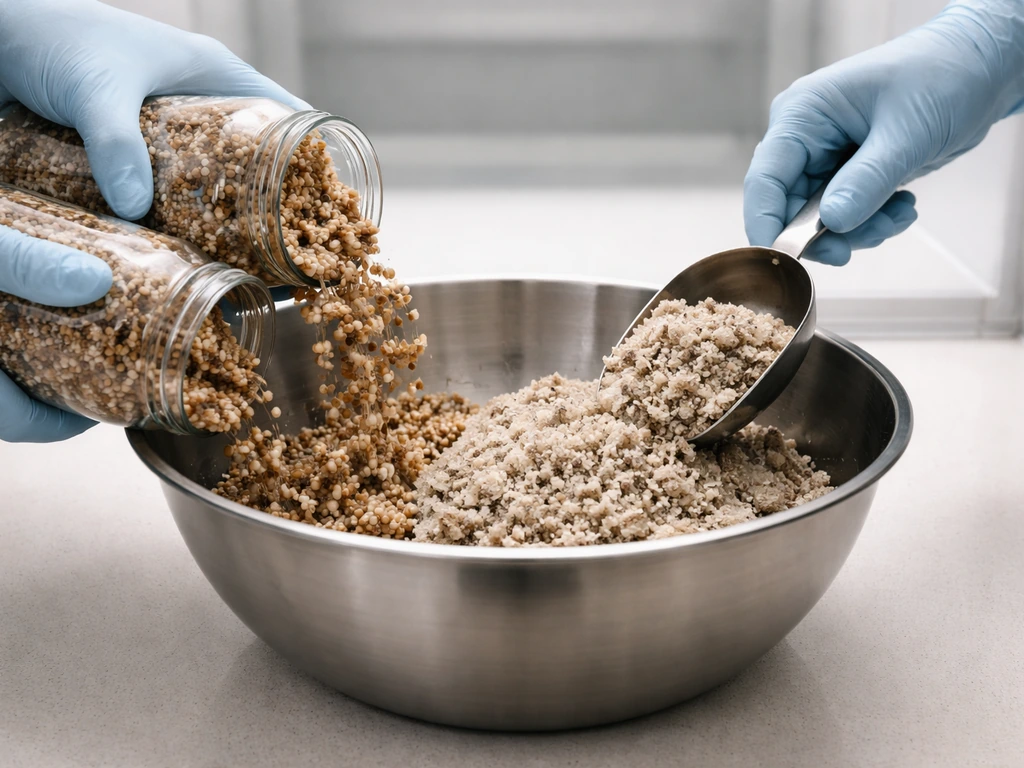
Bulk substrate spawn-to-substrate ratio
Once your grain jars are fully colonized, mix them into your cooled bulk substrate at roughly a 1:3 to 1:4 ratio (grain to bulk) by volume. A higher grain ratio speeds colonization but also raises contamination risk. Layer or thoroughly mix the grain spawn into the bulk substrate in your fruiting tub, then pat it level and add a thin casing layer of dry vermiculite on top to protect the surface.
Fruiting conditions: humidity, fresh air, and light
APE has specific environmental preferences for pinning and fruiting that you need to hit consistently. The numbers that show up repeatedly in cultivation profiles for this strain are worth taking seriously.
| Parameter | Colonization | Pinning | Fruiting |
|---|---|---|---|
| Temperature | 24–27°C (75–81°F) | 22–24°C (72–75°F) | 22–24°C (72–75°F) |
| Relative Humidity | 95–98% | 95–98% | 92–97% |
| CO2 Level | Elevated (passive) | Below 700 ppm | Below 700 ppm |
| Light | Not required | 12 hrs indirect/day | 12 hrs indirect/day |
Humidity and CO2 management are the two things APE growers most often get wrong. You need relative humidity between 92 and 98 percent throughout the fruiting phase. Drop below 90 percent and you'll see aborts. But you also need fresh air exchange to keep CO2 below 700 ppm. High CO2 from a sealed environment causes long, leggy stems with underdeveloped caps, which is a classic sign of insufficient fresh air.
Setting up fresh air exchange without drying out the chamber
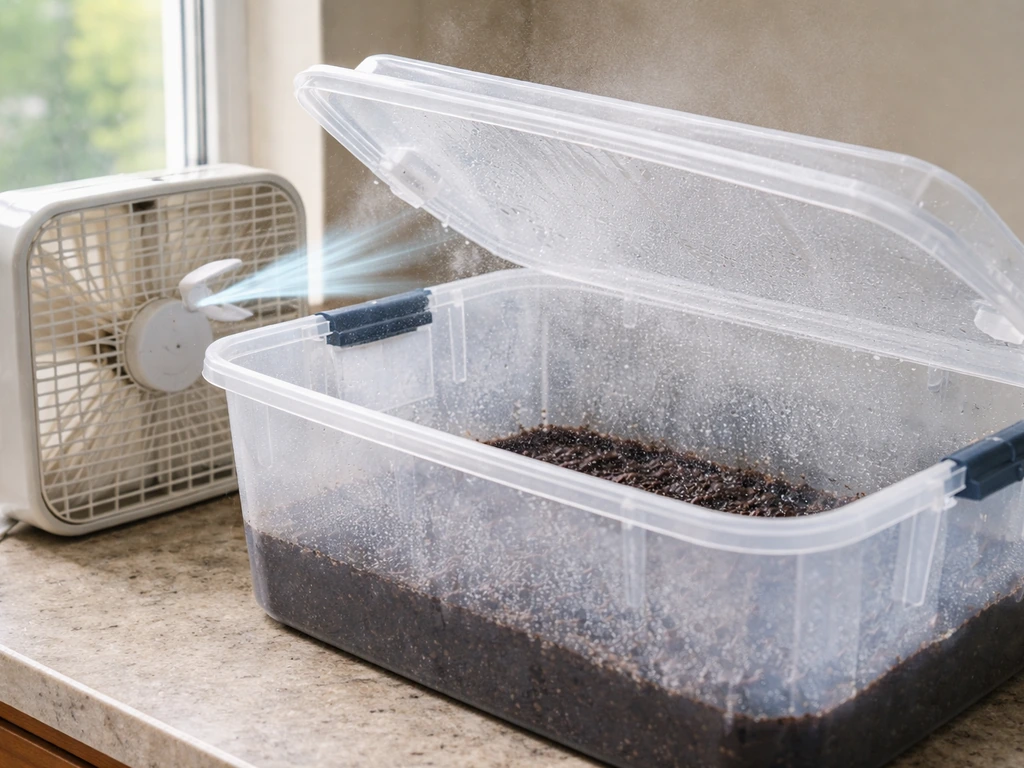
For a shotgun fruiting chamber or monotub, fan or fan-and-mist the chamber two to four times per day. Open the tub, fan for 30 to 60 seconds to exchange air, mist the walls lightly (not the substrate surface), and close it back up. For a Martha tent setup, an automated humidifier with a timer takes care of humidity, and small fans on a timer handle fresh air exchange. The goal is maintaining high humidity while still actually cycling in fresh air, not just misting everything and sealing it tight.
Light isn't critical for mushroom development but does help orient pinning. Indirect natural light or 12 hours of low-intensity artificial light per day works well. Don't point grow lights directly at your substrate surface.
Harvesting and drying APE for best results
Harvest APE just before or right as the veil underneath the cap begins to tear. Because APE drops very few spores, it's often hard to judge readiness by spore drop. Watch the veil: once it starts separating from the cap edge, that's your window. Twist and pull at the base with a slight rotation rather than cutting, which leaves less substrate behind to rot.
After harvesting a flush, clean any dead pins and substrate debris off the surface with a clean paper towel, fan the tub dry for an hour or so, then close it back up and let it rest for 7 to 14 days before the next flush. APE typically produces two to three solid flushes, with the first and second being the heaviest.
Drying and storage
blank" rel="noopener noreferrer">Fresh mushrooms are roughly 90 percent water, so drying is non-negotiable for storage. The practical target drying temperature is 35 to 43 degrees Celsius (95 to 110 degrees Fahrenheit). A food dehydrator set in that range works well. Most APE fruits dry fully in 4 to 12 hours depending on cap size and ambient humidity. They're done when they snap cleanly rather than bending. Avoid going above 50 degrees Celsius, which degrades heat-sensitive compounds.
Store dried mushrooms in an airtight glass jar with a food-safe silica desiccant packet, kept in a cool dark location. Done right, dried APE stores well for a year or more without significant degradation.
Troubleshooting: contamination, stalled growth, and low yields
APE is less forgiving than standard cubensis strains like Golden Teacher, so contamination and stalling are real risks. Here's how to diagnose and respond to the most common problems.
Green or black mold (Trichoderma or similar)
Green mold, usually Trichoderma, is the most common contamination you'll see. If it shows up in a grain jar, isolate and discard the jar immediately. Don't open it indoors. If it appears on bulk substrate after pinning has started, you can sometimes physically remove a localized spot and monitor, but a spreading green patch usually means the tub is a loss. Prevention is everything: sterilize properly, cool completely before inoculation, and sanitize your hands and tools rigorously.
Stalled colonization
If colonization stops progressing at around 50 to 70 percent, check your temperature first. Too cold slows or halts mycelial growth. Also check your moisture content: if grain looks wet or smells sour, bacterial contamination has taken hold and the jar needs to go. If the jar looks clean and smells earthy but growth has just slowed, slightly increasing temperature to the upper end of the 24 to 27 degree range often helps.
No pins forming
APE can be stubborn about initiating pins. If your tub is fully colonized but nothing is happening after 10 to 14 days, try a cold shock by putting the tub in the fridge for 12 to 24 hours, then bringing it back to fruiting conditions. Make sure you're actually doing fresh air exchanges and that CO2 isn't building up. High CO2 is often the silent reason pins refuse to form.
Fuzzy mycelium on the surface (overlay)
A thick, matted layer of aerial mycelium forming on the surface, called overlay or casing overlay, blocks pinning. This usually means humidity is too high with insufficient fresh air. Scratch the surface lightly to break up the overlay, increase your fresh air exchanges, and slightly reduce misting frequency.
Low yields or aborted pins
Aborting pins (small pins that die before maturing) almost always point to humidity dropping too low at some point, CO2 spiking, or a temperature swing. Check your hygrometer readings over 24 hours rather than just spot-checking. Low bulk substrate spawn rates also produce fewer pins, so if your first grow yielded almost nothing, try increasing your grain-to-bulk ratio on the next round. If you want how to grow big cubensis results with APE, dialing in your grain-to-bulk ratio is one of the biggest levers you have.
Planning your first successful APE grow: timeline, checkpoints, and next steps
Here's a realistic end-to-end timeline for a first APE grow at home:
| Stage | Duration | Key Checkpoint |
|---|---|---|
| Grain preparation and sterilization | Day 1–2 | Grain fully sterilized, cooled, and ready to inoculate |
| Inoculation | Day 2–3 | Clean inoculation completed; jars sealed and labeled |
| Grain colonization | Day 3–33 (up to 30 days) | Grain fully covered in white mycelium, no off-colors |
| Bulk substrate prep and spawn-in | Day 33–35 | Spawn mixed into cooled CVG, tub sealed |
| Bulk colonization | Day 35–49 (up to 14 days) | Full white surface coverage, substrate smells earthy |
| Pinning initiation | Day 49–63 | Visible pin heads forming across substrate surface |
| First flush fruiting and harvest | Day 63–70 | Veils beginning to separate; mushrooms harvested |
| Rest and second flush | Day 70–84 | Surface cleaned; tub resting before next flush |
The whole process from inoculation to first harvest typically runs 8 to 10 weeks with APE. Plan for it. Don't cut colonization short because you're impatient, and don't skip the rest period between flushes.
If your first grow doesn't go as planned, don't write off the strain. APE has a learning curve. The most common fixes between runs are tightening up sanitation during inoculation, dialing in humidity so it stays consistently above 92 percent without going so high that you sacrifice fresh air exchange, and making sure your grain is genuinely fully colonized before spawning to bulk. Those three things solve the majority of first-time APE failures.
If you want to build your skills before tackling APE, starting with a more forgiving cubensis strain or a beginner-focused indoor grow gives you the environmental control experience that makes APE much more manageable. You can use the same general indoor setup principles, including tight humidity control and consistent fresh air exchange, when learning how to grow amanita muscaria indoors indoor grow. If you want a step-by-step plan for indoors, this article walks through the cubensis workflow and the exact conditions APE needs. The core fruiting chamber skills, humidity management habits, and inoculation discipline you develop on easier grows transfer directly to APE. Once you've got a successful run under your belt, APE rewards the extra patience with a seriously impressive fruiting body.
FAQ
Can I grow APE outdoors or in a garden bed like some other mushroom species?
APE is an indoor cultivar and does not reliably perform outdoors. Instead, it needs stable humidity in the 92 to 98 percent range and consistent fresh air exchange to keep CO2 controlled. Outdoor conditions usually swing too much (temperature, humidity, airflow), which is a common reason for stalls and aborted pins.
Why does my grain fully colonize but the bulk substrate still fails or gets contaminated?
Full grain colonization does not guarantee that bulk will be clean. The most common causes are bulk that was not fully cooled to room temperature before mixing, substrate moisture above field capacity, or poor mixing that traps wetter clumps. Also avoid using grain-to-bulk ratios higher than your planned range, since that can increase competition and contamination load early in bulk colonization.
How can I tell if I have bacterial contamination, not just a slow APE grow?
Use more than appearance. Bacterial contamination often comes with a sour smell, slimy wet kernels, or wet grain that looks unusually glossy. If you see those signs, discard that material promptly rather than “waiting it out,” because bacterial issues rarely improve with more time or more humidity.
Do I really need to use liquid culture or grain spawn, or can I start from spores?
Starting from spores is usually impractical for APE because it produces extremely few spores. If you try spore-based routes anyway, you may get inconsistent outcomes and a longer timeline. Grain spawn or liquid culture gives you a workable genetic consistency and is the cleanest option for most home setups.
What is the best way to measure whether my humidity and CO2 are actually in range?
Don’t rely only on what your humidifier is set to. Use a hygrometer placed where the fruiting surface sits, then log readings over an entire 24-hour cycle. For CO2, if you notice long stems, underdeveloped caps, or very poor pin formation despite high humidity, assume CO2 is building and increase fresh air exchange even before making humidity changes.
How often should I fan and mist, and what mistakes cause overlay or aborts?
Fan briefly and consistently, then mist the chamber walls lightly rather than soaking the substrate surface. Too much misting can raise surface moisture and encourage overlay. Too little fresh air exchange can raise CO2, which leads to leggy growth. The key is balancing high humidity with real air cycling, not just keeping the walls wet.
My APE tubs look too wet. Should I dry them out immediately?
If the bulk is clearly beyond field capacity (pooling moisture, heavy wet clumps), pause and correct fresh air first, then reduce misting frequency. However, don’t open the tub for long periods or repeatedly. Small, controlled adjustments are safer, because drastic changes can trigger pin aborts.
What should I do if pinning never starts after the tub is fully colonized?
First, confirm CO2 is not accumulating by ensuring your fresh air exchange routine is actually happening (not just opening the tub briefly without exchange). If nothing appears after 10 to 14 days, try a cold shock (12 to 24 hours in a fridge) and then return to the fruiting setup. Also re-check that your temperature stayed within roughly 24 to 27°C during the waiting period.
How do I handle overlay if scratching the surface doesn’t help?
If overlay comes back quickly, it usually means humidity is too high or fresh air exchange is insufficient. Reduce misting frequency, increase fan or air cycling, and keep the substrate surface from staying constantly damp. If overlay is thick, you may need to repeat surface disruption while tightening the humidity-to-fresh-air balance.
When harvesting, how strict do I need to be about the veil stage?
Be consistent and harvest at the first sign the veil is starting to separate under the cap. Waiting too long can degrade quality and increase mess. Since APE drops very few spores, you cannot rely on spore drop cues, so veil monitoring is the more reliable readiness indicator.
How should I clean and dry between flushes without damaging the substrate?
Remove dead pins gently, wipe debris, then let the tub sit with airflow until the surface is dry to the touch for about an hour. Avoid scrubbing deeply or soaking. A proper rest period of 7 to 14 days also matters, because skipping it often reduces subsequent flush strength.
What’s the safest drying approach to prevent mold or loss of potency?
Dry promptly using a temperature range around 35 to 43°C. Ensure airflow in the dehydrator and avoid stacking fruits in a way that traps moisture. When done, pieces should snap cleanly. Going above 50°C can degrade heat-sensitive compounds, so don’t “turn it up” to speed drying.
How can I improve my odds on the next attempt if my first grow stalled or aborted heavily?
Focus on three levers: sanitation at inoculation (to reduce hidden contamination), keeping humidity consistently above about 92 percent without sealing in excess CO2, and only spawning when grain is genuinely fully colonized. If pin counts were extremely low, adjust your grain-to-bulk ratio upward within your planned target range rather than changing everything at once.