You can grow shimeji mushrooms at home from start to harvest in about 8 to 14 weeks, depending on whether you start from a colonized kit or raw spawn. The easiest path is buying a ready-to-fruit block, which skips inoculation and incubation entirely and gets you to your first harvest in just 2 to 3 weeks. If you want to go deeper and build blocks yourself from sawdust spawn, that is absolutely doable too, and this guide covers both routes end to end.
How to Grow Shimeji Mushrooms at Home Step by Step

Marcus Holloway
23 May 2026
Choosing your shimeji variety and starting material
Most shimeji mushrooms you will find available for home cultivation are Hypsizygus tessulatus, commonly called beech shimeji or Buna-shimeji. There is also the white variety known as Bunapi-shimeji, which is actually a UV-induced mutant of the same species with cream-colored caps instead of tan. Both grow the same way, so the cultivation steps below apply to either. You may also see Hypsizygus marmoreus listed, which is closely related and grown identically.
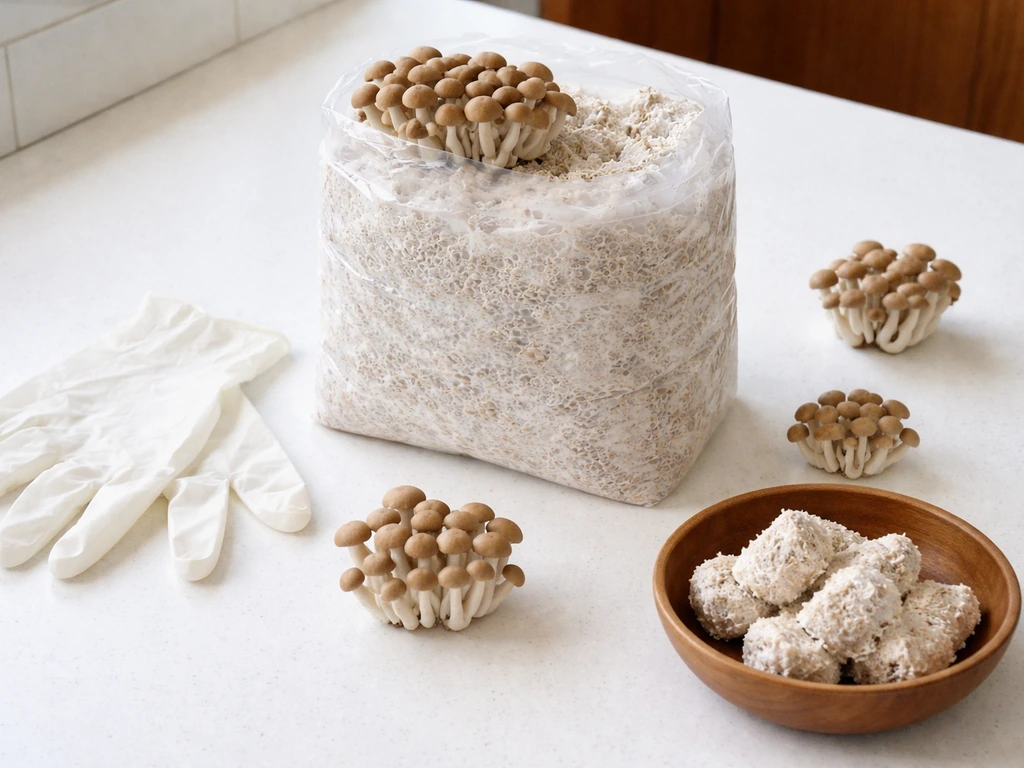
Now, the starting material question. You basically have three options: a ready-to-fruit kit (already colonized, just add fruiting conditions), grain or sawdust spawn (live mycelium you mix into your own prepared substrate), or spores (a petri dish and agar work, but honestly this is the hardest route and not where beginners should start). For your first grow, I strongly recommend a colonized kit or sawdust spawn. Spores require sterile agar technique and add weeks of complexity without any advantage in the final mushroom quality.
| Starting Material | Difficulty | Time to First Harvest | Best For |
|---|---|---|---|
| Ready-to-fruit kit | Beginner | 2 to 3 weeks | First-timers who want fast results |
| Grain or sawdust spawn | Intermediate | 8 to 14 weeks total | Growers who want to build their own blocks |
| Spores / agar | Advanced | 16+ weeks | Experienced cultivators only |
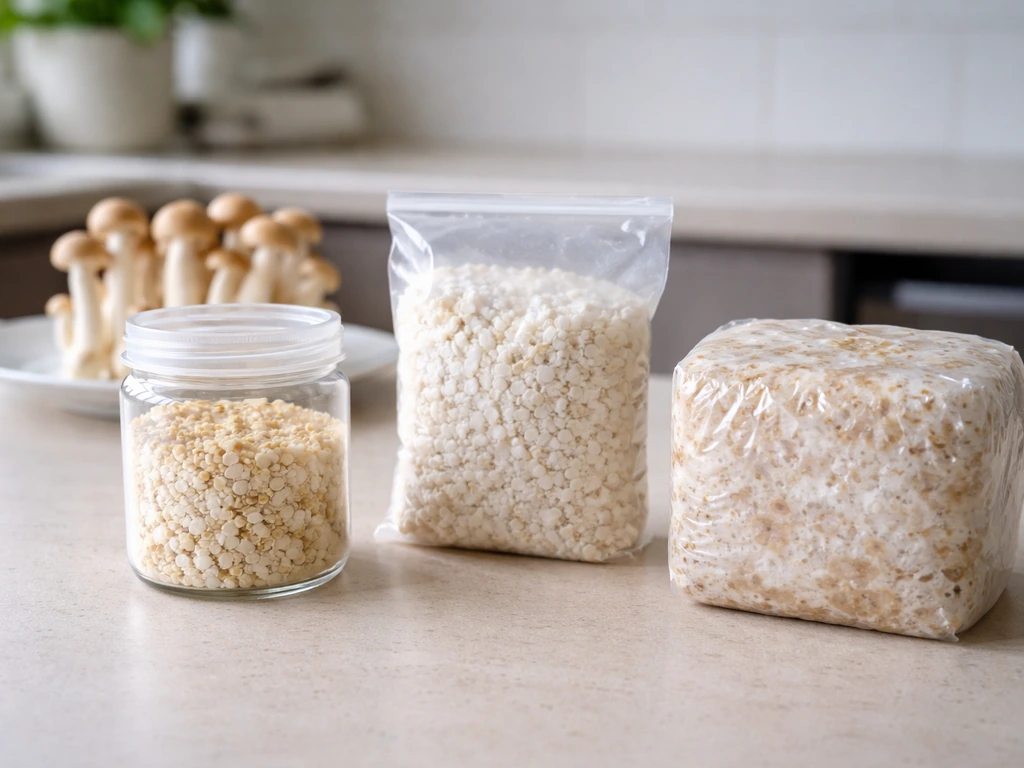
Spawn is simply a carrier material (grain, sawdust, or wooden plugs) already colonized by shimeji mycelium. A plug or dowel inoculation method is also commonly used for Hypsizygus tessulatus, as shown in this “Shimeji (Hypsizygus tessulatus) Instructions for inoculating logs using mycelium dowels” PDF blank" rel="noopener noreferrer">wooden plugs. When you mix it into your prepared substrate, the mycelium spreads and colonizes the new material. It is faster and more consistent than starting from spores every time. You can source shimeji sawdust spawn from specialty mushroom supply shops online, and availability has improved a lot over the past few years.
Supplies checklist and where you will grow
Before you get started, gather everything. Running out of something mid-process (especially during inoculation) is one of the most common beginner mistakes. Here is what you need for a DIY spawn-to-harvest grow:
- Shimeji sawdust spawn (enough for roughly 15 to 20% of your substrate weight)
- Hardwood sawdust (oak, beech, or alder work well) and a supplement like rice bran or wheat bran (10 to 20% of the dry mix by weight)
- Heat-resistant polypropylene filter-patch bags (these allow gas exchange while keeping contaminants out)
- A pressure cooker or large steamer pot for substrate sterilization
- Isopropyl alcohol (70%) and a still-air box or flow hood for cleaner inoculation
- Latex or nitrile gloves
- A hygrometer to monitor humidity during fruiting
- A thermometer (ideally a digital probe model)
- A spray bottle for misting
- A fruiting chamber (a clear plastic storage tote works great for beginners)
For location, shimeji mushrooms are best grown indoors where you can control temperature. You need two distinct temperature zones: around 68 to 75°F (20 to 24°C) for incubation/colonization, and a cooler 55 to 65°F (13 to 18°C) for fruiting. A spare room that stays cool, a basement, or even a temperature-controlled grow tent works. If your house runs warm year-round, fruiting shimeji gets tricky in summer, which is something worth knowing upfront.
Preparing substrate and inoculating your blocks
Mixing and sterilizing the substrate
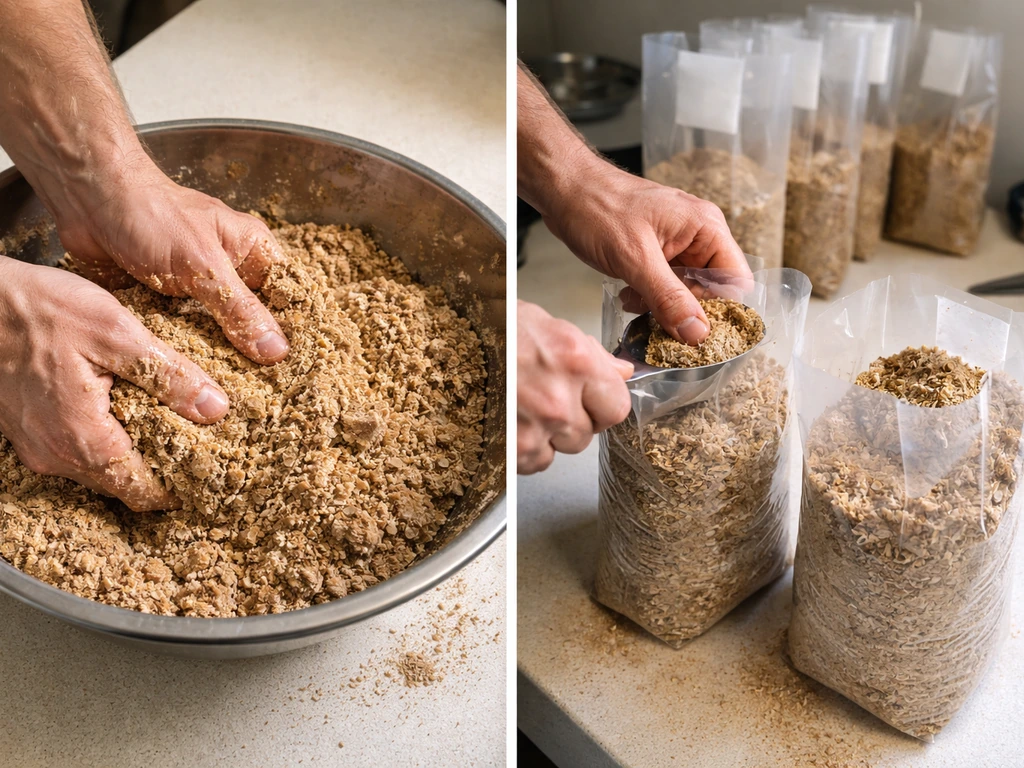
Shimeji is a wood-decomposing species, so it thrives on supplemented hardwood sawdust. A reliable beginner formula is roughly 80% hardwood sawdust and 20% rice bran or wheat bran by dry weight. Mix thoroughly, then add water until the mix reaches field capacity: squeeze a handful and you should see only a few drops come out, not a stream. Aim for around 60 to 65% moisture content.
Pack the mix into your filter-patch bags, leaving a few inches of headspace at the top. Fold and loosely close the tops (you will seal them after inoculation). Run them through a pressure cooker at 15 PSI for 2.5 to 3 hours, or steam sterilize at 212°F (100°C) for 8 to 12 hours if you are using pasteurization-grade substrate. Let the bags cool completely to room temperature (this can take 12 to 24 hours) before you touch them again. Inoculating warm bags is one of the most common ways growers accidentally kill their spawn.
Inoculation steps
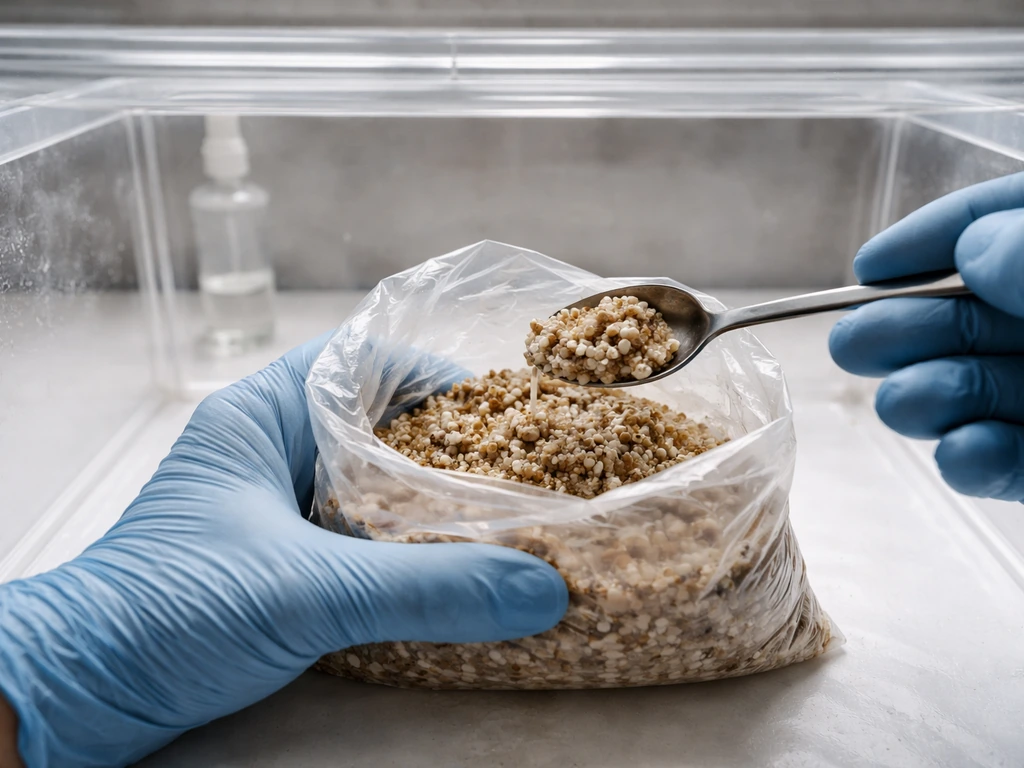
- Wipe down your work surface with 70% isopropyl alcohol and let it air dry.
- Put on gloves and wipe them with alcohol too.
- Open the cooled substrate bag in a still-air box or as close to a clean environment as you can manage.
- Add your sawdust spawn at roughly 15 to 20% of the substrate weight (so about 150 to 200g of spawn per 1kg of substrate).
- Mix the spawn evenly throughout the substrate using clean, gloved hands.
- Press out as much excess air as possible, then fold the top of the bag down and seal it with a rubber band, zip tie, or heat sealer.
- Label each bag with the date so you can track colonization progress.
If you bought a ready-to-fruit kit, skip everything above. Your kit is already at this stage. The supplier has handled inoculation and incubation for you, so you move straight to the fruiting setup section.
Incubation: keeping colonization on track
Place your inoculated bags in a warm spot at 68 to 75°F (20 to 24°C). The mycelium needs warmth to spread, but it does not need light at this stage. A dark closet, cardboard box, or incubation chamber all work. Keep the bags still if you can, since jostling them during early colonization can introduce contamination risks.
You will start to see white, fluffy mycelium spreading through the bag within the first 5 to 10 days. After 30 to 45 days at a consistent warm temperature, the bag should be fully colonized: the substrate will appear almost entirely white, with a firm, consolidated texture. During this period, keep air exchange minimal inside the bags. The filter patch handles the gas exchange you need without exposing the interior to contaminants.
What you are watching for: steady white growth with no green, black, or orange patches. A slight yellowing of the mycelium at the edges is sometimes normal, but any vivid color is almost always contamination. Check bags daily but do not open them. If a bag is clearly contaminated, remove it from the incubation area immediately so it does not spread to the others.
Fruiting setup: the conditions that actually trigger mushrooms
Once the block is fully colonized, it is time to shift conditions and trigger pinning. This is where shimeji has a specific requirement that catches people off guard: it needs a meaningful temperature drop to initiate fruiting. Matsutake has different requirements, but once you understand incubation and fruiting triggers, you can adapt your setup for how to grow matsutake mushrooms. Move your blocks from the warm incubation space to a cooler area at 55 to 65°F (13 to 18°C). This temperature shift is one of the primary signals that tells the mycelium it is time to fruit.
Opening the bag and setting up your fruiting chamber
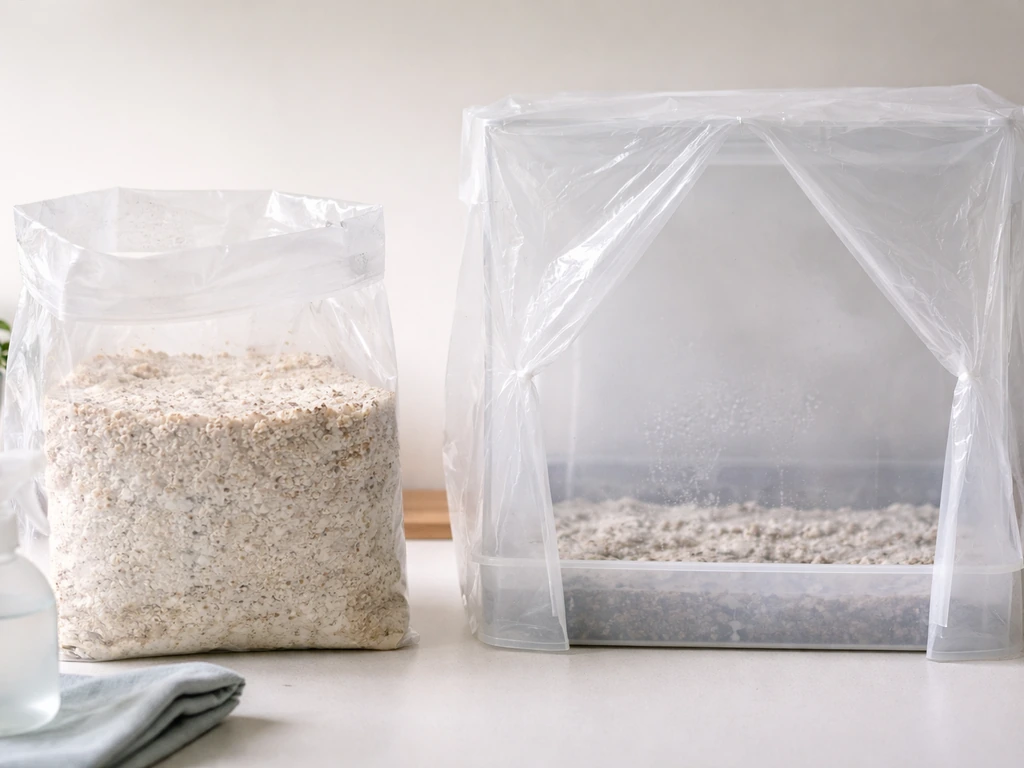
Cut or open the top of the bag to expose the surface of the colonized block. This allows fresh air to reach the mycelium, which is the second key trigger for pinning. Place the open bag inside a clear plastic storage tote or humidity tent. Add a few centimeters of water to the bottom of the tote and place the bag on a small rack or elevated surface above the water. Put the lid on loosely or use a humidity tent setup so air can still circulate slightly. This keeps relative humidity at 95 to 100%, which shimeji needs during fruiting.
Fresh air exchange matters a lot here. Shimeji needs CO2 levels below 1,000 ppm to produce well-formed mushrooms. CO2 management during fruiting is important, and one guide notes that keeping CO2 below 1,000 ppm through fresh air exchange helps produce healthy mushrooms CO2 levels below 1,000 ppm. In practice, that means fanning or briefly opening the chamber 2 to 4 times per hour, or using a small fan set to run for a few seconds every 15 minutes if you have one on a timer. Too much CO2 is why you get long, spindly stems and tiny caps, which is one of the most common complaints in shimeji growing.
Light is helpful but does not need to be intense. Indirect natural light or a basic LED on a 12-hour timer is plenty. The rule of thumb is: if you can comfortably read by it, there is enough light for the mushrooms. Shimeji does not need direct sunlight and too much heat from a lamp will work against the cool fruiting temperature you are trying to maintain.
| Parameter | Incubation (colonization) | Fruiting |
|---|---|---|
| Temperature | 68–75°F (20–24°C) | 55–65°F (13–18°C) |
| Relative Humidity | Moderate (bag sealed) | 95–100% |
| Fresh Air Exchange | Minimal (filter patch only) | 2–4 exchanges per hour |
| Light | Not needed | Indirect / 12-hour cycle |
| CO2 Level | Not critical | Below 1,000 ppm |
Harvesting, repeat flushes, and storing your shimeji
Shimeji typically pins within 7 to 14 days of moving to fruiting conditions. The mushrooms grow in dense clusters from a shared base, which is their signature look. Harvest when the caps are still slightly convex and before they start to flatten out completely. At that point, the caps are around 1 to 3 cm across, and that is peak flavor and texture. To harvest, grab the base of the cluster and twist gently while pulling. Avoid cutting them at the base because that leaves stump tissue behind that can rot and invite contamination.
After the first flush, clean off any leftover mushroom stumps or debris from the surface of the block. Let the block rest for 5 to 10 days in your fruiting conditions with good humidity. Most blocks will produce 2 to 3 flushes before yields drop off significantly. The second flush often comes within 2 weeks of the first harvest. Total yields per block average around 200 to 400g across all flushes, though this varies with substrate quality and environmental consistency.
For storage, fresh shimeji keeps well in the refrigerator for 5 to 7 days in a paper bag or loosely wrapped in paper towel inside a container. Avoid plastic bags that trap moisture, as shimeji will get slimy quickly that way. They can also be dried at low heat (around 95 to 115°F) and stored in an airtight jar for months.
Troubleshooting the most common shimeji problems
No pins forming
If your block is fully colonized but no pins appear after 2 to 3 weeks in fruiting conditions, the most likely culprits are CO2 buildup and temperature. Make sure you are actually hitting 55 to 65°F (13 to 18°C) and that you are exchanging fresh air frequently. If your space is too warm, shimeji will simply refuse to pin. A second common cause is the block surface drying out: mist the exposed surface lightly twice a day if you are not seeing enough condensation on the inside walls of your fruiting tent.
Long stems, tiny or malformed caps
This is almost always a CO2 problem. When CO2 is too high (above 1,000 ppm), shimeji responds by growing tall, searching for fresh air. The fix is simple: increase your fresh air exchanges. Fan the chamber more frequently or adjust your ventilation setup. You should start seeing more compact growth with proportionally wider caps within a few days of fixing the airflow.
Green, black, or orange mold contamination
Contamination during colonization almost always traces back to one of three causes: substrate that was not fully sterilized, inoculation that happened when the bag was still warm, or a breach in the bag (a pinhole or a poorly sealed top). If you catch contamination early in just one spot, some growers cut it out and re-seal the bag, but honestly, once Trichoderma (green mold) appears, the block is usually lost. Remove contaminated bags from your grow space immediately. During fruiting, surface contamination on spent substrate between flushes is more common and often harmless at the edges; just remove the affected material with a clean spoon.
Slow or incomplete colonization
If your bags are still only partially white after 45 days, the incubation temperature is probably too low or too inconsistent. Double-check with your thermometer. Also consider your spawn ratio: if you used less than 10% spawn by weight, colonization will take noticeably longer and leave more time for contaminants to get established. You can also try gently breaking up and redistributing the colonized sections by squeezing the bag from the outside (without opening it) to help spread the mycelium into uncolonized areas.
Poor yields on later flushes
By the third flush, most blocks have used up a significant portion of their nutrients, and yields naturally drop. This is expected. What you can do to maximize later flushes is rehydrate the block between flushes by soaking it in cold water for a few hours before returning it to fruiting conditions. This replenishes moisture that the mycelium has consumed and often revives blocks that seem to be fading.
What to do after your first grow
Once you have gotten through one successful grow, you have learned the fundamentals that apply to nearly every wood-loving gourmet species. From here, you can scale up by running multiple blocks staggered over time (so you have a continuous harvest), experiment with substrate supplements to improve yields, or branch out into related species. Growing nameko mushrooms or shiitake mushrooms from plugs uses very similar principles to what you have just done with shimeji, as do log-based species like reishi. If you want, you can adapt these same wood-loving principles to learn how to grow reishi mushrooms on logs log-based species like reishi.
Growing shiitake mushrooms from plugs follows the same general ideas, but the timing and log or substrate setup are a bit different. Growing nameko mushrooms is also very similar, but you should pay close attention to their specific temperature and fresh-air needs during fruiting. If you want to grow reishi on logs, you will need the right log species, inoculation method, and an outdoor schedule that matches your climate.
The same general approach to sourcing the right starting material and controlling conditions also applies when you learn how to grow crimini mushrooms. The core skills transfer well.
If you want to go deeper on shimeji specifically, try keeping a grow log: note your temperatures, humidity readings, spray schedule, and harvest weights for each flush. Over two or three grows, patterns will emerge that show you exactly which variables matter most in your specific home environment. That data is worth more than any guide, including this one.
FAQ
Do I need two different temperature zones to grow shimeji mushrooms successfully?
Yes, but avoid changing multiple variables at once. If you can only afford one temperature, prioritize a cooler fruiting space and delay perfect incubation precision, since colonization can tolerate minor swings. Use a thermometer you trust, and target the incubating range only during the 2 to 6 weeks your bags are colonizing, then switch to the 55 to 65°F (13 to 18°C) zone for pinning and fruiting.
Can I open the bag during incubation to check progress or improve air exchange?
Do not re-open sealed bags during incubation to “check.” Instead, inspect through the clear areas of the bag and look for surface cues when the block is done. Once fully colonized, cut or open the top for fruiting, then keep high humidity in the chamber without letting the block sit in pooled water.
What’s the balance between humidity and fresh air for shimeji?
High humidity without fresh air usually backfires. Aim for 2 to 4 brief air exchanges per hour during fruiting, or a timed fan cycle that runs for seconds every 10 to 20 minutes, while still keeping relative humidity at 95 to 100%. If caps become small with long stems, treat it as a CO2 or airflow symptom first, then adjust humidity slightly.
My shimeji are growing long, thin, and small. What should I troubleshoot first?
If you are seeing tall stems and tiny caps, it usually means CO2 is too high or the fruiting area is too warm. Check that your fruiting temperature is truly under 65°F (18°C), then increase ventilation frequency before adding more mist. Excess moisture can also worsen surface conditions, so mist the surface lightly rather than flooding the chamber.
How often should I mist, and what if my fruiting tent gets too wet?
Yes, but it must be handled differently than a continuous spray routine. Mist lightly only on the exposed block surface or chamber walls to maintain condensation, then let things settle between mistings. If you see heavy dripping or pooling, reduce misting immediately and increase airflow slightly so the surface does not stay wet for long periods.
What is the best way to store shimeji mushrooms, fresh and dried?
It depends on why you are drying. For short-term refrigerator storage, paper wrapping prevents excess condensation. For longer storage, dry at low heat until the mushrooms snap or break rather than bend, then store in an airtight jar with the label of the drying date. Avoid plastic for long-term storage, it can trap residual moisture and lead to spoilage.
When is the best time to harvest shimeji, and does harvesting earlier improve later flushes?
For maximum yield per block, harvest the whole cluster together when the caps are still slightly convex and before they flatten fully. If you delay, the block often spends energy producing older caps and spores instead of a tighter next flush. Remove stumps and debris after each flush so leftover tissue does not accelerate surface contamination.
My blocks are fully colonized but no pins appear. What should I check step by step?
If pins do not appear after 2 to 3 weeks, re-check three things in this order: (1) you actually achieved the cooler fruiting temperature, (2) you exposed the block surface by opening or cutting the bag, and (3) fresh air exchange is frequent enough to keep CO2 low. Only after those are correct should you focus on moisture, since overly wet conditions can cause poor pin development.
Can I change the substrate recipe or supplements to boost yields?
Yes, but understand the risk tradeoff. Mixing in extra bran can raise yield potential, but too much supplementation can stress the mycelium or increase contamination if your sterilization or hydration is off. If you experiment, change only one variable per run and keep the same moisture target and sterilization method so you can interpret results.
Why would colonization be slow or only partially white after the first month?
Partial colonization after about 45 days usually points to one of two things: incubating conditions were too cold or inconsistent, or spawn ratio was low. As a practical rule, if you used under about 10% spawn by dry weight, expect slower colonization. You can sometimes speed recovery by gently redistributing the colonized sections without fully opening the bag, but avoid doing this repeatedly.
What should I do if I see contamination during incubation or after a flush?
For contamination you should prioritize containment and sanitation. Remove affected bags right away, keep the rest sealed, and clean the surrounding area before continuing. When green mold appears, plan to discard the block rather than trying to salvage it, because spores can spread quickly and contaminate your fruiting setup.
How do I rehydrate blocks between flushes without causing problems?
When you soak blocks between flushes, do it briefly and return them to fruiting quickly. Use cold water for a few hours, then drain thoroughly so the block does not stay waterlogged inside the chamber. The goal is rehydration, not soaking the block long enough that it stays saturated and invites bacterial or mold growth.