Nameko mushrooms (Pholiota microspora) are absolutely growable at home, but they do ask for a few things that most beginner guides skip over: a real cold shock to trigger pinning, sustained humidity above 85% (ideally 90–95%), and a fruiting temperature between 10–18°C (50–64°F). Reddit growers in particular mention that a cold drop or temperature fluctuation for a few days can help nameko start pinning a real cold shock to trigger pinning.
How to Grow Nameko Mushrooms at Home Step by Step

Marcus Holloway
7 May 2026
If you want to expand beyond nameko, here is how to grow crimini mushrooms with similar basics like temperature control, clean substrate, and reliable humidity. Get those three things right and you can expect your first pins in 5–14 days after inducing fruiting, with 3–4 flushes per block and total yields that can reach around 100% of your dry substrate weight.
Skip the cold shock or let humidity drop, and you'll be staring at a block that does absolutely nothing.
What nameko mushrooms are and when to expect pins
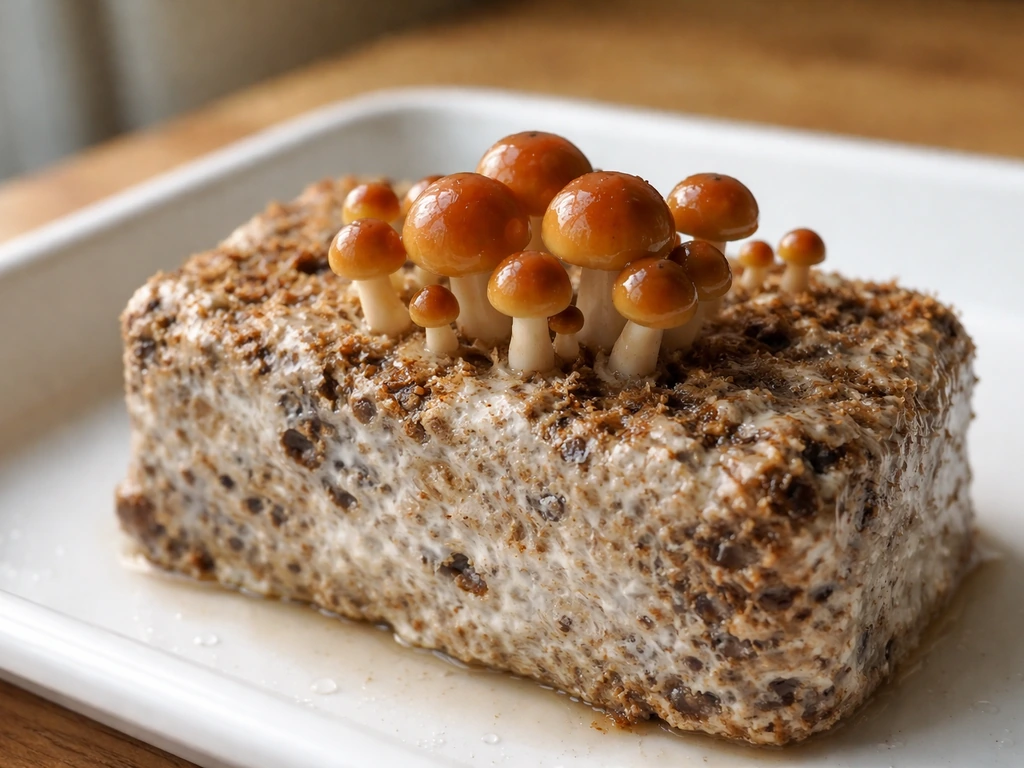
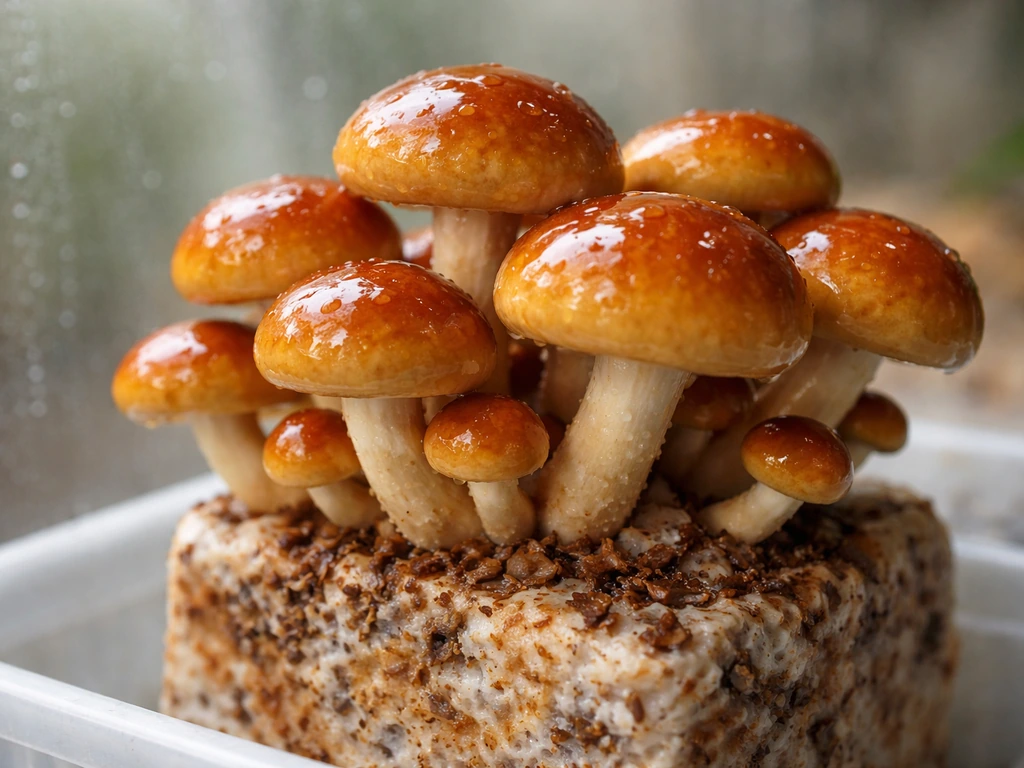
Nameko are small, amber-brown mushrooms with a distinctive shiny, slightly gelatinous coating on the cap. Wikipedia describes Pholiota microspora as having a blank" rel="noopener noreferrer">slightly gelatinous coating and being used as an ingredient in miso soup and nabemono. That slimy glaze is completely normal and actually desirable. It's what makes them so prized in Japanese cooking, especially miso soup, where they add both flavour and a natural thickening quality. They grow in clusters, so one healthy block can give you a satisfying flush all at once.
Timeline-wise, be realistic. After inoculation, nameko needs 60–90 days of colonisation at incubation temperatures (around 20–24°C / 68–75°F) before the mycelium is ready to fruit. Once you trigger the cold shift into fruiting conditions, pins typically emerge within 7–14 days. Compared to fast species like oysters, nameko is a slow burn. Don't rush the colonisation phase. A block that isn't fully colonised simply won't perform well no matter how perfect your fruiting environment is.
Indoor blocks vs outdoor logs: picking your method
For most home growers, indoor substrate blocks are the better starting point. You get more control over temperature, humidity, and timing, and the colonisation is faster than logs. You can start in any season, and the whole process from inoculation to first flush can be managed on a shelf in a spare room or basement. If you already grow other species indoors, like shiitake or shimeji, you'll feel at home with this workflow.
If you're already growing shiitake or shimeji, the main differences will be tuning your temperature, humidity, and fresh-air exchange to match the species shimeji mushrooms. If you can set up shiitake plug spawn in the same indoor workflow, the rest of your mushroom routine will feel much easier.
Outdoor log cultivation is the traditional method for nameko, and it works well if you have the patience and the right wood. Hardwoods like cherry and oak are ideal. You inoculate cut logs with sawdust or plug spawn, seal the holes, and let them colonise for 12–18 months before they start producing. Once they get going, they can fruit naturally for several years. The downside is that you're at the mercy of seasonal temperatures, and you need outdoor space. You can force flushes by soaking logs in water for 24–48 hours, but only after the first natural flush has already occurred.
| Factor | Indoor Blocks | Outdoor Logs |
|---|---|---|
| Time to first flush | 3–5 months | 12–18 months |
| Season flexibility | Year-round | Seasonal (autumn preferred) |
| Environmental control | High | Low |
| Setup cost | Low–moderate | Low (if you source logs yourself) |
| Longevity | 3–4 flushes per block | Several years of seasonal flushes |
| Best for | Beginners wanting faster results | Patient growers with outdoor space |
My recommendation: start with indoor blocks. Get comfortable with nameko's quirks, especially the cold shock and humidity requirements, before committing to a multi-year log project. You can always do both once you have a feel for the species.
What you need: supplies, substrate, and spawn
Supplies checklist
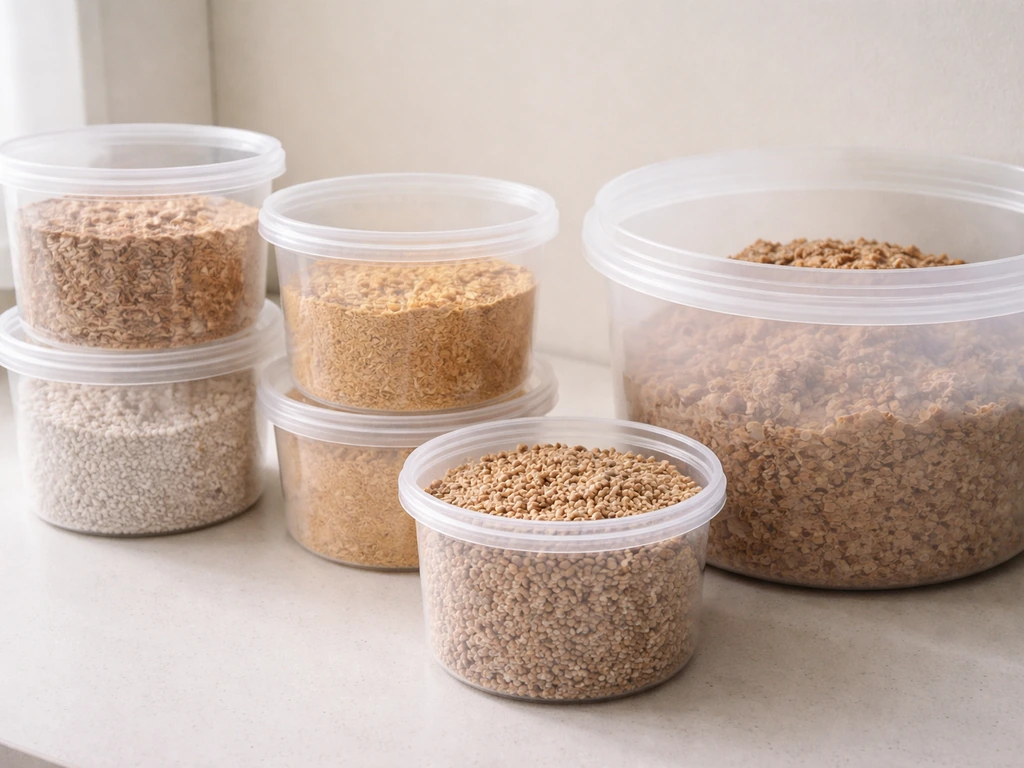
- Nameko sawdust or grain spawn from a reputable supplier
- Fine hardwood sawdust (oak is excellent)
- Wheat bran or rice bran for supplementation
- Gypsum (food grade or agricultural)
- Polypropylene grow bags (autoclavable) with filter patches
- Pressure cooker or autoclave for sterilisation
- Isopropyl alcohol (70%) and a still-air box or flow hood for clean inoculation
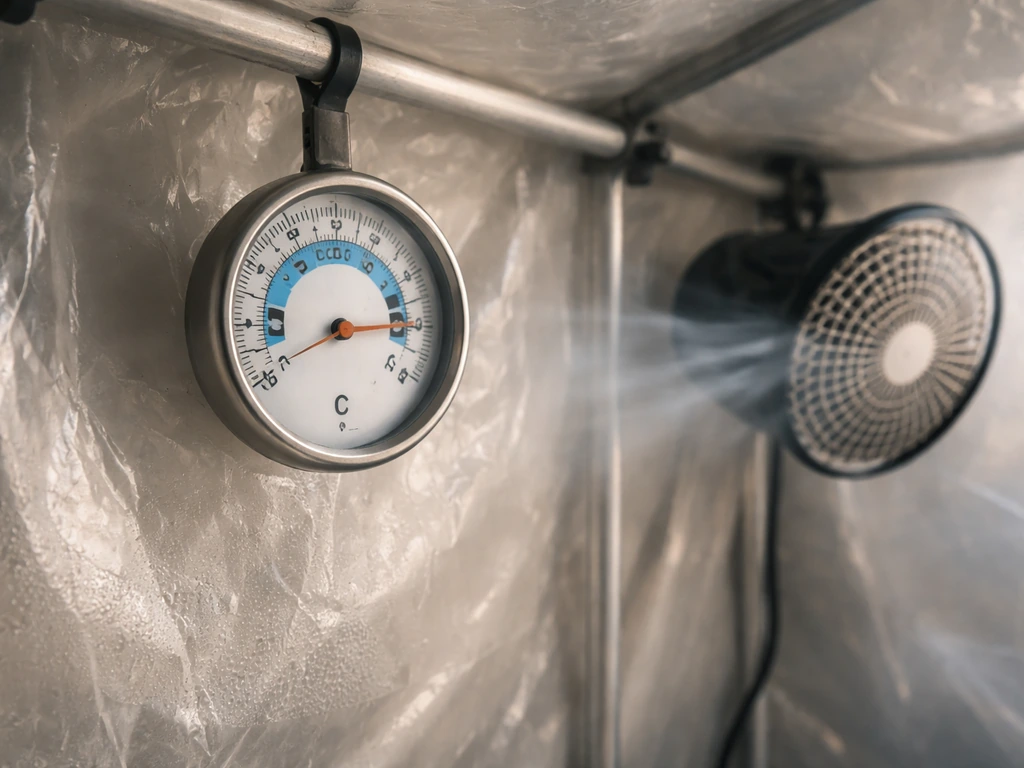
- Thermometer and hygrometer for your fruiting space
- Spray bottle or ultrasonic humidifier
- A space that can hold 10–18°C during fruiting (a basement, wine fridge, or dedicated mini-fridge tent setup works great)
Substrate formula
The standard nameko substrate mix is 80–85% fine hardwood sawdust, 15–20% wheat or rice bran, and 1–2% gypsum. The bran adds nutrition that drives mycelial density and yield. Because you're supplementing, you must sterilise (not just pasteurise). Pasteurisation is fine for lower-nutrient straw-type substrates, but supplemented hardwood sawdust will get contaminated fast unless you reach full sterilisation temperatures. Aim for 121°C (250°F) at 15 PSI for 2.5–3 hours in a pressure cooker. Let the substrate cool to room temperature before inoculating, which will take several hours.
For spawn rate, around 2% by weight of the wet substrate is a practical starting point. That translates to roughly 20 grams of spawn per 1 kg of wet substrate. Higher spawn rates speed colonisation and can reduce contamination risk, so some growers go up to 10–20% for indoor grows. Mix spawn thoroughly throughout the substrate for even colonisation rather than layering it.
Log cultivation spawn and prep
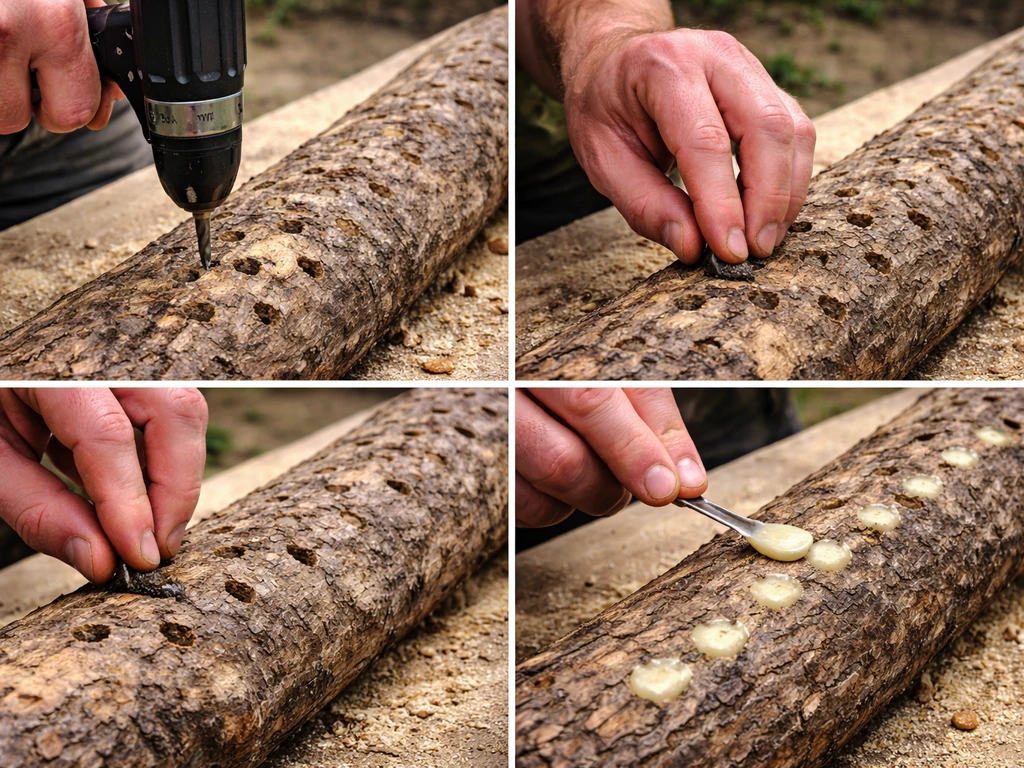
For logs, use hardwood sawdust spawn or plug spawn. Drill holes with an 8.5 mm (5/16 inch) drill bit in a diamond pattern along the log, pack spawn into each hole, and seal with cheese wax to keep moisture in and contaminants out. Fresh-cut logs that have rested for 2–6 weeks (to let natural anti-fungal compounds dissipate) work better than green or very old wood.
Step-by-step: from inoculation to first flush
- Mix your substrate: combine hardwood sawdust, bran, and gypsum. Add water until you reach field capacity (the mix should hold its shape when squeezed but not drip water freely). Pack into polypropylene bags and seal.
- Sterilise: pressure cook at 121°C / 15 PSI for 2.5–3 hours. Allow to cool completely before opening.
- Inoculate: in a still-air box or next to a flow hood, wipe everything down with 70% isopropyl alcohol. Open the bag, add spawn, mix it through the substrate thoroughly, then re-seal or fold the top of the bag down tight. Work fast and keep your hands and tools clean.
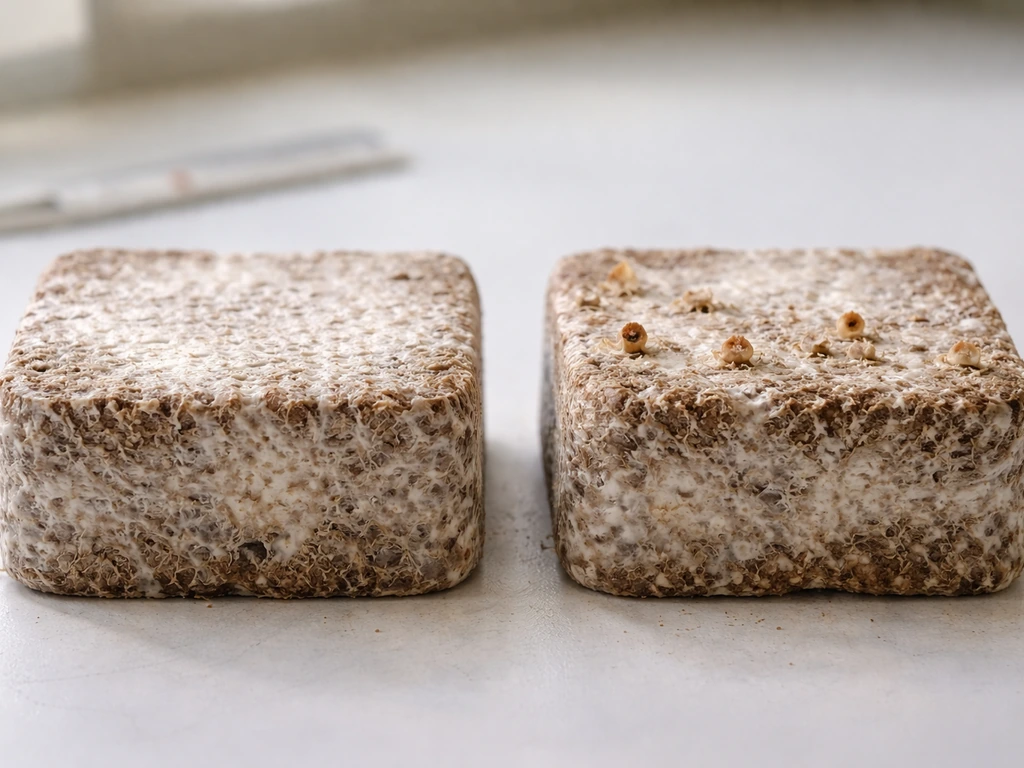
- Colonise (incubation): move bags to a warm, dark space at 20–24°C (68–75°F). This phase takes 60–90 days for nameko. Check weekly for signs of contamination (green, black, or pink patches). Healthy mycelium is white and will look dense and ropy as it matures.
- Trigger fruiting (cold induction): once fully colonised, drop the temperature to 10–16°C (50–60°F). This cold shock is non-negotiable for nameko. At the same time, raise humidity to 90–95% RH, introduce diffuse light (500–1000 lux for 10–12 hours per day), and increase fresh air exchange to keep CO2 below 1000 ppm. Open or cut the top of the bag to expose the substrate surface.
- Wait for pins: under good fruiting conditions, pins typically emerge 7–14 days after induction. They'll appear as tiny amber-brown dots, then rapidly develop into recognisable clusters.
- Harvest and rest: harvest before or just as the veil underneath the cap begins to tear. After the first flush, let the block rest at incubation conditions for 7–10 days before re-inducing. You should get 3–4 flushes per block.
Dialling in your environment: daily and weekly care
Temperature
Temperature is the single biggest trigger for nameko. The mycelium grows at 20–24°C, but fruiting must happen at 10–18°C, with the sweet spot being 10–16°C. If your house runs at 20°C or warmer year-round, you need an external cooling solution. A wine fridge with the temperature dialled down, a dedicated mini-fridge, or a basement in autumn/winter all work. Some growers build a small fruiting chamber inside a chest freezer with a temperature controller. Do not try to fruit nameko at room temperature if that room is above 18°C. It will not pin.
Humidity
This is where most home growers fail. Nameko needs above 85% RH at all times during fruiting, with 90–95% being the real target. Anything lower and pins abort, caps dry out, or the gelatinous coating disappears. An ultrasonic humidifier connected to a humidity controller is the most reliable solution. If you're misting manually, you need to do it at least 3–4 times per day and check your hygrometer constantly. Once pins form, be careful not to mist directly onto them. Mist the walls of your fruiting chamber instead to maintain ambient humidity.
Fresh air exchange
Nameko needs fresh air but hates drying out, so the balance here is important. Aim for about 3–5 air changes per day and keep CO2 below 1000 ppm. In practice, this means cracking a tent or opening a fruiting chamber for 10–15 minutes a few times a day, or using a small fan on a timer with the intake drawing through a humidified space. The key insight: when you increase fresh air, you also increase evaporation, which means you'll need to compensate with more humidity. If your pins are elongating abnormally or caps are staying small, CO2 is probably too high. If the substrate surface is drying out and cracking, you're ventilating too much without enough humidity to compensate.
Light
Nameko responds to light as a fruiting cue. Diffuse light at 500–1000 lux for 10–12 hours per day is enough. This doesn't need to be strong. A standard LED grow light, a desk lamp, or even indirect natural light through a window works. It doesn't drive photosynthesis, it just signals to the mycelium that it's time to fruit. A simple outlet timer handles this without any daily effort.
Harvesting, storage, and getting multiple flushes
Harvest nameko just before the veil beneath the cap starts to tear open, or right as it begins to tear. At this stage the gelatinous coating is at its best and the mushrooms store well. Twist and pull clusters away from the substrate cleanly, or use a clean knife to cut at the base. Don't leave stumps sitting on the substrate as they can rot and introduce contamination.
Fresh nameko keeps in the fridge for about a week. Store them in a paper bag or a container lined with paper towel to absorb excess moisture. Avoid airtight plastic containers, which accelerate sliminess. If you have a large flush, nameko dries well and can be rehydrated for soups.
After each flush, clean up any leftover stump material from the substrate surface and move the block back to incubation conditions (20–24°C) for 7–10 days. This rest period lets the mycelium recover and build energy for the next flush. Then repeat the cold induction: drop to fruiting temperature, raise humidity, restore the light schedule, and increase fresh air. Most blocks deliver 3–4 flushes, with the first and second being the largest. Total yield across all flushes can approach 100% of the initial dry substrate weight, meaning a block made with 1 kg of dry ingredients can yield around 1 kg of fresh mushrooms in total.
When things go wrong: troubleshooting nameko problems
No pinning after 2+ weeks in fruiting conditions
First suspect: temperature is too high. If your fruiting space is sitting above 18°C, the block simply won't pin. Get a thermometer in there and verify. The fix is to find a cooler space or use a dedicated cooling setup. Second suspect: the block wasn't fully colonised before you moved it to fruiting. White, dense mycelium should cover the entire substrate before you induce. If it isn't there yet, move it back to incubation temps and give it more time. Third suspect: humidity is too low. A hygrometer reading below 85% RH in the fruiting area will kill your chances. Add a humidifier or mist more frequently.
Pins aborting or drying out before maturing
Aborted pins almost always mean humidity crashed. Check your hygrometer logs if you have them, or just accept that manual misting probably isn't keeping up. An ultrasonic humidifier with a humidity controller set to 90% is the real fix here. Also check that fresh air exchange isn't too aggressive. If you have a strong fan blowing directly on the block, redirect airflow so it circulates the room without hitting the substrate surface directly.
Low yield or small mushrooms
Small yields usually come from one of three places: CO2 too high, humidity inconsistent, or the substrate was underfed. Check your fresh air exchange first. If you're fruiting in a small sealed container with minimal ventilation, CO2 builds up fast and pins stay small or develop long, skinny stems. Increase your air changes per day and watch what happens on the next flush. If substrate nutrition is the issue, there's not much you can do mid-grow, but for your next block, make sure the bran content is 15–20% and everything was properly sterilised so the substrate isn't contaminated at a low level that's competing with your mycelium.
Contamination (green, black, or pink patches)
Green (Trichoderma) is the most common contamination you'll see in supplemented hardwood blocks. If you spot it during incubation, isolate the bag immediately to stop spores spreading to your other projects. If it's a small patch early in colonisation, some growers cut that section out and monitor closely, but honestly, once Trichoderma is established in a supplemented block, it usually wins.
Prevention is the real fix: ensure sterilisation was thorough, work in a clean inoculation environment, and make sure your spawn is healthy and aggressive before adding it to substrate. Black or pink patches are typically bacterial contamination from insufficient sterilisation or wet, warm conditions. Double-check your sterilisation time and pressure, and make sure bags aren't sweating at warm temperatures post-inoculation.
Slow or weak colonisation
If your mycelium is growing but looks thin and wispy rather than dense and ropy after several weeks, check your incubation temperature. Nameko likes 20–24°C for colonisation. Below 18°C it slows down considerably. Also check that your substrate wasn't too wet at packing. Over-saturated substrate compresses the air pockets mycelium needs to grow through and creates anaerobic zones that slow things down. Field capacity is the right moisture level: the substrate clumps and holds shape when squeezed but doesn't release water.
Nameko is more demanding than oysters or even shiitake, but once you've nailed the cold fruiting environment and humidity control, it's a genuinely rewarding grow. The clusters are beautiful, the harvests are productive, and the flavour is unlike anything you'll buy at a grocery store. Start with one indoor block, get your fruiting setup dialled in, and you'll have the confidence to scale up or even try an outdoor log project alongside it. If you want the full walkthrough, see our guide on how to grow matsutake mushrooms for step-by-step setup and timing.
FAQ
My blocks won’t form pins, but the hygrometer shows 90% RH. Could temperature still be the issue?
If the fruiting room is above 18°C, nameko usually will not pin even with good humidity. The practical fix is to verify temperatures with a probe placed where the blocks sit, then run your cooling solution until the fruiting zone is consistently in the 10–16°C range (not just the thermostat reading).
How strict does humidity timing need to be during fruiting, and what happens if it dips briefly?
For indoor blocks, measure humidity near the substrate surface and keep it from cycling. If you are using a humidifier with a controller, set a target around 90%, and allow only small swings, because a short crash during evening can cause aborted pins even if mornings look fine.
Why does my nameko look less glossy or the gelatinous cap coating is weak?
If your gelatinous coating seems reduced, it is often tied to either humidity drifting under the target or overly direct misting onto caps. Keep misting toward chamber walls or indirect airflow, and avoid spraying the cluster itself after pins form.
Can I start cold induction early if the block is partially colonised?
Yes, you can lose performance if you induce fruiting before full colonisation. Even if there is white growth, wait until the block is uniformly covered and feels fully “knit” throughout, then switch to fruiting temps, otherwise you can trigger weak or uneven clusters.
How do I adjust fresh air when caps are drying out or growth looks stressed?
Air exchange depends on evaporation control. If caps are drying, curling, or splitting, reduce ventilation duration or airflow strength, then compensate with humidity, aiming for roughly 3–5 air changes per day and keeping CO2 under 1000 ppm if you can measure it.
Is manual misting enough for nameko if I cannot use an ultrasonic humidifier?
Manual misting often fails because humidity rebounds fast after evaporation. If you do mist, plan for more than 3–4 times daily in small, leaky chambers, and use a hygrometer log to see the real minimum RH overnight, not just peak readings after misting.
How long should I wait between flushes, and what if I want more flushes sooner?
Restarting fruiting after a rest period should be done only after the block has completed that 7–10 day recovery. If you put it back into cold and high humidity too soon, you can get fewer or smaller flushes because the mycelium has not rebuilt energy.
Can I pasteurise nameko substrate instead of sterilising it to save time?
Pasteurisation is usually not safe for supplemented hardwood sawdust because the added nutrition increases contamination pressure. For best results, follow full sterilisation conditions (pressure and time) for the whole load, then cool fully before inoculation to prevent heat damage and condensation.
What spawn rate should I use if my colonisation is slow or uneven?
Spawn rates that are too low can cause slower, patchy colonisation, which then leads to weak fruiting even with perfect fruiting conditions. If you are consistently seeing thin mycelium or long delays before pins, try moving up from about 2% toward 5% for your next batch.
What are the signs that the substrate is too wet, and should I correct it immediately?
Don’t let blocks sit in standing water or in saturated conditions where the surface stays wet for long periods. If you see sweating or pooling after soaking logs, allow excess water to drain, and for indoor blocks avoid over-humidifying so the substrate surface stays tacky rather than moist.
If I see Trichoderma, can I cut it out and still get a harvest?
Yes. If you isolate a contaminated block early, you can sometimes salvage the rest of your grow room, but removal is still the safest move if contamination is spreading. For supplemented hardwood, once Trichoderma is established, it usually overcomes the mycelium, so focus on prevention for future batches.
My mycelium is growing, but it stays wispy. What should I troubleshoot first?
Thin, wispy growth during incubation often points to incubation temperature being off, or packing moisture being too high. Verify colonisation temps with a probe, then check field capacity during packing by confirming the substrate holds shape and does not release free water when squeezed.
Does nameko require light every day, and what if I skip a few hours?
Nameko needs light as a cue, but not intense light. If you forget to run a daily schedule, it usually will not stop colonisation, but inconsistent light cycles during fruiting can contribute to uneven clusters, so use a simple timer and keep the photoperiod steady.
When is the best time to harvest for texture and future flushes?
Harvest timing affects storage and appearance. Pick just as the veil begins to tear, or right as it starts, then cool promptly. If you leave stumps, you increase decay risk and can seed contamination that affects the next flush.