Yes, you can grow shiitake mushrooms at home, and they are genuinely one of the most rewarding species to cultivate once you understand what they actually need. Shiitake are a hardwood-decomposing fungus, so your whole job as a grower is to put them in contact with the right wood substrate, keep conditions reasonably moist and cool, and then wait. The waiting is the hard part. But the process itself is not complicated, and you have real options depending on whether you want to grow on logs outdoors, set up a small indoor system, or run a low-maintenance bed in your yard.
How to Grow Shiitake Mushrooms: Logs and Indoors

Marcus Holloway
19 Apr 2026
Which growing method is right for you?
The biggest fork in the road is logs versus indoor blocks. Both work well, but they suit different situations and timelines. Log cultivation is slower (think 6 to 18 months before your first flush) but extremely low-maintenance once the logs are set up, and the mushrooms tend to have excellent texture and flavor. Indoor growing on supplemented sawdust blocks is faster and more controllable, but it demands more attention to humidity, fresh air, and temperature. Outdoor bed cultivation falls somewhere in between: you are essentially running log production but designing your site for natural rainfall and shade to do most of the work.
| Method | Setup Effort | Time to First Harvest | Ongoing Effort | Best For |
|---|---|---|---|---|
| Logs (outdoor) | Moderate (inoculation day) | 6–18 months | Low (watering, forcing) | Long-term yield, low intervention |
| Indoor blocks/bags | Higher (substrate prep) | 2–4 months | High (daily humidity/FAE) | Year-round control, faster results |
| Outdoor beds/shade site | Low–Moderate | 6–18 months | Low–Moderate (site watering) | Hands-off, natural rainfall areas |
If you are a beginner with outdoor space and some patience, logs are hard to beat. If you live in an apartment or want mushrooms faster, an indoor block setup makes more sense. This guide covers all three in detail so you can pick your path and get started.
What you need to buy before you start
Shiitake spawn comes in a few forms: plug (dowel) spawn, sawdust spawn, and thimble spawn. For log cultivation, plug spawn is the easiest for beginners. It comes as small wooden dowels pre-colonized with shiitake mycelium that you hammer directly into pre-drilled holes. Sawdust spawn is a bit cheaper but requires a specialized inoculation tool (a brass inoculation tool or modified caulking gun) to pack the spawn into holes, so it adds a step. Importantly, avoid grain spawn for logs entirely. Grain spawn is designed for sterilized indoor substrates and will not colonize raw hardwood reliably.
For indoor cultivation on sawdust blocks, you want sawdust or pellet spawn that you will mix into a sterilized hardwood sawdust substrate. Pre-made fruiting blocks are also widely available if you want to skip substrate preparation entirely and just focus on the fruiting stage.
Sourcing your spawn and supplies
Reputable online suppliers like North Spore, Field and Forest Products, and Fungi Perfecti sell shiitake plug spawn, sawdust spawn, and complete kits. North Spore's plug spawn kit, for example, includes 500 plugs, an 8.5mm mushroom-specific drill bit, a bag of wax, and four wax applicators, which covers most of what you need for a beginner log setup. You can also find spawn at local homebrew shops, garden centers, or regional mushroom cultivation suppliers. Buy fresh spawn, check the packaging date, and store it in the refrigerator if you are not using it immediately.
- Plug or sawdust spawn (shiitake-specific strain)
- 8.5mm drill bit (plug spawn) or inoculation tool (sawdust spawn)
- Cordless drill
- Food-grade wax (paraffin or cheese wax) and a wax applicator or sponge
- Fresh hardwood logs, 4 to 6 inches in diameter, 3 to 4 feet long
- A hammer (for plug spawn)
- A heat source to melt wax (small electric pot or camp stove works fine)
For indoor growing, add to that list: hardwood sawdust or pellets, wheat bran or other supplemental nitrogen source, large polypropylene grow bags with filter patches, a pressure cooker or autoclave for sterilization, and a hygrometer to monitor humidity in your fruiting chamber.
Growing shiitake on logs: step-by-step from inoculation to harvest
Log cultivation is the traditional method and still one of the most reliable for home growers with outdoor space. Shiitake's natural home is hardwood, and a well-inoculated log can produce mushrooms for three to seven years.
Step 1: Choose and cut your logs
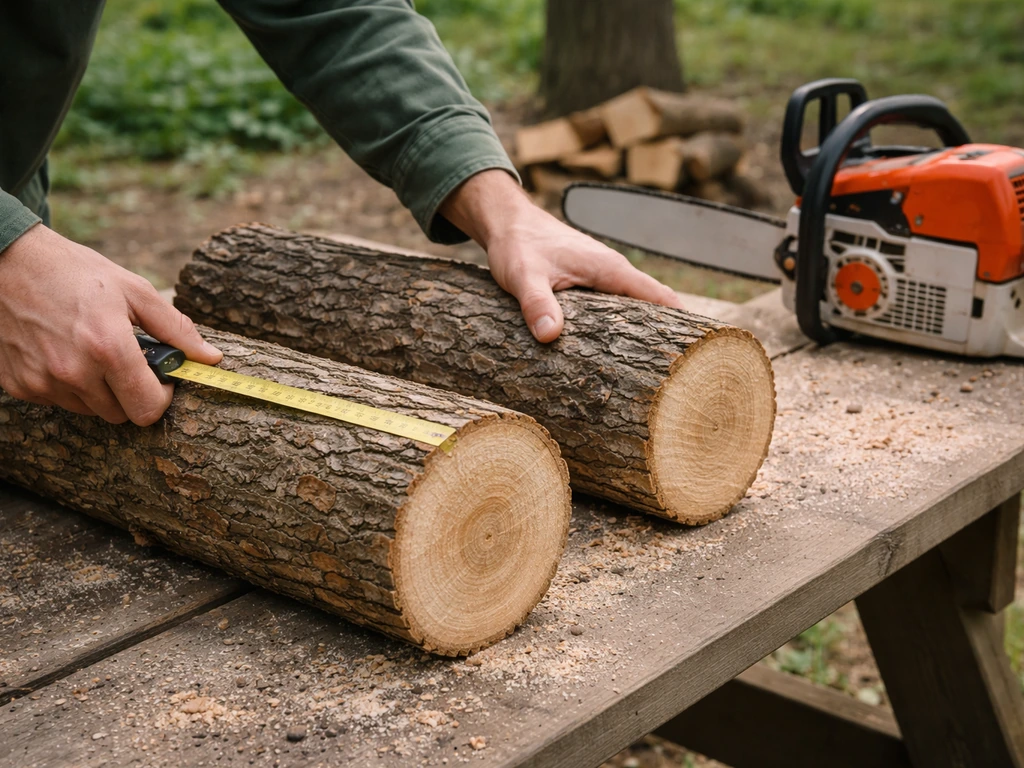
Species matters here. Oak is the gold standard for shiitake, but alder, maple, ironwood, hornbeam, and sweetgum also work well. Avoid conifers, black walnut, and cedar. The logs need to be freshly cut hardwood, ideally cut in late winter or early spring before the tree buds out, when the wood is still full of the starches and sugars the mycelium will feed on. The ideal diameter is 4 to 6 inches (up to 8 inches is fine, but bigger logs are heavier to manage and take longer to colonize). Aim for 3 to 4 feet in length, which hits the sweet spot of manageable weight and enough surface area for a good spawn run. Do not use logs that are already dry, show signs of rot, or have visible mold or damage. Fresh is everything.
Step 2: Drill your inoculation holes
Once you have fresh logs, drill holes in a diamond or staggered pattern along the length of the log. Space holes roughly 4 to 6 inches apart within each row, with rows about 2 to 4 inches apart, offset so the holes form a diamond pattern rather than straight lines. Each hole should be about 1.25 inches deep and the right diameter for your spawn type (8.5mm for standard plug spawn). Closer spacing colonizes faster but uses more spawn and costs more. For a beginner, standard spacing is a fine balance between cost and speed.
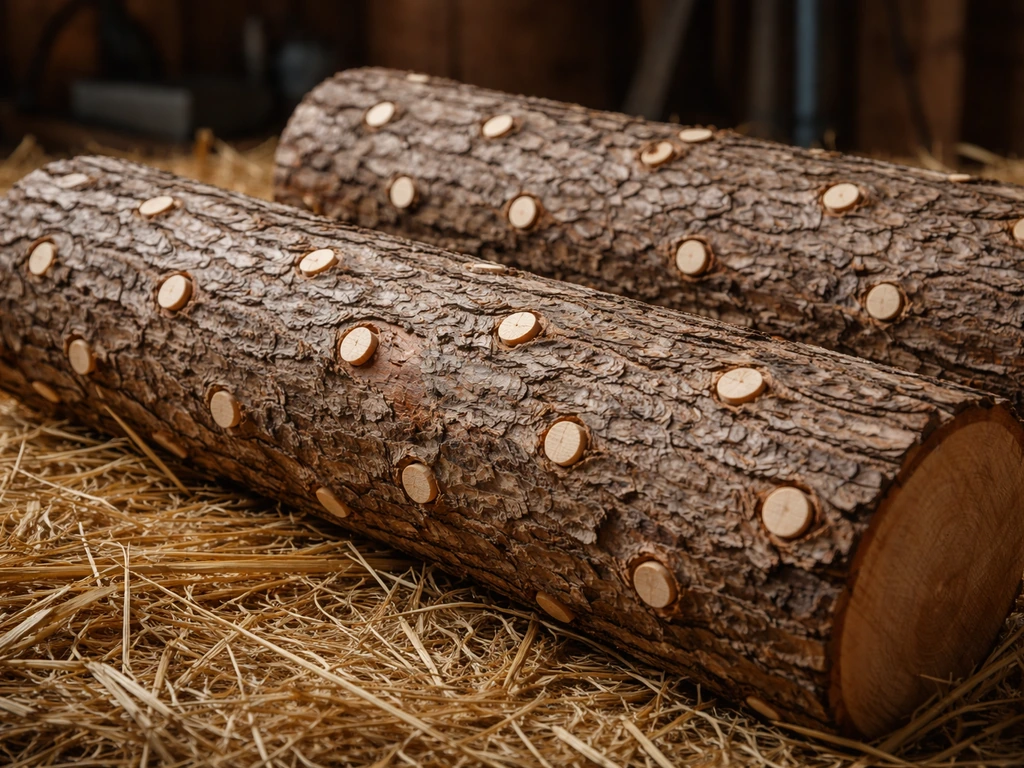
Step 3: Inoculate and seal
If you are using plug spawn, simply tap each plug into a hole with a hammer until it is flush with or just below the bark surface. For sawdust spawn, use your inoculation tool to pack sawdust spawn firmly into each hole. After every hole is filled, blank" rel="noopener noreferrer">seal each one with melted food-grade wax (paraffin or cheese wax works perfectly). A small paint sponge or purpose-made wax dauber makes this fast. blank" rel="noopener noreferrer">The wax prevents the spawn from drying out and protects it from competing molds and insects during the long colonization period. Some growers also seal the cut ends of the log, which helps retain moisture.
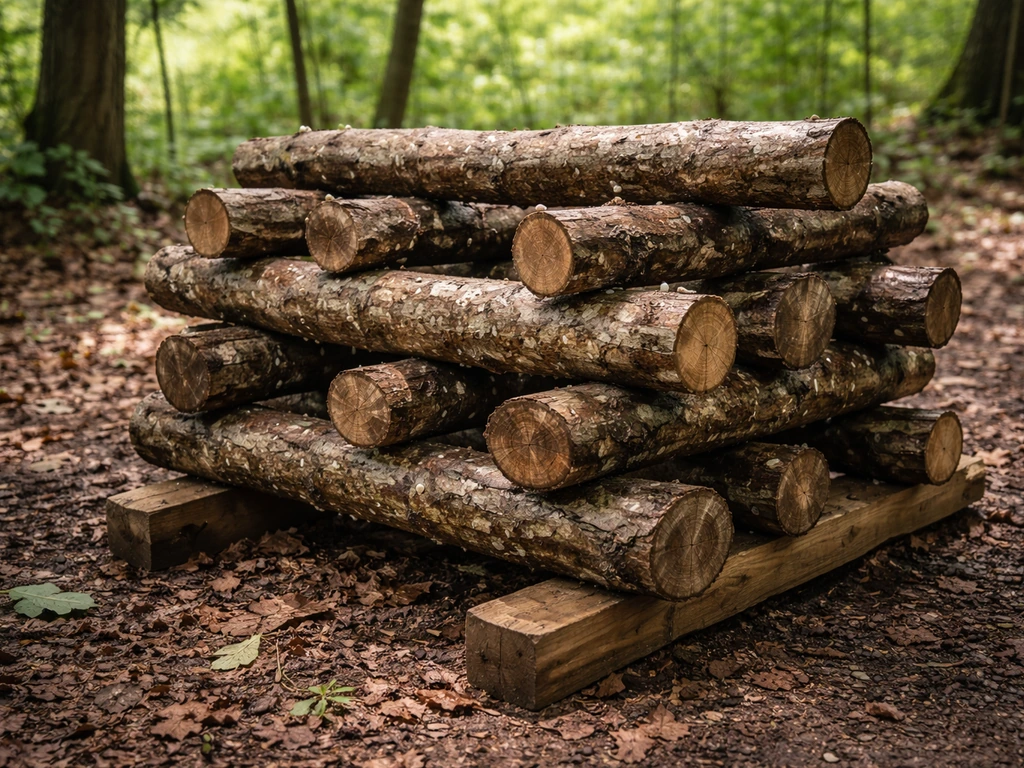
Step 4: Incubate (the spawn run)
Stack your inoculated logs off the ground in a shaded location with good air circulation. A shady spot under trees works well. The logs need to stay moist but not waterlogged, ideally maintaining at least 30 to 35% internal moisture during the entire spawn run. If you are in a dry climate, you may need to water logs occasionally, especially during summer. The mycelium grows slowly through the wood during this period, and you will start to see whitish patches of growth appearing on the log surface and ends over time. This stage takes anywhere from 6 to 18 months depending on wood species, log diameter, inoculation density, and ambient temperatures. Smaller logs in warmer conditions colonize faster.
Step 5: Force fruiting and harvest
Once your logs show good colonization (visible white mycelium, especially at the ends and under the bark), you can trigger fruiting by soaking logs in cold water. In summer, soak for about 6 to 24 hours. In spring or fall when temperatures are cooler, a 2 to 3 day soak is more effective. After soaking, prop the logs upright or lean them and wait. Mushrooms typically begin to pin within 7 to 10 days of soaking and the flush runs for about 3 to 5 days. Harvest when the caps are roughly two-thirds open by cutting stems flush with the bark using a sharp knife. After a flush, let logs rest and recover for about 21 days before attempting to force another flush. Logs in the right conditions will keep producing for years.
Growing shiitake indoors
Absolutely, you can grow shiitake mushrooms indoors. The common concern is that shiitake needs more precise environmental control than, say, oyster mushrooms, but it is well within reach for a home grower with a basic setup. The key variables are humidity, fresh air exchange, and temperature.
Setting up your indoor fruiting chamber
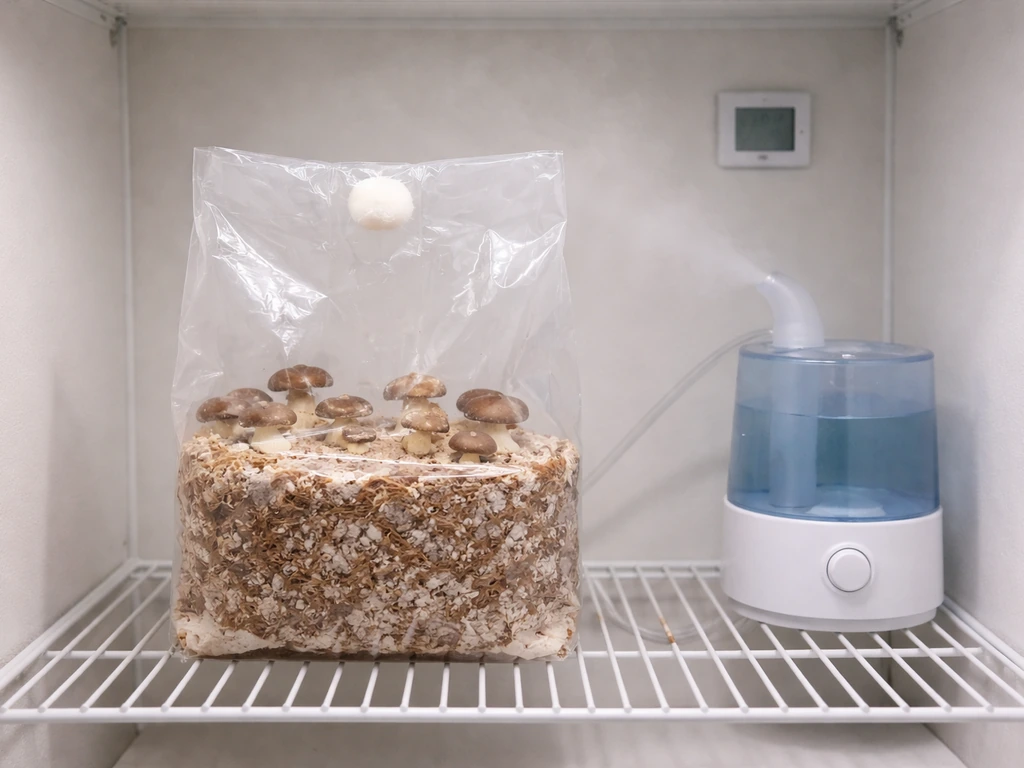
For indoor shiitake, you will typically grow on sterilized hardwood sawdust blocks inoculated with sawdust or pellet spawn. You can buy ready-to-fruit blocks from suppliers if you want to skip the substrate prep stage entirely, which is a great starting point. To fruit them, you need a fruiting chamber: a small tent grow, a monotub with fan and humidity control, or even a simple Martha tent setup all work. Target relative humidity of 85 to 90% in the fruiting chamber. CO2 should stay below 1,000 ppm, so fresh air exchange (FAE) is non-negotiable. Aim for 2 to 4 fresh air exchanges per hour. A small fan on an interval timer or a fan with a CO2 controller handles this.
Temperature during fruiting should sit in the range of about 60 to 77°F (15 to 25°C). Shiitake benefits from a temperature drop to initiate pinning, so if your chamber runs warm, dropping it by 5 to 10°F for a day or two can encourage pins to form. Light is not strictly required but a 12-hour light cycle (even indirect natural light) helps signal the mushrooms to fruit evenly.
The indoor growing cycle
For indoor sawdust blocks, the colonization phase takes roughly 60 to 90 days after inoculation (faster than logs, but still not quick). Once the block is fully colonized, it goes through a browning or hardening stage where the surface forms a tan to brown skin, which is normal and indicates the block is ready to fruit. A common beginner mistake is trying to fruit a block before this stage is complete. Once the surface is fully browned and firm, you can initiate pinning by dropping temperature slightly, increasing fresh air, and misting the block surface. Pins appear within a week or two, and a flush runs for about 5 to 7 days. After each flush, let the block rest for 2 to 3 weeks, keep it from drying out, and then re-initiate. Most blocks give 2 to 3 good flushes before yields decline significantly. One thing to note from growing experience: if blocks are touching each other in your fruiting chamber, you will get poor pinning at the contact points, so give each block some breathing room.
Growing shiitake outdoors (beds and shade sites)
Outdoor cultivation is essentially log cultivation managed in a natural site, and for many growers it is the most sustainable and lowest-effort approach over the long term. The goal is to find or create a microenvironment that mimics the shaded, moist forest floor where shiitake naturally thrives.
Choosing your site
Pick a location that gets dappled or full shade for most of the day, ideally on a north-facing slope or under deciduous trees. Avoid spots that stay waterlogged or have standing water, but also avoid exposed, dry, sunny areas that will stress and dry out your logs quickly. Logs stacked under a tree canopy with 70 to 80% shade cover is a classic setup. If you are in a dry region, you may need to run drip irrigation or hand-water periodically to keep moisture up.
Timing and seasonal considerations
Inoculate logs in late winter to early spring, right after cutting trees while logs are still fresh and before warmer temperatures accelerate competing mold growth. Shiitake logs naturally fruit in cool, moist conditions, so outdoors you will typically see the best flushes in spring and fall. Summer heat slows or pauses fruiting, and extreme cold halts it entirely, though the mycelium is dormant rather than dead. You can force fruiting any time the mycelium is sufficiently colonized by soaking logs as described above, but timing your soaks to coincide with naturally cool, moist weather gives the best results with the least intervention. If you experience a dry summer, water logs at least once a week to prevent moisture loss below that 30 to 35% threshold.
Stacking and log management
During the spawn run, stack logs in a criss-cross or crib-style stack (like a log cabin) or lean them against a fence or rack. Keep them off bare soil if possible during colonization, especially in areas with aggressive native molds, to reduce contamination risk. Once logs are colonized and you are in the fruiting rotation, you can lay them on the ground or prop them at an angle. Many growers move logs to a dedicated fruiting area (with easier access to water and harvest) and leave another batch colonizing nearby.
Troubleshooting common problems and setting realistic expectations
Most shiitake failures come down to a handful of predictable issues. Here is what to watch for and what to do about it.
Colonization is not taking (or taking forever)
If you see no visible mycelium growth after several months, the most likely culprits are logs that were too dry when inoculated, old or dead spawn, or logs cut from the wrong species. Always start with fresh logs and verified-fresh spawn. If logs dry out during the spawn run (no visible moisture on cut ends, logs feel very light), soak them for 24 hours and return them to shade. Also confirm you are not in conditions that are too cold: mycelium grows very slowly below about 50°F and basically stops below 40°F.
Green or black mold on logs
Some green (Trichoderma) mold on logs during the spawn run is common and does not automatically mean failure. Healthy, fast-colonizing shiitake mycelium can outcompete these molds over time. However, heavy contamination across the surface usually indicates the logs were not fresh, the wood was damaged or had existing fungal growth, or inoculation sites were exposed to contamination during the process. You cannot fully reverse a heavily contaminated log, but you can slow the spread by keeping logs in good airflow and making sure wax seals are intact. For indoor blocks, green mold anywhere means the block is likely done, pull it to avoid spreading spores to other blocks.
Logs are colonized but not fruiting
This is the classic patience problem. Shiitake logs are ready to fruit when the mycelium has colonized the full cylinder of available sapwood, not just when a certain amount of time has passed. The readiness signal is visible white mycelium across the ends and surface, plus a slightly spongy feel to the bark. If your logs look fully colonized but are not fruiting naturally, try a cold water soak for 12 to 24 hours. If you are wondering how to grow shiitake on logs, use this same cold-soak approach to trigger fruiting once the wood is fully colonized. Make sure the soak water is genuinely cold (below 60°F). The temperature shock is part of what triggers the fruiting response.
Poor pinning or tiny, malformed mushrooms indoors
Indoors, poor pinning almost always traces back to high CO2 (not enough fresh air exchange) or humidity that is too low. Long-stemmed, small-cap mushrooms are a classic sign of CO2 buildup. Increase your fresh air exchanges. Dry, cracking caps usually mean humidity is below 80%. Add more misting or a humidifier. If blocks fruit too early before fully completing the browning stage, yields will be low overall; patience at the colonization stage pays off downstream.
Realistic timelines at a glance
| Stage | Log Cultivation | Indoor Blocks |
|---|---|---|
| Inoculation to first signs of colonization | 1–3 months | 2–4 weeks |
| Full colonization / spawn run | 6–18 months | 2–3 months |
| First flush after forcing/initiation | 7–10 days after soak | 7–14 days after initiation |
| Flush duration | 3–5 days | 5–7 days |
| Rest period between flushes | ~21 days | 2–3 weeks |
| Total productive life | 3–7 years | 2–4 flushes per block |
What kind of yields can you expect?
For log cultivation, a reasonable benchmark is a biological efficiency of around 33% of the dry weight of the log over its full productive life. That is not all at once, it spreads across years of flushes. For indoor blocks, a well-managed block will typically yield roughly 1 to 1.5 times its dry substrate weight across all flushes combined. Neither of these numbers is a guarantee, and your first season as a grower will teach you more than any guide can. Start with 3 to 5 logs or one to two indoor blocks, get the process dialed in, and scale up from there.
Putting it all together: your next steps
If you have outdoor space and access to fresh hardwood, inoculating a few logs this late winter or spring is the most forgiving entry point into shiitake cultivation. Order plug spawn, source your logs from a local tree service or cut them yourself, and set aside a shady corner of your yard. For a complete rundown of the steps, see our guide on how to grow mushrooms in logs. If you are specifically aiming for wine cap mushrooms, the inoculation and moisture steps are similar, but the substrate and timing differ, so follow our guide on how to grow wine cap mushrooms how to grow mushrooms in logs. If you want faster results or are growing indoors, pick up a ready-to-fruit shiitake block to learn the fruiting stage hands-on before committing to substrate preparation. Either way, shiitake rewards growers who understand the timeline and manage moisture consistently. The patience investment is real, but so is the payoff when you pull your first flush from a log you inoculated yourself.
If you want to go deeper on the log-specific side of this, the log inoculation process, stacking, and site setup all have more nuance worth exploring. Shiitake also shares log-based cultivation techniques with other species like reishi and maitake, so the skills you develop here transfer directly if you want to branch out to other gourmet or medicinal varieties down the road. Maitake is another hardwood-loving mushroom, and the same kind of hands-on log and moisture management can help you learn how to grow maitake mushroom successfully. Once you have the log and humidity basics down, you can use that same mindset to learn how to grow reishi mushrooms too.
FAQ
How fresh do my shiitake logs need to be, and can I store them before inoculating?
For logs, the substrate must be fresh hardwood, and “fresh” usually means cut recently (late winter or early spring) and still flexible, not punky or heavily checked. If you have to store logs, keep them shaded and protected from drying, ideally wrapped or under cover, because shiitake colonization slows sharply when logs lose moisture.
Can I use grain spawn to grow shiitake on logs?
No, grain spawn is a poor match for log cultivation because it is formulated to colonize sterilized, nutrient-rich mixes under indoor conditions. If you only have grain spawn, the most reliable option is to switch to an indoor or bag-based workflow where you can use a compatible sterilized substrate.
What should I do if my shiitake logs are drying out during the long colonization period?
Yes, and it is usually worth it. If you consistently get logs that feel “too light,” add a simple moisture check: touch the bark and, if it is dry, soak or water. For outdoor setups in dry climates, drip irrigation that runs in short cycles is often easier than soaking entire logs repeatedly.
How do I choose the right length and water temperature for a fruiting soak?
Soak timing depends on temperature, not just the season name. A practical rule is to use a shorter soak (hours) in warm weather and a longer soak (days) when temperatures are cool, and to keep the water cold enough to create a real temperature shock (not just “cool tap water”).
Is green mold on shiitake logs always a failure, and how can I tell when it is serious?
Healthy colonization usually shows white mycelium that spreads across ends and under bark, but “green mold” is a separate situation. For logs, small amounts of green growth can be outcompeted, but heavy, fast spread across the surface is a warning sign that the wood was compromised or seals were not done well. Make sure wax seals are intact before you assume the log is doomed.
My logs look colonized, but they are not pinning. What should I try first?
If a log looks fully colonized but does not fruit, the most common fix is a targeted cold soak for a shorter window (often 12 to 24 hours) and then immediate return to shade. Also verify that the log is not still too cold overall, because fruiting responds to both the soak and the ambient conditions afterward.
How can I tell when an indoor shiitake block is ready to fruit?
Do not rush the browning stage. Indoors, if you fruit too early, you may get weak yields and poor pinset. Wait until the block surface is tan to brown and feels firm, then initiate pinning by dropping temperature slightly, increasing fresh air, and misting just enough to keep surface moisture without soaking the block.
Why does pinning fail when indoor shiitake blocks are touching?
Keep blocks separated to avoid localized high humidity and CO2 pockets at contact points, which often produces patchy pinning or malformed clusters. Leave a clear gap between blocks in the fruiting chamber, and consider rotating shelf positions if one side of the chamber is consistently more humid or stagnant.
What do “long stems” and “cracking caps” indicate in an indoor shiitake setup?
If caps are small with long stems and they seem spaced out, it usually means CO2 is too high or fresh air exchange is too low. If caps are cracking or drying, humidity is typically too low. Use one adjustment at a time (more FAE, then humidity) so you can identify what fixed the problem.
How many logs or indoor blocks should I start with as a beginner?
Plan for an initial learning curve. A common best practice is to inoculate a small batch first, then note your local temperature and moisture patterns, because these strongly affect colonization time. Once you see how long your logs take to fully colonize and how your environment behaves during summer, scaling up becomes much more predictable.