Maitake (Grifola frondosa) is one of the most rewarding mushrooms you can grow at home, but it's not a beginner's first project. Expect a long colonization period of 3 to 6 months, specific cold-temperature fruiting requirements around 10 to 18°C (50 to 64°F), and a substrate that needs real attention to get right. If you're set up for those conditions and willing to be patient, you'll end up with those gorgeous, layered hen-of-the-woods clusters that can weigh several pounds per harvest. Here's exactly how to make that happen, start to finish.
How to Grow Maitake Mushroom at Home: Indoor Guide

Marcus Holloway
26 Apr 2026

What maitake actually needs (and what to realistically expect)
Maitake is a hardwood-loving, cold-weather mushroom that fruits in autumn in the wild. That biology shapes everything about growing it indoors. It colonizes slowly at room temperature and absolutely requires a cold trigger to form pins. If you can't get your fruiting chamber down to 10 to 16°C (50 to 61°F) reliably, maitake is going to frustrate you. A cool basement, a wine fridge, or a temperature-controlled tent in autumn are your best bets.
Here's the honest timeline: you're looking at roughly 3 to 6 months from inoculation to first harvest. Colonization alone takes 2 to 4 months at typical home temperatures. Pinning initiation then takes 5 to 10 days once conditions are right, and the fruiting bodies develop fully over another 1 to 3 weeks. Compare that to oyster mushrooms, which fruit in 2 to 4 weeks total. Maitake is a long game, but the payoff in flavor and medicinal value is worth it. The yield from a well-colonized 5 lb block can be anywhere from 200 to 500 grams of fresh mushrooms per flush, depending on how well you dial in your fruiting conditions.
Indoor setup and materials to gather before you start
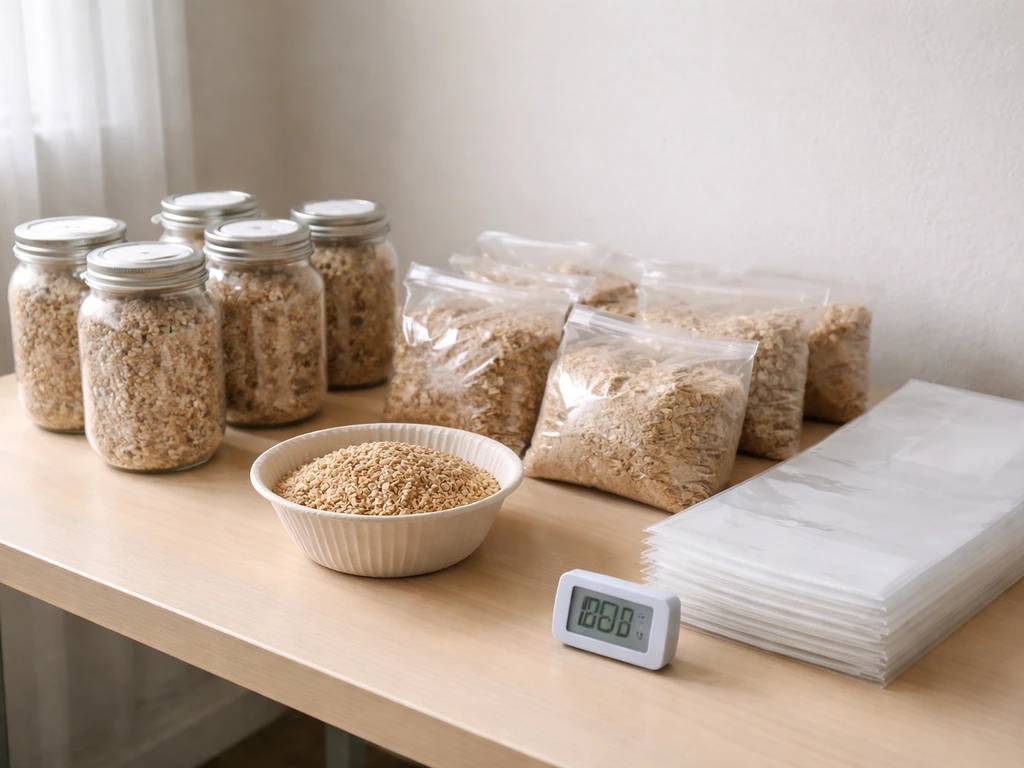
You don't need a professional lab to grow maitake, but you do need a few specific things. The most important is a space where you can control temperature during fruiting. A spare mini-fridge set to 55°F, a cool basement corner, or a grow tent with an AC unit in late fall will all work. For colonization, a stable room-temperature space (18 to 24°C / 65 to 75°F) out of direct sunlight is fine.
- Grain spawn or sawdust spawn inoculated with maitake mycelium (more on sourcing below)
- Hardwood sawdust (oak is ideal; supplemented with wheat bran or rice bran at 10 to 20%)
- 5 to 10 lb autoclave-safe polypropylene grow bags with filter patches
- A pressure cooker (15 psi capable) or autoclave for sterilization
- A still air box (SAB) or laminar flow hood for inoculation
- 70% isopropyl alcohol and nitrile gloves
- A hygrometer and thermometer for your fruiting space
- A humidifier or ultrasonic mister for the fruiting chamber
- A humidity tent, Martha tent, or monotub-style fruiting chamber
- Spray bottle for misting
One thing that trips up new maitake growers: buying pre-made kits expecting a quick turnaround. Some vendors sell colonized maitake blocks, which cuts months off your timeline and is a great way to get your first harvest while you learn the process. If you want to go full DIY from spawn, keep reading.
Substrate prep: what to use, how to mix it, and how to sterilize it
Maitake is a primary hardwood decomposer, so the substrate needs to mimic that. The best base is hardwood sawdust, specifically oak, beech, or alder. Fruitwood like apple or cherry also works well. Avoid softwoods like pine or cedar because the resins inhibit mycelium growth.
The substrate mix
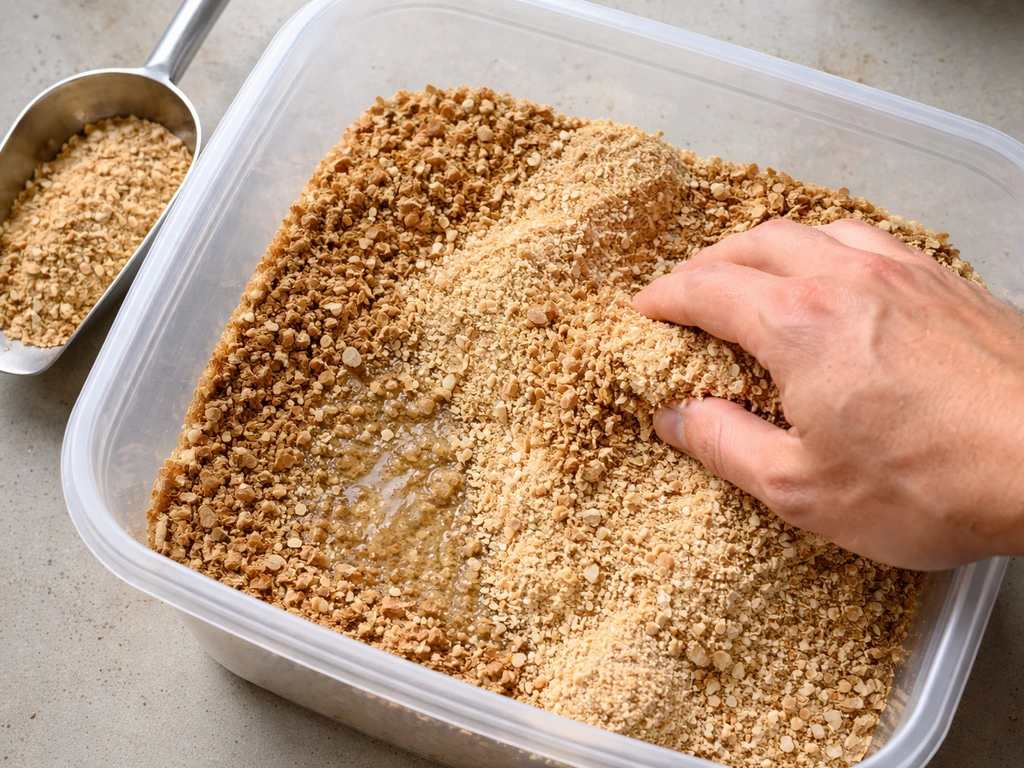
A reliable maitake substrate formula is 80% hardwood sawdust and 20% wheat bran or rice bran by dry weight. The bran adds nitrogen and nutrients that fuel mycelium through that long colonization stretch. Some growers add a small amount (5%) of gypsum to improve structure and keep the mix from compacting too tightly. You can also replace part of the sawdust with hardwood pellets (the kind used in pellet stoves) broken down with water, which is a cheap and widely available option.
Getting hydration right
Target field capacity: when you squeeze a handful of the mixed substrate firmly, only a few drops of water should come out. Too wet and you'll get bacterial contamination during sterilization. Too dry and colonization stalls. The mix should feel damp like wrung-out sponge, not sloppy. Most growers target around 60 to 65% moisture content by weight.
Sterilization (non-negotiable for maitake)
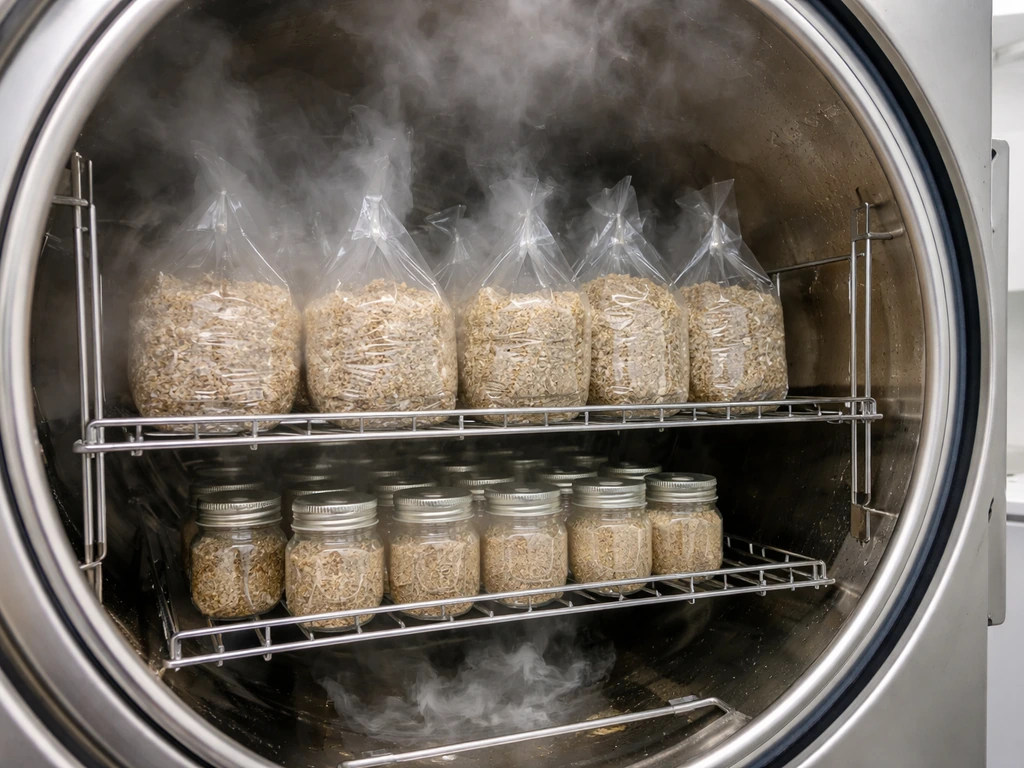
Maitake is a slow colonizer, which means competitors like Trichoderma mold have a long window to establish if the substrate isn't fully sterilized. Pasteurization is not enough here. You need to pressure cook your bags at 15 psi for 2. A substrate-prep guide from SporesLab summarizes pressure-cooking at about 121°C (15 PSI) for roughly 2.5 to 3 hours for sawdust blocks 121°C (15 PSI) for 2.5 to 3 hours. 5 to 3 hours for bags up to 5 lbs, and 3.5 hours for larger blocks. Let the bags cool completely to below 21°C (70°F) before inoculating. This usually takes 8 to 12 hours. Inoculating warm bags is one of the most common beginner mistakes and kills your spawn.
Inoculation and colonization: spawn types, steps, and sanitation
Choosing your spawn
Grain spawn (rye, wheat, or millet) is the most efficient choice for bags because the grains distribute evenly through the substrate and give mycelium many colonization starting points. Sawdust spawn works too and is slightly less prone to contamination because it has fewer nutrients to attract competitors. Avoid using spore syringes for maitake if you can: spores are slower to establish, more variable in genetics, and colonization takes even longer. Buying quality liquid culture or grain spawn from a reputable supplier is the smart move.
The inoculation process
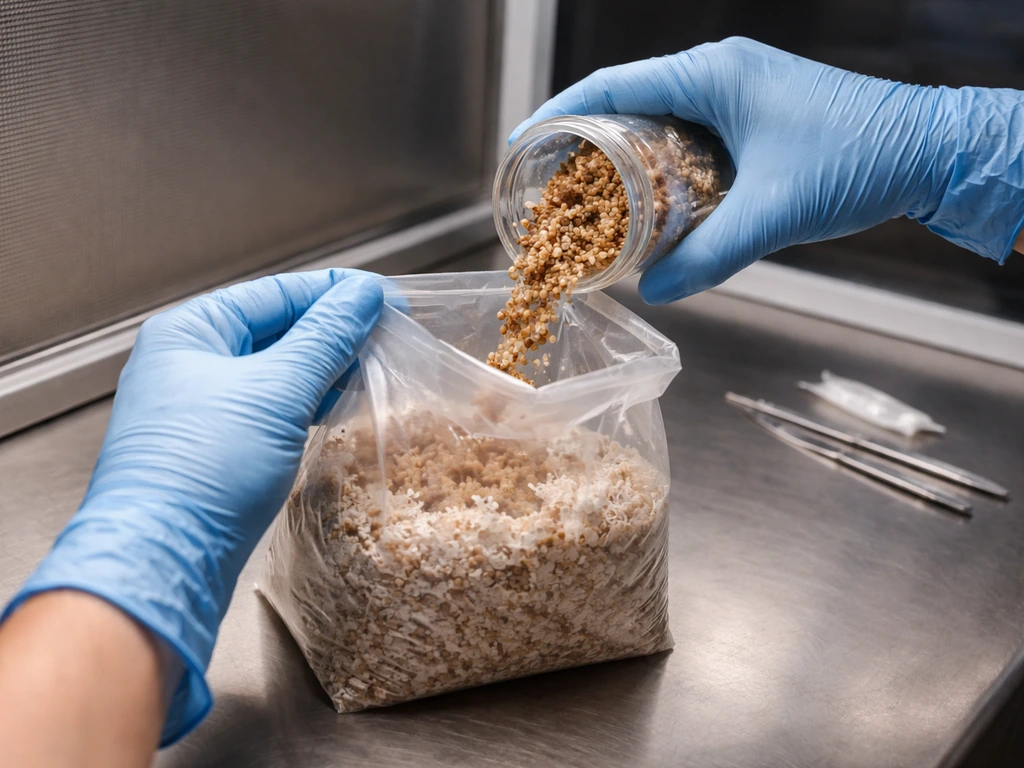
- Set up your still air box or flow hood and wipe everything down with 70% isopropyl alcohol. Let it dry fully before working.
- Put on nitrile gloves and wipe them down with alcohol too.
- Open the cooled substrate bag and add spawn at a rate of about 15 to 20% of the substrate weight. So for a 5 lb bag, that's roughly 12 to 16 oz of grain spawn.
- Mix the spawn into the substrate thoroughly by kneading the outside of the bag.
- Seal the bag with a heat sealer or fold and tape tightly, making sure the filter patch remains unobstructed.
- Label the bag with the date and species.
Colonization: what to expect and watch for
Place your inoculated bags in a dark space at 18 to 24°C (65 to 75°F). Maitake mycelium is white to off-white and grows in a fairly tight, ropy pattern. Don't be alarmed if it looks slower than other species you've grown. After 2 to 3 weeks you should see visible white growth radiating from the spawn points. Full colonization of a 5 lb block typically takes 2 to 4 months. Be patient and resist squeezing or disrupting the bags frequently. Check on them weekly. Any pink, green, black, or orange patches are contamination and the bag needs to be removed from your grow space immediately, sealed in a trash bag outside.
Fruiting conditions: hitting the right numbers
Once the block is fully colonized (all white, no visible substrate, mycelium firm throughout), it's time to trigger fruiting. This is where maitake's cold requirement becomes critical. Primordia (the first tiny pin formations) won't form without dropping temperatures significantly.
| Stage | Temperature | Humidity | CO2 Level | Light | Duration |
|---|---|---|---|---|---|
| Primordia initiation | 10 to 15.6°C (50 to 60°F) | ~95% RH | 2,000 to 5,000 ppm | 100 to 500 lux | 5 to 10 days |
| Fruiting body development | 12 to 18°C (54 to 64°F) | 80 to 90% RH | ~1,000 ppm | 500 to 1,200 lux | 10 to 21 days |
How to set up your fruiting chamber
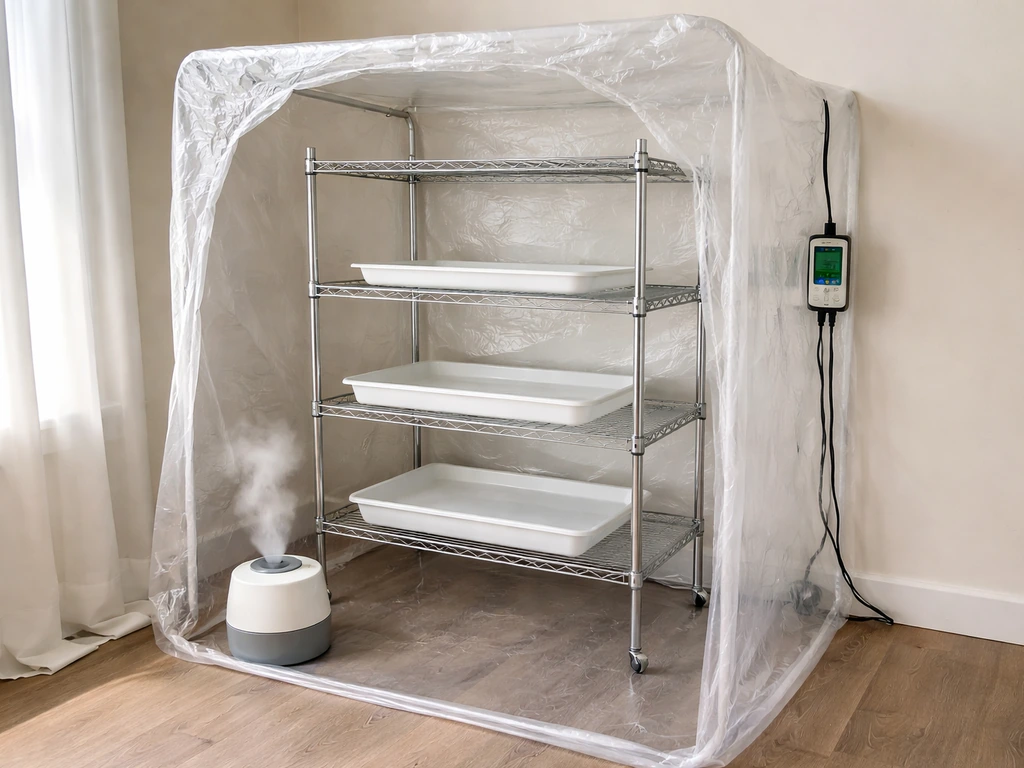
The most practical home setup is a humidity tent or Martha-style wire shelving unit inside a plastic tent with an ultrasonic humidifier connected to a humidity controller. Set your humidifier to maintain 90 to 95% RH during pin initiation. Once pins are clearly forming (small brown nubs appearing), you can back humidity down slightly to 80 to 90% and increase fresh air exchange. For CO2, the numbers above tell an interesting story: high CO2 (low fresh air) during pin initiation, then much lower CO2 (more fresh air) during fruiting body development. In practice, this means you should limit how often you fan or open the chamber in the first week, then increase fresh air exchange significantly once pins are set.
Light matters more for maitake than for many other species. Aim for indirect natural light or an LED grow light set to 500 to 1,200 lux for about 12 hours a day during fruiting. Light helps guide the directional growth of the caps and improves the structure of the final clusters. A windowsill with indirect light works in a pinch, but be careful of temperature swings through the glass.
The daily fruiting workflow
- Check humidity readings morning and evening and adjust the humidifier as needed.
- During pin initiation: keep the chamber mostly closed, mist the walls lightly if humidity drops, fan briefly once per day.
- Once pins are visible: open the chamber and fan for 1 to 2 minutes, 2 to 3 times daily to lower CO2 and introduce fresh air.
- Mist the walls and floor of the chamber, not directly onto the mushrooms, to avoid bacterial blotch.
- Monitor temperature closely. Even a few degrees above 18°C can stall fruiting or cause malformed clusters.
Harvesting, second flushes, and handling your maitake
When and how to harvest
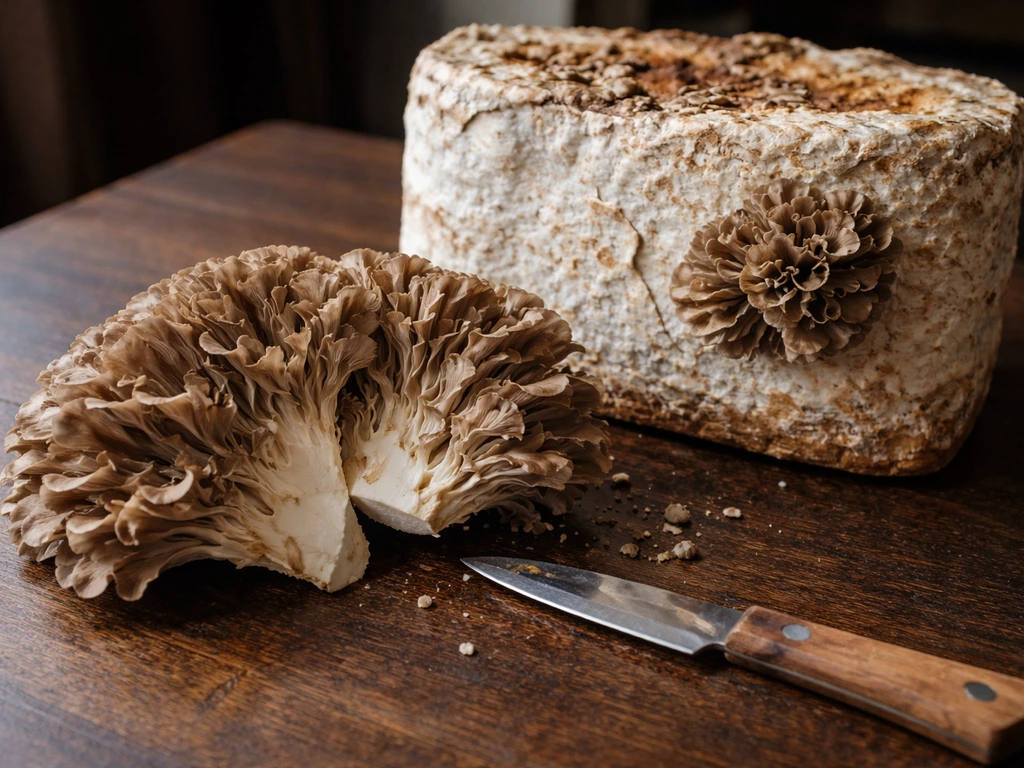
Harvest maitake before the caps start to curl upward or release spores. The edges of the fronds should still be slightly undulating and dense, not flattened or lightening in color around the margins. Twist and pull the whole cluster from the block in one motion, or use a clean knife to cut at the base. Don't try to harvest partial clusters because it damages the remaining fronds and opens the block to contamination.
Second flushes
Maitake can produce a second flush, but it's less reliable than with oysters or lion's mane. After your first harvest, clean any remaining stump material off the block surface with a clean knife, then soak the block in cold water for 12 to 24 hours. Return it to fruiting conditions and wait. Many growers get a decent second flush within 3 to 5 weeks. A third flush is possible but yields drop significantly. If the block shows any contamination after the first harvest, don't risk it. Cut your losses and start a fresh block.
Storing your harvest
Fresh maitake keeps in the refrigerator for 5 to 7 days wrapped loosely in paper towels inside a paper bag. Don't seal it in plastic because it traps moisture and causes sliminess. For longer storage, slice and dry at 40 to 50°C (105 to 122°F) in a food dehydrator until completely crisp, then store in an airtight jar away from light. Dried maitake reconstitutes well and retains its flavor and medicinal compounds.
Troubleshooting: stalling, contamination, no pins, and weird clusters
Colonization has stalled or barely started
If you see little to no growth after 3 to 4 weeks, check your colonization temperature first. Temperatures below 15°C (59°F) slow maitake mycelium dramatically. Also check that your spawn was actually viable when you used it, grain spawn older than 6 months or stored improperly can be dead. Finally, make sure your substrate wasn't too wet going into the bag. If moisture was too high and the bag smells sour or off, contamination has likely won.
Green, black, or pink contamination on the block
Green is almost always Trichoderma, the most common contamination in hardwood grows. It usually means sterilization wasn't complete, inoculation wasn't clean enough, or the bag was damaged. Remove the bag from your grow space immediately, seal it, and discard it outside. Don't try to cut away the bad section and continue. With maitake's long colonization window, contamination has too much time to spread. Prevention is everything: thorough sterilization, clean inoculation technique, and using bags with intact filter patches.
Block is fully colonized but won't pin
This is the most frustrating maitake problem and it almost always comes down to temperature. If your fruiting space isn't getting below 16°C (61°F) consistently, maitake simply won't initiate pins. If you are looking for another rewarding hardwood mushroom with a more forgiving approach, learning how to grow wine cap mushrooms can be a great next step.
If you want to try something more traditional, you can also learn how to grow shiitake on logs instead of using indoor blocks. Try moving the block to a cooler spot, a fridge set to 55°F, a basement corner in late fall, or even placing it outdoors overnight (if temps stay above freezing).
If you want to grow mushrooms outdoors, learning the process for how to grow mushrooms in logs will pair well with what you already do for indoor maitake blocks. Once you have the logs or blocks dialed in, the same basics of substrate, spawn, and patience also apply to reishi cultivation. Also make sure you're not running CO2 too low during initiation.
Surprisingly, maitake needs elevated CO2 in the pin initiation phase, so don't over-ventilate in the first week of fruiting conditions.
Malformed clusters or long, stringy fronds
If your maitake clusters look stretched, pale, or are forming long individual caps rather than a tight layered cluster, CO2 is too high during the fruiting body development stage. This means you need more fresh air exchange once pins are clearly visible. Increase your fanning sessions or add a small computer fan on a timer to bring CO2 levels down closer to 1,000 ppm. Temperature too high (above 20°C) can also cause this, pushing the mushroom toward elongated rather than compact growth.
Clusters aborting before they develop fully
Pins that form and then stop growing or dry out are usually caused by humidity dropping too low, temperature swinging too high, or direct airflow hitting the pins. Make sure your humidifier is working consistently and check for gaps in your fruiting tent where dry air might be getting in. Misting directly onto forming pins can also cause them to abort due to bacterial issues, so always mist the walls and floor, not the mushrooms themselves.
What makes maitake worth the effort
Maitake is genuinely one of the harder species to grow at home, mostly because of the time commitment and the cold fruiting requirement. If you've grown shiitake or reishi, you already have a good baseline for the patience this species demands. But when you pull that first big layered cluster, dense and fragrant, off a block you've been tending for months, it hits differently than faster-growing species.
The flavor is earthy and complex in a way that store-bought maitake almost never delivers because it's always a few days old by the time it reaches the shelf. Growing your own changes that completely. Give yourself the right setup, be rigorous about sterilization, and get your fruiting temperatures dialed in, and maitake is very much achievable at home.
FAQ
Can I use my normal room temperature for colonizing and fruiting maitake?
Yes, but only if you can keep the fruiting phase cold and stable. If your “cool” room drifts above about 16°C (61°F) at night, maitake may never pin, even if colonization looked perfect. A practical workaround is to use a dedicated minifridge or temperature-controlled tent during the entire pinning window, then move the block to your usual cool room only after primordia are clearly forming.
How do I know if my temperature control is actually stable enough for pinning?
No, temperature swings during the pin initiation period are one of the fastest ways to get aborted pins. Use a probe thermometer with a data logger if possible, and place the sensor where the block actually sits, not near the humidifier or airflow source. If you see frequent excursions above your target (around 10 to 18°C), plan on fixing the control setup before inoculating.
What’s the biggest mistake with sterilizing maitake bags?
Choose a bag size and capacity that matches your pressure cooker. If you routinely under-process larger blocks or try to cram multiple oversized bags at once, sterilization can fail and the long colonization period lets competitors take hold. Follow your pressure time guidance per bag mass, and leave space in the cooker so steam can circulate evenly.
Should I use grain spawn or sawdust spawn for maitake?
Different spawn types can work, but grain spawn is usually the easiest for consistent starts. If you’re switching from a grain-spawn habit to sawdust spawn, expect slower and sometimes less uniform colonization because there are fewer initial “points” to start ropy growth. For any spawn, confirm the seller’s storage conditions, and avoid spawn that smells sour or looks discolored.
Can I cut out a contaminated spot and keep the rest of the maitake block?
If you’re seeing contamination, don’t try to salvage a block by cutting out bad areas. With maitake’s slow growth, hidden contamination can spread beyond the visible patch, and fresh cuts often introduce new entry points. The safer approach is to remove and discard immediately, then review sterilization time, bag integrity, and inoculation cleanliness.
How do I adjust fresh air and CO2 when switching from pinning to fruiting?
Humidity targets only matter if fresh air and CO2 are managed together. High CO2 during initiation helps pins form, but if you never increase fresh air once pins are visible, clusters can become stretched and uneven. Use the “first week, minimal opening, then ramp up” approach, and adjust fan timing based on pin appearance rather than a fixed daily routine.
What causes maitake clusters to look elongated instead of layered and tight?
Stretched, pale growth often indicates CO2 staying too high or fruiting temperatures running slightly warm. Aim for cooler fruiting closer to the lower part of your range (but avoid dropping so far that humidity control becomes unstable), and increase fresh air exchange once you see pins. If you also have strong direct airflow, reduce it by diffusing the fan or directing airflow above the canopy.
When exactly should I harvest maitake for best texture and flavor?
Harvest timing is the main driver of quality. Pick when the fronds are still dense and before edges start to curl upward or lighten at the margins. If you wait until spores are released, flavor and texture often degrade, and you also increase mess and airborne spores inside your grow space.
How can I improve my chances of getting a reliable second flush?
A second flush can work, but it is easy to lose the block if you over-handle it. After the first harvest, remove stump remnants cleanly, soak for the recommended cold window, then reintroduce cold-trigger fruiting conditions. If you see any contamination after harvest cleanup, discard rather than soaking again, since soaking can spread microbes.
What’s the best way to dry and store maitake so it keeps well?
Drying too long can make rehydration worse and reduce pleasant aroma. For home dehydrators, stop when the pieces snap rather than turn brittle immediately from the center, then cool and store quickly. Keep dried maitake in an airtight jar away from light, and consider vacuum sealing if your storage area is humid.