You can grow puffballs at home, but it takes a different approach than oysters or shiitakes. The most beginner-accessible species are giant puffballs (Calvatia gigantea) and common puffballs (Lycoperdon perlatum), and both do best in outdoor beds rather than indoor bags or jars. On r/mushroomID, people also report blank" rel="noopener noreferrer">common puffballs (Lycoperdon perlatum) showing up in hardwood litter, decayed wood, and forest-floor duff environments. The process involves sourcing viable spawn or spore slurry, preparing a rich organic substrate bed, keeping moisture consistent, and waiting out a colonization period of several weeks before fruiting kicks off in late summer or fall. It is genuinely rewarding when it works, but you need to go in with realistic expectations: puffballs are saprobic decomposers, and their cultivation has not been as thoroughly cracked as commercial species. That said, outdoor bed growing has a solid track record for home growers willing to put in the prep work. If you want the quick overview, the rest of this guide walks you through how to grow puffball mushrooms at home from spawn and substrate to fruiting and harvest.
How to Grow Puffballs at Home: Beginner Guide and Tips

What counts as a puffball (and which ones are actually growable)
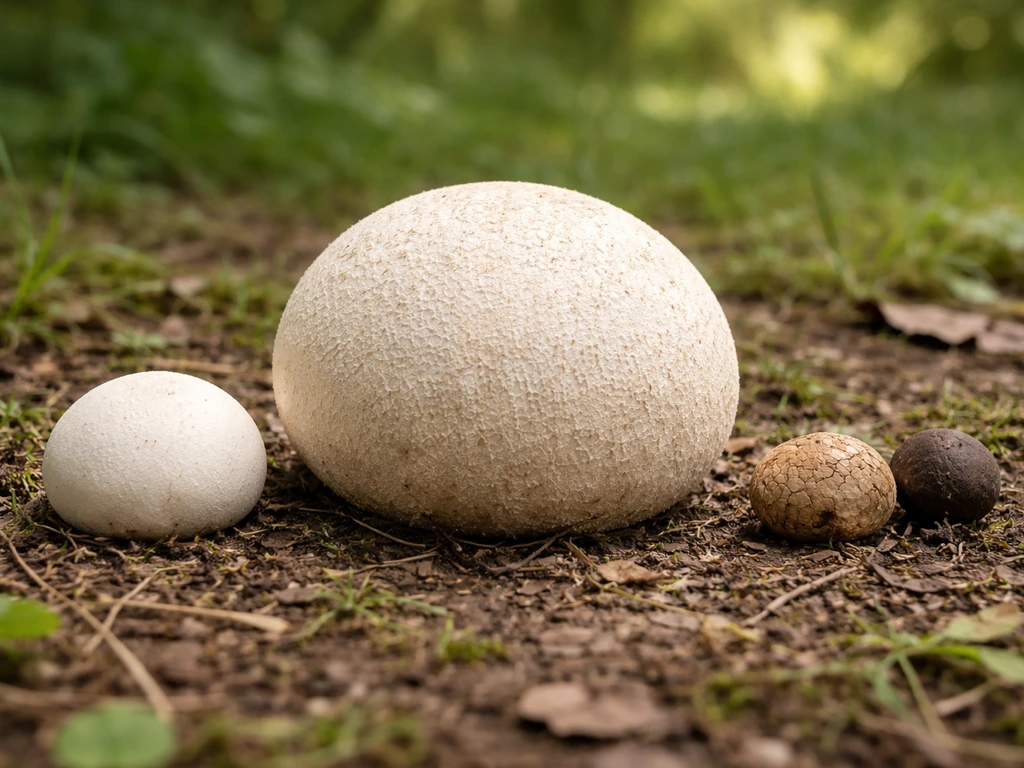
"Puffball" is a loose common name covering several genera, but not all of them are worth your time as a home grower. The two species most people target are Calvatia gigantea (the giant puffball, which can grow to the size of a soccer ball or larger) and Lycoperdon perlatum (the gem-studded or warted puffball, smaller and more common in wooded settings). Both are edible when young and the interior flesh is solid white, and both are saprobic, meaning they break down dead organic matter rather than forming tree root partnerships like porcini or morels.
Giant puffballs prefer open meadows, fields, and woodland edges. They fruit in late summer through autumn and can produce impressive flushes once a bed is established. Lycoperdon perlatum is smaller but fruits in groups and grows well on soil mixed with rotten wood in deciduous or mixed forest settings, also from summer into autumn. Both species are far more forgiving in an outdoor bed than in any kind of sealed indoor container, which is why most successful home growers skip the sterile bag setup entirely for these species.
A word on species that are not worth pursuing at home: some puffball-like fungi, including Scleroderma (earthballs), are toxic and look similar on the outside. These are not true puffballs and cannot be cultivated for eating. If you come across puffball spawn or spores marketed with vague species names, push for a Latin name before buying. Calvatia gigantea is the gold standard for home growing.
Outdoor beds vs indoor setups: where to grow
For most home growers, the honest answer is: grow puffballs outside. If you want the step-by-step details, follow this guide on how to grow puffball mushrooms from start to finish. Puffballs thrive in natural environments because they need a living soil ecosystem to colonize effectively. Their saprobic nature means they want to break down real organic matter in conditions that shift naturally with the seasons. According to Puffball (Wikipedia), puffballs are gasteroid fungi whose blank" rel="noopener noreferrer">spores are produced internally and released when the mature fruit body dries or breaks. Trying to replicate this in a sealed indoor fruiting chamber usually ends in contamination or stalled mycelium before you ever see a pin.
That said, there is a role for partial indoor control. You can start your spawn or spore slurry indoors in a tray or bucket of substrate to get colonization going in a stable environment, then transplant the colonized material to an outdoor bed. This hybrid approach reduces early contamination risk and gives you a head start before the outdoor season hits. Full indoor fruiting is theoretically possible but requires consistent high humidity, careful air exchange management, and a lot of troubleshooting. Most dedicated puffball growers simply do not bother because the outdoor method is so much more reliable.
| Method | Pros | Cons | Best for |
|---|---|---|---|
| Outdoor bed | Most natural conditions, lower maintenance once established, scalable | Weather-dependent, slower, harder to control pests | Calvatia gigantea, most puffball species |
| Indoor tray colonization then transplant | Controlled early colonization, lower contamination risk at start | Extra step, needs suitable outdoor space for fruiting | Growers in unpredictable climates |
| Full indoor fruiting chamber | Year-round potential, controlled humidity and temps | High contamination risk, protocols not well established for puffballs, significant effort | Experimental growers with prior mushroom cultivation experience |
If you are starting out, go with the outdoor bed method for your first grow. Get at least one successful flush under your belt before experimenting with indoor fruiting.
Spores vs spawn: choosing your starting material
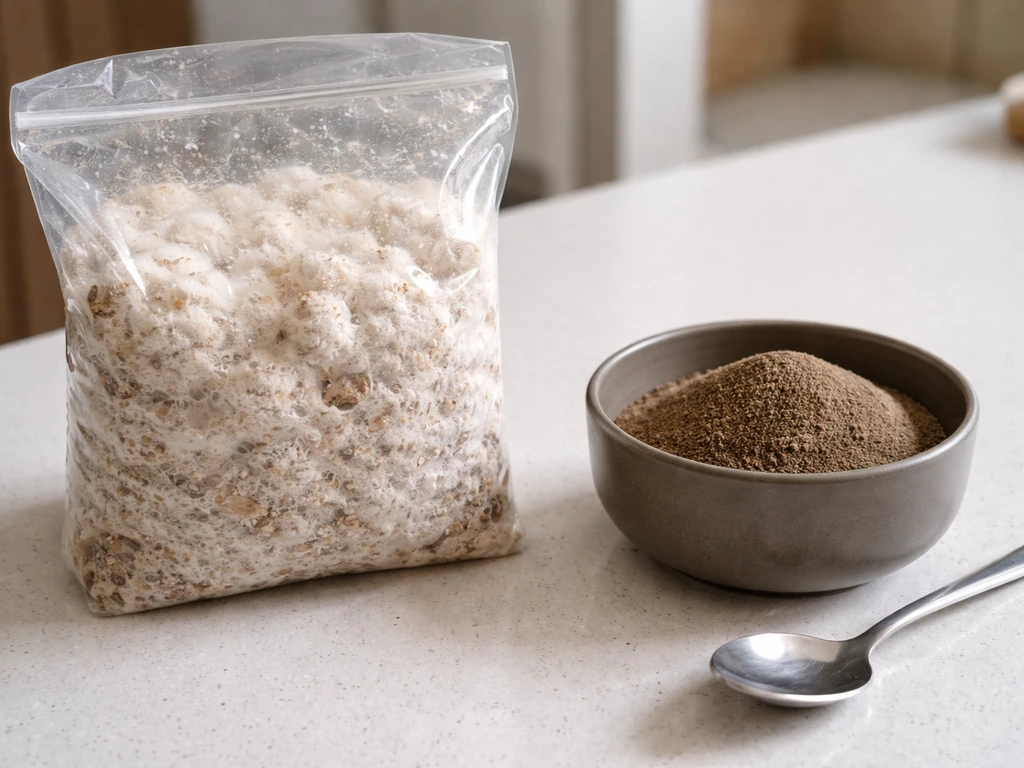
Spawn is substrate that is already colonized with puffball mycelium. Think of it as a live starter culture. It is faster, more reliable, and the recommended choice for most beginners. Spores are the raw reproductive cells, available as spore prints or slurries. They are cheaper and easier to find, but germination and colonization from spores takes longer and has a higher failure rate, especially in outdoor conditions with competing microbes.
For Calvatia gigantea, spawn is sold by several specialty mushroom suppliers as grain spawn or sawdust spawn. Buy from a reputable supplier who can confirm the species and storage conditions. Fresh spawn stored under refrigeration should be used within a few weeks of purchase. If you are working from a spore print or spore slurry harvested from a wild puffball you found and correctly identified, you can make a slurry by blending a small amount of mature (but not fully powder-spore) interior tissue with distilled water and applying it directly to a prepared bed. This is the most accessible DIY route but requires patience.
- Buy Calvatia gigantea grain or sawdust spawn from a reputable supplier and confirm the Latin species name
- Check spawn for signs of contamination before use: green, black, or pink patches mean discard and replace
- If using a spore slurry, blend a golf-ball-sized piece of fresh white puffball interior in 500 ml of distilled water and apply immediately to the bed
- Store unused spawn in the refrigerator (not freezer) and use within 4 weeks
- Avoid spawn sold just as "puffball" without a species name
Preparing your substrate and bed
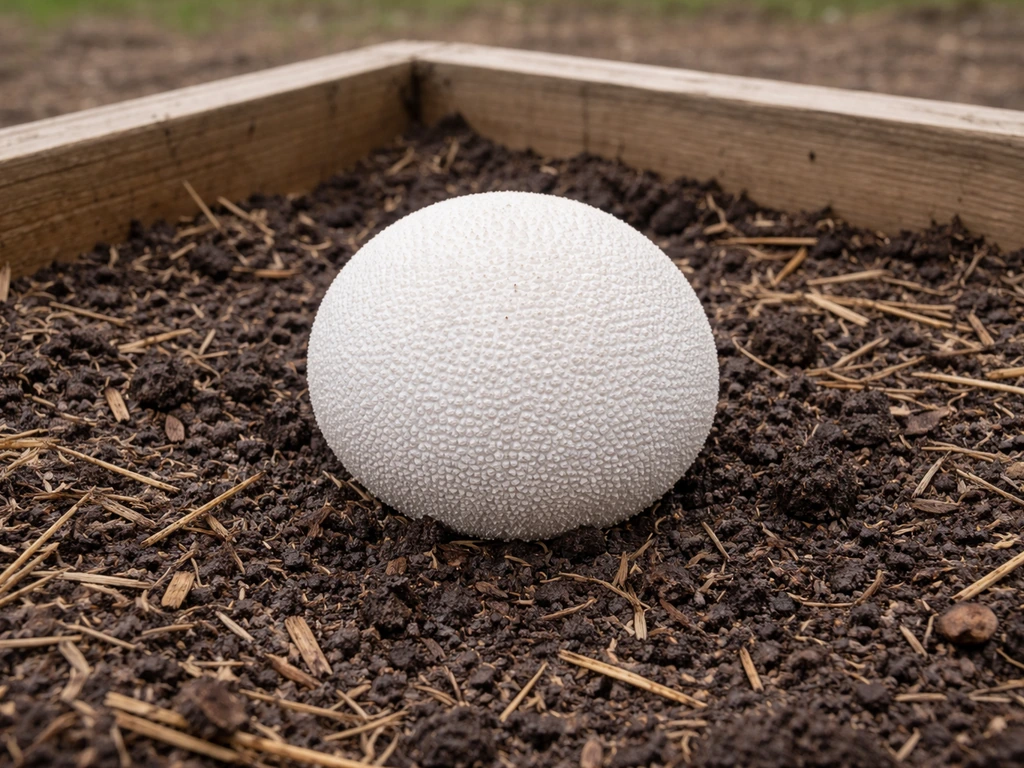
Puffballs want a rich, organic substrate that mimics their natural decomposing habitat. For Calvatia gigantea, the ideal outdoor bed is a mix of composted straw, aged wood chips, leaf litter, and a layer of garden soil. A ratio of roughly 50% composted organic matter to 50% local topsoil works well. The bed should be at least 20–30 cm (8–12 inches) deep to give the mycelium room to colonize and buffer moisture.
For Lycoperdon perlatum, add rotted hardwood chunks or sawdust to your mix, since this species is more wood-associated. Bury a few pieces of well-decayed hardwood log in the bed as anchor points for colonization. Avoid softwood (pine, cedar) as these can inhibit mycelium growth.
Pasteurization: do you need it?
For full outdoor beds, pasteurization of the entire bed is not practical. Instead, focus on using well-composted materials (which have already gone through a natural heating process) and mix in a small amount of hydrated lime to raise pH temporarily and reduce competing bacteria. For any indoor trays or starter containers you use before transplanting, pasteurizing your substrate is worth doing: bring it to 65–82°C (150–180°F) for 1–2 hours using boiling water or a steam pasteurization setup, then let it cool to room temperature before adding spawn. This knocks out most competitors without sterilizing the substrate so completely that beneficial microbes are eliminated too.
- Mix your substrate: composted straw, aged hardwood chips, leaf litter, and garden topsoil in roughly equal parts
- For indoor trays, pasteurize by pouring boiling water over the mix, cover with foil, and let sit for 1–2 hours
- Let the substrate cool to below 30°C (86°F) before adding spawn to avoid killing the mycelium
- For outdoor beds, use well-composted materials and add a light dusting of garden lime to the surface
- Shape the bed into a mounded or flat raised bed roughly 1 meter wide and however long you want, at least 25 cm deep
- Mix spawn or spore slurry into the top 10–15 cm of substrate, distributing evenly
- Cover with a thin layer of straw mulch to retain moisture and protect from direct sun
Fruiting conditions and daily care
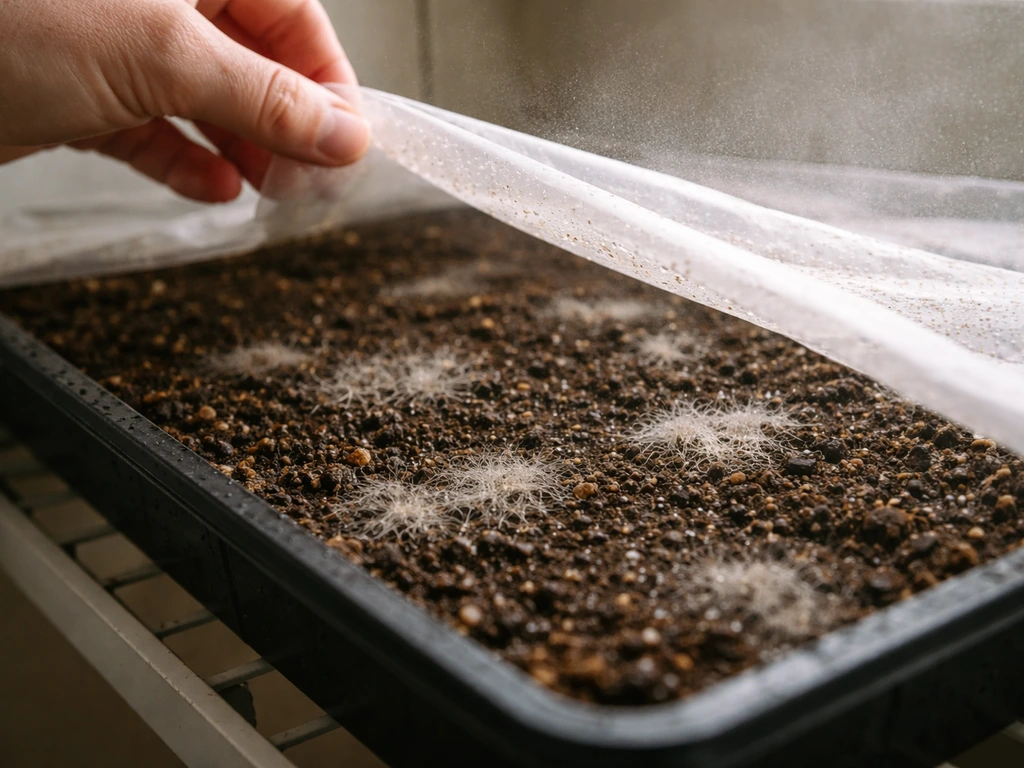
After inoculation, the mycelium needs several weeks to colonize the substrate before fruiting bodies appear. During colonization, the priority is consistent moisture and protection from temperature extremes. Keep the bed damp but not waterlogged. A moisture level where the substrate clumps when squeezed but does not drip is about right.
Once colonization is underway (white mycelial threads are visible when you gently pull back the mulch layer), you are waiting on the right environmental trigger. For Calvatia gigantea, fruiting is triggered by a combination of cooling temperatures in late summer and adequate moisture, often following rain. Aim for ambient temperatures of around 15–22°C (60–72°F) during fruiting. For indoor setups, target 70–80°F (21–27°C) during colonization and drop slightly for fruiting initiation.
Humidity is critical during fruiting. You want the air around fruiting bodies to stay at 85–95% relative humidity. In an outdoor bed, natural rainfall plus mulching usually handles this. During dry spells, water the bed gently every 1–2 days using a watering can with a rose head (not a direct hose jet, which can damage developing pins). For indoor setups, mist the chamber walls and substrate surface twice daily and ensure you have some fresh air exchange: crack the lid or provide small ventilation holes to prevent CO2 buildup, which stalls fruiting. Do not seal a chamber completely, as stagnant air above 95% humidity with no airflow dramatically increases mold and bacterial rot.
What to expect week by week
| Timeframe | What you should see | Action needed |
|---|---|---|
| Week 1–2 post-inoculation | No visible change; mycelium beginning to colonize beneath surface | Keep moist, do not disturb bed |
| Week 3–4 | White mycelial threads visible when mulch layer is lifted | Continue watering, replace mulch if disturbed |
| Week 4–8 | Colonization spreading through substrate; possible early pinning if conditions are right | Maintain humidity; do not overwater |
| Late summer/fall (outdoor) | Small white round fruiting bodies emerging at or just below surface | Increase watering slightly; monitor daily for size |
| Days to weeks after pinning | Puffballs expanding rapidly, white and firm | Harvest before any yellowing or softening begins |
Harvesting and storing your puffballs
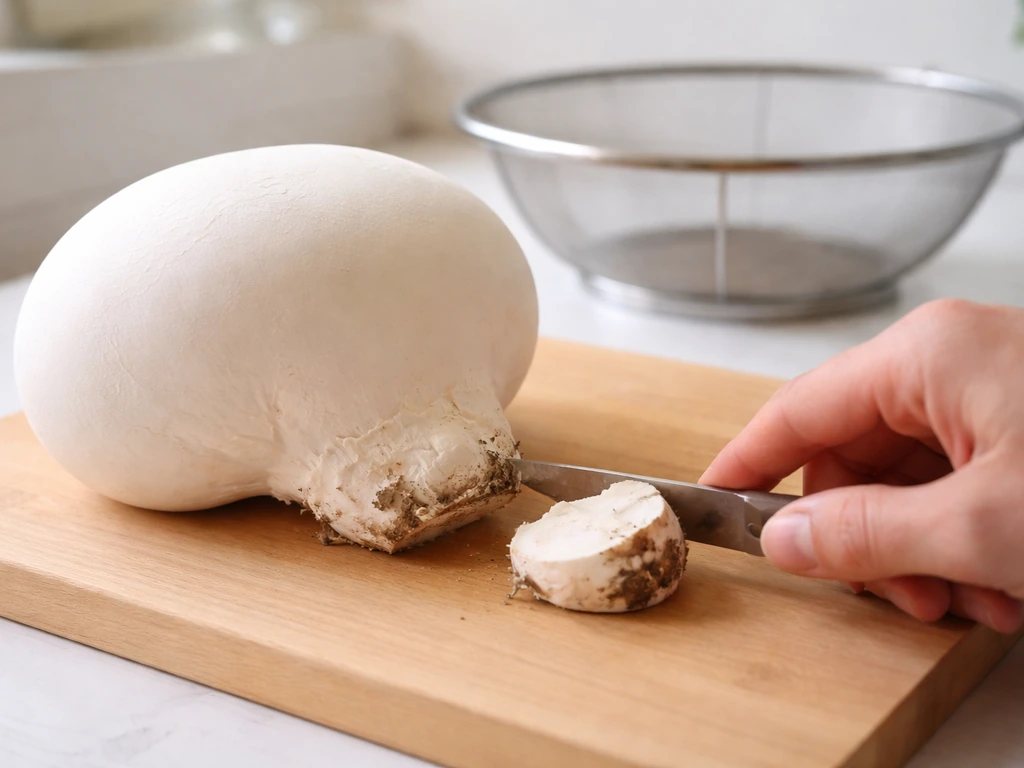
The harvest window for puffballs is narrow and timing matters. A puffball is ready to eat when it is fully white on the outside, firm to the touch, and the interior is solid white all the way through when cut in half. That interior whiteness is your quality control check: if it has started to yellow, become spongy, or develop any greenish or brownish tinge, it is past prime. At that point, the flavor degrades and the texture turns unpleasant. Giant puffballs can develop from pin to harvest-ready in just a few weeks, so check your bed daily once fruiting starts.
To harvest, twist and pull gently at the base, or cut the puffball off with a clean knife just at soil level. Brush off any substrate debris with a soft brush. Do not wash them before storing. Slice one open immediately to confirm the interior is uniformly white with no outline of gills, cap, or stalk structure visible (more on why that matters in the safety section below).
For storage, puffballs do not keep as long as most mushrooms. Whole puffballs can be stored in a paper bag in the refrigerator for 3–5 days. Sliced puffballs should be cooked within 24 hours. For longer storage, slice them into 1 cm rounds and freeze after a light blanch (2 minutes in boiling water, then an ice bath, then pat dry and freeze on a tray before bagging). Dehydrating puffball slices at 40–50°C (105–120°F) is also effective and extends shelf life significantly.
Safety first: identification and toxic lookalikes
This section matters more for puffballs than almost any other mushroom you can grow at home, because two dangerous lookalikes can appear alongside or instead of your target species, even in a cultivated bed if wild species decide to show up.
The earthball problem (Scleroderma)
Earthballs (Scleroderma species) are the most common dangerous confusion. From the outside they look convincingly puffball-like, especially when young. The key differences: earthballs have a thick, tough, warty rind that feels more like leather than the soft, smooth skin of a true puffball. When you cut one open, a young earthball may show white flesh initially, but it quickly reveals a marbled purplish or dark pattern as the spore mass develops. A mature earthball interior is purple-brown to dark brown. Never eat anything with a purplish, mottled, or darkening interior. True edible puffballs should be pure, uniform white inside with no marbling at all.
The Amanita egg problem
Young, immature Amanita mushrooms (including deadly species like Amanita phalloides, the death cap) start as egg-shaped buttons that can be buried in soil and look similar to small puffballs from the outside. This is the other major safety risk. When you cut one of these in half, you will see the outline of a developing mushroom: a tiny cap, gills, and stalk structure forming inside the white outer skin, often with a membrane. A true puffball has none of this. Its interior is a completely undifferentiated, solid white mass with no internal structure whatsoever. If you see any internal structure after cutting, do not eat it, full stop.
- Always cut every puffball in half before eating and inspect the entire cross-section
- The interior must be solid, pure white with zero marbling, no gills, no stalk outline, and no discoloration
- Any purplish, brownish, greenish, or mottled interior means discard the mushroom
- Any internal structure (gills, cap outline, stalk) means discard immediately, as this may be an Amanita egg
- A soft, yellowed, or powdery interior means the puffball is overripe and should not be eaten
- If you are at all unsure about identification, do not eat it
Even when growing from purchased spawn in a cultivated bed, wild species can colonize nearby. Treat every harvested puffball as unknown until you cut it open and confirm the interior. This is not paranoia, it is just good mushroom habit.
Troubleshooting: what went wrong and how to fix it
No signs of colonization after 4 weeks
The most common causes are bad spawn, a substrate that was too wet or too dry at inoculation, or a substrate temperature that was still too hot when spawn was added. If you used pasteurized substrate indoors, confirm it was cooled to below 30°C before inoculation. For outdoor beds, check whether the bed has been waterlogged by rain or has dried out completely. Dig gently to look for any white mycelial growth. If there is none after 6 weeks in reasonable weather, the spawn likely failed and you will need to re-inoculate with a fresh batch.
Green or black mold appearing on the substrate
Green mold (usually Trichoderma) and black mold are signs of contamination. In an outdoor bed, a small amount of surface mold is normal and the puffball mycelium can often outcompete it if the bed is healthy. Remove visibly contaminated sections of substrate and top-dress with fresh composted material. For indoor setups, contamination usually means you did not pasteurize thoroughly enough or the container was not clean. Discard contaminated trays fully, sterilize the container, and start again with fresh pasteurized substrate.
Puffballs forming but drying out or cracking
This is a humidity problem. If fruiting bodies are forming but the surface cracks or they dry out before reaching full size, you need to increase watering frequency or add a mulch layer around the base of the fruiting bodies to trap moisture. For outdoor beds in dry weather, water every evening and consider covering the bed loosely with a shade cloth to slow evaporation. Do not spray water directly onto developing puffballs; water the substrate around them.
Puffballs turning yellow or brown quickly after appearing
This is almost always a harvesting-too-late problem. Puffballs mature and go blank" rel="noopener noreferrer">past prime within days once they start yellowing. Increase how often you check the bed during active fruiting season. Daily checks are the minimum; twice daily is better when you know puffballs are developing. Harvest as soon as the puffball feels firm and is still bright white outside.
No fruiting despite healthy-looking colonization
Puffballs need an environmental trigger to fruit. For outdoor beds, this often means waiting for a natural cool-down and rainfall event in late summer. If you have colonized substrate but no fruiting, try increasing watering to simulate rain and wait for a cooler weather window. For indoor setups, try lowering the temperature by a few degrees for a few days while maintaining high humidity to signal a seasonal shift. Puffball cultivation has genuine unpredictability compared to oysters or shiitakes, and sometimes a well-colonized bed simply waits until the right season arrives.
Slugs, insects, or other pests
Outdoor beds attract slugs, which love developing puffballs. Use diatomaceous earth around the perimeter of your bed as a physical barrier. Copper tape around raised beds also deters slugs effectively. Flies can lay eggs in developing fruiting bodies if the outer skin is damaged, so harvest promptly and avoid mechanical damage to the skin during watering.
Where to go from here
After your first flush, leave the bed in place. A well-established puffball bed can reflush for multiple seasons, especially if you top-dress it with fresh composted straw each spring. Keep notes on what you inoculated, when, what the weather was like during colonization, and when fruiting appeared. That record is invaluable for dialing in timing on your next grow.
If you want to scale up, add a second bed nearby the following spring, this time using a piece of the colonized substrate from your successful first bed as spawn rather than buying new. This saves money and gives you locally adapted mycelium. You can also try expanding into Lycoperdon perlatum alongside your Calvatia gigantea bed, since the two species have slightly different substrate preferences and fruiting overlaps nicely, extending your harvest window through the season.
If you are interested in exploring other challenging wild mushroom species for home cultivation, morels and porcini present similar (and in some ways even greater) challenges around mycelial ecology and fruiting triggers. If you specifically want how to grow porcini mushrooms, those rules shift toward tree-associated inoculation, different substrates, and more careful attention to host roots morels and porcini. If you are curious about another challenging species, learning how to grow morchella mushrooms can help you apply similar logic about fruiting triggers and substrate ecology morels. Puffballs are actually a reasonable entry point into this category of "difficult but possible" home grows, and the skills you build here, especially around bed preparation, substrate moisture management, and reading colonization progress, will carry over directly. Pioppino mushrooms (Flammulina velutipes) have different substrate and temperature needs, so it helps to follow a pioppino-specific guide once you’re comfortable with basic outdoor mushroom bed work. Start with one bed, get a flush, and build from there.
FAQ
How long should it take before I see puffball mycelium in an outdoor bed?
After inoculation, check gently at about 2 to 4 weeks for white threads near the surface, you may see more spread by 4 to 6 weeks. If you see no healthy white growth by 6 weeks in reasonable weather, the inoculation likely failed (often due to spawn age, bed moisture issues, or substrate temperature being too hot at inoculation).
Can I grow puffballs indoors year-round in a grow tent or sealed chamber?
You can start colonization indoors, but full indoor fruiting is harder because puffballs need very stable high humidity plus enough fresh air exchange to prevent CO2 buildup and rot. If you try anyway, focus on airflow and cleanliness as much as humidity, and expect more failed attempts than with outdoor beds.
Is it safe to harvest puffballs that grew near earthballs or unknown wild fungi?
Do not assume safety based on proximity. Harvest only specimens you cut open and confirm are fully solid white inside with no marbling and no internal structure, even if the outside looks perfect.
What moisture problem should I suspect if pins start forming but then stall or abort?
Stalling during early development is usually inconsistent moisture rather than lack of spawn. Make sure the substrate stays damp but not dripping (it should clump when squeezed without running), and avoid blasting pins with water, water the surrounding substrate instead.
What should I do if my substrate looks wet and sour-smelling instead of just damp?
If the bed is waterlogged, reduce standing water immediately (improve drainage, lift mulch, or stop overwatering) because oxygen-poor conditions encourage rot. Remove any visibly decaying sections, then top-dress with fresh well-composted material to reset the microenvironment.
Can I reuse soil or compost from a previous puffball bed for a new grow?
You can, but only if the bed stayed healthy and you remove contaminated top sections. Plan on top-dressing with fresh compost each spring, and consider starting with a new inoculation zone rather than relying entirely on old material that may be depleted or colonized by competitors.
Do I need to pasteurize the whole outdoor bed?
Usually no. Outdoor bed pasteurization is impractical, the article approach is to use well-composted materials plus optional temporary pH adjustment. For starter trays or any indoor pre-colonization containers, pasteurizing the substrate is much more worthwhile.
How deep should the bed be for giant puffballs versus common puffballs?
A depth of about 20 to 30 cm (8 to 12 inches) is a good baseline for both, giving room for colonization and moisture buffering. Giant puffballs often benefit from extra bulk and organic matter, so if you have the space, slightly deeper beds can improve consistency.
What do I do if my bed never fruits even though colonization seems successful?
First confirm the bed is fully colonized and not just lightly white. Then trigger fruiting by simulating seasonal conditions, increase watering to mimic rain and wait for a cooling window outdoors. For partial indoor start setups, lower temperatures slightly for a few days while keeping humidity high, and ensure there is airflow to avoid CO2 buildup.
Can I move colonized material from one location to another outdoors?
You can transplant colonized sections, but handle them gently to avoid tearing the mycelium network and do it during mild weather. Prepare the new bed first, keep the material shaded and covered to reduce drying, and water the new bed lightly after placement rather than soaking it.
How do I prevent slugs and other pests without harming the bed?
Use physical barriers first (diatomaceous earth around the perimeter and copper tape for raised beds), and harvest promptly once puffballs are ready because damaged skin attracts flies and speeds spoilage. Avoid heavy chemical treatments that could disrupt the soil ecosystem you rely on for saprobic colonization.
What’s the fastest way to confirm a puffball is truly edible?
Cut it open immediately and check the interior. It should be completely undifferentiated, solid white throughout. Any purplish marbling, darkening, or internal mushroom structure means stop and do not eat it.
Can I start from a wild spore slurry and expect the same success as store-bought spawn?
Expect slower and less predictable results. Spores often take longer to colonize and are more vulnerable to competition in outdoor beds, so if your first attempts fail, switch to reputable spawn for your next inoculation to reduce variables like germination rate and contamination risk.
Why did my harvested puffballs turn yellow or spongy after I cut them?
That pattern usually indicates they were past prime at harvest. Puffballs can go from firm bright white to yellow quickly once mature, so check daily during active fruiting and harvest as soon as the exterior is bright white and the interior is solid when cut.
Is dehydrating puffball slices at 40 to 50°C safe for all puffball types?
Use the method only after confirming the species is truly a puffball with solid white interior. Dehydrate in thin slices for even drying, and store airtight once fully dry, because partially dried slices can rehydrate and spoil quickly.
When scaling up, is it better to make a second bed or increase size of the same bed?
A second bed is often easier to manage and more resilient, especially in inconsistent weather. Once you get a successful first bed, you can top-dress each spring and use a portion of colonized material as inoculum, but keep beds separated enough that one failure does not contaminate the whole setup.