Yes, you can grow puffball mushrooms at home, but the honest answer is: it depends heavily on which species you're after and how patient you are. Smaller puffball species like Calvatia cyathiformis or Lycoperdon perlatum are more cooperative than the giant puffball (Calvatia gigantea), which is notorious for being unpredictable outside of wild conditions. Wikipedia provides general background on puffballs and includes the giant puffball as Calvatia gigantea. Giant puffball indoor fruiting has never been reliably demonstrated in peer-reviewed research, and outdoor cultivation can take up to four years before you see your first fruit body. That's not a reason to give up, but it is a reason to go in with realistic expectations. If you're growing smaller puffballs, you're in better shape. If you're set on giants, outdoor inoculation of a prepared patch is your best shot, and this guide walks you through exactly how to do it.
Can You Grow Puffball Mushrooms at Home? Giant Guide

Can You Really Grow Giant Puffballs at Home?
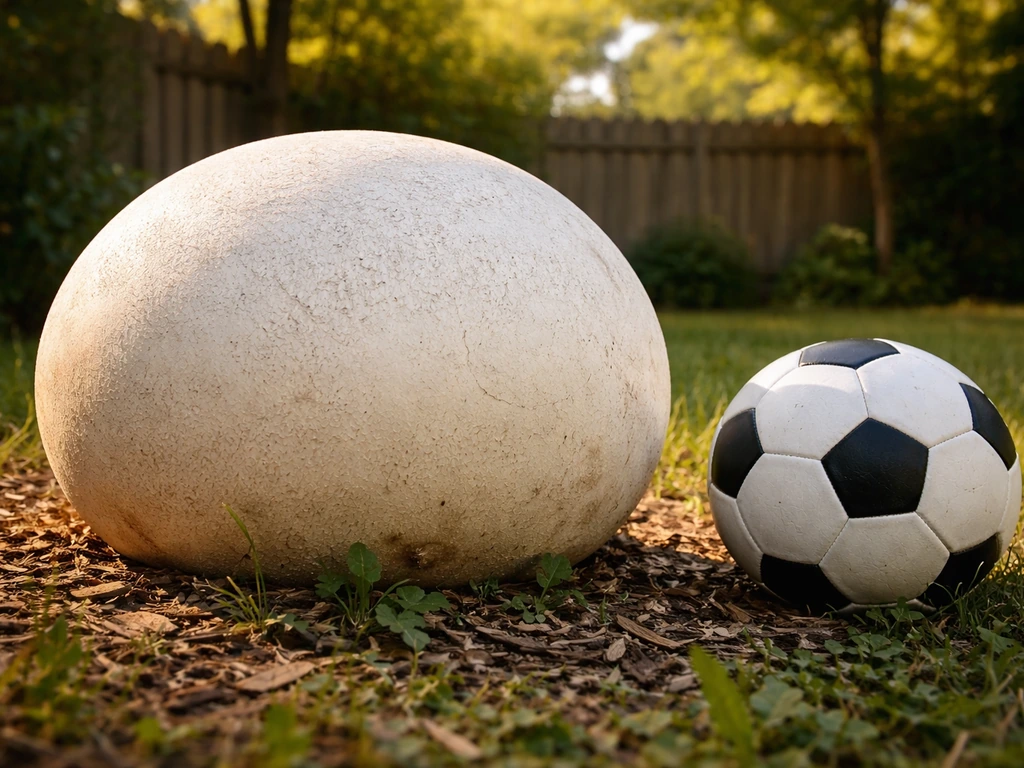
Giant puffballs (Calvatia gigantea) are one of the most impressive edible fungi in North America and Europe. They can reach soccer-ball size, sometimes bigger, and they're one of the safest mushrooms for beginners to identify in the wild. But cultivating them is a different story. Unlike oyster or shiitake mushrooms, giant puffballs are saprotrophic fungi that have extremely demanding and finicky germination requirements. One 1961 Mycologia study found basidiospore germination probability for Calvatia gigantea to be less than 0.001, and even visible colony growth took at least four weeks of incubation under controlled conditions. That's a sobering number.
Indoor fruiting of giant puffballs has not been documented in any peer-reviewed research to date. Commercial cultivation simply doesn't exist the way it does for oyster or lion's mane mushrooms. What growers have had success with is outdoor patch inoculation, essentially mimicking the disturbed, rich-soil grassland environments where Calvatia gigantea naturally fruits between late summer and fall, typically August through September in the northeastern U.S. So when people ask 'can you grow giant puffball mushrooms,' the realistic answer is: outdoors, yes, with patience. Indoors, not reliably yet.
Smaller puffball species are more forgiving and worth considering if you want faster, more predictable results. The cultivation principles are similar, but the timeline is shorter and the mycelium is generally more vigorous in prepared substrates. Think of giant puffball cultivation as an advanced outdoor project, while smaller species can be a more beginner-friendly gateway.
What Puffballs Actually Need to Thrive
Understanding the natural preferences of puffballs is the foundation of any successful grow attempt. Calvatia gigantea consistently shows up in disturbed sites with rich, well-aerated soil, think field edges, old gardens, compost-amended lawns, and areas where the ground has been recently turned. They are not woodland mushrooms. They want open ground, decent organic matter, and the temperature swings that come with late summer moving into early fall.
Temperature and Seasonality
Giant puffballs fruit in late summer through fall. In the northeastern U.S., that window is August to September, while in the UK and parts of Europe it extends into October. Soil temperatures in the 55 to 65 degrees Fahrenheit range (around 13 to 18 degrees Celsius) seem to trigger fruiting. If you're setting up an outdoor patch, you want to inoculate in spring or early summer so the mycelium has time to establish before the fruiting season arrives.
Space and Timeline
Give your patch at least a 4 by 4 foot footprint, though bigger is better since mycelium spreads. For giant puffball, the honest timeline is long: some growers report fruiting in the first or second year after inoculation, but industry sources suggest four years is more realistic for a productive, established patch. Smaller puffball species can fruit within one to two seasons. Plan for this to be a multi-year garden project rather than a quick crop.
Indoor vs. Outdoor: Choosing the Right Setup
For giant puffballs specifically, outdoor is your only real option with current methods. For smaller puffball species, indoor attempts in tubs or buckets have shown some promise in the hobbyist community, though results are inconsistent. Here's how the two approaches compare:
| Factor | Outdoor Patch | Indoor Tub/Bucket |
|---|---|---|
| Best for | Giant puffball (Calvatia gigantea), all species | Smaller species like Lycoperdon perlatum |
| Timeline to first fruit | 1 to 4+ years | Unpredictable, less documented |
| Setup cost | Low (soil amendments, spawn) | Moderate (containers, humidity control) |
| Control over environment | Low | High |
| Fruiting reliability | Moderate with good site prep | Low, not peer-reviewed |
| Space needed | 4x4 ft minimum patch | 5 to 10 gallon container |
| Recommended for beginners | Yes, with patience | Experimental only |
My recommendation: if you're growing giant puffballs, commit to an outdoor patch and treat it like a long-term garden bed. If you want indoor results and don't mind experimenting, try a smaller puffball species in a tub setup and document everything, because this is genuinely under-explored territory and your notes could be valuable.
Substrate and Soil Amendments
Puffballs are saprotrophic decomposers, meaning they break down dead organic matter rather than forming symbiotic relationships with tree roots (like porcini or morels do). If you want an easier comparison point, see how to grow porcini mushrooms, which have a completely different relationship with trees than puffballs do. If you are curious about a different type of mushroom with very different growing requirements, see this guide on how to grow morchella mushrooms. This makes substrate preparation more accessible. You're building a rich, well-draining organic bed that mimics the disturbed grassland soils where giant puffballs naturally appear.
What to Use
- Compost: well-aged compost is the backbone of your patch substrate, aim for at least 30 to 40 percent of the mix
- Topsoil: mix in native or quality topsoil to give the mycelium structure and water retention
- Straw: adds carbon-rich bulk and helps retain moisture without compacting
- Manure (composted): horse or cow manure boosts nitrogen and organic richness, which giant puffballs love
- Wood chips (aged): a small addition helps with drainage and adds slow-release carbon
- Gypsum: a cup or two per square yard can improve soil structure and calcium levels without altering pH drastically
How to Prepare the Patch
- Choose a site with partial shade to full sun and good drainage. Avoid spots that puddle after rain.
- Remove grass and weeds from the patch area, loosen the top 8 to 12 inches of soil with a fork.
- Mix in your compost, manure, and amendments thoroughly so you have a uniform, crumbly substrate.
- Rake smooth and water lightly so the bed is moist but not waterlogged before you add spawn.
- Let the bed rest for a few days before inoculating if you've used any fresh manure, to let ammonia off-gas.
Spores vs. Spawn: How to Start Your Grow
This is where giant puffball cultivation gets genuinely tricky. Because spore germination rates are so low (remember, less than 0.001 probability per spore under lab conditions), starting from raw spores is essentially a numbers game. A single mature giant puffball contains more than 7 trillion spores, so you have raw material to work with, but most of those spores won't germinate regardless of conditions. The more reliable starting point is grain spawn or mycelium spawn from a reputable supplier, which gives you already-germinated, living mycelium ready to colonize your patch.
Using Spores from a Wild or Harvested Puffball
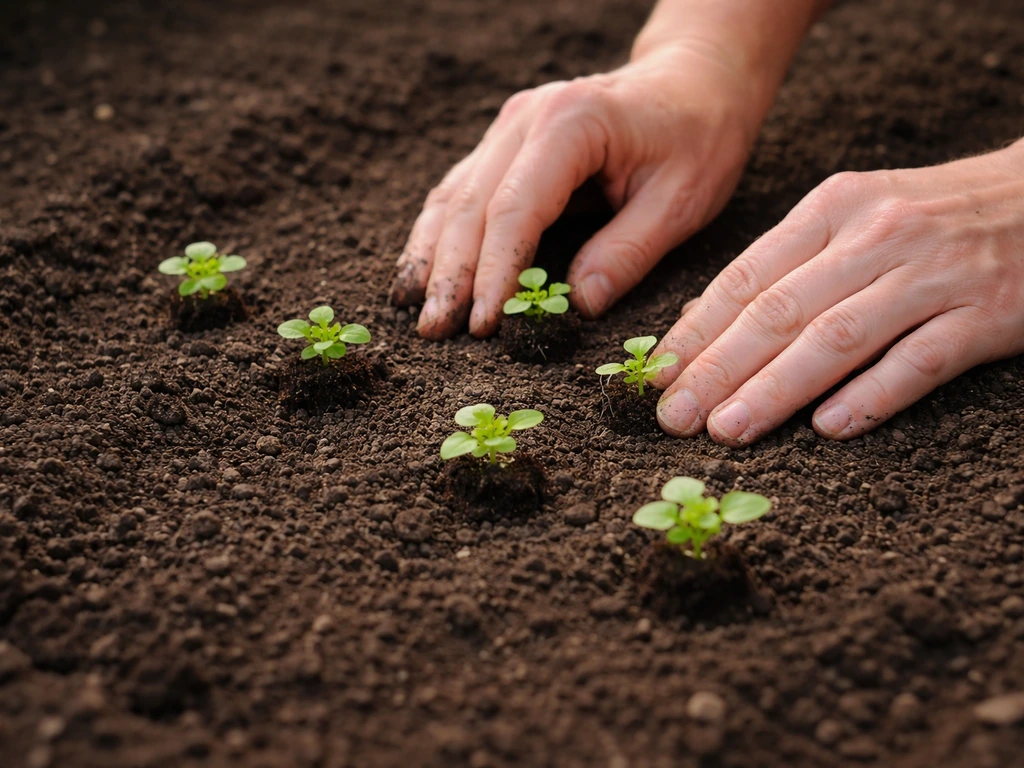
If you want to use spores, collect them from a fully mature giant puffball (one that has turned from white to brown and is releasing spore dust). Slice open the puffball and let it dry over your prepared bed, or mix the powdery gleba directly into the top inch of your substrate. Water the area in lightly. This is the most low-tech method and takes the longest, but it works with the natural life cycle of the fungus. The downside is you have no way to guarantee germination, and contamination from competing organisms is high.
Using Grain or Plug Spawn
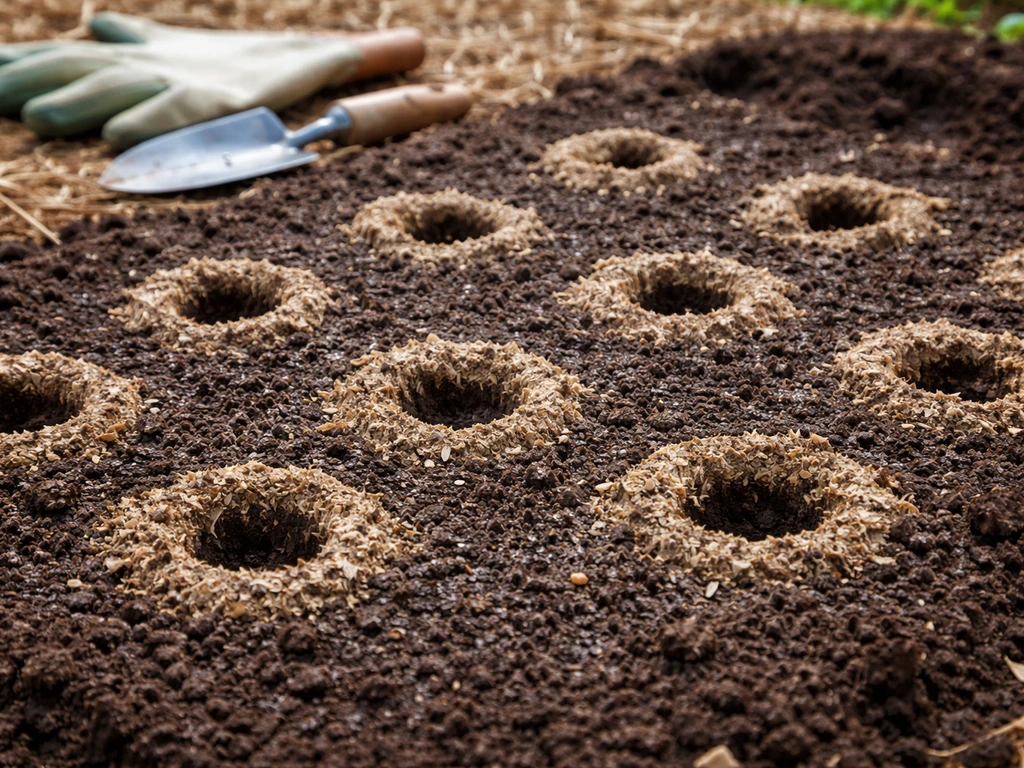
Grain spawn or mycelium-colonized substrate from a reputable cultivar supplier is the faster, more reliable option. Search for Calvatia gigantea spawn or puffball mushroom spawn from specialty suppliers. You'll typically receive a bag of colonized grain or sawdust. Break it up and mix it into the top 2 to 4 inches of your prepared bed at a rate of about one pound of spawn per square foot. Cover lightly with a thin layer of your substrate mix, water in gently, and mulch with a thin layer of straw to retain moisture.
Planting Depth and Timing
Whether using spores or spawn, keep inoculation depth shallow: 1 to 3 inches maximum. Puffball mycelium colonizes near the surface. Burying it deeper doesn't help and can limit oxygen access. Time your inoculation for spring (April to May) to give the mycelium a full summer season to establish before the late summer to fall fruiting window.
Keeping Your Patch Alive: Moisture, Airflow, and Light
Once your patch is inoculated, maintenance is mostly about keeping conditions consistent without overdoing it. Puffballs do not want to be waterlogged, but they also can't dry out completely during colonization. Think of it like keeping a wrung-out sponge, moist throughout but not dripping.
Watering
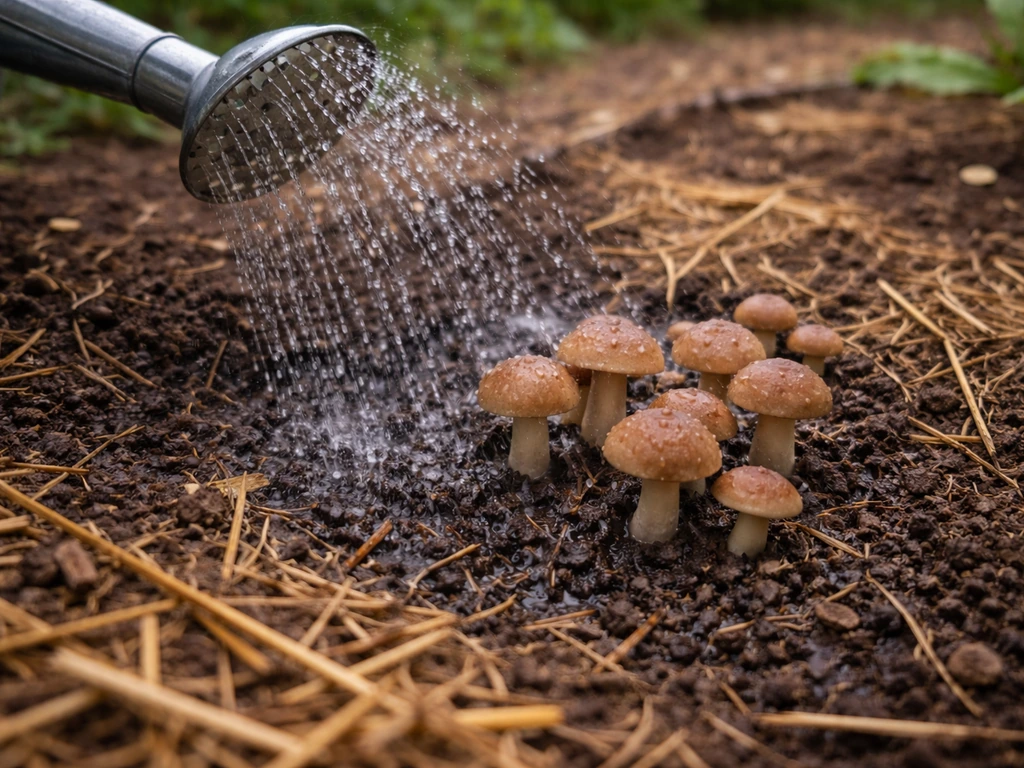
Water your patch two to three times per week in dry weather, using a gentle spray rather than a hard pour to avoid displacing surface mycelium. During rainy periods, you can skip supplemental watering entirely. In summer heat, early morning watering helps prevent evaporation loss and keeps soil temps more stable.
Humidity and Airflow
For outdoor patches, natural airflow handles ventilation automatically, which is one reason outdoor cultivation is preferable for this species. You don't want a site that's totally enclosed or in a low-lying area with stagnant air. Gentle air movement encourages healthy mycelial growth and reduces the chance of green mold (Trichoderma) establishing in your bed. The American Mushroom Institute explains that green mold (Trichoderma) is linked to composting and environmental conditions, and that it must be introduced via spores and supported by the right conditions to infest a mushroom crop green mold (Trichoderma) establishing in your bed. If you're attempting an indoor tub setup for smaller puffballs, provide fresh air exchanges two to three times daily by briefly lifting the lid or using a filter patch lid.
Light

Puffballs don't need light the way plants do, but they're not complete darkness lovers either. A site with dappled light or morning sun followed by afternoon shade is ideal. Full blazing afternoon sun will dry out your patch too fast. Avoid deep shade under dense tree canopy, which tends to stay too damp and competes with root networks.
Common Problems and Fixes
- Green mold in patch: usually Trichoderma contamination from overwatering or too-fresh organic material. Reduce watering, improve airflow, and consider whether your amendments were fully composted.
- No fruiting after year one: don't panic. Mycelial establishment takes time, especially with giant puffball. Refresh the top layer of compost and ensure moisture was maintained through summer.
- Patch drying out: add a thicker straw mulch layer (2 to 3 inches) over the bed and increase watering frequency during hot, dry spells.
- Slugs and insects eating developing fruitbodies: use copper tape as a border or apply diatomaceous earth around the patch perimeter. Hand-pick slugs at dusk.
- Competing weeds overtaking the patch: hand-weed gently without disturbing the top 3 inches of substrate. Avoid chemical herbicides near your mycelium.
Harvesting, Safety, and Telling Puffballs Apart from Lookalikes
When and How to Harvest
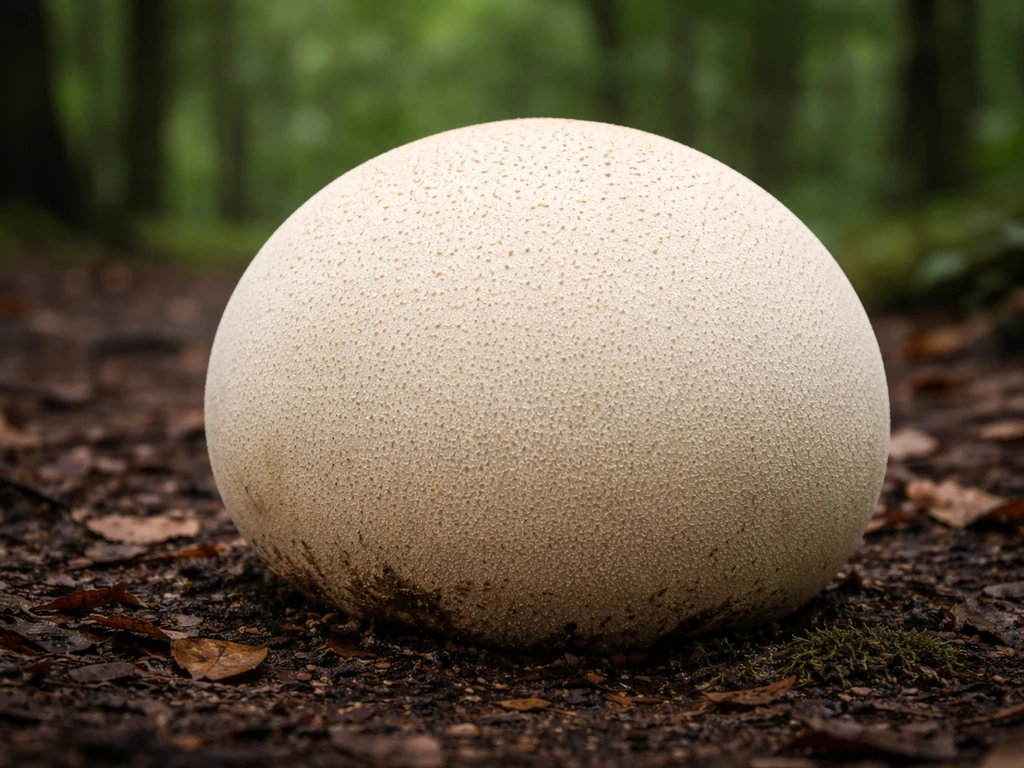
Harvest puffballs while they are still fully white inside and out. This is the critical rule. A fresh, edible puffball should look like a smooth white ball and, when sliced in half, reveal pure bright white flesh throughout with no visible internal structure. Once the interior begins to yellow or turn any shade of brown, the gleba (the spore mass) is maturing and the mushroom is no longer good to eat. At full maturity it becomes a dusty brown spore cloud. Check your developing fruit bodies daily once they appear, because the window from perfect harvest size to overripe can be just a few days in warm weather.
To harvest, twist gently at the base or use a clean knife to cut the puffball off at ground level. Don't pull aggressively, which can disturb the mycelium below. Store fresh puffballs in the refrigerator in a paper bag for up to a week. For longer storage, slice and dry them or freeze after blanching.
The Lookalike Problem: What to Watch For
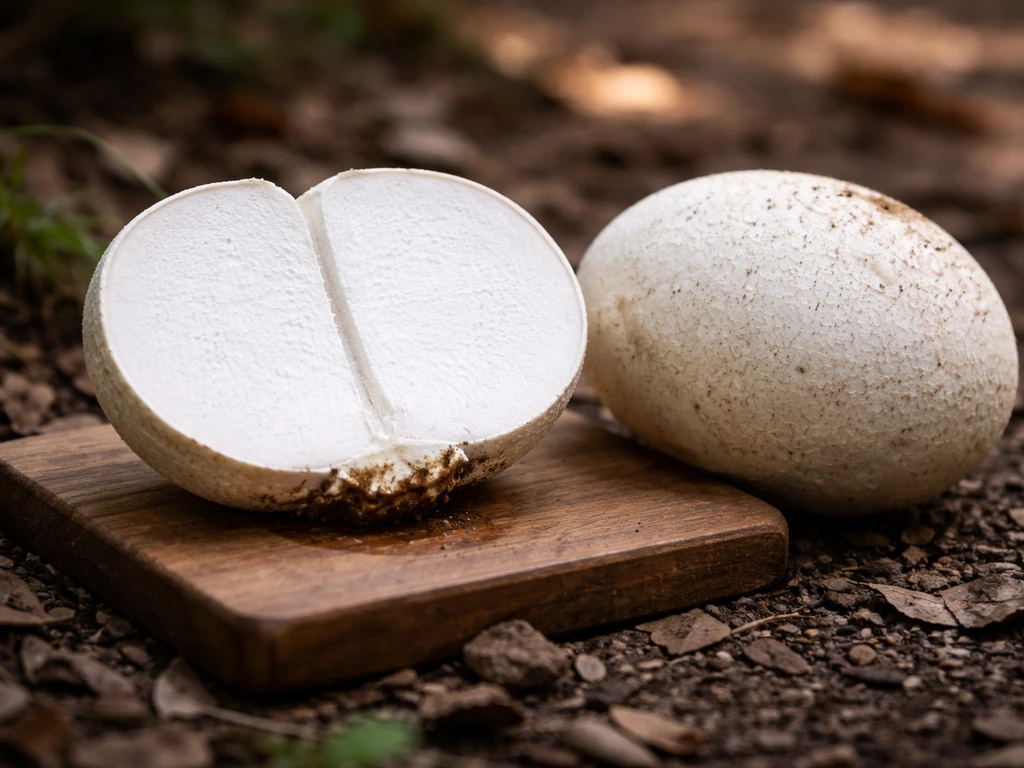
Giant puffballs have a well-earned reputation as one of the safest wild mushrooms to identify, but there are dangerous lookalikes you need to rule out every single time, even when you're harvesting from your own cultivated patch. The most serious danger is mistaking an immature Amanita egg (particularly Amanita phalloides, the death cap) for a small puffball. Young Amanitas emerge as white egg-shaped structures underground and can look puffball-like from the outside.
The slice test is non-negotiable: always cut every puffball in half from top to bottom before eating. A true edible puffball shows completely uniform white flesh with no outline of a cap, gills, or stem structure inside. If you see any hint of a developing mushroom shape inside, you have an Amanita egg and you need to discard it immediately. No exceptions. A genuine puffball is solid white throughout, like a marshmallow.
| Feature | Edible Puffball | Immature Amanita (Dangerous) |
|---|---|---|
| Interior when sliced | Solid, uniform bright white throughout | Outline of developing cap, gills, and stem visible |
| Skin texture | Smooth or slightly warty, no veil | May show remnants of a veil or feel slightly layered |
| Base attachment | No stem, attached at the base | Often shows a rooting base or partial veil at the cut |
| Smell | Mild, mushroomy | Can be faintly unpleasant or neutral |
| Size at harvest | Golf ball to soccer ball or larger | Typically smaller, egg-sized when dangerous stage |
Giant puffballs (Calvatia gigantea) also have distinctive surface features when mature: a smooth, bright white skin when young, developing irregular surface cracks as they age, a shallow crater-like base, and no stem whatsoever. Their sheer size (softball to soccer ball and beyond) is itself a useful identification clue, as nothing dangerous grows that large in that form. But don't skip the slice test just because of size.
Your Next Steps Starting Today
Here's what you can do right now, in May, to set yourself up for the best possible shot at fruiting this coming fall or next year:
- Source your spawn: Search for 'Calvatia gigantea spawn' or 'giant puffball mushroom spawn' from specialty mushroom suppliers. A few reputable online cultivar suppliers in the U.S. carry it seasonally. Order now since spring stock sells out.
- Choose and prepare your site: Pick a sunny to partly shaded spot in your yard with good drainage. An old garden bed or a spot you can turn and amend works well. Prepare it this month so it's ready when spawn arrives.
- Build your substrate mix: Combine well-aged compost, topsoil, a handful of composted manure, and straw. Aim for a loose, crumbly mix about 8 to 10 inches deep.
- Inoculate and mulch: Mix your spawn into the top 2 to 3 inches, cover with a thin layer of substrate, and top with straw mulch to hold moisture.
- Set a watering schedule: Check your patch two to three times weekly through summer. Keep notes on what you're doing, this data is useful if you troubleshoot later.
- Mark your calendar for harvest season: Late August through September is your window. Check your patch daily once you're in that window. Bring a knife and always do the slice test before eating anything.
If you want a faster win while your giant puffball patch gets established, consider running a parallel project with a more responsive species. The step-by-step details for growing puffballs at home with smaller species follow many of the same substrate and moisture principles covered here, and a successful smaller grow teaches you the mycelium management skills that carry over to the giant puffball patch. If you want the full step-by-step rundown, see the guide on how to grow puffballs at home with smaller species. For more specific guidance on getting started, see our full guide on how to grow pioppino mushrooms. Either way, you're building toward something genuinely rewarding, and few things in home mushroom growing beat pulling a perfect white puffball the size of a volleyball out of your own backyard.
FAQ
Can you grow puffball mushrooms indoors year-round?
Yes, but only if you’re aiming for a smaller puffball species. Even then, treat indoor success as experimental, because puffball fruiting is highly dependent on outdoor-like cues (soil temperature swings, aeration, and a disturbed, nutrient-rich surface). If you want the highest odds, plan on an outdoor patch for Calvatia gigantea.
Should I start puffballs from spores or spawn (grain/mycelium)?
If you start with spores, expect long odds unless conditions are very controlled, and expect more competition risk. The practical edge is to use grain spawn or mycelium-colonized material from a reputable source, since it bypasses the extremely low spore germination step and lets you measure progress by colonization instead of waiting for unknown germination.
When should I harvest puffballs if I want to eat them versus save spores?
Harvest timing depends on what you plan to do next. For eating, only pick when the interior is completely white and uniform, check daily once they appear. If you’re saving for spores, allow a mature puffball to fully turn brown and release spore dust, then collect and store the material dry, away from humidity.
How wet should the patch be, and what does overwatering look like?
Don’t assume “more water” helps. During colonization you want consistently moist soil, not soggy conditions, since waterlogged surfaces increase mold pressure (including green mold). A simple decision aid is to water when the top layer begins to dry but the subsoil still feels cool and lightly damp.
How deep should I mix or bury puffball spawn?
Puffball mycelium is surface-oriented, so inoculating too deep can reduce colonization efficiency. Keep the spawn within about 1 to 3 inches of the surface, and when you cover it, use a light top layer so oxygen can still reach the colonized zone.
Can I use compost, manure, or garden soil to prepare the patch?
Yes, but introduce it carefully. Too much fresh manure or heavy amendments can create a nutrient imbalance and encourage competing organisms. For best results, mimic “disturbed, rich-soil grassland” by using well-aerated organic matter and compost-amended soil rather than thick, raw amendments.
What should I do if I see mold or green growth in the patch?
If you see rapid green or fuzzy growth, stop and assess the bed rather than continuing to water and hope. Small outbreaks can spread quickly, so consider improving aeration, reducing watering, and removing obviously contaminated sections if you can do so without disturbing the surrounding mycelium.
Does sunlight or shade affect puffball fruiting?
Yes, location and exposure matter even within the same yard. Avoid deep dense shade (stays too damp and competes with roots), and also avoid blazing afternoon sun that can dry the surface too fast. A site with morning sun and afternoon shade is often the best compromise for maintaining the moist-but-aerated balance.
If I don’t get fruit this year, does that mean the patch failed?
You generally should not rely on a single season to judge success. For giant puffballs, it can take multiple years for a productive patch to establish, and some beds only fruit after the mycelium has expanded and stabilized. Keep notes on soil moisture, weather, and any colonization signs, then reassess after at least one full fruiting window.
Will puffballs fruit if they just show up naturally in the area, or do I need to inoculate?
Not reliably, and don’t treat “volunteer puffballs” as proof your indoor setup will work. Outdoor conditions (open airflow, seasonal temperature shifts, disturbed substrate) strongly influence outcomes. Indoor attempts for smaller puffballs are the most plausible, but success varies widely with ventilation and microclimate.
What’s the safest way to confirm a puffball is edible every time?
For safety, do a strict cut-and-check every time, even if it’s from your own patch. If you see any developing mushroom structure inside or the interior is not uniformly bright white, discard it. Also, inspect the “base” details, since some dangerous lookalikes are egg-shaped when immature.