You can grow pioppino mushrooms at home on wood-based substrates like hardwood sawdust blocks, logs, or wood chip beds outdoors. If you want the full step-by-step, follow the same cool-season principles for puffball cultivation: prepare a suitable substrate, get fresh spawn or mycelium, then manage moisture and temperature closely how to grow puffball mushrooms. They colonize best around 25–28°C (77–82°F) and fruit after you drop the temperature to roughly 15–18°C (59–64°F) with high humidity and good air exchange. From inoculation to first harvest typically takes 6–12 weeks depending on your setup, spawn quality, and how well you manage the environment.
How to Grow Pioppino Mushrooms at Home Step by Step

Marcus Holloway
5 May 2026
What pioppino actually is (and why the name gets confusing)
Before you buy anything, it helps to know what you're actually growing. Pioppino (the Italian name, loosely meaning "little poplar") refers to the species currently classified as Cyclocybe aegerita. If you're shopping for spawn or looking up cultivation guides, you'll also see it listed under Agrocybe aegerita and Agrocybe cylindracea, which are older names used in cultivation literature and still appear on many vendor labels today. Some older sources even list it as Pholiota aegerita, which is a completely separate-looking genus that causes real confusion. They're all the same mushroom. When you see any of those Latin names on a spawn bag, you're good.
The common names pile on even more: velvet pioppini, black poplar mushroom, and poplar field cap are all referring to Cyclocybe aegerita. In the wild it grows in tight clusters at the base of poplars, willows, elders, elms, and mulberry trees, usually fruiting from late spring through autumn. It's native to southern Europe and parts of Asia and has been cultivated commercially for decades, especially in Italy. That wood-rotting, cluster-forming habit is exactly what you replicate when you cultivate it at home.
Pioppino basics: what you'll need to get started
Pioppino is a wood-rotting fungus, specifically a white-rot species, so everything in your grow revolves around giving it a woody food source. It's not a beginner's first mushroom (oysters are easier and faster), but it's very achievable for someone willing to pay attention to temperature. The cool-weather fruiting requirement is the biggest thing that trips people up. If you're in a warm climate or growing in summer without climate control, plan accordingly.
Here's what you'll need at minimum for an indoor sawdust-block grow:
- Grain spawn or sawdust spawn of Cyclocybe aegerita (look for any of the names above on the label)
- Hardwood sawdust or wood pellets as the base substrate
- Wheat bran or rice bran as a nitrogen supplement (around 5–10% by weight)
- Grow bags or containers rated for sterilization if you're sterilizing
- A pressure cooker (for sterilization) or a large pot (for pasteurization)
- A space that can hold 15–18°C during fruiting, like a basement, garage, or spare room in cooler months
- A humidity tent or fruiting chamber with a way to mist
- A thermometer and hygrometer
For an outdoor log or wood chip bed grow, the list is shorter: freshly cut hardwood logs or wood chip beds, spawn plugs or sawdust spawn, and a shaded outdoor spot. More on that below.
Spawn vs spores: why most growers should skip spores entirely
Pioppino spores exist but are almost never the right choice for home cultivation. Starting from spores means you need to germinate them, grow out mycelium on agar, isolate a healthy strain, and then expand it to grain spawn before you can even start growing. If you want a more step-by-step approach, follow our guide on how to grow Morchella mushrooms from start to finish. That process takes months, requires sterile lab technique, and often produces inconsistent results. Spawn, on the other hand, is already colonized mycelium on grain, sawdust, or wooden dowels ready to inoculate your substrate directly.
Buy grain spawn if you're doing an indoor block grow. It mixes into substrate easily, colonizes quickly, and is generally available from specialty mushroom suppliers. Plug spawn or sawdust spawn works better for log inoculation outdoors because you're inserting it into pre-drilled holes or packing it into saw cuts. For your first grow, sourcing quality spawn from a reputable vendor is the single biggest factor in success. Cheap or old spawn colonizes slowly, stalls, and invites contamination.
Indoor vs outdoor growing: which setup fits you
Both approaches work well for pioppino, but they have very different timelines and effort levels. Pioppino is naturally a cool-weather fruiter, doing best from November through June in most temperate climates, which actually makes outdoor growing a surprisingly good fit if your seasons align.
| Factor | Indoor Block/Bag Grow | Outdoor Log or Wood Chip Bed |
|---|---|---|
| Setup time | 1–2 days | Half a day to a full day |
| Time to first harvest | 6–10 weeks from inoculation | 6–18 months from inoculation |
| Temperature control needed | Yes, critical during fruiting | Mostly managed by season |
| Yield per flush | Moderate, multiple flushes | Lower per event, but long-lived |
| Skill level | Intermediate | Beginner-friendly once set up |
| Ongoing effort | Daily misting and monitoring | Minimal after establishment |
| Best season | Year-round with climate control | Late spring and autumn |
If you want mushrooms this season and have a cool space indoors (a basement that sits around 60–65°F in fall/winter is ideal), go with the indoor block method. If you have a shaded yard and patience, a log or wood chip bed is a really satisfying low-effort setup that fruits for years. I've had outdoor pioppino beds fruit for three consecutive seasons with almost no maintenance beyond occasional watering.
Substrate and log prep: getting the foundation right
Indoor sawdust blocks
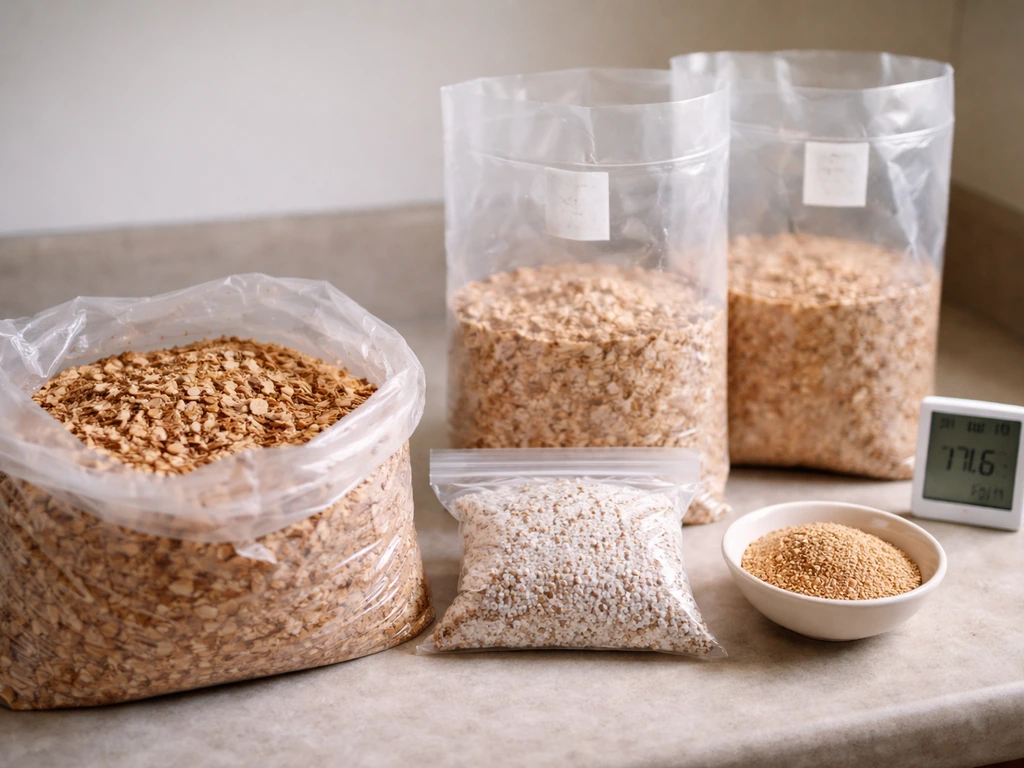
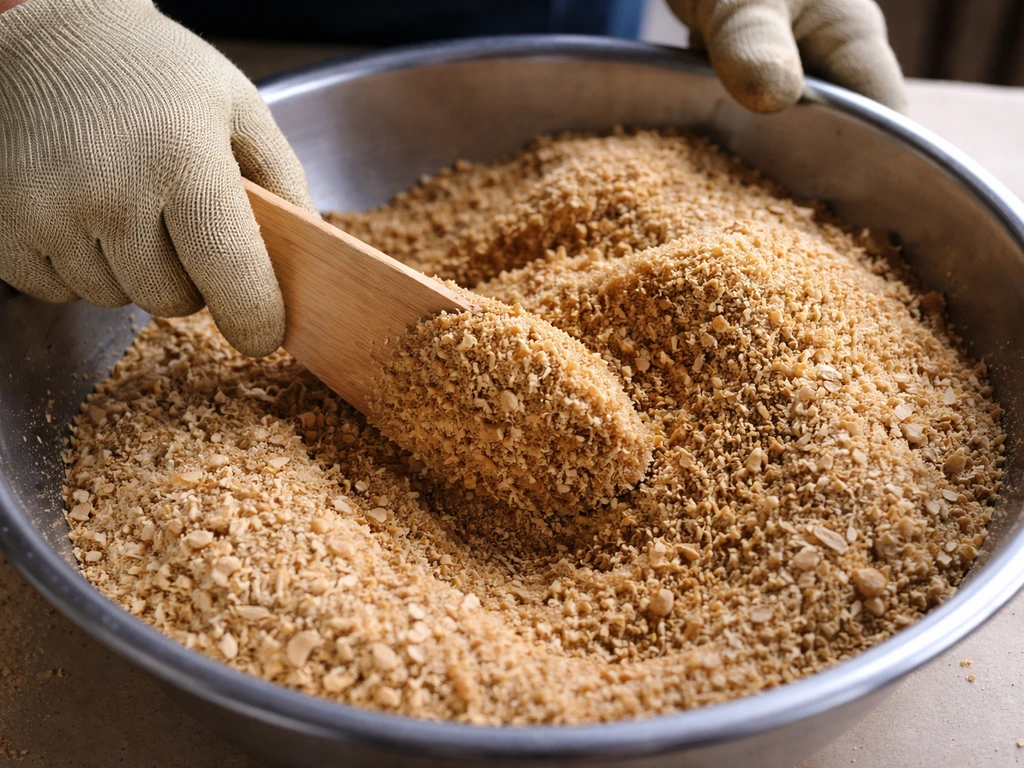
The standard indoor substrate for pioppino is hardwood sawdust with a bran supplement. Use oak, alder, maple, beech, or poplar sawdust (poplar is especially good given pioppino's natural habitat preferences). Mix in 5–10% wheat bran or rice bran by dry weight to boost nutrition. Add water until you hit field capacity, meaning when you squeeze a handful hard, only a few drops come out. That's roughly 60–65% moisture content.
Because you're adding bran (a high-nutrient supplement), you need to sterilize rather than just pasteurize. The bran creates conditions that competing molds love, and pasteurization won't reliably knock them out. Sterilize your packed grow bags in a pressure cooker at 15 PSI for 2–3 hours. Let the substrate cool completely to below 25°C before adding spawn. This part is non-negotiable. Hot substrate kills your mycelium instantly.
If you want to skip the bran and work with a lower-nutrient base (plain hardwood sawdust or hydrated hardwood pellets), pasteurization at 160–185°F for 1–2 hours is usually enough. You give up some yield potential, but the contamination risk drops significantly, which matters a lot for newer growers. Once cooled, inoculate at roughly 10–20% spawn by weight relative to dry substrate, mix well inside the bag, seal or fold closed, and move to your incubation space.
Logs and outdoor wood chip beds
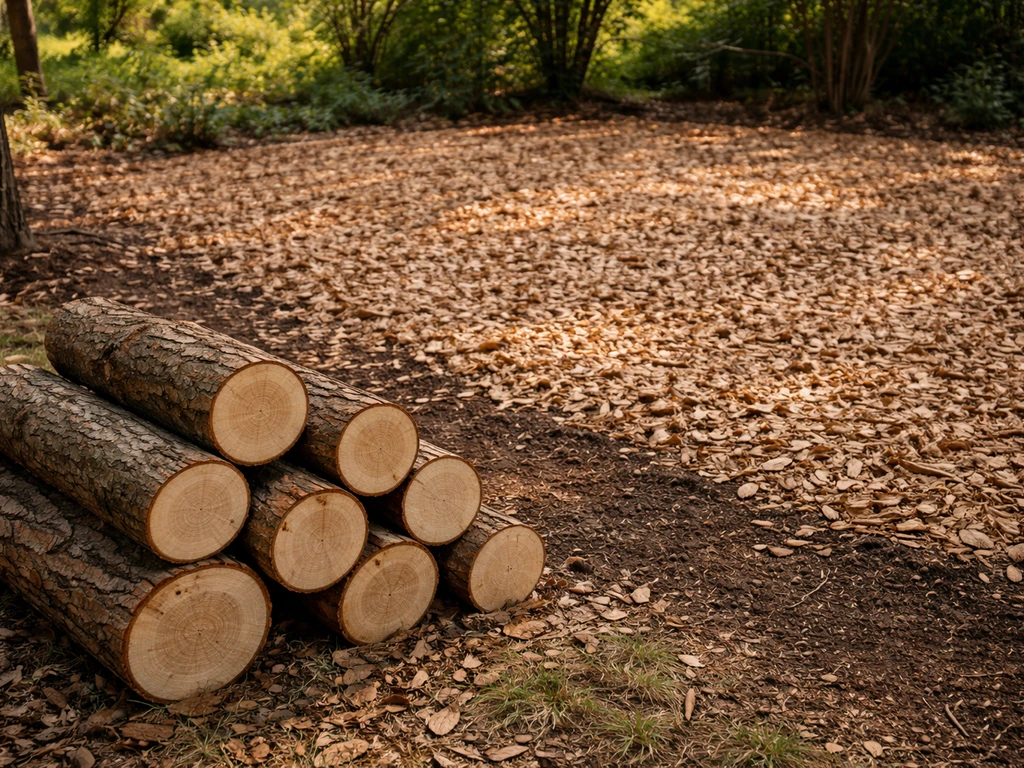
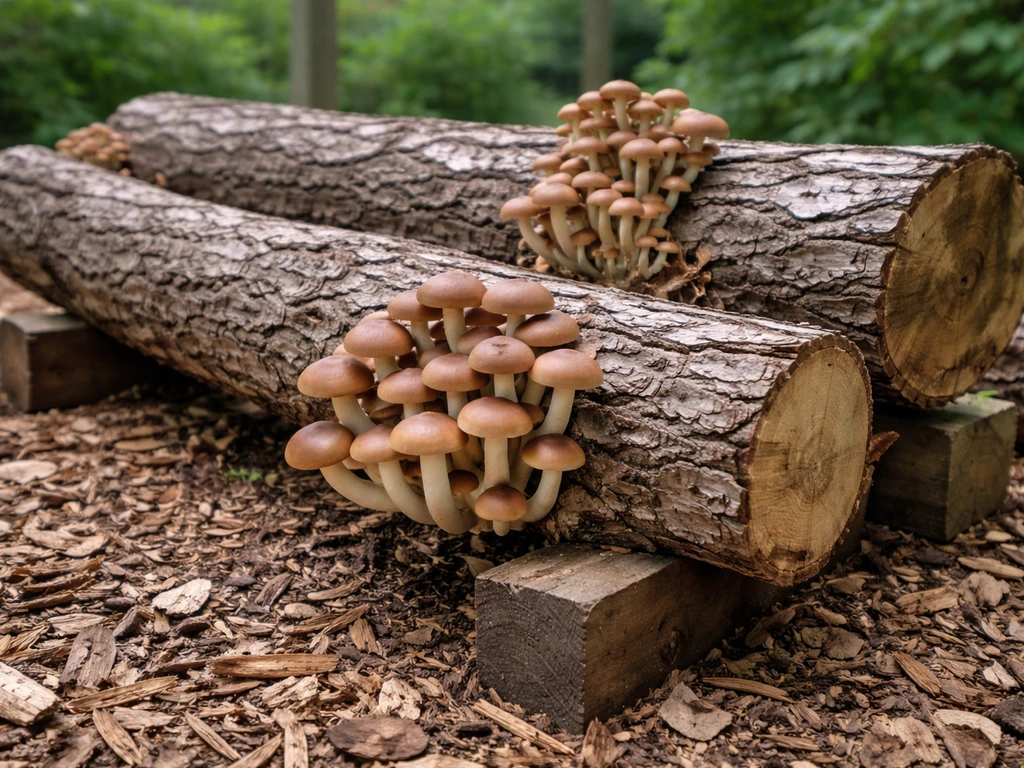
For logs, use freshly cut hardwood logs 3–8 inches in diameter. Poplar, willow, alder, oak, and elm are all good choices. Freshly cut logs have the most available moisture and nutrients; logs that have been sitting for more than a few months start drying out and can carry competing fungi. Drill holes in a diamond pattern about 2 inches apart and 1 inch deep, pack plug spawn or sawdust spawn into each hole, then seal with cheese wax or beeswax to keep moisture in and competing organisms out. Store logs in a shaded, humid area and water during dry spells.
For wood chip beds, lay 4–6 inches of hardwood wood chips over bare soil in a shaded area. Broadcast or layer sawdust spawn throughout, then cap with another inch of chips. Keep the bed moist with regular watering or by laying burlap over the top. This is the most forgiving method because the soil ecosystem helps regulate moisture and the sheer volume of substrate buffers environmental swings.
Environmental requirements and day-to-day care
Colonization phase
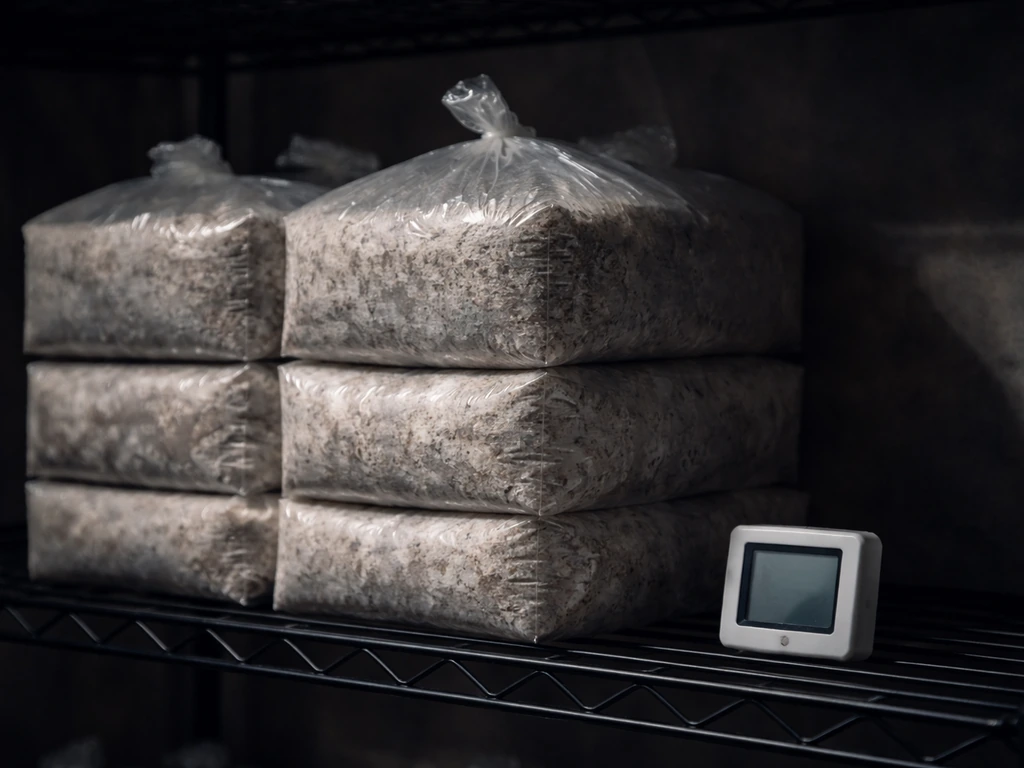
During colonization, pioppino mycelium grows best at 25–28°C (77–82°F). Keep your bags in a dark or low-light space at this temperature. You don't need to do much during this phase other than check for contamination every few days. Colonization on a fully supplemented sawdust block takes roughly 3–4 weeks. On plain sawdust it can take 4–6 weeks. The mycelium should look white to off-white and rope-like. If you see green, black, or pink patches, that's contamination (more on that below).
Fruiting induction
Once the block is fully colonized, it's time to trigger fruiting. Move it to your fruiting space and drop the temperature to 15–18°C (59–64°F). One horticultural science study on Agrocybe aegerita reports incubation at about 25°C with 80, 85% relative humidity, followed by fruiting at an air temperature around 15, 17°C International Journal of Horticultural Science. This cool-down is the key trigger for pioppino. Without it, the mycelium just sits there. Maintain humidity at 80–95% RH during fruiting by misting the walls of your fruiting chamber (not directly on the block) 2–3 times a day, or by using an ultrasonic humidifier on a timer.
Fresh air exchange matters more at this stage than during colonization. High CO2 (above roughly 1,000–1,500 ppm) causes malformed fruits with long spindly stems, tiny caps, or poor pin development. Fan your fruiting chamber for a few minutes several times a day or leave gaps in your tent for passive airflow. Pioppino pins typically appear 5–8 days after you open the bag and start fruiting conditions. Give them 12 hours of indirect light per day, around 500–1,000 lux, which can be a standard LED grow light or even a bright north-facing window.
What a realistic timeline looks like
- Day 1: Prepare and sterilize substrate, cool completely, inoculate with spawn
- Days 2–21: Colonization at 25–28°C, dark, minimal intervention
- Days 21–28 (or up to 42 for plain sawdust): Full colonization complete, block is white throughout
- Days 28–35: Move to fruiting environment at 15–18°C, open bag, start humidity and airflow
- Days 33–43: Pins appear, typically 5–8 days after opening
- Days 40–55: First harvest ready, depending on strain and conditions
- Days 55–70+: Second and third flushes after rest and re-hydration
Research on Cyclocybe aegerita cultivation documents fruiting features appearing 25–50 days post-inoculation depending on strain and conditions. ResearchGate's publication on Agrocybe aegerita specifically reports blank" rel="noopener noreferrer">experimental work showing how different cultural conditions influence mycelial growth and fruiting, which can help explain why timelines vary. In a well-managed home setup, most growers see their first harvest around 6–8 weeks. If you want to jump straight to a home-friendly step-by-step, see the full guide on how to grow puffballs at home. Faster strains on well-supplemented substrate can push that to 5 weeks. Slower setups, especially lower-temperature incubation rooms or low-nutrient substrate, may take closer to 10–12 weeks. Log grows are a completely different animal: expect 6–18 months for the first fruiting outdoors. If you're wondering how to grow porcini mushrooms, focus on similar fundamentals like proper substrate, temperature swings, and consistent humidity.
Harvesting without wrecking future flushes
Harvest pioppino just before or as the veil under the caps starts to tear. Once the veil breaks fully and spores drop, the mushrooms degrade quickly and can make a big mess in your fruiting chamber. The caps will be 2–5 cm across and still slightly convex. To harvest, grip the cluster at the base and twist gently while pulling, or use a clean knife to cut the cluster off at the substrate surface. Don't yank individual mushrooms out of a cluster. You'll damage the mycelium underneath and reduce the quality of your next flush.
After each flush, remove any leftover mushroom bases or pins that didn't develop (they'll rot and invite bacteria). Let the block rest for 5–7 days with the surface exposed to air at room temperature, then soak the block in cold water for 8–12 hours to rehydrate it before moving it back into fruiting conditions. Most blocks give 2–3 good flushes before yields drop off significantly. Pioppino yields vary, but a well-colonized supplemented block typically produces 150–300 grams total across multiple flushes.
Troubleshooting the most common problems
No growth or extremely slow colonization
If you see no visible mycelium after two weeks, the most likely causes are dead spawn (from overheating during inoculation, old or improperly stored spawn), or a colonization temperature that's too low. Make sure your incubation space is genuinely hitting 25–28°C and not just the ambient room, which can be several degrees cooler inside a thick block. If the spawn was warm to the touch when you received it or smells sour, it's likely dead. Contact your vendor for a replacement and store new spawn in the fridge until use.
Green, black, or pink mold contamination
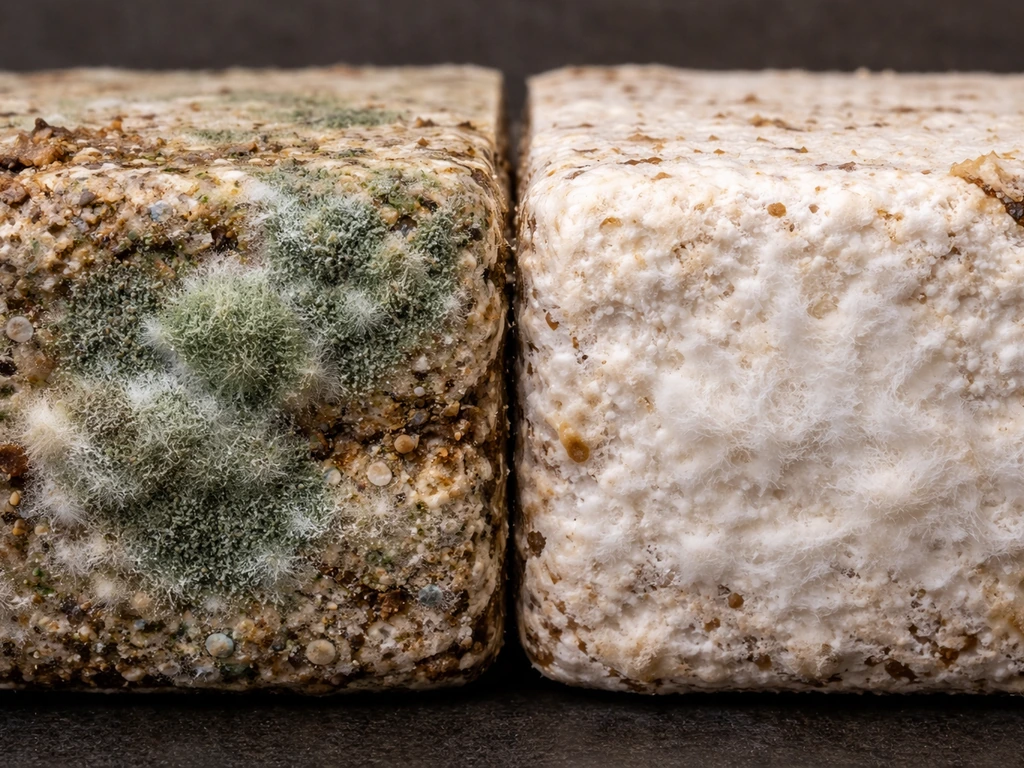
Green mold (Trichoderma) is the most common contamination in mushroom blocks and almost always traces back to inadequate sterilization, substrate that wasn't fully cooled before inoculation, or contaminated spawn. If you see green on a supplemented block, it's not salvageable. Seal it in a plastic bag and throw it out well away from your grow space, because Trichoderma spores spread easily. To prevent it: sterilize thoroughly, cool substrate completely (wait at least 4–6 hours after autoclaving), work in the cleanest environment you can manage, and use fresh spawn. Straw-only or low-nutrient substrates pasteurized correctly are less vulnerable because competing organisms have a harder time out-competing pioppino mycelium at lower nutrient levels.
Pins abort or caps stay tiny
Aborted pins or tiny underdeveloped caps almost always mean CO2 is too high (not enough fresh air exchange), humidity is too low and pins dried out, or temperature is still too warm for fruiting. Check your fruiting temperature first. If it's above 20°C, pioppino will struggle to pin reliably. Increase fanning frequency, open vents wider, or check if your humidifier is actually maintaining 85–95% RH with a hygrometer rather than estimating by feel.
Long, spindly stems and small caps
This is the classic high-CO2 look. The mushrooms stretch toward fresh air and put energy into stem length instead of cap development. Increase your fresh air exchange immediately. If you're growing in a sealed tent or bag with no vent holes, cut more holes or fan more aggressively. This issue fixes itself within a flush or two once airflow improves.
Colonization stalls partway through
Partial colonization that stops usually means either moisture is off (too wet or too dry), temperature dropped during a cold snap, or there's a contamination zone the mycelium hit and won't cross. Feel the block: if it's soggy or has visible condensation pooling at the bottom, there's too much free moisture, which creates anaerobic pockets that kill mycelium. If the block feels dry and light, it needs rehydration. For stalled colonization with no visible contamination, try moving to a slightly warmer spot (closer to 28°C) and wait another week before giving up.
Poor inoculation contact and uneven colonization
If your block colonizes in patches with large uncolonized sections, the spawn wasn't mixed evenly through the substrate. This matters especially with grain spawn. Next time, mix spawn thoroughly throughout the substrate before bagging, rather than layering spawn on top. For log grows, under-drilled holes or sparse plug spacing (more than 2–3 inches apart) leaves dead zones that competing fungi colonize first. Denser inoculation points mean faster, more even mycelium spread and less vulnerability to contamination.
Weak third flush or yields dropping off
After 2–3 flushes, blocks naturally deplete. This is normal. You can try rehydrating the block by fully submerging it in cold water for 12–24 hours before the final flush attempt, but expect smaller yields. At some point the substrate is spent. Outdoors, you can bury exhausted blocks in a wood chip bed where they'll often produce a few more scattered flushes over the following months as the wood breaks down further.
Pioppino rewards patience and attention to temperature more than almost any other part of the process. The cool fruiting requirement is what separates growers who get reliable harvests from those who keep waiting for pins that never come. Nail that temperature drop, keep your humidity consistent, and give your blocks enough fresh air, and you'll have clusters of those beautiful bronze-capped mushrooms in a matter of weeks. You can also grow puffball mushrooms at home, but the substrate and timing are different from pioppino.
FAQ
Can I grow pioppino year-round indoors, or does it require the same cool-season timing?
You can grow outside the calendar season, but you still need the temperature swing. Plan your incubation near 25–28°C, then schedule fruiting at 15–18°C. In many homes, keeping that cool during fruiting is the limiting factor, so use a dedicated cool room or a humidity-controlled tent placed away from heaters.
How do I know my incubation temperature is correct when using thick sawdust blocks?
Don’t rely on room temperature alone. Put a thermometer probe into a spare or sacrificial block and confirm it reaches 25–28°C during colonization. Blocks can lag behind the ambient space by several degrees, especially if they’re newly inoculated.
What’s the simplest way to tell if my spawn is dead before I waste a whole bag?
Check two things: look and smell. Healthy spawn should be colonized and off-white to creamy, with little to no sour or fermented odor. If it smells strongly sour, looks wet or slimy, or has mostly uncolonized grain, assume it’s compromised and do not proceed.
If I see contamination, can I cut it out and save the block?
For pioppino blocks, you should assume it’s not salvageable once visible contamination appears (especially green, black, or pink patches). Removing parts risks spreading spores and bacteria throughout the bag, and in practice the remaining mycelium often stalls.
My block fully colonized, but it won’t pin. What should I check first?
Start with the cool-down and airflow sequence. If the temperature never truly drops into the 15–18°C range, the mycelium may stay dormant. Then verify fresh air exchange during fruiting, because high CO2 can prevent pins even when humidity looks good.
How can I measure humidity accurately for pioppino fruiting?
Use a hygrometer placed inside the fruiting chamber, not just near it. Target 80–95% RH, and watch for overly wet conditions, condensation dripping, or misting directly onto the block, which can cause aborts or bacterial spots.
Is it okay to mist the mushrooms or the block directly to maintain humidity?
Prefer misting the chamber walls or using humidity from the air source rather than spraying the block or clusters. Direct wetting can encourage surface bacteria, distort fruiting, and increase the chance of spotty growth or slime on caps.
How many holes or what spacing should I use when inoculating logs?
Follow the guideline of drilling in a diamond pattern about 1 inch deep and around 2 inches apart, then use enough plug or sawdust spawn to fully pack each hole. If holes are too sparse, you’ll get slow or uneven spread and higher odds of competing fungi taking over.
Why did my caps form but the stems are long and thin?
That’s usually a fresh air or CO2 problem during fruiting. Increase venting or fanning immediately, and make sure you’re not keeping the grow in a sealed tent. It often improves within a flush or two once CO2 control is corrected.
What causes aborted pins or tiny underdeveloped caps?
The most common drivers are CO2 too high, humidity too low (pins dry out), or fruiting temperature still too warm. Use a hygrometer and a real thermometer reading for the fruiting space, then adjust fresh air and misting frequency accordingly.
My block colonized only in patches and then stopped, what usually went wrong?
Most often spawn was not mixed evenly through the substrate, or the block experienced uneven moisture (pockets of free water or areas that dried out). For the next attempt, mix spawn thoroughly before bagging, and confirm moisture is at field capacity.
Do pioppino blocks need to be rehydrated before every new flush?
Usually not immediately. After harvesting, rest the block 5–7 days with air exposure, then soak for 8–12 hours before returning to fruiting. If yields are dropping quickly, a longer pre-flush rehydration (within that range) can help reintroduce moisture.
Are pioppino yields likely to be low on plain sawdust without bran?
Yes, you may get smaller total grams on lower-nutrient substrates, but they’re often less prone to contamination when pasteurized. If your priority is learning success, plain sawdust plus correct pasteurization is a reasonable first experiment, then you can move to bran for higher yields later.
Can I bury exhausted pioppino logs or blocks outdoors for extra flushes?
Yes, burying or incorporating exhausted material into a wood chip bed can produce scattered, smaller flushes over time as the wood breaks down. Keep it shaded and moist, but expect irregular timing rather than a consistent weekly flush schedule.