Growing puffball mushrooms at home is genuinely possible, but it requires honesty upfront: puffballs are among the most challenging mushrooms to cultivate, and the indoor fruiting protocols that work reliably for oysters or shiitake simply don't translate here. The most realistic and documented path is an outdoor soil-bed method where you inoculate humus-rich garden soil with mycelium spawn or a slurry, then give it time, the right seasonal conditions, and good moisture management.
How to Grow Puffball Mushrooms Indoors and at Home

Marcus Holloway
27 Apr 2026
The only peer-reviewed success on record used outdoor field-soil inoculation and saw first fruiting bodies after about 4 years. That's not a typo. Indoor fruiting for giant puffballs (Calvatia gigantea) and related species like Calvatia craniiformis and Lycoperdon perlatum has not been reliably demonstrated in controlled research. So this guide focuses on what actually works: a practical outdoor bed approach, with honest notes on what an indoor colonization setup can and can't do.
What puffball mushrooms actually need to grow
Puffballs are saprotrophic fungi, meaning they decompose dead organic matter in the soil rather than forming partnerships with tree roots. In nature, blank" rel="noopener noreferrer">giant puffballs fruit in meadows, fields, and deciduous forest edges in late summer and autumn. They need nitrogen-enriched, humus-rich, well-draining soil with a specific combination of soil temperature and moisture that researchers describe as not yet fully characterized. That last point is key: we don't have a clean set of temperature and CO2 and humidity numbers to dial in the way we do for oyster mushrooms.
For outdoor growing, the conditions that matter most are soil composition (rich in organic matter, slightly moist but never waterlogged), semi-shaded placement that prevents the bed from drying out in direct sun, and seasonal timing that mimics the natural late-summer to autumn fruiting window. For any indoor colonization work you do before moving mycelium outdoors, you need humidity around 85 to 95 percent, fresh air exchange to keep CO2 below roughly 1,000 ppm, and temperatures in the 65 to 75°F range during colonization. The difference between indoor and outdoor here isn't just setup, it's that outdoor soil provides a complex microbial and structural environment that no fruiting chamber has yet replicated for puffballs.
Spores vs spawn: what to actually start with
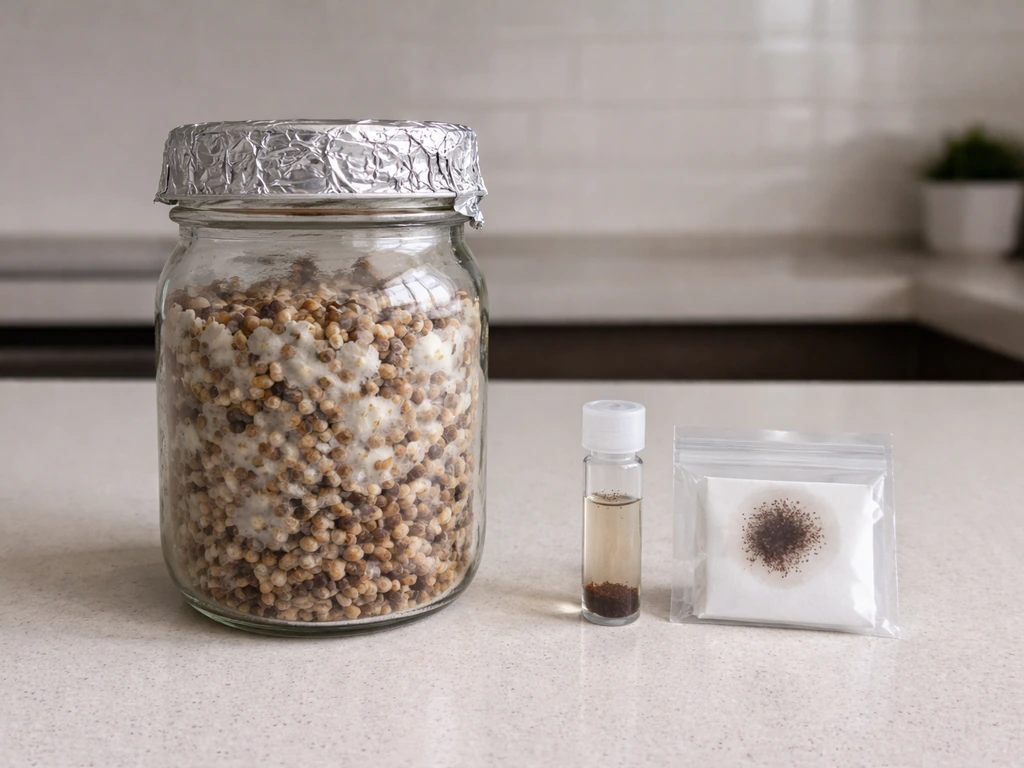
You have two realistic starting points: spores or spawn (colonized mycelium grown on a substrate like grain or sawdust). Spawn is the more practical choice for home growers. Think of it as the mushroom equivalent of a starter culture rather than raw seeds. It's mycelium that's already been established on a carrier material, which means it's primed to colonize your substrate faster and with less risk of contamination outcompeting it. Spores, by contrast, require germination before they produce mycelium, which takes longer and leaves a longer window for contaminants to take hold.
Spawn for puffballs is available from a small number of specialty suppliers, typically as grain spawn or as a mycelium slurry. When you're sourcing it, look for spawn that is clearly labeled for Calvatia gigantea or the specific puffball species you want to grow, visually white and healthy with no green, black, or pink patches (signs of contamination), and stored or shipped cold. Spore syringes for puffballs exist, but given the already-difficult fruiting biology, starting from clean spawn removes one major variable.
| Starting Material | Pros | Cons | Best For |
|---|---|---|---|
| Grain Spawn | Fast colonization, widely available, easy to mix into soil | Shorter shelf life, must be used promptly | Outdoor bed inoculation |
| Mycelium Slurry | Easy to distribute evenly in a large bed, low cost to make | Requires blending colonized material with water | Large outdoor patches |
| Spore Syringe | Long shelf life, lower cost upfront | Slower germination, higher contamination risk, no guaranteed fruiting triggers known | Experimental only |
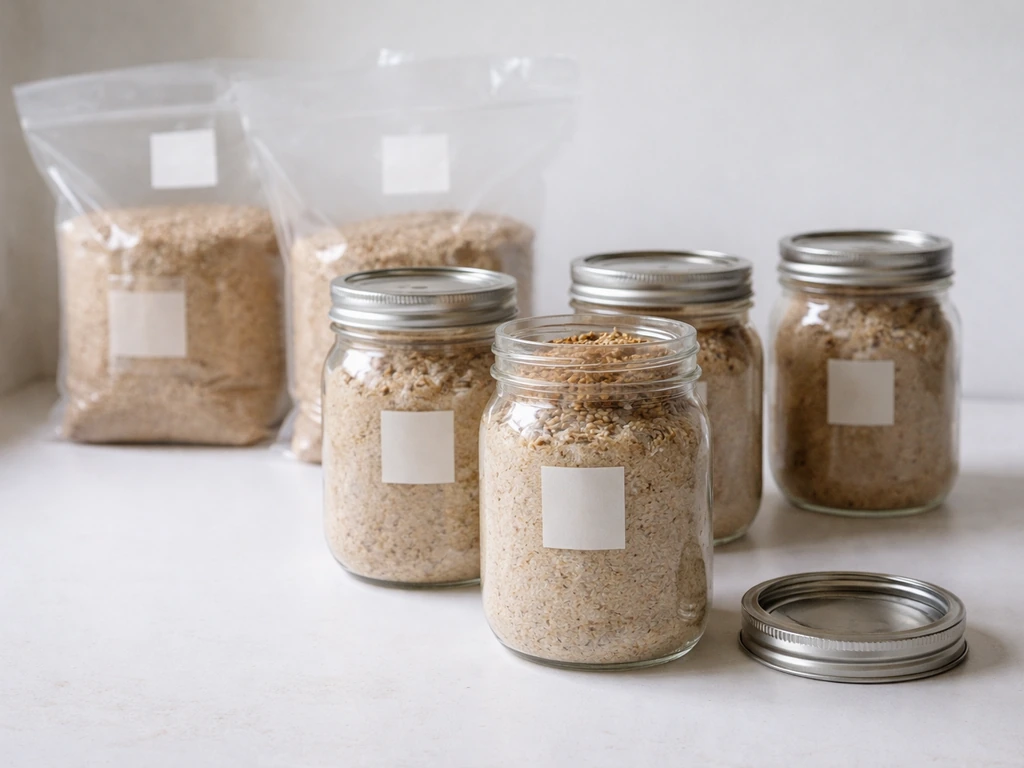
For most home growers, grain spawn applied directly to an outdoor bed is the clearest path forward. If you want to experiment with an indoor colonization stage first (growing mycelium in jars before transferring outdoors), grain spawn works well for that too.
Substrate selection and preparation
Puffballs thrive in nitrogen-enriched, organic-matter-rich soil. For an outdoor bed, the ideal substrate is a blend of garden topsoil, well-aged compost, and some straw or wood chips to add structure and hold moisture. A rough mix that works well is about 60 percent quality topsoil, 30 percent mature compost, and 10 percent straw or chopped hardwood chips. Avoid fresh manure, which can be too hot and introduce competitors, and avoid heavy clay soils that waterlog easily.
If you're doing a small indoor colonization stage in jars or bags before moving mycelium outdoors, pasteurized straw or a compost-based substrate works. To pasteurize straw, soak it in water heated to around 160°F (71°C) for 45 to 60 minutes, then drain it and let it cool to room temperature before inoculating. This reduces competing organisms without fully sterilizing it, which is appropriate for puffballs since they don't need the ultra-clean conditions that more fragile species require. The substrate should be at field capacity: squeeze a handful and only a few drops of water should come out, not a stream.
Indoor setup: what you can (and can't) achieve indoors
Let's be direct: you can run an indoor colonization stage for puffball mycelium, and there's genuine value in doing that before moving spawn outdoors. What you almost certainly won't get is fruiting bodies in an indoor fruiting chamber. No one has reliably cracked the environmental cues that trigger puffball primordia indoors. That said, here's how to set up a solid indoor colonization environment.
Containers and setup
Use wide-mouth mason jars or polypropylene bags for small colonization runs. Fill them about two-thirds full with your pasteurized substrate, inoculate with grain spawn (about 10 to 20 percent spawn by volume), and seal with a polyfill filter lid or a lid fitted with a self-healing injection port. Keep jars in a dark location at 65 to 75°F during colonization.
Humidity, airflow, and temperature
During colonization you don't need a fruiting chamber, just stable temperature and the occasional fresh air exchange. Once mycelium is fully colonized and you want to experiment with fruiting conditions indoors (understanding that results are not guaranteed), move jars or blocks into a humidity tent or modified plastic storage tote. Cut four holes of about 1 inch in diameter, two on each side at opposing heights, to allow pressure-differential airflow without fans.
Mist the walls of the chamber (not the substrate directly) to maintain 85 to 95 percent humidity. Avoid direct drafts, which dry out the substrate surface and stall growth. Temperature during any fruiting attempt should be around 60 to 65°F, mimicking the autumn conditions puffballs naturally associate with fruiting.
Lighting
Puffballs don't require light for colonization, and fruiting cues for this genus are not light-dependent in any documented way. Indirect ambient light or a simple 12-hour cycle from a nearby window is fine. Don't overthink this one.
The outdoor bed approach: where to place it and how to set it up
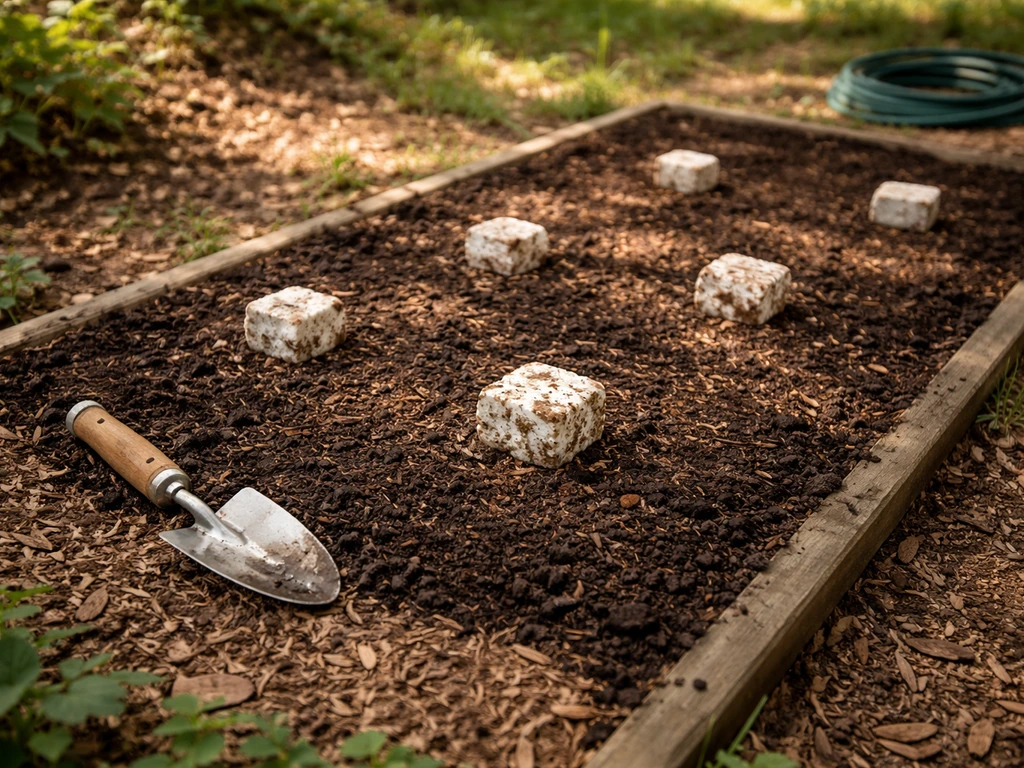
This is where puffball cultivation actually has a track record. Choose a spot that is semi-shaded (dappled light under trees or on the north side of a structure works well), away from heavy foot traffic, and in soil that drains well but stays consistently moist. Meadow edges and open deciduous woodland borders match where giant puffballs naturally grow.
Prepare a bed that is roughly 3 to 4 feet wide and as long as you like, loosened to about 8 to 10 inches deep. Mix in generous amounts of compost throughout the bed. Slightly mound the center so water doesn't pool. If your soil is heavy clay, consider raising the bed a few inches and mixing in perlite or wood chips for drainage.
Inoculate by mixing grain spawn evenly into the top 4 to 6 inches of the prepared bed, using roughly 1 pound of spawn per 4 to 5 square feet of bed. Alternatively, blend colonized substrate with water in a blender to make a slurry and pour it evenly across the bed, then work it in lightly with a rake. Cover the bed with a thin layer of straw mulch (1 to 2 inches) to retain moisture and protect the mycelium from temperature swings. Water the bed to field capacity immediately after inoculation, and plan to water regularly during dry spells.
Step-by-step timeline from inoculation to first fruits
This timeline reflects the outdoor bed approach, which is the only method with documented results. Indoor colonization stages are noted where relevant.
- Week 1 to 2: Prepare your outdoor bed and source clean puffball grain spawn. If doing an indoor colonization stage first, inoculate jars or bags with spawn mixed into pasteurized substrate and keep them at 65 to 75°F in a dark spot.
- Week 2 to 8: Colonization phase outdoors. Keep the bed consistently moist with a straw mulch cover. You may see white mycelial threads in the top layer of soil when you gently scrape back the mulch. Indoors, jars should show white mycelial growth spreading through the substrate within 2 to 4 weeks.
- Month 2 to 6: Mycelium establishment outdoors. No visible fruiting yet. Maintain moisture and protect from drying out. This is the longest and most patience-testing phase.
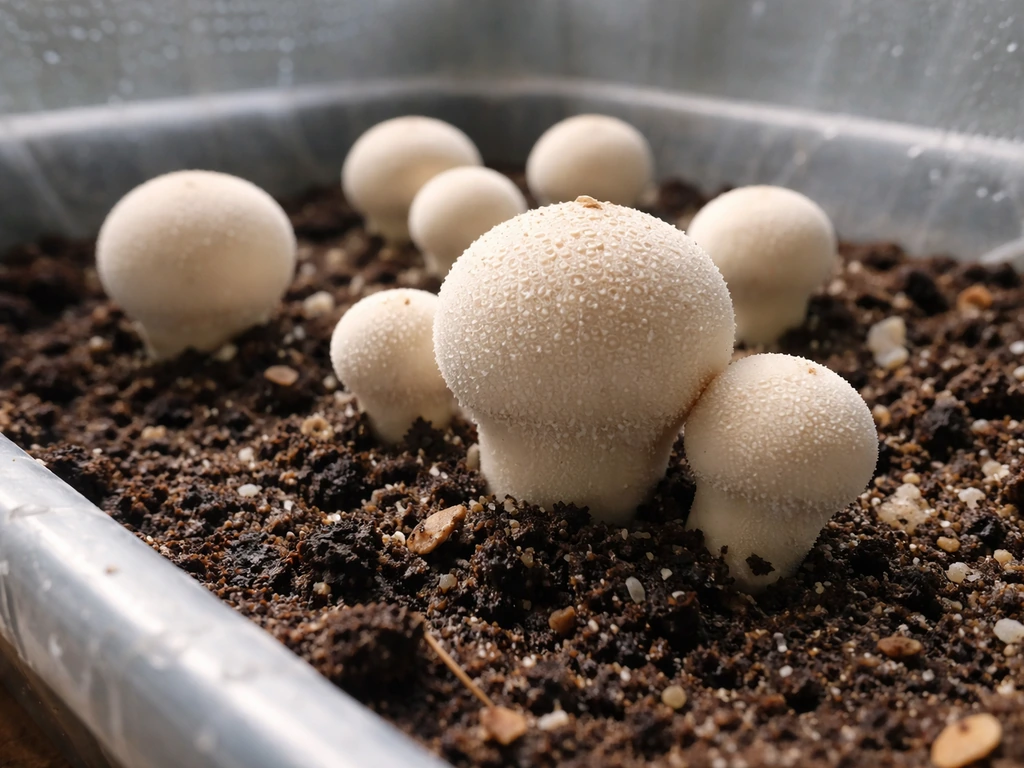
- Season 1 to 4 (late summer/autumn windows): Watch for pinning during cool, moist late-summer to autumn conditions. First fruiting bodies, if they appear, will emerge as small white spheres that swell quickly. The only documented successful outdoor cultivation saw first fruiting after about 4 years, though anecdotal reports from home growers suggest occasional fruiting in year 1 or 2 under ideal conditions.
- Harvest: Pick puffballs when they are still fully white inside (slice one open to check; the interior should be pure white with no internal structure visible). Once any hint of yellow or the internal structure of gills appears, flavor and edibility decline.
- Ongoing: Leave some puffballs to mature fully and release spores back into the bed. This can help reinoculate and extend the productive life of your patch.
Troubleshooting and common mistakes
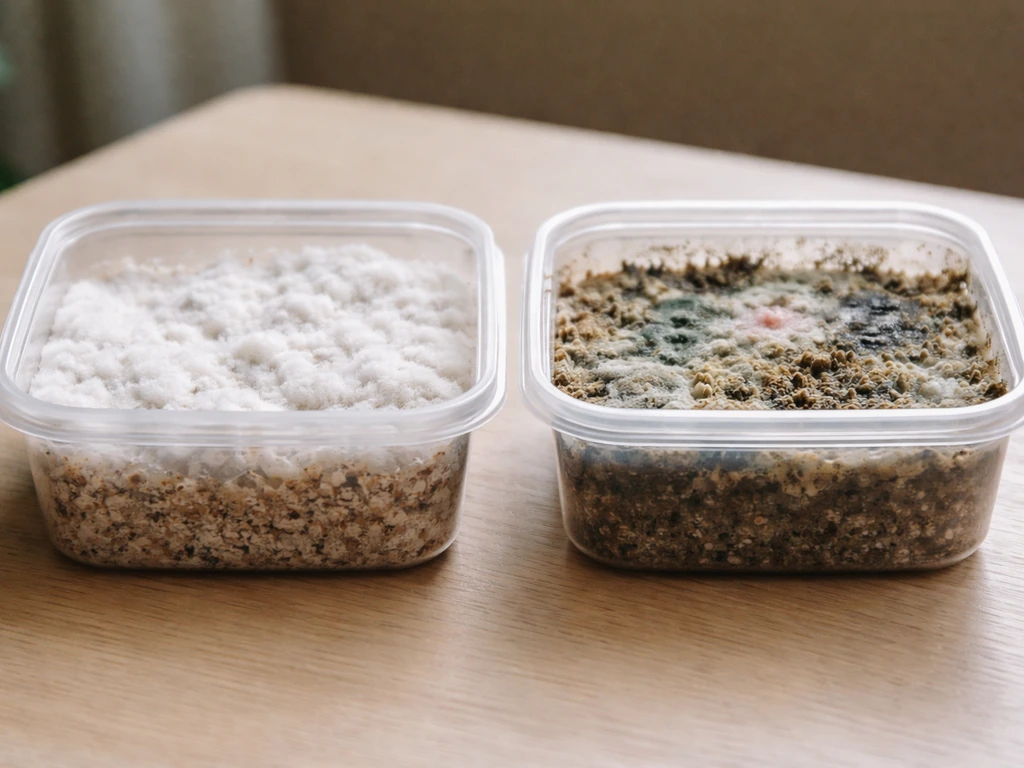
No visible colonization after 4 weeks
The most common cause is contaminated spawn or substrate. Check for green (Trichoderma), black, or pink patches, any of which signal mold taking over. If contamination is present in an indoor jar, remove it from your grow space immediately and don't open it indoors. For an outdoor bed, spot-treat contaminated areas by removing the top few inches of affected soil and replacing with fresh compost, then re-inoculate. Also check that your substrate wasn't too wet (which creates anaerobic conditions that kill mycelium) or too dry (which stops growth entirely).
Bed drying out
Dry air and direct sun are the fastest ways to kill puffball mycelium. If your mulch layer is thin or your location gets afternoon direct sun, increase the mulch to 3 to 4 inches and consider adding a shade cloth over the bed during the hottest part of summer. Water consistently, aiming to keep the soil feeling like a wrung-out sponge, not dry crumbles and not muddy.
Mycelium colonized but no fruiting bodies
This is the most frustrating and most common situation, and it reflects the genuine difficulty of puffball cultivation. The specific soil temperature and moisture combinations that trigger fruiting have not been fully characterized even in research settings. What you can do: ensure your bed experiences genuine seasonal temperature swings, including cool autumn nights, and maintain adequate moisture through late summer. Some growers report success after a dry-then-wet cycle mimicking late summer rain after a drought. Patience is the most honest advice here. If nothing fruits after 2 years, consider refreshing the bed with new compost and re-inoculating.
Indoor fruiting chamber not producing pins
If you've set up an indoor fruiting chamber and are waiting on puffball pins, the hard truth is that indoor fruiting has not been reliably demonstrated for this genus. Out-Grow likewise notes that reliably replicating puffball indoor fruiting conditions has not yet been achieved and that a dependable indoor fruiting protocol is still lacking indoor fruiting has not been reliably demonstrated for this genus. No published study has identified the temperature, humidity, CO2, or photoperiod cues that initiate puffball primordia indoors. Don't interpret lack of indoor fruiting as a failure of your technique. The biology simply isn't figured out yet. Use your colonized indoor blocks as a transplant source for your outdoor bed instead.
Puffballs turning yellow before harvest
Puffballs mature fast once they appear. Check your bed every day once you see pins forming. Slice a puffball open before eating: the interior must be pure white with no visible internal structure. Any yellowing or the appearance of a small figure inside (the developing gills of what would be a different mushroom) means it's past peak or not the species you think it is. For giant puffballs (Calvatia gigantea), which can reach a foot or more in diameter, this check is both the quality test and an important safety step.
Realistic expectations and what success actually looks like
Growing puffball mushrooms is a long game. If you go in expecting a fruiting block ready to harvest in 8 weeks the way oysters or pioppino mushrooms work, you'll be disappointed. If you want a faster, more predictable outdoor option, pioppino mushrooms are often easier to plan around than puffballs.
The realistic expectation is: inoculate an outdoor bed, maintain it carefully through at least one full growing season, and hope for pins in the late summer or autumn window. Some growers see results in year one or two; the only peer-reviewed case took four years.
The flip side is that a well-maintained outdoor puffball patch can produce for multiple seasons once established, and the harvest of a single giant puffball, which can weigh several pounds, makes the wait feel worth it.
If you're also exploring other challenging wild-taste mushrooms that are difficult to cultivate indoors, porcini mushrooms face similar obstacles with their mycorrhizal biology, and morel cultivation shares many of the same frustrating unknowns around fruiting triggers. Puffballs are at least saprotrophic, giving you a genuine (if slow) cultivation pathway that those species don't offer.
FAQ
When should I start, and what if my area does not have a strong late-summer to autumn season?
Plan your growth calendar around your local late-summer to autumn conditions, not around indoor “cycle” expectations. If your climate lacks cool autumn nights, your best workaround is to start the bed early enough that it matures by late summer, then keep moisture stable through fall rather than trying to force fruiting in winter or spring.
How can I tell if my pasteurized substrate was too wet or over-treated before inoculation?
If you do a pasteurization stage for jars or bags, aim for “field capacity” and avoid boiling or steaming the substrate too long. Overheating or excessively wet substrate increases anaerobic zones and competitor growth, which can look like healthy colonization for a short time and then collapse.
What is the best response when I see contamination in an indoor jar versus in an outdoor bed?
Use a numbered checklist for contamination rather than trying to “wait it out.” Remove affected jars immediately and do not open them indoors, because spore release from molds can contaminate every nearby substrate. For outdoor beds, the safest approach is to remove the top few inches of affected area and replace with fresh, compost-enriched soil, then re-spread spawn to the repair zone.
If nothing fruits indoors, should I try adding more light or a stronger light cycle?
No, you should not rely on increasing light or brightening the room as a substitute for the missing indoor fruiting cues. Light is not the lever for this genus during colonization, and indoor fruiting cues have not been reliably identified, so changing photoperiod usually wastes time.
Can I overwater my puffball bed, and what signs mean I should change my watering routine?
Yes, but do it conservatively. If your bed is drying out, increase mulch thickness and adjust watering frequency to maintain a wrung-out sponge feel. Avoid heavy soaking, because waterlogged soil creates anaerobic conditions that can halt mycelium and delay or prevent fruiting.
Should I try to fruit indoors for more control, or is there a better way to use indoor stages?
If you want to speed up progress without gambling on indoor fruiting, keep the indoor step limited to colonization, then transplant. Fully colonized blocks or substrate mixed into the outdoor bed give you the best chance, while attempting true indoor fruiting is likely to fail regardless of chamber tweaks.
How do I keep spawn viable, and what handling mistakes most often ruin results?
Store and handle spawn cold and work quickly once you bring it out. A common mistake is leaving spawn warm for long periods before mixing, which can reduce vigor. Visually inspect for off-color patches (green, black, pink) and discard contaminated spawn instead of “scraping and saving” portions.
Do I need to re-inoculate every year, or can a successful outdoor bed keep producing?
Once a bed is established, annual top-dressing with a thin layer of compost can help maintain nitrogen and organic matter, which puffballs tend to favor. Refreshing the whole bed is usually unnecessary after a good start, but after multiple failed years, a partial refresh in the inoculated zones improves odds.
What should I check inside the puffball before eating it, and when is it too late to harvest?
Harvest timing matters. Slice open before eating and only use puffballs with pure white interior and no visible internal structures. Yellowing, or a developing “figure” inside, indicates it is past peak or likely not the intended species, so do not gamble on appearance after the first cut.
My humidity tent is getting airflow, but the mycelium seems stalled. What airflow mistake should I correct first?
Treat airflow like a balance, not a “more is better” rule. In humid setups, avoid direct drafts because they dry the surface and can stall growth even if humidity readings look high. Use passive holes or gentle exchange, and mist walls rather than blasting the substrate surface.