Growing truffles in New Zealand is absolutely possible, but it takes 5 to 10 years from planting to first harvest, requires a specific host tree, and hinges on getting your soil chemistry right from day one. This is not like growing oyster mushrooms on straw. You are establishing a living underground fungal partnership between a tree's roots and a truffle species, then managing that system for years until it decides to fruit. Get the foundations right and you can produce some of the world's most valuable fungi right here in New Zealand. Rush or cut corners and you will wait a decade for nothing.
How to Grow Truffles in NZ: Step-by-Step Guide

Marcus Holloway
16 May 2026
Truffles are not like regular mushrooms (and that changes everything)
Most cultivated mushrooms, oysters, shiitake, lion's mane, grow as saprotrophic fungi. You give them a substrate (straw, sawdust, logs), inoculate it with mycelium, manage humidity and temperature, and fruiting bodies appear in weeks. Truffles are completely different. They are mycorrhizal fungi, meaning they form a symbiotic relationship with living tree roots. The fungus wraps around or penetrates the root tips of a compatible host tree, and in return for sugars from the tree, it dramatically expands the tree's ability to absorb water and nutrients. Neither partner can thrive without the other. There is no substrate to pack into a bag. You cannot grow truffles indoors on a shelf in your spare room.
What you are actually doing when you grow truffles is managing an outdoor orchard system where the truffle fungus lives underground on the roots of inoculated host trees. The truffle fruiting bodies (the things you eat) form in the soil within the root zone of those trees, usually within 15 to 30 centimetres of the surface. This is why the entire process, from soil preparation to harvesting, looks more like orchard management than mushroom cultivation. If you have been reading about growing gourmet mushrooms at home, some of that knowledge is useful background, but the methods are almost entirely different. If you are wondering whether you can grow truffles at home, this guide will help you map the realistic timeline and site requirements for an outdoor orchard. The guides on growing truffles indoors or in a greenhouse on this site go into controlled-environment variations, but for most NZ growers, an outdoor orchard is the realistic starting point. If you want greenhouse-based results, the key is maintaining the right soil chemistry and simulating the outdoor cues that trigger fruiting how to grow truffles in a greenhouse.
NZ basics: climate, legal considerations, and choosing the right truffle and host
Which truffle species works in New Zealand
New Zealand's climate suits European truffle species well, particularly in the South Island and parts of the North Island with cool winters and warm, dry summers. The two most commercially relevant species are Tuber melanosporum (Périgord black truffle) and Tuber aestivum (Burgundy or summer truffle). Black truffle is the gold standard, commands the highest price, and performs well across Central Otago, Canterbury, Hawke's Bay, and parts of Marlborough. Summer truffle is slightly more tolerant of variable conditions and can work in a wider range of NZ sites, but it fetches a lower price at market. Tuber magnatum, the white Alba truffle, is almost impossible to cultivate reliably anywhere in the world, so skip it unless you are a research institution.
Host tree selection
Your truffle species and host tree must be compatible. For Tuber melanosporum, the proven NZ hosts are English oak (Quercus robur), holm oak (Quercus ilex), and hazel (Corylus avellana). Holm oak handles dry NZ summers particularly well and stays evergreen, which suits sites with water restrictions. Hazel grows faster and fruits sooner on average, often producing truffles in 5 to 7 years compared to 7 to 10 years for oak, but hazel trees are shorter-lived. Many NZ growers mix both to spread risk. For summer truffle, downy oak (Quercus pubescens) and hazel are solid choices.
Climate requirements and site selection by region
Tuber melanosporum needs cold winters (ideally with some frosts), warm to hot dry summers, and a clear seasonal temperature shift. This maps well onto Central Otago, inland Canterbury, Hawke's Bay, Marlborough, and parts of Wairarapa. Coastal Northland and Auckland are generally too warm and humid for reliable black truffle production. Areas with waterlogged winters or very high summer rainfall are also poor candidates unless you invest heavily in drainage. Check your average annual rainfall: T. melanosporum prefers 600 to 900 mm per year with dry summers. Above 1,200 mm in summer months, you will fight disease and contamination constantly.
Legal and biosecurity considerations
This is where many NZ growers get caught off guard. If you plan to import inoculated plants or truffle material from overseas, you must comply with MPI's biosecurity requirements. The Ministry for Primary Industries has a formal Import Health Standard specifically for truffles for propagation, blank" rel="noopener noreferrer">published as 'Truffles for Propagation 2018' within NZ legislation. This is not informal guidance, it is a regulatory requirement. You will need to blank" rel="noopener noreferrer">apply for a plant import permit, the exporting country's National Plant Protection Organisation (NPPO) must provide phytosanitary certification, and your consignment will be inspected by an MPI inspector on arrival. Your plants and packaging must be free of soil contamination, pests, and disease. If the required treatments cannot be met by the exporter, you can request an assessment under equivalent measures. The simplest route for most NZ growers is to buy inoculated plants from a New Zealand-based nursery that has already done this work legally. That eliminates the import process entirely and removes a significant compliance headache.
Sourcing inoculated plants and planning your site
Where to get inoculated plants in NZ
Several specialist nurseries in New Zealand produce mycorrhiza-inoculated truffle host plants. These nurseries grow the host tree from seed or cutting, then inoculate the root system with truffle spores under controlled conditions, and verify colonisation before sale. Always ask a nursery for evidence of inoculation, ideally a lab verification or at minimum a description of their inoculation and quality control process. A plant that looks healthy but carries no truffle mycelium on its roots is worthless for your purposes. Prices for verified inoculated plants typically range from $25 to $80 NZD per plant depending on species, size, and supplier. Budget accordingly.
Site layout, spacing, drainage, and sunlight
Plan your site before you buy a single plant. Truffles need full sun, ideally 8 or more hours per day during the growing season. Shaded sites fail. For holm oak or English oak, plant at 6 x 6 metres spacing, which gives you roughly 275 trees per hectare. Hazel is typically planted at 4 x 4 metres. Closer spacing increases competition and disease risk; wider spacing wastes productive ground. Most serious NZ operations run rows on a north-south orientation to maximise sun exposure. Your brûlé (the zone of bare, compacted soil that forms around the base of the tree as the truffle mycelium kills competing plants) develops within this spacing and is one of the first signs that your mycorrhizal relationship is working.
Drainage is non-negotiable. Tuber melanosporum will not tolerate waterlogging. If your site has clay soils or sits in a low-lying area, install subsurface drainage before planting. Raised planting rows or mounds can also help. Test your water table depth in winter. The root zone should never be saturated for more than a few days at a time. Aspect matters too: north-facing slopes in the South Island warm up faster in spring and dry out more reliably in summer, which suits black truffle production well.
Soil prep and management
pH is the most critical factor
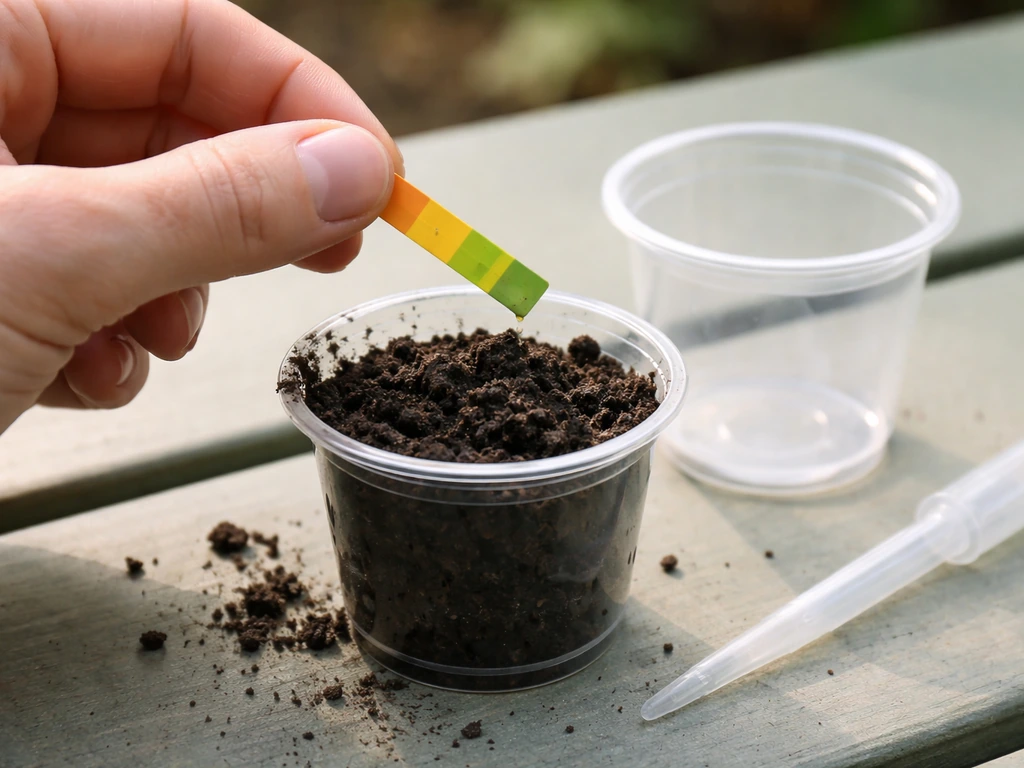
Get a soil test done before you do anything else. Seriously, this is the single most important step in the entire process. Tuber melanosporum requires a soil pH of 7.5 to 8.3. Most NZ soils sit between 5.5 and 6.5, which is too acidic for black truffle. You need to raise the pH using agricultural lime (calcium carbonate) or dolomite lime. Apply lime in stages, testing every three to six months, because overshooting your target pH is also harmful. On heavily acidic NZ soils, you may need multiple lime applications over 12 to 24 months before planting. Apply lime, incorporate it 30 to 40 cm deep by ripping or deep cultivation, let it react, test again, and repeat as needed. Do not rush this step. Planting into soil that is still too acidic dooms your project from the start.
| Parameter | Target Range | NZ Problem | Fix |
|---|---|---|---|
| Soil pH | 7.5 to 8.3 | Most NZ soils 5.5 to 6.5 (too acidic) | Agricultural lime or dolomite lime, incorporated 30 to 40 cm deep |
| Calcium | High (>2000 mg/kg) | Often low in NZ pasture soils | Gypsum or lime addition |
| Phosphorus | Low to moderate | Superphosphate fertilised paddocks can be too high | Avoid P fertiliser; dilute over time |
| Nitrogen | Low | High N suppresses mycorrhizal development | No nitrogen fertiliser; no compost |
| Organic matter | Low (under 3%) | High OM competes with truffle mycelium | Avoid adding compost or manure |
| Drainage | Free-draining | Clay or low-lying NZ soils waterlog easily | Subsoil drainage, raised rows, or mounding |
What not to add to your soil
This is counterintuitive for most gardeners. Do not add compost, manure, blood and bone, or nitrogen fertilisers to your truffle site. High nutrient levels, especially nitrogen and phosphorus, actively suppress mycorrhizal development. The truffle fungus needs the tree to be slightly nutrient-stressed so that the symbiotic relationship is beneficial to both parties. Rich soil removes the tree's incentive to maintain the mycorrhizal partnership. If your site was previously used as improved pasture with regular superphosphate applications, you may need to wait several years for P levels to drop naturally before planting, or consider a different site.
Weed and grass control
Competing vegetation is one of the biggest killers of young truffle orchards. Grass and weeds compete directly with your host tree roots and can harbour fungi that outcompete your truffle inoculant. Clear vegetation thoroughly before planting using herbicides or cultivation. During establishment, maintain a weed-free zone of at least one metre radius around each tree. Avoid cultivation tools that go deeper than 5 cm once trees are planted, as you risk damaging shallow roots and the mycorrhizal network. Many NZ growers use herbicide strips and mow between rows rather than cultivating. Some use organic mulch (see the planting section below) but placement and depth are critical.
Planting and establishment
When and how to plant
Plant in late autumn to early winter (May to July in NZ), after the heat of summer but before hard frosts set in. This gives roots time to establish before spring growth. Dig holes 40 to 50 cm deep and wide. Do not add fertiliser or compost to the hole. Back-fill with the original soil (amended to target pH) only. Place the inoculated plant so the root collar sits at ground level, not buried. Firm the soil gently to remove air pockets and water in with plain water. Mark each tree so you can monitor individual plant health over time.
Watering during establishment
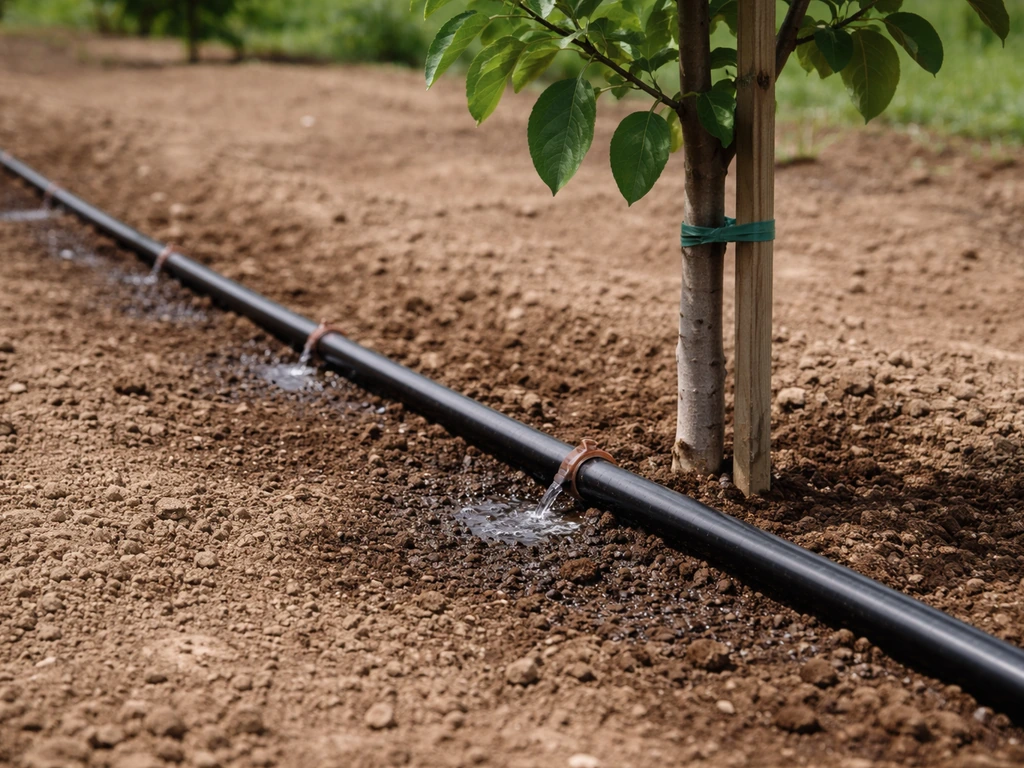
Young trees need consistent moisture during their first two summers, but never waterlogged conditions. A drip irrigation system set to deliver 10 to 15 litres per tree per week during dry periods is ideal. Overhead irrigation is less ideal because wet foliage increases disease risk and the truffle fungus prefers drier surface conditions. Once trees are established (after 2 to 3 years), reduce irrigation to simulate the dry summers that trigger truffle fruiting. Over-watering mature trees is a common mistake. The summer dry-down is a key fruiting cue.
Mulching
Mulching is a double-edged tool in truffle orchards. A thin layer (5 to 8 cm) of coarse limestone gravel or calcareous rock chips around the base of each tree helps maintain pH, reflects heat, and reduces moisture loss without encouraging competing fungi the way organic mulch does. Avoid wood chip, bark, or straw mulches directly over the truffle zone because they lower pH, add organic matter, and introduce competing saprotrophic fungi that can overwhelm your truffle inoculant. If you use organic mulch, keep it at least 50 cm away from the tree trunk and out of the expected brûlé zone.
Signs your mycorrhizal establishment is working
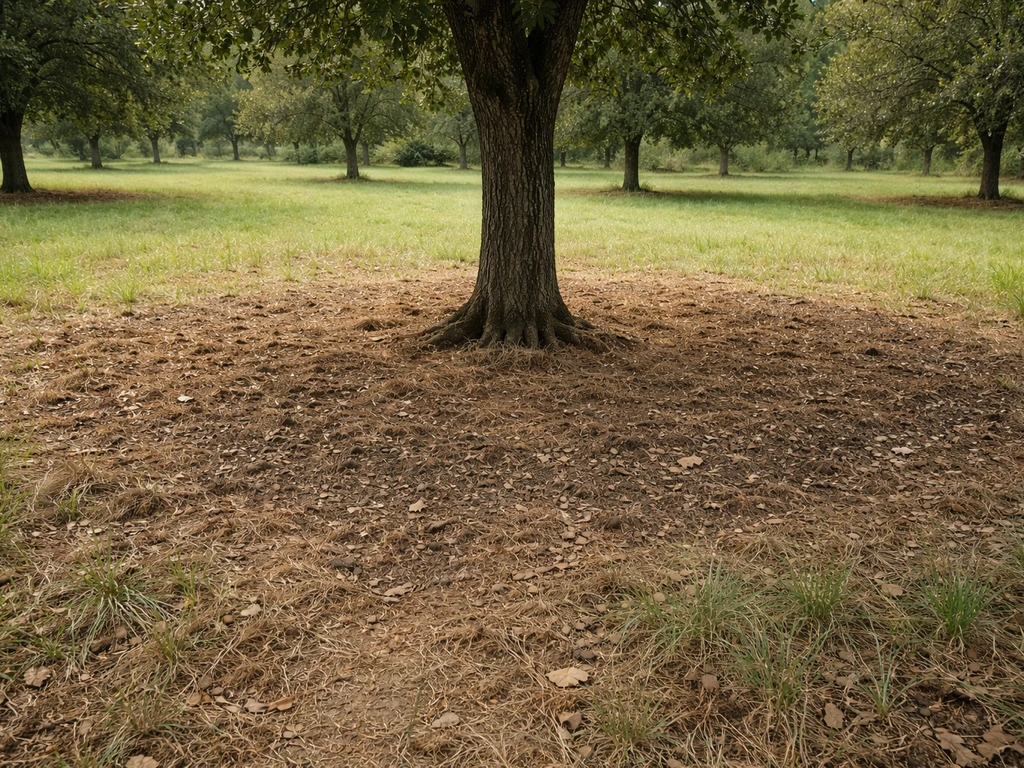
You will not see the truffle mycelium without a microscope, but you can watch for field signs. After 3 to 5 years, a healthy truffle tree should start showing a brûlé: a roughly circular bare patch of soil around the tree base where nothing grows. This happens because the truffle mycelium releases compounds that inhibit competing plants. The brûlé is one of the best positive indicators you can observe without digging. If your trees are 5 years old and there is still lush grass right up to the trunk, something is wrong. Either the mycorrhizal inoculant did not establish, the soil pH is still off, or competing fungi have outcompeted your truffle mycelium.
Long-term care and troubleshooting
Triggering fruiting
Tuber melanosporum in NZ typically fruits from June to September (winter). The fruiting is triggered by a combination of factors: the summer dry period followed by autumn rains and cooling temperatures, sufficient root colonisation (usually from year 5 onwards), and correct soil conditions maintained over several years. If your trees are colonised but not fruiting, check that your summer irrigation is not too heavy (you want the trees to experience some stress), that the pH has remained in range, and that the brûlé zone is being maintained. Some orchardists use a reduced autumn irrigation before the expected rains to sharpen the moisture contrast.
Managing animals
Pigs, wallabies, rabbits, and even dogs can be a serious problem in NZ truffle orchards. Truffles produce volatile aromas that attract animals, and many an orchard has been raided before harvest. Fencing with rabbit netting (buried 30 cm underground to prevent burrowing) is standard practice on most NZ properties. Dogs can be trained to find ripe truffles, which is useful at harvest, but uncontrolled dogs will eat them. Wallabies and possums can damage young trees. Factor predator and pest management into your long-term plan from the start.
Common failures and how to fix them
- Wrong pH maintained over time: pH drifts back down in high-rainfall areas. Test annually and apply maintenance lime as needed. Do not assume one initial lime application is permanent.
- Competing fungi outcompeting truffle: Common in high-organic-matter or previously forested soils. There is no simple fix once established; prevention through site selection and soil management is the only reliable approach.
- Incompatible host and truffle species: Only buy plants where the species combination is verified. Ask your nursery for specifics on the truffle species used for inoculation.
- Overwatering mature trees: Suppresses fruiting. Reduce summer irrigation from year 3 onwards.
- Grass and weed invasion of the brûlé: Hand-weed or spot-spray immediately. Grass in the brûlé signals that mycorrhizal density is dropping.
- Frost damage to young trees in inland sites: Use frost cloth on young trees during their first two winters, particularly in Central Otago.
- Contamination with non-target Tuber species: If you import plants or material, this is a biosecurity risk. Buying from verified NZ nurseries significantly reduces this risk.
Harvesting, storage, and realistic timelines for NZ
When and how to harvest
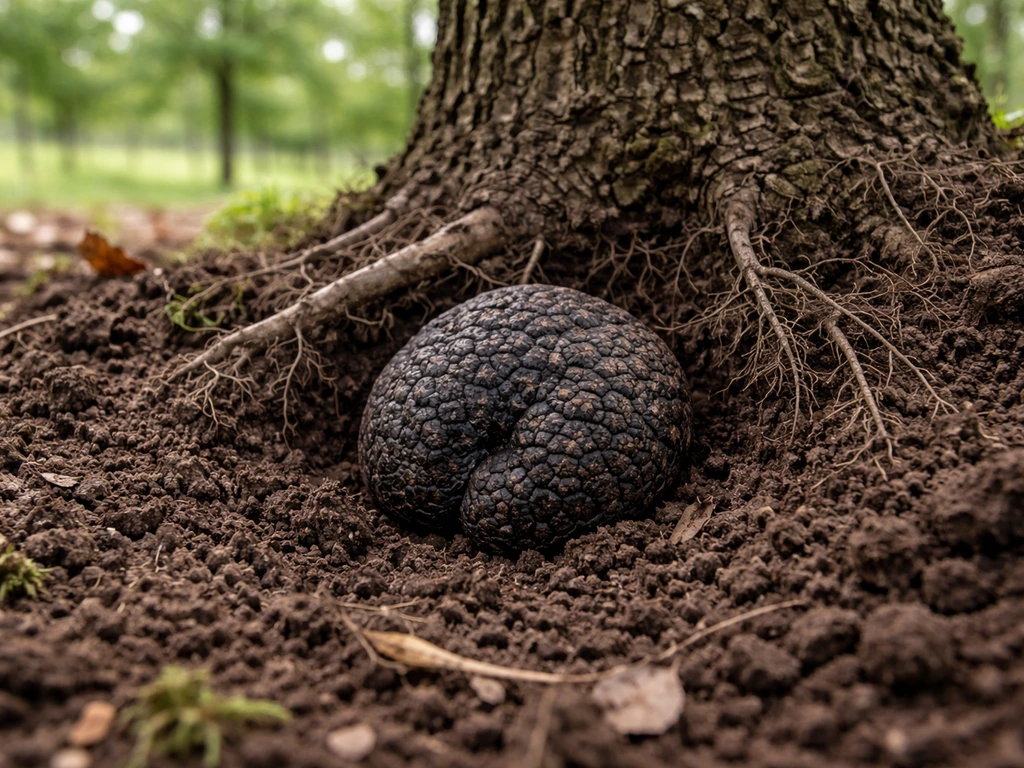
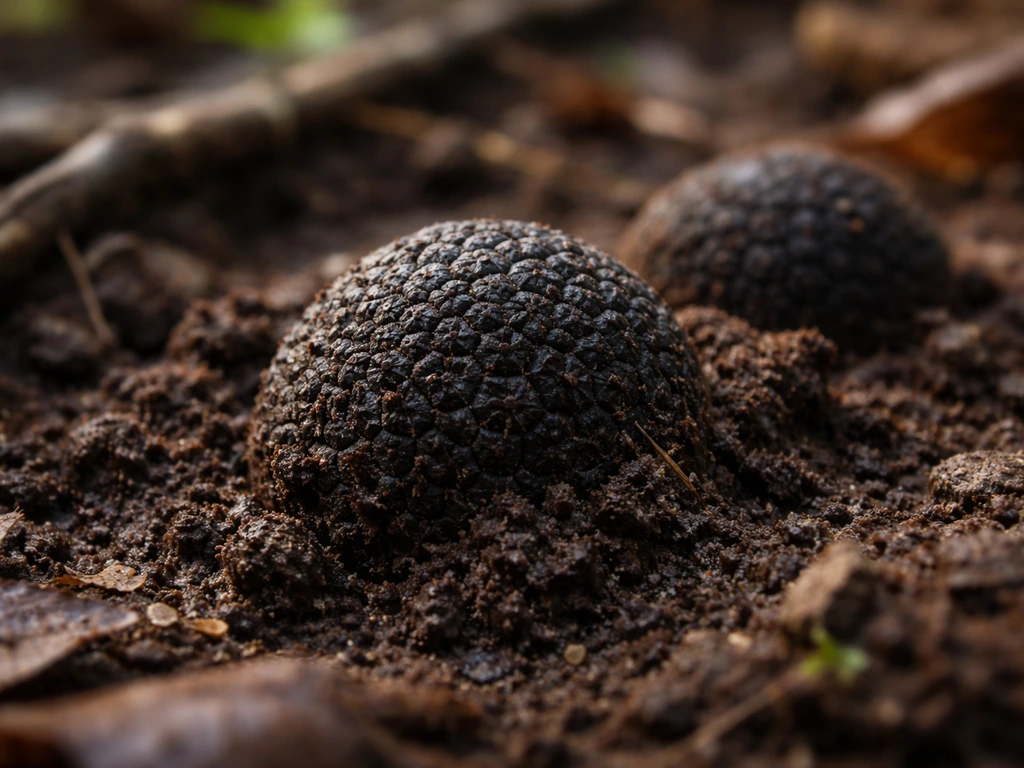
Tuber melanosporum reaches full maturity in New Zealand from approximately late June through August. A ripe black truffle has a strongly aromatic smell (earthy, garlicky, slightly chocolate-like), firm texture, and a dark interior with white marbling. Unripe truffles have little aroma and are not worth harvesting. Traditionally, trained dogs (or pigs, though less practical) are used to locate ripe truffles by scent. A trained dog can cover your orchard efficiently and pinpoint ripe truffles without disturbing unripe ones. You can also probe the soil gently with a thin rod around the brûlé edge and smell the rod after withdrawal. When you smell truffle on the rod, dig carefully with a hand trowel at 10 to 25 cm depth. Never use a spade or mechanical tool.
Post-harvest handling and storage
Truffles are highly perishable. Once harvested, they lose aroma and weight rapidly. Brush off loose soil with a soft brush (do not wash), wrap individually in paper towel, and store in an airtight container in the refrigerator at 2 to 4 degrees Celsius. Change the paper towel daily. Fresh black truffles hold quality for 7 to 10 days maximum. For longer storage, vacuum sealing and freezing preserves aroma reasonably well, though texture changes. Premium prices depend on fresh product, so plan your harvest logistics to align with buyer collection or market delivery within 48 hours.
Realistic NZ timelines
| Stage | Typical Timeline | What to Expect |
|---|---|---|
| Site preparation and soil adjustment | 12 to 24 months before planting | Lime applications, drainage works, pH testing, weed clearance |
| Plant inoculated trees | Year 0 | Late autumn planting, drip irrigation installed |
| Establishment and early management | Years 1 to 3 | Watering, weed control, tree health monitoring |
| First brûlé appearance | Years 3 to 5 | Bare patches forming around tree bases; sign of active mycorrhizal colonisation |
| First truffle production (hazel hosts) | Years 5 to 7 | Small initial yields, irregular fruiting |
| First truffle production (oak hosts) | Years 7 to 10 | Yields starting to build with oak trees |
| Peak production | Years 10 to 20+ | Established orchards can produce 10 to 40+ kg per hectare in good seasons |
Costs, scaling up, and your next steps
Realistic budgets for NZ growers
A small backyard planting of 10 to 20 trees is achievable on a budget of $2,000 to $5,000 NZD, covering inoculated plants, lime, soil testing, irrigation, and fencing. A serious commercial planting of one hectare (around 275 oak trees) will cost $25,000 to $60,000 NZD to establish properly before you see a single truffle, factoring in land preparation, drainage, plants, irrigation infrastructure, fencing, and 5 to 10 years of management before meaningful returns. These numbers are why truffle farming is often described as a retirement investment. The payoff is real, premium black truffles wholesale for $1,500 to $3,000+ NZD per kilogram in NZ, but the timeline requires patience and financial stamina.
Scaling from backyard to managed planting
Start small if you are new to this. Plant 10 to 20 trees on a well-prepared trial site before committing to a commercial scale. This lets you learn soil management, irrigation calibration, and tree health monitoring with a manageable investment. If your trial planting shows good brûlé formation and early production by year 6 or 7, you have validated your site and can scale with confidence. Many successful NZ truffle orchardists started this way, running a small test block for 5 years before expanding. Do not scale up before your site has proven it works.
Practical next steps checklist
- Get a soil test done now. Test for pH, calcium, phosphorus, nitrogen, and organic matter. This is your baseline and shapes everything else.
- Assess your site for drainage, sunlight hours, and rainfall. Consult NZ climate data for your specific region to confirm suitability for T. melanosporum or T. aestivum.
- Contact NZ truffle nurseries to understand current inoculated plant availability, species options, and pricing. Ask specifically about their inoculation verification process.
- Begin soil pH correction if needed. Apply agricultural lime, incorporate deeply, and test again after 3 to 6 months. Repeat until you reach 7.5 to 8.0.
- Plan and install drainage infrastructure before planting season. This cannot be retrofitted easily once trees are in the ground.
- Design your site layout including row orientation, spacing (6x6m for oak, 4x4m for hazel), irrigation placement, and fencing.
- Plant in late autumn (May to June) using verified inoculated stock from a NZ-based nursery.
- Set up a monitoring schedule: annual soil tests, visual brûlé checks each spring, and tree health assessments each season.
- Contact Truffles New Zealand or connect with the NZ truffle grower community for peer advice and access to local market networks.
- If you are considering importing plant material from overseas, contact MPI early to understand the import health standard requirements and apply for the necessary permits before committing.
Truffle growing is genuinely one of the most complex and slow-returning things you can do in NZ horticulture. If you are wondering how hard it is to grow truffles, the real answer depends on patience, soil chemistry, and having the right outdoor orchard setup how hard is it to grow truffles. But for growers with the right site, the patience, and the discipline to manage soil chemistry consistently over years, it is also extraordinarily rewarding. The NZ truffle industry is still young, which means local supply is limited, prices are strong, and growers who get established now are well positioned for the next decade. If you are also curious about whether indoor or greenhouse approaches might work as a complement to an outdoor orchard, those controlled-environment options are worth exploring separately, though for serious production, nothing replaces a well-managed outdoor site. If you are also curious about how to grow truffles indoors, treat greenhouse and controlled-environment methods as complementary experiments alongside your outdoor orchard plan.
FAQ
Can I grow truffles indoors or on a patio in NZ?
Not in the way most people mean. Cultivated truffles require an outdoor mycorrhizal orchard system, with living host roots and long-term soil chemistry control. A greenhouse or indoors setup is only realistic if you can replicate the outdoor cues that trigger fruiting (seasonal temperature shift, dry-down, and stable pH) and you still need the same inoculated host trees.
Which NZ truffle species should I choose if my area is warm or humid?
Start with Tuber melanosporum only if your site meets the climate and soil constraints, especially cool winters with frosts and truly dry summers. If you are in a warm, humid coastal area, most growers have better odds with summer truffle (Tuber aestivum) because it tolerates variability more. Still, you must avoid waterlogged winters and keep pH within target range for the species you choose.
Is it okay to plant different truffle species or hosts together in one orchard?
Yes, but only at the orchard design level, not by “mixing truffles” in inoculum. You should plan a host and truffle pairing for each block, then place trees accordingly. Mixed orchards can spread risk, but you still must maintain the same high-level rules (drainage, weed control, pH, and low nutrient status) across the whole planting.
What if my soil test shows my pH is too low after I’ve planted?
The main limitation is that you cannot correct the mycorrhizal partnership quickly. A soil pH target is critical, and overshooting with lime can harm performance, too. If your pH is drifting low, fix it gradually with staged liming and retesting, and double-check you are not adding nitrogen or high-phosphorus inputs from fertiliser runoff.
What fencing setup actually works for NZ truffle orchards?
Yes, but fencing details matter. For rabbits and similar burrowers, rabbit netting is typically buried about 30 cm to stop underground entry. Also consider exclusion for wallabies and pigs, which may require stronger barriers and maintenance routines because damage can let scent and animals back into the orchard.
Can I use organic mulch to suppress weeds in a truffle orchard?
Don’t rely on organic mulch near the tree. Wood chip, bark, or straw can lower pH, add organic matter, and introduce competing saprotrophic fungi. If you mulch, use a calcareous, coarse rock/gravel approach near the base, and keep any organic material well outside the brûlé zone (at least 50 cm from the trunk, and out of the active root zone).
My trees formed a brûlé, but I still get no truffles, what should I troubleshoot?
Check the basics first, then make one change at a time. If you have a healthy brûlé but no truffles, the usual causes are excessive summer irrigation (no dry-down stress), pH slipping out of range, or insufficient root colonisation for your species and site age. Avoid “feeding” to fix it, because added nitrogen and phosphorus tend to suppress the symbiosis.
How do I know if I am watering too much or too little?
Over-watering often delays fruiting rather than helping. During establishment, you need consistent moisture for the first two summers, but once established you should reduce irrigation to mimic dry summers. If you keep soil too wet, you can also increase disease pressure and weaken the conditions that trigger autumn rains and fruiting.
Are there any common planting mistakes that prevent colonisation or fruiting?
Many growers miss that the root collar placement matters for establishment. Keep the inoculated plant’s root collar at ground level, do not bury it, and firm gently after backfilling to remove air pockets. Also avoid adding fertiliser or compost into the planting hole, because you are trying to maintain mild nutrient stress at the tree roots.
How should I store and handle truffles to keep aroma and value?
At harvest, the cleanest approach is brushing loose soil off, not washing. For storage, wrap individually in paper towel, store in an airtight container at about 2 to 4 degrees Celsius, and change the paper towel daily. Plan buyer delivery, because black truffles typically keep only about 7 to 10 days at best under proper cold storage.
How small should my trial planting be, and when can I scale up?
If you want to trial your site, use a staged approach. Plant a small block (10 to 20 trees), track brûlé development by around year 3 to 5, and only consider scaling after you see consistent health and early signs (for many sites, meaningful production often shows by year 6 or 7). This reduces the risk of investing heavily before your soil chemistry and orchard management are proven.