Growing mycelium at home comes down to three things: a clean working environment, sterilized substrate, and patience. You inoculate a sterile medium (agar, liquid culture, or grain) with spores or an existing culture, keep it warm and dark, and wait for the white hyphal network to colonize the container. Most beginners get their first visible mycelium in 2 to 7 days on agar, and fully colonized grain jars in 10 to 21 days depending on species and temperature. The tricky part is not the biology, the fungus knows what to do, it's keeping contamination out long enough for the mycelium to win.
How to Grow Mycelium at Home: Step-by-Step Guide

Marcus Holloway
7 May 2026
What mycelium actually is (and why bother growing it)
Mycelium is the vegetative body of a fungus: a dense, interconnected network of thread-like filaments called hyphae. When you see white fuzzy growth spreading through a grain jar or across an agar plate, that is mycelium colonizing its food source. The mushroom itself, the thing you eventually harvest and eat, is just the reproductive fruiting body that the mycelium produces when conditions trigger it. Think of mycelium as the plant and the mushroom as the fruit.
So why grow mycelium specifically? A few reasons. If you want to fruit mushrooms, you have to grow mycelium first, there is no skipping it. But plenty of home cultivators also work with mycelium for its own sake: maintaining genetic lines on agar, building up grain spawn banks for future grows, or producing mycelium for non-fruiting uses like mycelium bricks or mycelium grown into specific forms. Either way, the core skills are the same, and once you learn them, every future grow gets easier and cleaner.
Spores vs spawn: which starting point is right for you
You have two main entry points when starting at home. The first is spores, which are the fungal equivalent of seeds. They are widely available, legally sold for microscopy in most of the US and many other countries, and give you the most genetic diversity to work with. The downside is that spores take longer to germinate into visible mycelium and carry a slightly higher contamination risk because you are working with unsterilized biological material going into a sterile environment.
The second option is buying ready-made spawn or isolating a culture from an existing colonized block or mushroom. Grain spawn from a supplier is already fully colonized mycelium on a substrate, so you skip the germination phase entirely. This is faster and more beginner-friendly if you just want to get to fruiting quickly. If you already have a working culture on agar or in liquid, transferring from that is the cleanest and most reliable route of all because you are working with known, healthy mycelium rather than an unknown spore mix.
| Starting Point | Speed to Colonization | Contamination Risk | Cost | Best For |
|---|---|---|---|---|
| Spores (syringe) | Slowest (germination adds time) | Moderate to high | Low ($10–20) | Learning, genetic diversity, budget growers |
| Liquid culture (LC) | Fast | Low to moderate | Low–moderate ($10–30 or DIY) | Experienced beginners who want control |
| Agar culture | Fast | Low | Moderate (equipment needed) | Growers focused on clean genetics and selection |
| Ready-made grain spawn | Fastest | Low (if fresh) | Moderate ($15–40) | Beginners who want to fruit quickly |
| Colonized block / commercial kit | Immediate | Very low | Higher ($20–60) | Complete beginners, first-time fruiting |
My recommendation for most home growers: start with a spore syringe transferred to agar, then move to liquid culture or grain once you have a clean isolated culture. It takes a few extra weeks up front but saves you from scaling up contaminated material into an expensive grain jar. If you just want mushrooms fast, buy quality grain spawn from a reputable supplier and skip straight to the substrate step.
Setting up a clean workspace at home
You do not need a lab. What you need is a space with minimal air movement, surfaces you can sanitize, and the discipline to clean everything before you start. The two most practical setups for home growers are a still air box (SAB) and a laminar flow hood. The flow hood is better but costs $300 to $600. The SAB costs about $10 in materials and works well if you use it correctly.
The still air box setup
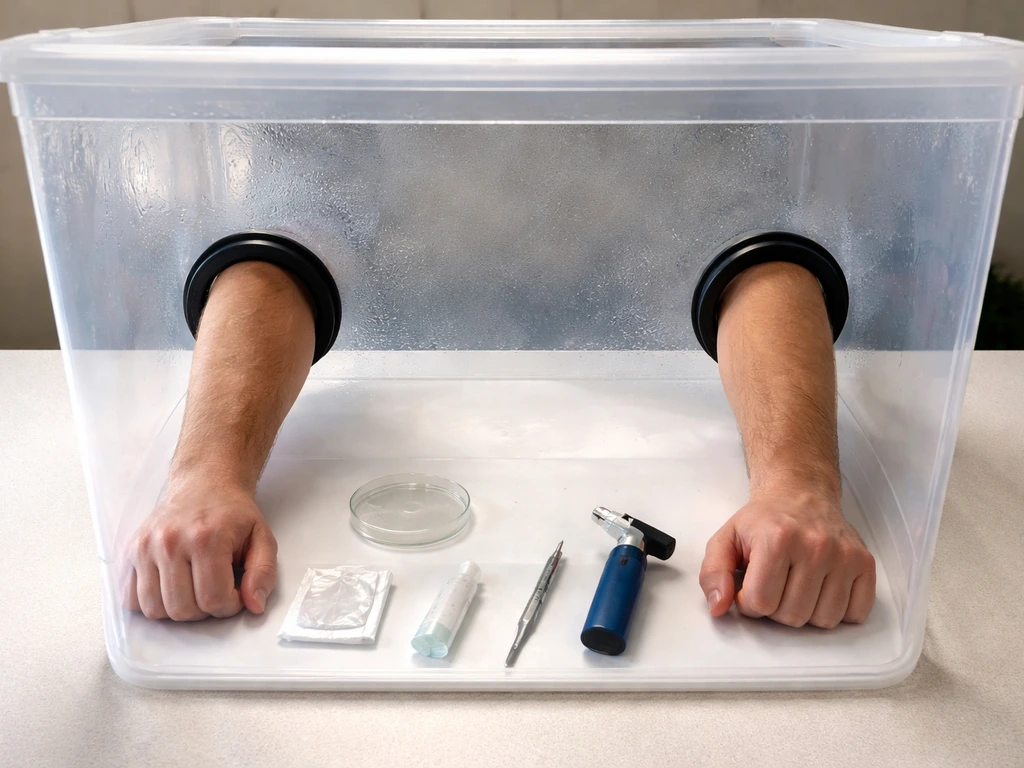
A still air box is just a large clear storage tote with two arm holes cut into one side. You spray the inside thoroughly with 70% isopropyl alcohol, let it sit for a minute, then wipe dry. Work slowly and deliberately inside it, fast arm movements stir up air and defeat the purpose. I spray my arms and gloves with 70% isopropyl before reaching in and try not to talk or breathe directly into the box. It sounds paranoid, but it makes a real difference in contamination rates.
Basic supplies you will need
- Pressure cooker (minimum 6-quart, 15 psi capable) for sterilizing grain and liquid culture
- Mason jars (quart or half-pint) with modified lids (polyfill filter or injection port)
- Agar plates or petri dishes (poured with PDA or similar media)
- Spore syringe or liquid culture syringe
- 70% isopropyl alcohol and a spray bottle
- Nitrile gloves and face mask
- Still air box or laminar flow hood
- Alcohol lamp or butane torch for flame-sterilizing your inoculation loop or needle
- Thermometer (for monitoring incubation temp)
- Parafilm or micropore tape for sealing agar plates
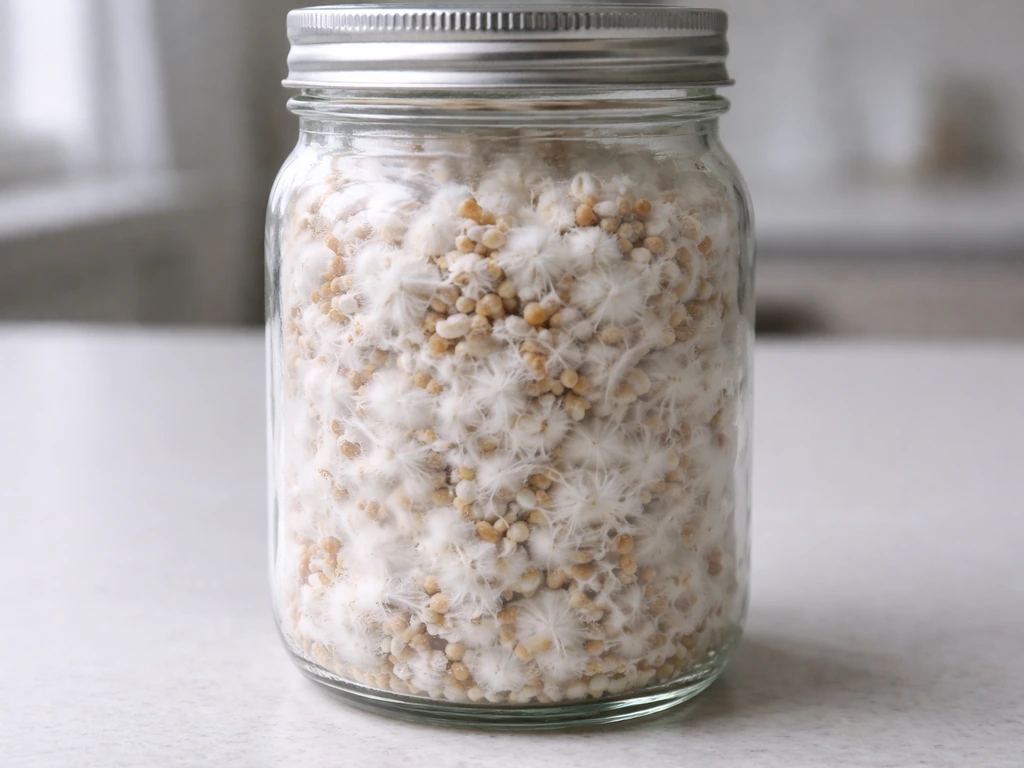
Grain is the most common substrate for building mycelium spawn at home. Rye berries, wheat berries, and popcorn all work well. They are cheap, hold moisture effectively, and colonize fast. For agar, potato dextrose agar (PDA) is the standard home option, a typical recipe uses about 39 grams of premixed PDA powder per liter of water. You can buy premixed PDA powder for around $15 to $25 for enough to pour dozens of plates.
Step-by-step: from agar and liquid culture to colonized grain
Stage 1, Agar work (spores or clone to plate)
- Pour your prepared PDA agar into petri dishes inside your SAB or flow hood. Let them solidify and cool completely, usually 20 to 30 minutes.
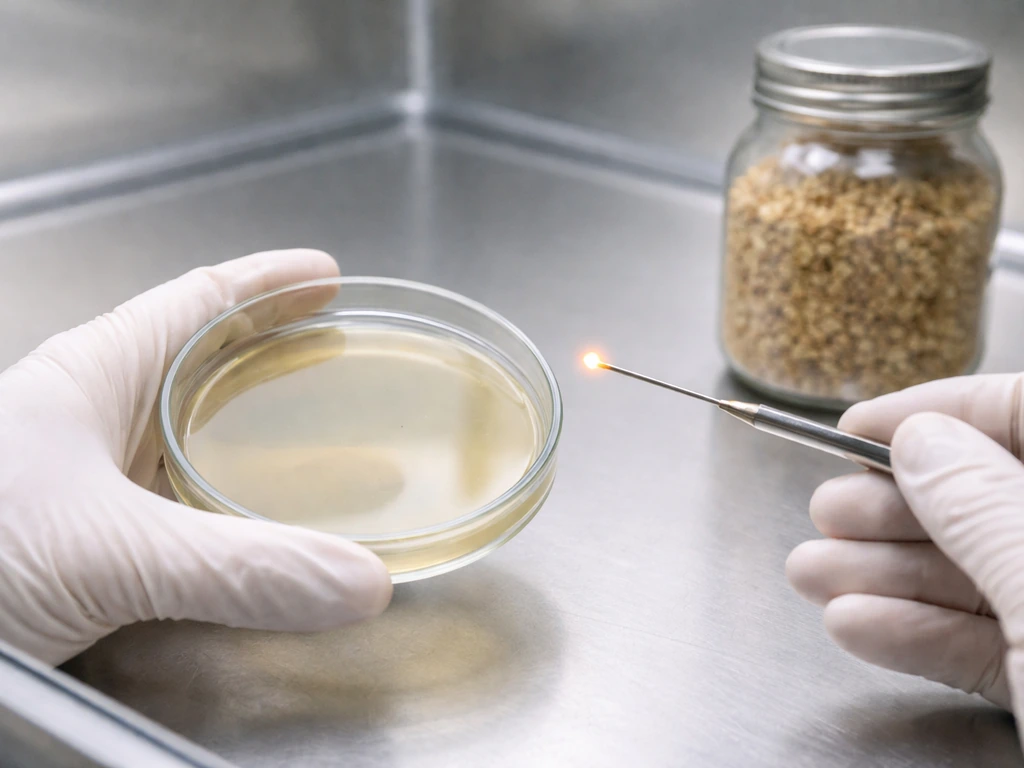
- Flame-sterilize your inoculation needle until it glows red, then let it cool for 5 seconds before touching agar.
- Inoculate the plate with a small amount of spore solution or a tissue/culture transfer. Less is more — a small dot is all you need.
- Seal the plate edges with Parafilm or micropore tape and label with species and date.
- Incubate in darkness at the appropriate temperature for your species (more on that below). Expect to see first mycelial growth in 2 to 5 days.
- Once you see clean white mycelium, cut a small wedge from the leading edge (the cleanest, fastest-growing area) and transfer it to a fresh plate or directly to liquid culture.
Stage 2, Liquid culture (optional but useful)
Liquid culture (LC) is a nutrient-rich liquid, typically water with honey or light malt extract at about 4% concentration, that mycelium colonizes in suspension. The advantage is that one colonized LC jar can inoculate many grain jars quickly via syringe without ever opening anything. To make LC, pressure-cook your nutrient solution in a mason jar with a self-healing injection port lid at 15 psi for 30 minutes. Once cooled, inject a small agar wedge or spore solution through the port inside your SAB. Incubate on a stir plate or shake daily. Fully colonized LC looks like white stringy clouds suspended in the liquid, it typically takes 5 to 10 days.
Stage 3, Inoculating grain jars
- Hydrate your grain by simmering it in water for 15 to 20 minutes, then drain and dry the surface (spread on a towel for 30 to 60 minutes until no surface moisture remains but the grain is still moist internally).
- Fill mason jars about two-thirds full and add modified lids with polyfill or a self-healing injection port.
- Sterilize at 121°C / 15 psi for 90 to 120 minutes in your pressure cooker. Let jars cool completely, ideally 12 to 24 hours, before inoculating.
- Inside your SAB or flow hood, inject 1 to 3 cc of liquid culture per quart jar through the injection port. Flame the needle before and after each jar.
- Shake the jar gently to distribute the inoculant.
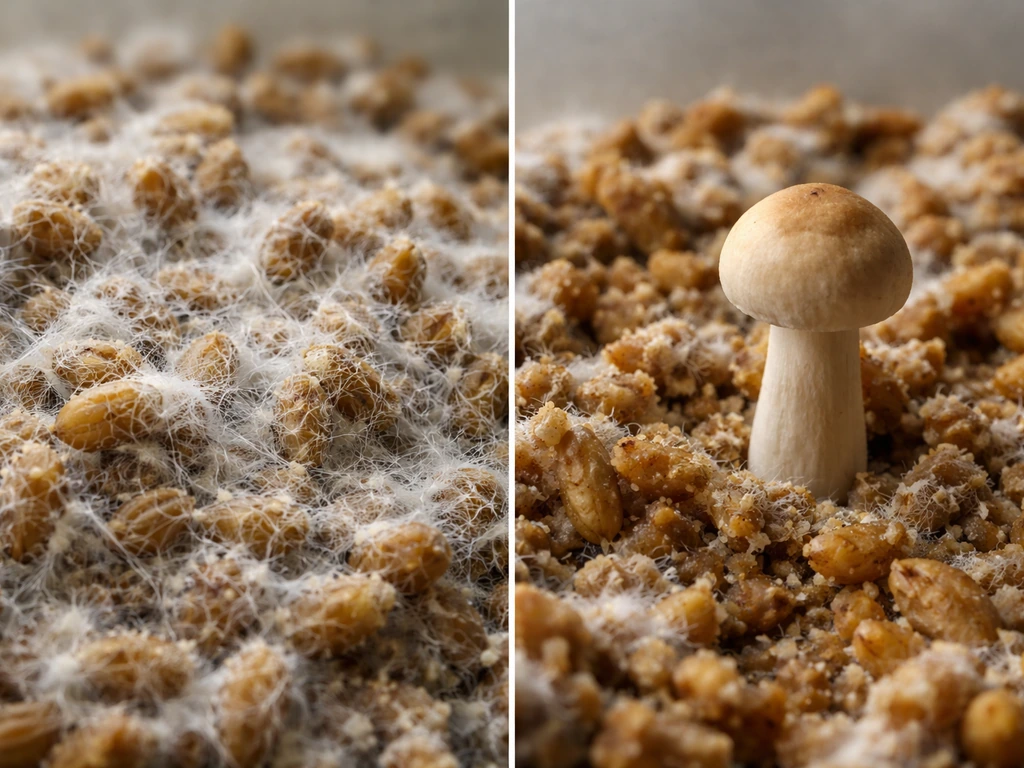
- Incubate at your species' target temperature in darkness. Begin shaking jars once you see 20 to 30% colonization to redistribute mycelium and speed up full colonization.
- Wait for 100% white colonization before transferring to bulk substrate or fruiting conditions.
Temperature, humidity, and other environmental requirements
During the mycelium colonization phase, most common edible species want warmth, darkness, and still air inside the container. High ambient humidity is not critical at this stage because your jar or bag is sealed. What matters most is temperature. Too cold and growth stalls; too warm and you risk accelerating bacterial contamination. Most edible species colonize well between 70 and 80°F (21 to 27°C). Some species like oysters and lion's mane prefer the lower end of that range, while others like reishi and tropical species can go a bit warmer.
| Species | Colonization Temp (°F) | Fruiting Temp (°F) | Fruiting Humidity |
|---|---|---|---|
| Blue oyster | 70–75°F | 55–65°F | 85–95% |
| Shiitake | 70–78°F | 60–70°F | 85–95% |
| Lion's mane | 70–75°F | 60–68°F | 85–95% |
| Reishi | 75–80°F | 75–85°F | 85–95% |
| Enoki | 72–78°F | 45–60°F | 85–95% |
Once you move to fruiting, the game changes. You need 85 to 95% relative humidity, fresh air exchange (FAE) to prevent CO2 buildup, and indirect or ambient light. Aerial mycelium is grown by giving the culture access to fresh air and moisture without submerging it fresh air exchange (FAE). CO2 buildup from poor FAE causes long, thin, deformed stems and poor fruit body development. A simple Martha tent setup with an ultrasonic humidifier and a small fan on a timer handles all of this for most home fruiting situations without spending more than $100 to $150.
Troubleshooting: contamination, slow growth, and stalled colonization
Spotting contamination
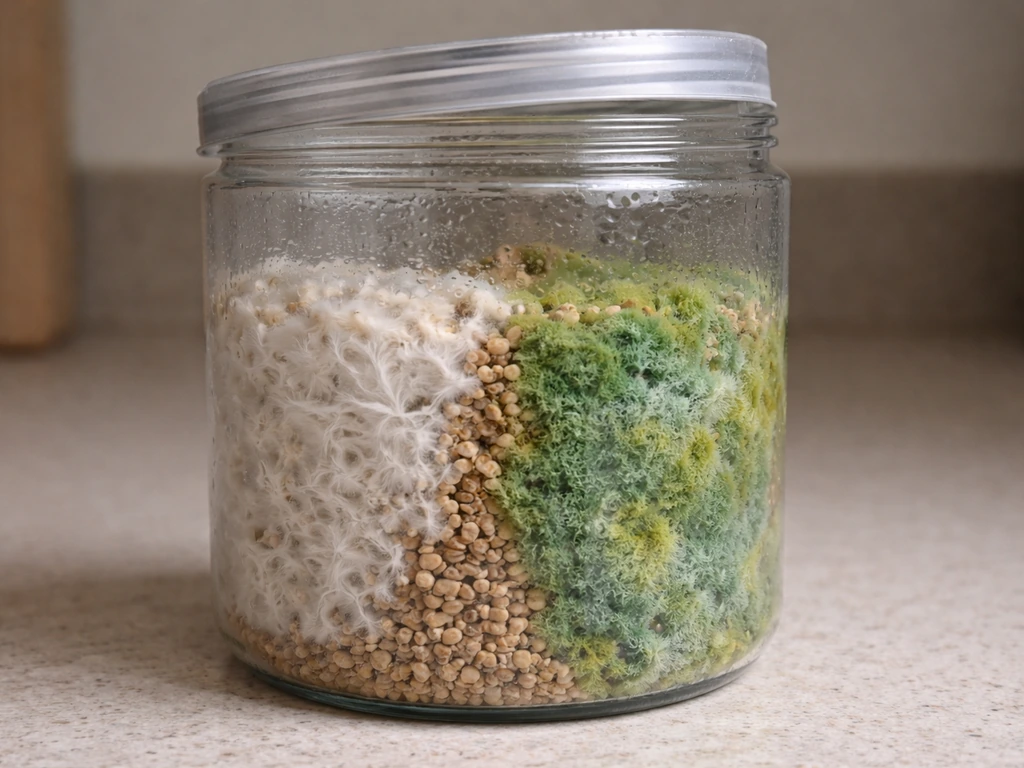
Healthy mycelium is white to off-white, sometimes slightly yellowish (that can be normal metabolite secretion called 'mushroom pee'), and has a clean earthy smell. Contamination shows up as any non-white coloration: green or teal patches almost always mean Trichoderma, a highly aggressive mold that spreads fast and will destroy your substrate. Black, gray, pink, or orange growth is also a red flag. A sour, sweet, or rotten smell with no visible growth usually means bacterial contamination, which often looks wet and slimy rather than fuzzy.
The moment you see Trichoderma or any obvious contamination, seal the jar or bag in a plastic bag without opening it and get it out of your grow space immediately. Trichoderma produces spores that go airborne when disturbed and will contaminate everything else nearby. Do not try to salvage a contaminated grain jar, the cost of the grain is not worth the risk of spreading mold spores through your workspace.
Slow or stalled growth
If you see no growth after 7 to 10 days on grain, a few things could be happening. First, check your temperature, if it dropped below 65°F, growth slows dramatically. Second, your inoculant might have been weak or dead. This happens with old spore syringes or liquid culture that sat too long and became anaerobic. Third, your sterilization may not have cooled long enough and the mycelium was killed by residual heat when you inoculated. A good rule is to never inoculate grain jars until they feel room temperature when you hold them, even if that means waiting overnight.
Uneven colonization
Patchy or uneven colonization usually means you need to shake. Once the mycelium hits 20 to 30% coverage, shake the jar vigorously to break up and redistribute the colonized grain. This spreads inoculant points throughout the substrate and speeds up total colonization significantly. If you wait until the jar is 70% colonized to shake, it takes much longer because the mycelium has to re-knit everything from a more consolidated mass.
Preventing contamination from the start
- Always sterilize grain at 15 psi for at least 90 to 120 minutes — pasteurization is not enough for grain spawn
- Let jars cool completely before inoculating, ideally overnight
- Wipe all injection ports with 70% isopropyl before inserting a needle
- Flame your needle until red, then cool before every transfer
- Work slowly inside your SAB — fast movements disrupt still air and invite contamination
- Wear gloves and a face mask during all inoculation work
- Never work when you are sick or when there are dusty or dirty activities nearby
Fruiting mushrooms vs keeping mycelium-only cultures
Once your grain jars are fully colonized, you have two directions to go. If your goal is mushrooms, you mix the colonized grain into a bulk substrate (coco coir, hardwood sawdust, or straw depending on species), allow it to fully colonize that, then move it to fruiting conditions. If you want to grow mushrooms from mycelium, the key step after colonizing grain is mixing it into a suitable bulk substrate and then switching to fruiting conditions mix the colonized grain into a bulk substrate (coco coir, hardwood sawdust, or straw depending on species). This is the standard workflow for most home growers, and it is covered in detail for species-specific approaches in related guides on growing mushrooms from mycelium.
If you want to maintain mycelium-only work, fully colonized grain jars become your master spawn bank. You can store them in the fridge at 35 to 40°F for weeks to months to pause growth, then use them to inoculate new grain jars on demand. Agar plates can be stored similarly. This approach is great if you want to maintain multiple genetic lines or if you are doing more experimental work like growing mycelium in soil for garden applications or creating mycelium bricks and other formed materials. The shelf life of refrigerated grain spawn is typically 3 to 6 months if kept sealed and cold.
Species choice matters a lot for beginners. Oyster mushrooms (Pleurotus species) are the most forgiving because they colonize fast, tolerate a wider temperature range, and fruit reliably on cheap substrates. Lion's mane and shiitake are slightly more demanding but totally manageable at home. Reishi requires higher heat and longer timelines. If you are just starting out, oysters will teach you the workflow without punishing small mistakes as harshly as more sensitive species would.
Realistic timelines, success rates, and safety practices
What to expect on your first few grows
Honest expectation: your first grow will probably have at least one contaminated jar. That is not failure, it is the normal learning curve. Most experienced home growers see contamination rates drop below 10 to 15% once they have dialed in their sterilization and SAB technique. Early on, 30 to 50% contamination rates are common, especially when working from spores directly into grain without an agar or LC intermediate step. To grow mycorrhizal fungi, you generally start from a mycorrhizal culture and inoculate the roots of a compatible host plant rather than growing the fungus for fruiting in the same way as edible mushrooms how to grow mycorrhizal fungi.
| Stage | Typical Timeline | Signs of Success |
|---|---|---|
| Spores to first agar growth | 2–5 days | White fuzzy growth visible on plate |
| Agar to full plate colonization | 7–14 days | Plate mostly covered with clean white mycelium |
| LC inoculation to colonized LC | 5–10 days | White stringy clouds in liquid |
| Grain inoculation to full colonization | 10–21 days | 100% white grain, no green/black patches |
| Colonized grain to fruiting pins | 5–14 days after bulk colonization | Small pin heads appearing on surface |
| Pins to harvest | 3–7 days | Caps just beginning to flatten/open |
Safety and cleanliness best practices
The edible mushroom species covered in most home cultivation guides are safe to grow. That said, a few practical safety points are worth keeping in mind. Never eat anything you cannot positively identify as the species you intended to grow, contamination with another fungus is usually obvious visually, but proper identification matters. Keep your grow space well-ventilated during fruiting because high spore counts in the air can trigger respiratory irritation in sensitive individuals, especially with species like oysters that release spores heavily. If you are immunocompromised, consult a physician before working closely with any fungal cultures.
On the chemical side, 70% isopropyl is the right concentration for surface disinfection, higher concentrations like 99% actually evaporate too fast to be as effective. Keep it away from open flames. Your pressure cooker will be working at 15 psi and 121°C, so follow standard canning-safety protocols: never leave it unattended, ensure the seal and pressure valve are functional before each use, and always allow it to depressurize naturally rather than forcing it. The Mycology at Home Instant Pot grain spawn guide notes that pressure cooker sterilization timing depends on reaching target sterilization conditions, which is why the common 15 PSI standard is used 15 psi and 121°C. These are not exotic risks, just basic kitchen-safety habits applied to a new tool.
The bottom line: growing mycelium at home is genuinely learnable, and the skills compound quickly. Your second grow will be cleaner than your first. Your fifth grow will feel almost routine. Start with a simple agar-to-grain workflow, protect your sterile work with a still air box, and do not skip sterilization time on your grain. Get that foundation right, and everything from maintaining cultures on agar to fruiting full flushes of oysters or lion's mane follows naturally from the same core habits.
FAQ
Can I reuse jars, bags, or lids to save money, or do I need to use everything new each time?
You can reuse jars, but only if they are physically clean (no residue) and you fully re-sterilize them with the substrate. Do not reuse lids that have plastic inoculation ports or self-healing injection points, since the port can fail to reseal and becomes a contamination pathway. For grain jars, replacing anything that can’t be reliably sanitized is usually cheaper than losing batches.
What’s the best way to tell whether liquid culture is healthy or already contaminated before inoculating grain?
Healthy LC looks uniformly milky-white to off-white with fine stringy growth, and it smells earthy. If you see fast-forming colored blobs or films, or the liquid smells sharply sour, rotten, or like chemicals, assume contamination and discard rather than inoculating grain. Also, if the LC doesn’t expand or cloud after about 7 to 10 days, it may be dead or inhibited, and adding it to grain typically just wastes spawn time.
How long can I keep spores or mycelium cultures before they stop working reliably?
Spore syringes can lose viability over time, especially if stored warm, so older syringes often take longer or never germinate strongly on agar. Agar cultures remain usable longer if kept sealed and refrigerated, but they still gradually age and can lose vigor. A practical approach is to always test a new batch by streaking or inoculating a single agar plate first, then scale up only if that test shows healthy growth.
Do I need to use sterile technique even when I’m not working inside a SAB, like when sealing jars?
Yes, but the strictness is staged. You want the highest cleanliness at the moments that break sterility (inoculation, opening substrate, transferring LC). Once everything is sealed and incubating, you mainly avoid shaking, opening, or disturbing contaminated containers. Still, wipe down the area, reduce talking and airflow, and handle jars gently because disturbed airborne spores can seed failures even if you sealed correctly.
Is it normal if colonization starts slowly or looks uneven on the first pass?
Some unevenness is normal, especially with grain and spore-based starts. Patchy growth usually improves after shaking once you reach partial coverage (around the 20 to 30% mark). If there is absolutely no visible growth by 7 to 10 days, the most common causes are low temperature, dead inoculum, or substrate that wasn’t sterilized properly, so check those before assuming the process failed.
What should I do if my grain is fully colonized but smells bad or has wet, slimy spots?
If you detect bacterial contamination signals like a rotten or sour smell with wet slimy areas, don’t try to “trim and use what’s good.” Seal the jar and remove it immediately to prevent bacteria and any mixed growth from spreading during later handling. In practice, once bacteria is established, it’s hard to isolate clean portions without risking full-batch failure.
How do I avoid long thin stems and poor fruiting, beyond just using humidity and a tent?
That symptom is usually CO2 buildup, so focus on fresh air exchange consistency, not just humidity level. If your fan is only running intermittently, set a routine so air changes happen regularly, and avoid sealing the grow area too tightly during fruiting. Also keep the humidifier output from directly blasting the fruits, since that can lead to surface issues even when humidity targets are met.
Can I grow mycelium without ever fruiting it, and how do I keep it going long term?
Yes, and the easiest method is to store fully colonized grain as a master spawn bank in the fridge, or keep cultures on refrigerated agar. The key decision is whether you want genetic stability or rapid expansion, since “aging” in storage can slightly reduce vigor. For long-term work, periodically refresh your cultures on fresh agar so you start subsequent runs from a healthy, younger line.
What are common mistakes when sterilizing grain, and how can I tell if it was under-sterilized?
Under-sterilization often shows up as delayed, unpredictable contamination, sometimes appearing later than you expect. If multiple jars contaminate around the same incubation window, it points to a sterilization or cooling problem rather than random bad luck. A strong practical check is to ensure the jars cooled to room temperature before inoculation, since residual heat can kill or stress inoculum and also create conditions where contaminant competitors gain an advantage.
How should I manage contamination risk between different projects or species in the same room?
Treat each species or stage as a separate “clean zone,” especially if one project uses spores (higher initial contamination likelihood). Don’t move a potentially contaminated jar near your still-air work area, and sanitize surfaces before starting a new species. If you have to handle multiple workflows, do the cleanest transfers first (agar-to-agar or known-clean culture work) and leave the riskiest steps (spore-to-agar, messy disposals) for later.