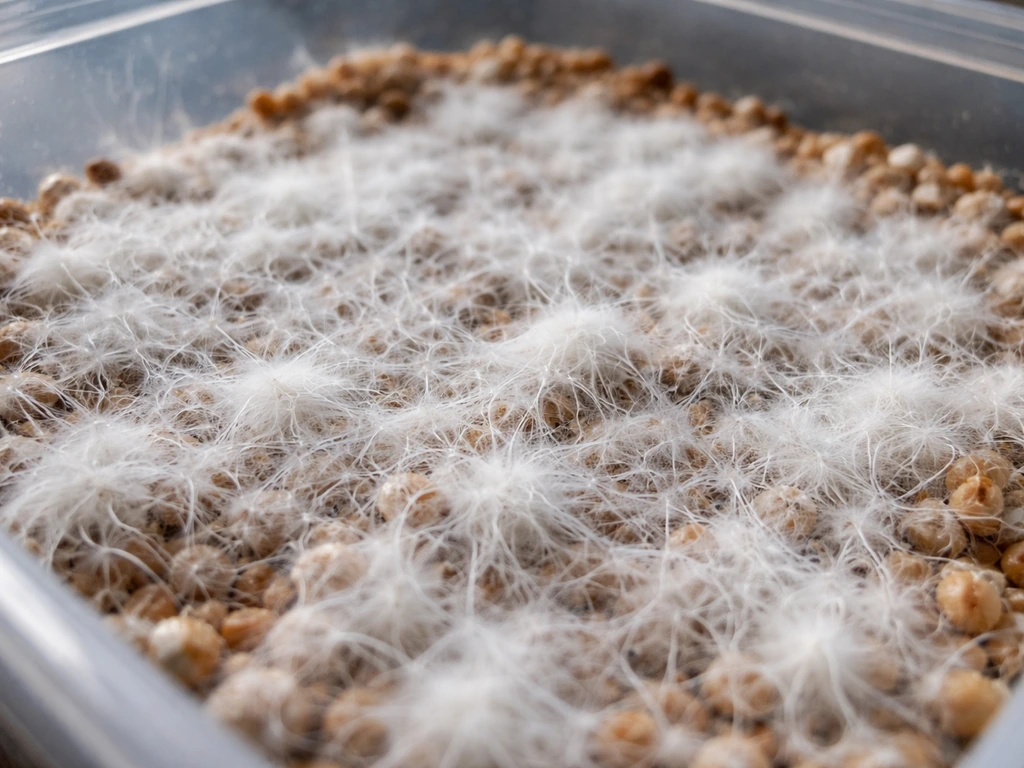
Growing mycelium at home means inoculating a prepared substrate with a mushroom culture, then incubating it at the right temperature until the white, thread-like network fully colonizes the material. Most gourmet species take 7 to 21 days to colonize grain or bulk substrate at 70 to 80°F (21 to 27°C), and what you end up with is either ready-to-fruit colonized substrate or a block of mycelium you can use as spawn for your next batch. The whole process is repeatable once you understand the handful of variables that matter: starting material, substrate prep, sterile technique, and incubation conditions.
How to Grow Mycelium at Home: Step-by-Step Guide

Marcus Holloway
26 Apr 2026
What you're actually trying to grow
Mycelium is the vegetative stage of a fungus, the dense white web of hyphae that spreads through organic material before mushrooms ever form. When growers talk about "growing mycelium," they usually mean one of two things: producing colonized substrate that will be triggered to fruit, or producing mycelium biomass itself (like mycelium bricks or mycelium leather projects). This guide focuses on the cultivation path, where colonized mycelium is the critical middle step between spore or culture and a harvest of actual mushrooms. To try an aerial approach, you can research how to grow aerial mycelium and adapt your setup to match its surface-colonizing needs.
It helps to know what stage you're at before you start. Mycelium and fruiting bodies are genuinely different things with different environmental needs. Rushing past mycelial colonization before it's complete is one of the most common beginner mistakes, and it almost always reduces yield or kills the grow entirely. Let the mycelium fully colonize before you do anything else.
Starting material: spores, liquid culture, or spawn
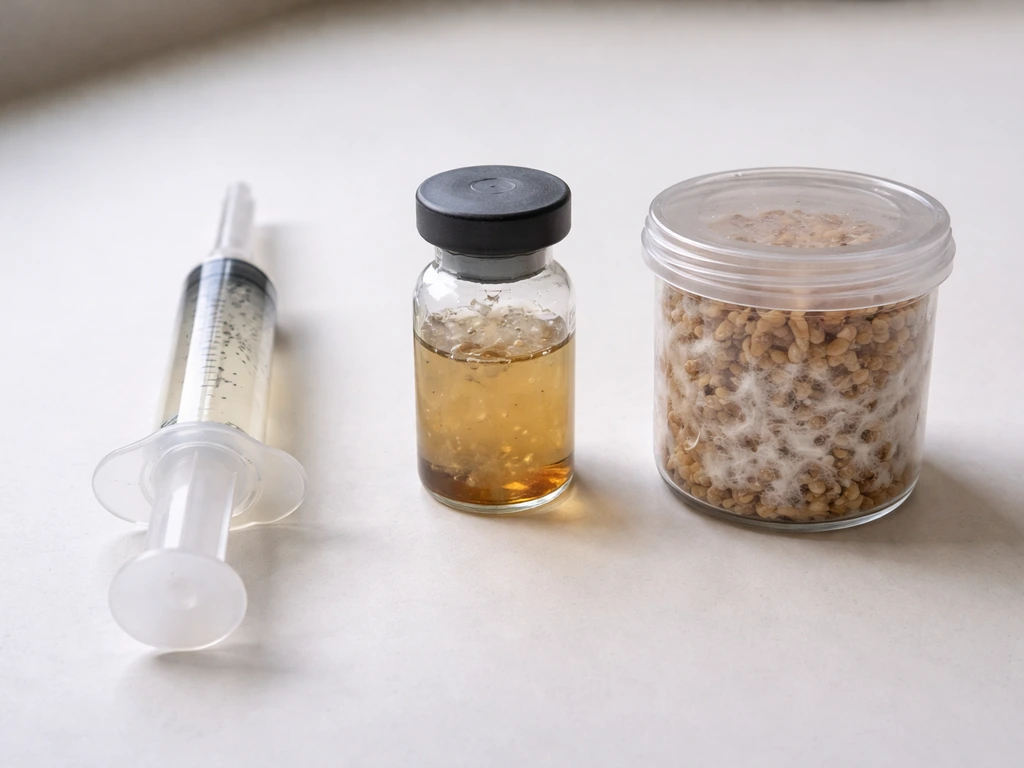
Your starting material is your single biggest variable for success. There are three main options, and they are not equal in difficulty.
| Starting Material | What It Is | Difficulty | Best For |
|---|---|---|---|
| Spore syringe | Mushroom spores suspended in sterile water | Moderate to hard | Species exploration, agar work, experienced growers |
| Liquid culture (LC) | Active mycelium suspended in a nutrient solution | Easy to moderate | Fast colonization, reliable results, home growers |
| Grain spawn | Sterilized grain already fully colonized by mycelium | Easiest | Beginners, quick bulk substrate inoculation |
Grain spawn is the most beginner-friendly option by far. It's sterilized grain (rye and millet are common) that already has healthy mycelium growing through it. You're essentially skipping the hardest contamination-risk window and going straight to expanding mycelium into bulk substrate. Liquid culture syringes are the next best option: active mycelium in a sterile nutrient broth colonizes grain or substrate faster than spores do, with less chance of contamination. Spore syringes are great for working on agar or for growers who want to explore genetics, but they require more technique and a longer colonization window.
If you're just starting out, buy ready-made grain spawn from a reputable supplier and skip making your own for the first few grows. Once you've seen what healthy colonization looks like, making your own liquid cultures and eventually your own grain spawn becomes much easier to do correctly.
Substrate choices and how to prepare them
The substrate is what your mycelium grows through and feeds on. Different species have different preferences, but most common gourmet mushrooms (oyster, shiitake, lion's mane) do well on a few standard options. Choosing the right substrate and preparing it correctly is what separates successful grows from contaminated failures.
Common substrate options
- Straw: cheap, widely available, great for oyster mushrooms, needs pasteurization only
- Hardwood sawdust supplemented with bran: excellent for shiitake, lion's mane, and many others, requires sterilization
- Coco coir and vermiculite mix: low-nutrient, low-contamination risk, popular for PF tek and beginners
- Masters mix (50/50 hardwood sawdust and soy hulls): very high-yield but requires thorough sterilization due to high nutrient content
- Grain (rye, millet, wheat berries): used as spawn substrate, not bulk fruiting substrate
Pasteurization vs. sterilization: which one you need
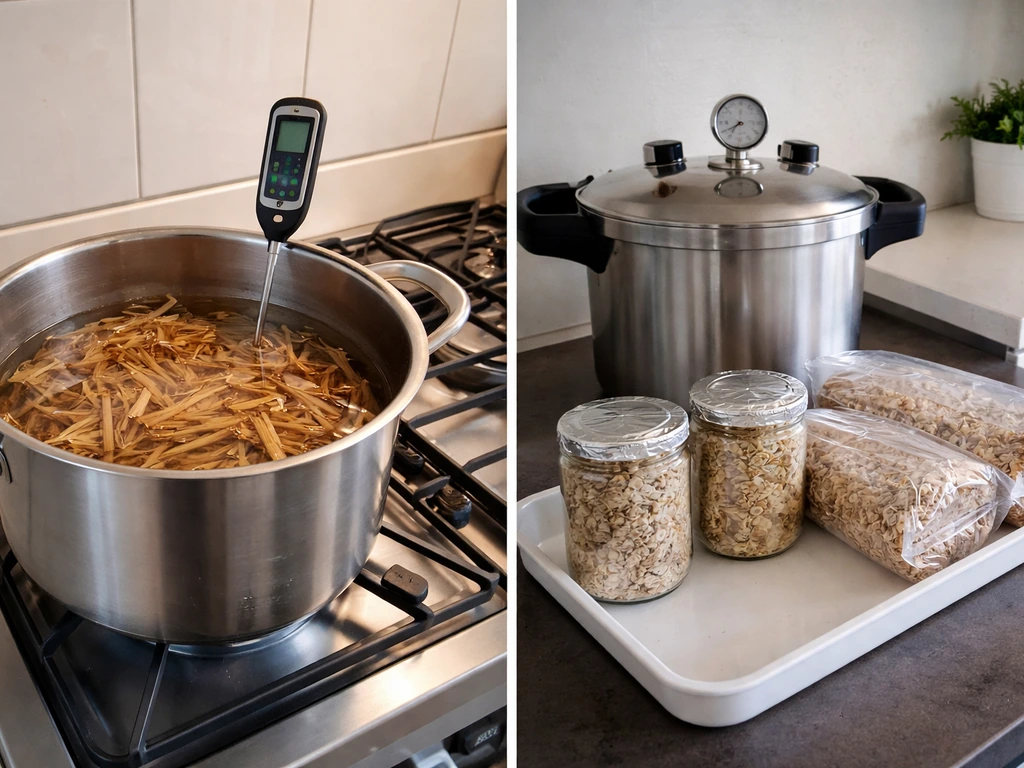
This is where a lot of beginners go wrong. Pasteurization and sterilization are not interchangeable. Pasteurization heats substrate to around 140 to 180°F (60 to 82°C) for 1 to 2 hours, which kills most competitor organisms while leaving some beneficial microbes that actually help suppress contamination. It's appropriate for low-nutrient substrates like straw. Sterilization uses a pressure cooker at 250°F (121°C) or higher, wiping out everything, and is necessary for high-nutrient substrates like grain or supplemented sawdust. If you pasteurize a high-nutrient substrate instead of sterilizing it, you're essentially creating a petri dish for contamination.
For pasteurization of straw, a hot-water bath at 160 to 170°F (71 to 76°C) for about 1 to 2 hours works well. A large stockpot works fine. For sterilization of grain jars or supplemented sawdust bags, you need a pressure cooker running at 15 PSI. Standard quart mason jars need at least 60 to 90 minutes; larger grain bags need 2.5 hours or more. Let everything cool completely to room temperature before you inoculate, ideally to below 75°F (24°C).
Inoculation and incubation: the hands-on workflow
Inoculation is the moment you introduce your culture to the substrate, and it's the highest-risk step for contamination. The goal is to work quickly, in a clean environment, with sterilized tools. You don't need a laminar flow hood to succeed at home, but you do need to minimize airborne contamination.
- Clean your workspace thoroughly. Wipe down surfaces with 70% isopropyl alcohol. Still air boxes (a large clear tote with arm holes) or a glove box work well for home growers without a flow hood.
- Flame-sterilize your needle or scalpel until it glows red, then let it cool for a few seconds before use. Repeat between each jar or bag.
- Inject liquid culture or spore solution into grain jars through a self-healing injection port, or directly into the bag through a filter patch area. Use 1 to 2 ml of liquid culture per quart jar.
- For grain-to-bulk transfers, work quickly: break up colonized grain spawn and mix it into your bulk substrate at a 10 to 20% spawn rate by volume. Higher spawn rates colonize faster and reduce contamination risk.
- Seal your jars or bags and label them with the species name and date.
- Move everything to your incubation space immediately.
Once inoculated, grain jars benefit from a gentle shake after 3 to 5 days (once you see initial growth) to redistribute mycelium and speed up colonization. Bulk substrate bags and blocks generally stay undisturbed until fully colonized.
Environmental controls for healthy mycelium growth

Mycelium is more forgiving than fruiting mushrooms in terms of environment, but it still has specific needs. Get these right and colonization moves quickly. Get them wrong and you'll either stall or invite contamination.
Temperature
Most gourmet mushroom varieties colonize best between 70 and 80°F (21 to 27°C). Oyster mushrooms specifically do well at 70 to 75°F (21 to 24°C) during incubation. Shiitake and lion's mane are slower colonizers and can sit toward the lower end of that range. Don't go above 85°F (29°C): heat stress weakens mycelium and creates conditions where bacteria thrive. A simple seedling heat mat with a thermostat is one of the most useful tools you can own for home cultivation.
Humidity and moisture content
During colonization, you're managing the moisture content of the substrate itself, not ambient humidity. Substrate that's too wet creates anaerobic pockets where bacteria thrive; too dry and mycelium stalls or dies. The classic field capacity test: squeeze a handful of prepared substrate and only a few drops of water should drip out. If it pours, it's too wet. If nothing comes out, add more water.
CO2 and fresh air exchange
During colonization, mycelium actually tolerates very high CO2 levels, well above 5000 ppm, which is why most growers keep their incubating jars and bags sealed. Minimal fresh air exchange during colonization is fine and actually reduces contamination risk by limiting what can get in. Once you flip to fruiting, everything changes: mushrooms need CO2 below 1000 ppm and high humidity (85 to 95%). Fruiting with poor fresh air exchange leads to long, leggy mushrooms and poor development. Don't conflate colonization conditions with fruiting conditions.
Light
Mycelium doesn't need light during colonization. A dark closet or cabinet is perfectly fine, and it also helps maintain consistent temperature. Light becomes relevant at the fruiting stage, where 12 hours of indirect light per day helps orient pinning.
Realistic timelines
| Species | Typical Colonization Time | Notes |
|---|---|---|
| Oyster (Pleurotus spp.) | 7 to 14 days | Fast and aggressive colonizer, good for beginners |
| King oyster | 10 to 18 days | Slightly slower than regular oyster |
| Lion's mane | 14 to 21 days | Slower, more sensitive to contamination |
| Shiitake | 14 to 21+ days | One of the slower colonizers, benefits from consolidation period |
| Wine cap / King Stropharia | 14 to 21 days | Typically grown in soil outdoors |
Troubleshooting contamination and stalled colonization
Contamination is the most common problem in home mycelium cultivation, and it happens to everyone at some point. Knowing what you're looking at and how to respond quickly is what separates growers who improve from those who give up.
Signs of contamination
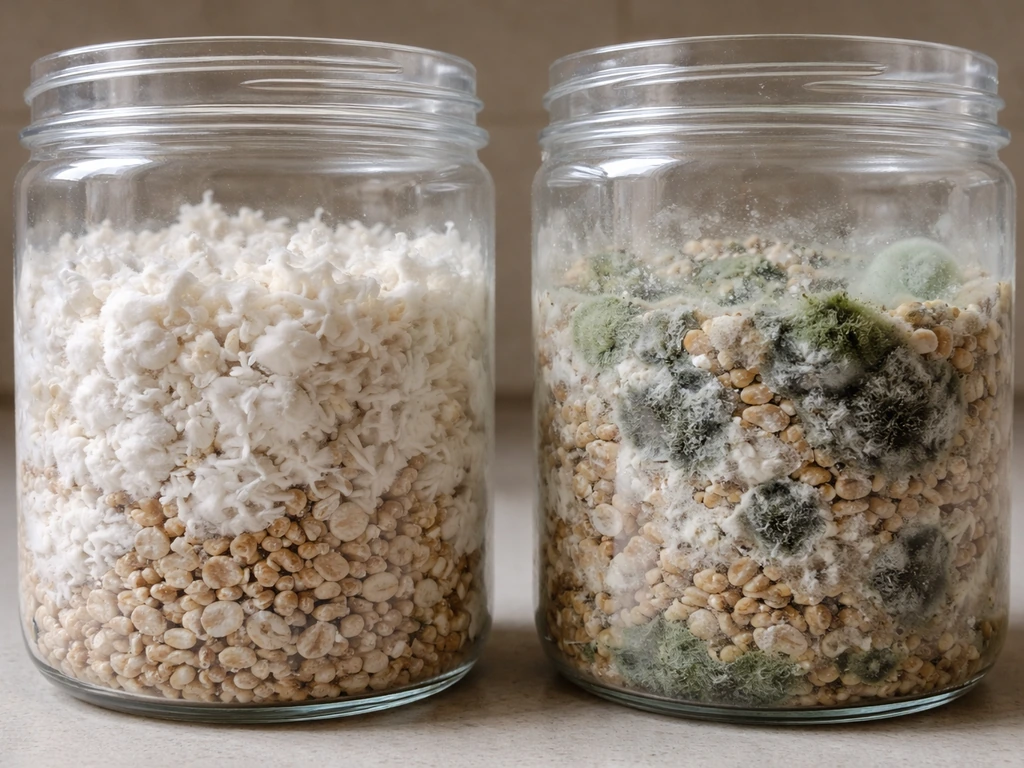
- Green, black, gray, or pink growth anywhere in your jar or bag (healthy mycelium is white to off-white only)
- Wet, slimy, or mushy texture in the substrate
- Sour, foul, or unusual odor when opening (healthy mycelium smells fresh and mushroom-like)
- Yellow or brown liquid pooling at the bottom of a jar
- Patches of fluffy white growth that don't spread (may indicate bacterial contamination rather than mold)
Green mold is almost always Trichoderma, a major fungal pathogen in mushroom cultivation. It's aggressive, spreads fast, and can infect neighboring grows. If you see green anywhere, seal the container in a plastic bag before opening it and remove it from your grow space immediately. Don't try to salvage it. Trichoderma can be sneaky in early colonization stages because it starts as white growth that only shows its green color as it sporulates, so if something looks "off" about the texture or smell before you see color, trust your instincts.
Stalled or slow colonization
If your mycelium starts growing and then seems to stop or slow dramatically, the most common culprits are temperature dropping below 65°F (18°C), substrate that's too wet creating anaerobic conditions, or weak starting culture. Check your incubation temperature first. If temperature is fine, look at whether the substrate is staying too moist. If you used a spore syringe rather than liquid culture, slow colonization is normal and not necessarily a problem, just a waiting game.
No growth at all after 5 to 7 days usually means either the culture was dead (old syringe, heat-damaged LC), the substrate is too hot or cold, or contamination won out before mycelium got established. With grain jars, a gentle shake at day 3 to 5 is worth doing to redistribute mycelium and speed things up if growth looks spotty.
Reducing contamination risk going forward
- Always inoculate in a still air box or near a still air environment, not next to an open window or HVAC vent
- Use higher spawn rates (15 to 20%) to let mycelium outcompete contaminants
- Never skip sterilization for grain or supplemented substrates
- Keep your incubation space clean and away from compost, soil, or other fungal materials
- Work with liquid culture instead of spores for faster colonization and a smaller contamination window
- If one batch gets contaminated, deep-clean your workspace before the next inoculation
What to do after mycelium has fully colonized
Full colonization looks like dense, unbroken white growth throughout the entire substrate with no visible uncolonized patches. At this point you have two main paths: trigger fruiting to grow actual mushrooms, or use the colonized material as spawn for your next batch. If you’re specifically aiming for how to grow mushrooms from mycelium, the key is making sure you have fully colonized material before you trigger fruiting conditions growing mycelium.
Triggering fruiting
To flip from colonization to fruiting, you change the environmental conditions. Move the colonized block or bag to your fruiting chamber, introduce fresh air exchange (opening and fanning the chamber 2 to 4 times per day, or running an automated fan on a timer), raise ambient humidity to 85 to 95%, and drop temperature slightly if your species requires it (oysters, for example, often benefit from a temperature drop of 5 to 10°F). CO2 must drop below 1000 ppm for proper pinning and mushroom development. Many species also benefit from exposure to indirect light at this stage.
After your first flush of mushrooms, give the block a rest period with reduced misting for a few days before soaking or rehydrating and attempting a second flush. Most blocks will give 2 to 3 productive flushes before the substrate is exhausted.
Using colonized grain spawn for the next batch
Fully colonized grain spawn can be used directly to inoculate fresh bulk substrate or broken up and used to inoculate more grain jars, a process called grain-to-grain transfer. This is how you multiply your spawn without buying new material every time. One colonized quart jar of grain spawn can inoculate 4 to 6 new jars. Keep the number of generations limited (3 to 4 max) before going back to a fresh culture, since each transfer has a small risk of introducing contamination or degrading the culture over time.
Storing mycelium between grows
Fully colonized grain spawn stores well in the refrigerator at 35 to 40°F (2 to 4°C) for 2 to 4 weeks without significant loss of viability. For longer-term storage, liquid cultures kept in a sealed syringe in the fridge can stay viable for 6 months or more. Agar cultures stored in the fridge under parafilm last even longer. The key is keeping everything cold, sealed, and away from light until you're ready to use it.
If you want to go deeper on specific use cases after this point, growing mycelium in soil outdoors opens up completely different techniques with species like wine caps and mycorrhizal fungi. You can apply the same colonization and cleanliness principles to learn how to grow mycelium in soil. Mycelium bricks and blocks for non-food applications (packaging, construction prototypes) follow a similar colonization process but use different substrate mixes and shaping steps. The core skills you build growing gourmet mushroom mycelium translate well to all of those directions.
FAQ
Can I reuse the substrate after mycelium finishes colonizing it?
Usually no for grain or supplemented mixes, because contaminants and nutrient depletion accumulate. For some setups, people do rehydration and fruit for 2 to 3 flushes, but if the goal is more colonization, reusing old substrate typically leads to higher contamination and weaker subsequent yields.
What should I do if I see small white fuzzy areas that turn colored later?
If it later becomes green (Trichoderma) or smells sharply sour or ammonia-like, remove it and discard the container sealed in a bag. Early white can be normal mycelium, but when texture looks patchy and growth is uneven, treat it as higher risk and isolate immediately.
How can I tell the difference between healthy mycelium and contamination before color appears?
Healthy growth tends to look uniform and cord-like, spreading from the inoculation points without strong odor. Contamination often shows irregular patterns, watery areas, or a texture that looks slimy, dusty, or unusually wet even before any green or black color appears.
Is a heat mat enough, or do I need a separate thermometer for accuracy?
A heat mat can work, but most home mats have weak built-in sensors. Use a separate digital probe placed at the same depth as the jars or bag to verify your actual substrate temperature, because warm air can be misleading and drive overheating inside.
How long can I wait between colonization and starting fruiting?
For best results, fruit soon after full colonization. If you wait too long, especially in warmer temps, the block can dry out, stress the culture, or start to shift to non-ideal behavior. If you must hold it, store in the fridge briefly, but expect some drop in performance depending on species and how sealed it is.
Should I mix or shake bulk substrate during colonization like grain jars?
Generally no, bulk blocks and bags are kept undisturbed to avoid introducing contamination and tearing the developing network. With grain, gentle redistribution is common after early growth, but bulk typically benefits more from correct moisture and temperature control.
What moisture level is safest to aim for if I’m unsure?
If you are between outcomes, aim slightly on the drier side rather than wetter. Too wet encourages anaerobic pockets, which raise bacterial risk. If your squeeze test pours, spread your substrate to dry a bit before inoculating.
Does fresh air exchange matter during colonization, or should I keep everything sealed?
Keeping sealed is usually best for colonization because it reduces contamination exposure. You only need minimal gas exchange for most species, and CO2 tolerance is high at this stage, so prioritize cleanliness and stable temperature over ventilation.
Can I grow mycelium successfully without a sterile room?
Yes, but you must still control cleanliness at each high-risk step. A practical approach is to work in a still, draft-free area, sanitize surfaces, limit how long containers are open, and use fresh gloves and clean tools. For most beginners, the main improvement comes from better sterile technique around inoculation rather than from having advanced equipment.
Why did my growth stall after it started strong?
Common causes include substrate that is now too wet (bacteria take over slowly), temperature dropping below the species’ effective range, or using a culture that was marginal. Also check for condensation inside bags, because persistent wetness can create localized anaerobic conditions even if the overall moisture looked fine.
I inoculated with spores, and it’s taking a long time. Is that normal?
Yes, spore germination and establishment typically take longer than liquid culture, and results can be uneven. If there is no progress after the early window, first verify temperature and substrate moisture, then consider that genetics and germination success might simply be slower for that batch.
How do I safely handle and discard contaminated jars or bags?
Seal the infected container in a plastic bag before opening or moving it, then remove it from your grow area immediately. Clean surrounding surfaces afterward, and do not try to salvage partially colonized material, because Trichoderma can spread spores invisibly before you see green.
Can I use colonized grain spawn straight from the fridge to inoculate new substrate?
You can, but bring it closer to room temperature first to avoid condensation and temperature shock during inoculation. Also check that the spawn is still visibly healthy and fully colonized, and keep it sealed to prevent drying before you mix with the new substrate.
What’s a practical limit for grain-to-grain transfers before I should restart?
Stick to about 3 to 4 generations as a rule of thumb. Beyond that, many growers notice increased variability, slower colonization, and more contamination risk, even when technique stays consistent. When performance drops, revert to a fresh culture source.