Growing Termitomyces (termite mushroom) at home is genuinely one of the more challenging projects in mushroom cultivation, but it is possible with the right setup, realistic expectations, and a lot of patience. Unlike oyster mushrooms or shiitake, Termitomyces evolved inside termite mounds where conditions are incredibly stable, making it slow to colonize and fussy about fruiting triggers. That said, growers have managed it using a combination of carefully prepared substrates, controlled humidity and temperature, and cultures sourced from reputable biological culture banks. This guide walks you through every stage, end-to-end.
How to Grow Termite Mushroom (Termitomyces) Step by Step

Marcus Holloway
12 May 2026
What Termitomyces actually is and what you'll need to get started
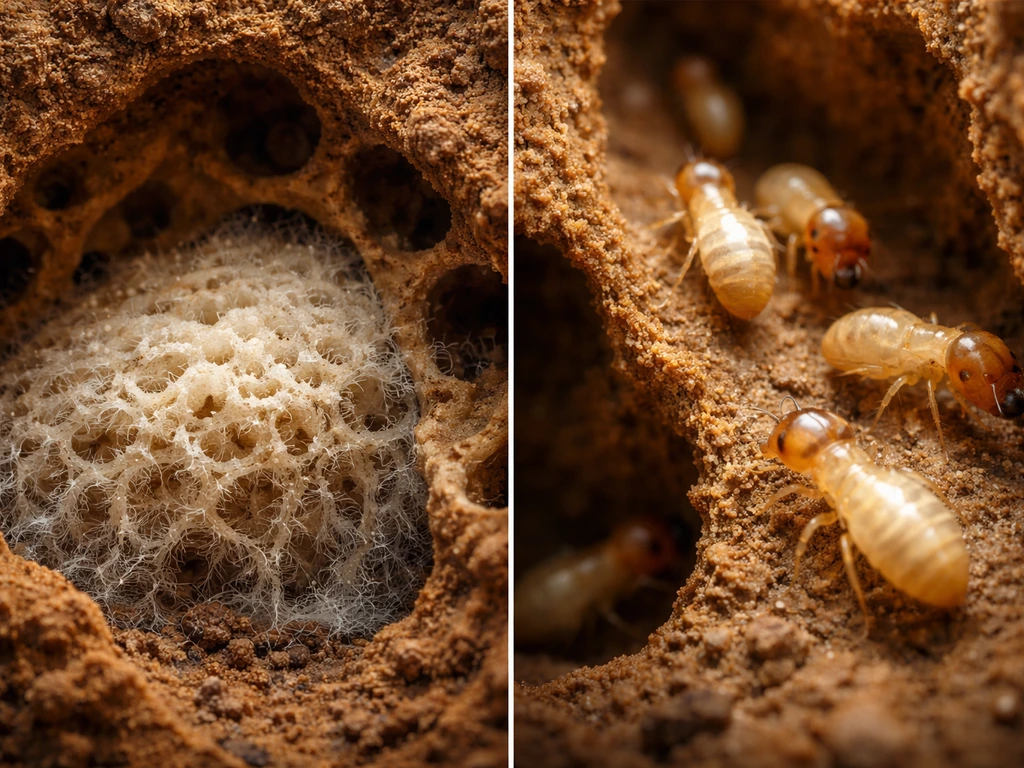
Termitomyces is a genus of edible mushrooms that live in a true symbiotic relationship with fungus-farming termites. The termites cultivate the fungus inside their mounds on a structure called a fungal comb, feeding it chewed plant material and, in return, eating the fungal nodules the comb produces. This is important context for cultivation because Termitomyces has never fully adapted to growing without its termite partner. Species like Termitomyces albuminosus, T. cartilagineus, T. schimperi, and T. eurrhizus have all been studied for artificial cultivation, and some have been cultured in laboratory and semi-commercial settings, but none colonize or fruit as readily as something like oyster mushrooms.
Before you start, here is an honest look at what you are committing to. This is not a 4-week beginner grow. Colonization can stretch to several months, fruiting is not guaranteed on your first attempt, and contamination pressure is high because the incubation period is so long. If you want to build skills first, working through a simpler species is worth doing before tackling this one.
Here is what you will need to have ready:
- A verified Termitomyces culture (agar or grain spawn) from a culture bank like ATCC (catalog number 58865 for T. cartilagineus) or DSMZ (DSM No. 4276)
- Pressure cooker (minimum 15 PSI) for sterilizing substrate and grain
- Still air box or laminar flow hood for sterile transfers
- Substrate materials: wood chips, sawdust, agricultural straw, and a protein or nitrogen supplement
- Growing containers: plastic tubs, grow bags, or deep trays with lids
- Hygrometer and thermometer (non-negotiable for this species)
- Spray bottle or ultrasonic humidifier for maintaining fruiting humidity
- pH meter or strips (target casing layer pH of 5.5 to 7)
Indoor vs outdoor: choosing your growing setup
Most growers will want to start indoors, where you can actually control the variables that matter to Termitomyces. Outdoor beds are possible in tropical and subtropical climates where the ambient temperature stays between 25 and 32°C (77 to 90°F) and humidity is naturally high, but you lose the ability to manage CO₂ levels, humidity fluctuations, and contamination pressure. For the first attempt, indoor cultivation gives you the feedback loop you need to actually figure out what is and is not working.
Indoor setup
Indoors, a grow tent or a dedicated fruiting chamber works well. The monotub method is a practical starting point: a deep, opaque plastic tote (at least 50 liters) with a lid can hold your substrate and serve as a fruiting chamber. You can run it as an unmodified monotub with no holes, relying on manual fanning twice a day to refresh oxygen and exhaust CO₂, or drill filtered holes on the sides for passive gas exchange. For Termitomyces, which responds to CO₂ concentration as a fruiting trigger, erring toward slightly elevated CO₂ during colonization and then increasing fresh air exchange to trigger pinning makes practical sense based on what we know from cultivation patents and research.
Outdoor setup
If you live in a warm, humid climate (think Southeast Asia, sub-Saharan Africa, or the southern United States in summer), you can try a shaded outdoor bed. Bury inoculated substrate 10 to 15 cm deep under a thick layer of wood chip mulch to stabilize moisture and temperature. The risk is contamination from competing soil fungi and bacteria, which is much harder to manage outdoors. Use clean substrate, inoculate heavily, and water regularly to prevent drying out. Outdoor grows are a longer shot for beginners but can work over a full growing season.
Substrate selection and how to prepare it
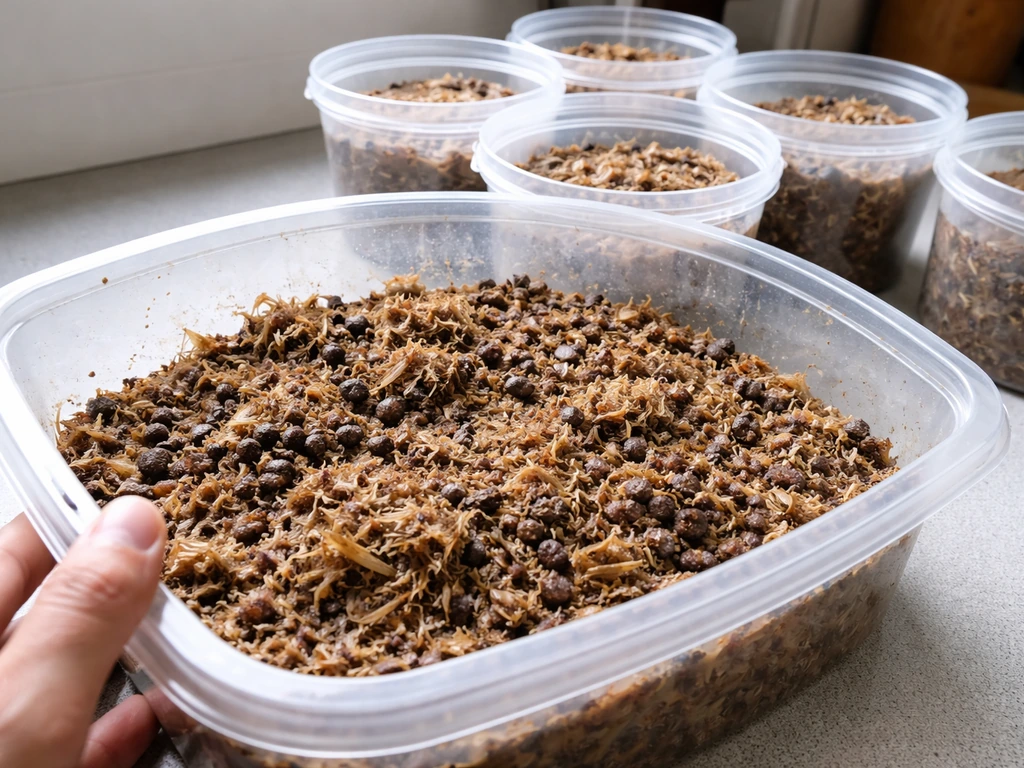
Termitomyces naturally grows on a fungal comb built from termite gut-processed plant material, which is essentially a highly nitrogen-enriched lignocellulosic substrate. To replicate this at home, you want a base of hardwood sawdust or wood chips mixed with a fibrous material like wheat straw or sugarcane bagasse, then supplemented with a protein or nitrogen source to push colonization. Some cultivation patents describe adding a 10 to 15% protein powder solution (around 40 to 50 mL per bag) daily during incubation as a nutritional boost, which is unusual but worth experimenting with on a small scale.
A straightforward home-grower substrate recipe that mirrors the termite-mound nutritional profile looks like this: 60% hardwood sawdust, 25% wheat straw (chopped), 10% wheat bran or rice bran, and 5% gypsum. Mix dry ingredients first, then hydrate to field capacity, which means the substrate holds together when squeezed but releases only a few drops of water. Field capacity is roughly 60 to 65% moisture content. Gypsum helps with structure and slightly buffers pH. After mixing, check pH and aim for 5.5 to 7, adjusting with a small amount of lime (to raise) or vinegar (to lower) if needed.
Sterilize the substrate fully, not just pasteurize it. Because Termitomyces colonizes slowly, any competing organism in an under-treated substrate will outcompete it. Pack the substrate into polypropylene grow bags, fold the tops, and pressure cook at 15 PSI for 2.5 to 3 hours for bags up to 2 kg. Let bags cool completely to below 25°C before inoculating. This step is where patience saves you from wasted effort later.
The casing (gobetage) layer
Unlike oyster mushrooms, Termitomyces benefits from a casing layer applied over colonized substrate to trigger fruiting. Use a 3 to 5 cm layer of peat moss and vermiculite (50/50 by volume), adjusted to pH 5.5 to 7, lightly moistened but not soaking. This mimics the earthen layer above the fungal comb in a termite mound. Apply the casing only after the substrate below is fully colonized. The casing holds surface moisture, provides a physical trigger for pinning, and buffers temperature swings at the surface.
Getting your spawn or spores and inoculating

This is the hardest part of Termitomyces cultivation and the step most growers get wrong by sourcing unreliable material. Termitomyces is not commonly sold by hobby spawn suppliers. Your most reliable options are culture banks: ATCC (T. cartilagineus, catalog 58865) and DSMZ (Termitomyces sp., DSM 4276) both offer verified cultures. These arrive as agar slants or frozen stocks. Frozen stocks require careful handling because incorrect storage temperature can kill the culture on arrival. Follow the storage instructions exactly and revive on agar before attempting grain spawn production.
A third route is isolating material from fresh termite mound nodules if you have access to an active mound. Research describes using a sterile scalpel to dissect nodules from the fungal comb and placing them directly onto agar culture media in a sterile environment. This is essentially a tissue isolation and requires a laminar flow hood or at minimum an extremely careful still-air box technique. It is ambitious for a first attempt but is how wild genetics are brought into cultivation.
Once you have an actively growing agar culture, transfer it to sterilized grain (rye, wheat, or millet work well) using the Penn State-style method: steam-sterilize grain, inoculate with mycelium, then incubate until mycelium has fully colonized the grain. Penn State describes spawn production as placing mycelium from a mushroom culture onto steam-sterilized grain so the mycelium completely grows through the grain, creating grain spawn for seeding mushroom compost. This grain spawn is then used to inoculate your prepared substrate bags. Use a sterile scalpel or inoculation loop for agar-to-grain transfers inside your still air box. Inoculation rate matters here: use about 15 to 20% grain spawn by volume relative to substrate to push colonization fast and outcompete any contamination that sneaks through.
- Receive culture from ATCC or DSMZ; revive on MEA or PDA agar at 25 to 28°C
- Once mycelium is actively growing on agar (expect 2 to 4 weeks), transfer to sterilized grain bags
- Incubate grain bags at 25 to 28°C until fully colonized (4 to 10 weeks typical)
- Break and shake colonized grain bags to distribute mycelium evenly
- Inoculate prepared, cooled substrate bags at 15 to 20% spawn rate using sterile technique
- Seal bags and move to incubation environment
Incubation conditions: what to dial in and why
Termitomyces incubation is a waiting game that demands stable conditions. Keep your inoculated bags in darkness at 25 to 30°C. Temperature consistency matters more than hitting a precise number. Swings of more than 3 to 4°C in a single day stress the mycelium and slow growth considerably. A small dedicated space like a shelf inside a temperature-controlled room, a seedling heat mat with a thermostat, or a grow tent with a small space heater all work.
Humidity during incubation does not need to be as high as during fruiting because the sealed bags maintain their own internal moisture. However, the room environment should not drop below 60% relative humidity or the bags can lose moisture through micropores over a long incubation. Keep the room at 65 to 75% RH during colonization. Airflow in the incubation space should be gentle and indirect. You do not want fans blowing directly on bags, just enough circulation to prevent hot spots and reduce the chance of mold accumulating on bag surfaces.
Light is not needed during incubation. Keep bags in the dark. When you move to fruiting, indirect light at low intensity (100 to 300 lux, equivalent to a softly lit room) is enough. Termitomyces does not need intense lighting to fruit, and direct sunlight will dry out your casing layer.
| Parameter | Incubation | Fruiting |
|---|---|---|
| Temperature | 25–30°C | 22–28°C |
| Relative humidity | 65–75% (room) | 85–95% (chamber) |
| Light | None | 100–300 lux indirect |
| Airflow | Gentle room circulation | Fresh air exchanges 2–4x daily |
| CO₂ level | Elevated acceptable | Reduce to trigger pinning |
Fruiting, harvesting, and what to realistically expect
Once substrate bags are fully colonized (which can take 2 to 5 months, so pace yourself), it is time to case and trigger fruiting. Apply your 3 to 5 cm casing layer, move the tub or tray to your fruiting chamber, and crank humidity up to 85 to 95% relative humidity. A commercial fruiting chamber guide for Southwest Mushrooms also recommends targeting roughly 85, 95% RH for fruiting and emphasizes CO2 management, including keeping CO2 lower for primordia than for pinning 85–95% RH for fruiting and CO2 management. Increase fresh air exchanges to 2 to 4 times per day, either by opening the fruiting chamber and fanning manually or by running filtered air through passive or active ventilation. The drop in CO₂ concentration combined with the stable high humidity is what signals the mycelium to start forming primordia.
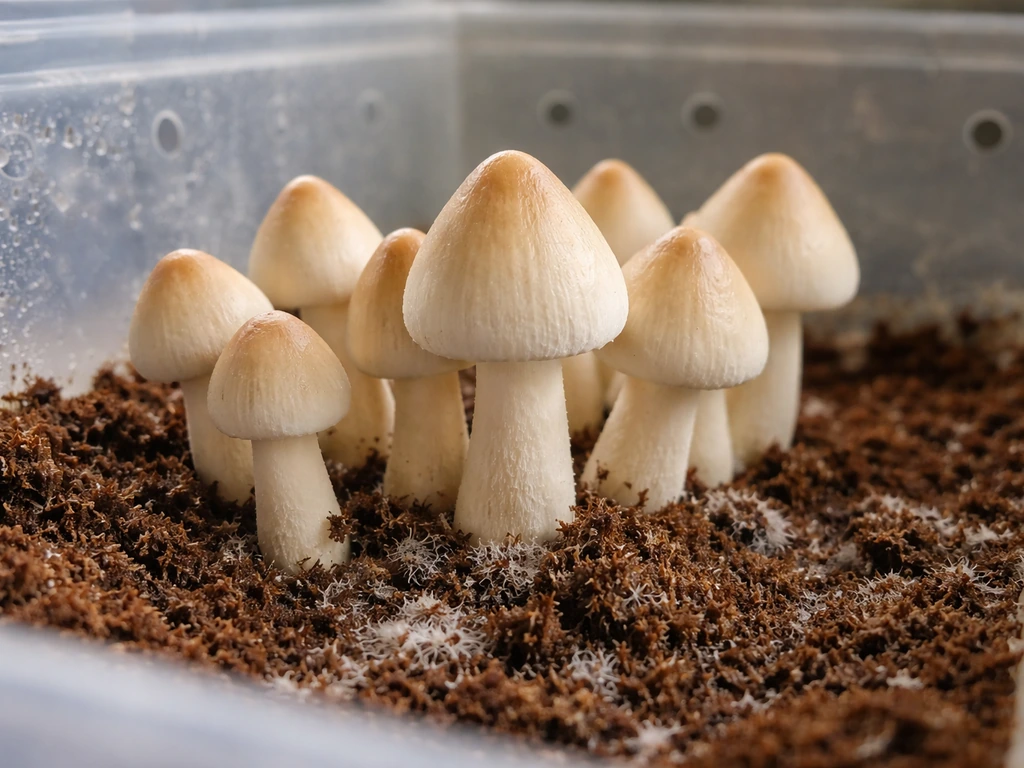
Pinning typically begins 2 to 6 weeks after casing if conditions are right. Pins emerge as small white to cream-colored bumps pushing up through the casing. Once you see pins, back off on disturbance and let humidity do the work. Termitomyces fruit bodies develop a distinctive central umbo (a pointed bump at the top of the cap) as they mature. Harvest just before or as the cap begins to flatten and the gills become visible, because Termitomyces sporulates quickly after the cap opens and quality drops fast. Harvest by twisting and lifting the entire mushroom, including the long pseudorrhiza (the taproot-like extension), which extends deep into the substrate.
Yield expectations on a first grow are modest. A well-colonized 2 kg substrate block might produce 100 to 250 grams of fresh mushrooms per flush. Subsequent flushes are possible but less consistent than with oyster mushrooms or shiitake. Re-case with fresh casing material after each flush and maintain humidity and temperature to encourage a second wave. Some growers get two to three flushes; others get one good flush and then stalling. That is normal for this species.
Troubleshooting contamination and stalled or failed grows
Contamination is the number one killer of Termitomyces grows, and it happens because of the long colonization window. Green mold (Trichoderma), black pin mold, and bacterial wet rot are the most common culprits. Black pin mold and other common molds can also show up if your growth conditions and sanitation are off, so it helps to know how to grow black fungus mushrooms safely and reliably. If you see green or black patches developing on or inside your substrate bags during incubation, isolate those bags immediately and do not open them indoors. A small isolated spot of green can sometimes be carved out if you catch it very early, but more often than not, a contaminated Termitomyces bag is a loss. The mycelium is simply too slow to recover the territory.
Prevention is everything. Make sure your sterilization is adequate (2.5 to 3 hours at 15 PSI, not less), let bags cool fully before inoculating, and do all inoculation work in a still air box or under a flow hood. Wipe down all surfaces with 70% isopropyl alcohol before transfers. Wear gloves and flame-sterilize your scalpel between each cut. These basics cut contamination rates dramatically.
Stalled colonization with no visible contamination is usually a temperature or moisture issue. If your incubation space dropped below 22°C for an extended period, the mycelium may have gone dormant. Bring temperature back to 27 to 28°C and give it two to three more weeks before writing the bag off. If the substrate dried out (you can tell because the bag feels light and pulls away from the sides), there is no recovery. Fully dried substrate will not re-colonize. This is why checking bag weight weekly and keeping room humidity above 65% matters.
Failed fruiting after colonization is often a CO₂ problem. If your fruiting chamber is too sealed or you are not exchanging air frequently enough, CO₂ accumulates and suppresses pinning. Increase fresh air exchanges and use your hygrometer to confirm humidity is genuinely at 85 to 95%, not just estimated. A cheap hygrometer placed inside the fruiting chamber is not optional for this species. If you are looking specifically for how to grow caterpillar fungus, the principles of sterile substrate, incubation control, and careful fruiting conditions are similar, but the species has different requirements to dial in hygrometer placed inside the fruiting chamber is not optional. You also want to confirm the casing layer is moist but not waterlogged. Soggy casing causes bacterial issues that look like pinning failure but are actually contamination at the surface.
If you have gone through a full grow cycle and fruiting simply did not happen, the most likely culprits in order are: CO₂ not reduced enough, temperature too high during fruiting (above 30°C), or culture quality issues from the start. A degraded or impure culture will colonize weakly and rarely fruit. Sourcing fresh, verified culture material from ATCC or DSMZ and starting a new grow is sometimes the most efficient path forward rather than troubleshooting an aging culture indefinitely.
A few final thoughts on making this work
Termitomyces is genuinely one of the harder mushrooms to cultivate at home, and it rewards growers who are methodical and patient rather than those who rush. If you have never grown mushrooms before, building experience with an easier species first is a legitimate recommendation, not a discouragement. Techniques that apply across species, like substrate preparation, sterile inoculation, and humidity management, are directly transferable to Termitomyces when you are ready. For those already comfortable in the grow room, this species is a worthwhile challenge. Once you dial in your conditions, you can follow the specific steps for how to grow nether fungus as a similar challenge in controlled cultivation. The flavor and cultural significance of termite mushrooms across Africa and Asia make a successful flush genuinely satisfying. Keep good notes on each grow, adjust one variable at a time when troubleshooting, and do not be discouraged by a first failed attempt. For foxfire fungus specifically, you will want to focus on the species' preferred host and microclimate, then adjust moisture, airflow, and light to match its fruiting needs. Most Termitomyces growers get their process dialed in by the second or third grow.
FAQ
Can I grow termite mushrooms outdoors instead of indoors?
Yes, but expect lower reliability. Termitomyces is slow and fussy about fruiting triggers, so an outdoor bed often struggles with sudden rainfall patterns, uneven airflow, and contamination organisms that are hard to predict. If you try it, bury inoculated material deeper (10 to 15 cm is a good target) under thick wood chip mulch and keep watering consistent enough that the block never dries between rains.
Is partially colonized grain spawn okay to use for inoculating the substrate?
Don’t. If you inoculate with grain that is colonized unevenly or not fully consolidated, competing microbes can take over during the long incubation window. Use grain spawn that is 100% colonized with no sour smell, no wet pockets, and no visible contamination, then mix it evenly so all substrate chunks get inoculated at about the intended rate.
My casing is set and humidity is high, but pinning is slow, what should I change first?
Increase airflow gradually rather than going from sealed to highly ventilated overnight. During fruiting, a sudden CO₂ drop can stress the casing surface, and you may see delayed pinning. A practical approach is to start with your target humidity (85 to 95%) and moderate fresh air exchange, then bump exchange once you see the first primordia forming.
How can I tell whether my fruiting chamber humidity readings are trustworthy?
Use a humidity controller or at least a hygrometer-based routine. A “feels humid” approach fails because Termitomyces is sensitive to small CO₂ and moisture deviations. If RH sits below target for more than short periods, the casing can dry and pins stall. If RH is too high without air exchange, CO₂ rises and also suppresses pinning.
What does over-wetting the casing layer do, and how do I fix it?
Don’t soak the casing. It should be evenly moist, holding together when you squeeze it lightly, but without runoff. Soggy casing can create bacterial slime and surface conditions that look like pinning failure. If you suspect over-wetting, pause, adjust airflow slightly, and let the casing re-equilibrate without adding more water.
Can I save a contaminated bag by removing the affected area?
If you see green or black patches in incubation, isolate and assume loss. Termitomyces is too slow to reclaim territory once competitors establish, and opening contaminated bags indoors increases spore spread. It’s usually better to discard sealed contaminated bags and focus your next attempt on sterilization timing, cooling time, and cleaner inoculation workflow.
My bags are stalled, but I see no contamination, how do I decide whether to wait or restart?
Stalled colonization can be from cold, excessive dryness, or high stress from temperature swings. If it’s been only a short time and the substrate still feels fully hydrated, you can try returning to 27 to 28°C and wait 2 to 3 additional weeks. If the bag is light, pulls away from the sides, or substrate looks cracked, drying has usually caused irreversible failure.
Why is inoculating right after sterilization a problem?
Even if you used good sterilization, improper cooling before inoculation is a common hidden failure. Inoculating while the substrate is still warm can damage or kill cultures and can also encourage fast-growing contaminants. Cool until the bag is below about 25°C, then proceed immediately with sterile transfers.
Can I apply casing and move to fruiting immediately after the substrate looks colonized?
Yes, but take care with timing and temperature. Since Termitomyces uses CO₂ concentration as part of the fruiting trigger, moving too early or disturbing during casing can reset conditions. Wait for full colonization, apply casing when the block is consolidated, and only then move into the fruiting chamber where you can control RH and air exchange.
My results are consistently weak, how do I know it’s a bad culture versus my environment?
Quality culture matters. If you repeatedly get weak colonization or poor fruiting across attempts, it may be genetics or culture viability, especially if storage temperature was inconsistent. A common practical decision is to start a new agar culture from a verified, fresh source and then remake grain spawn rather than reusing older agar indefinitely.
What’s the most important sanitation habit besides wiping surfaces?
Wash hands and sanitize tools, but the bigger win is controlling where spores land. Avoid working near open doors, vents, or dusty airflow, and keep a still air box or flow hood area dedicated for transfers. Flame-sterilize the scalpel between cuts, and wipe down surfaces with 70% isopropyl alcohol right before you start, not hours earlier.
How should I handle re-casing between flushes to improve the second flush?
After harvest, remove and discard the mushroom and any remaining debris, then re-case with fresh casing material if you want consistent second flushes. Termitomyces often needs surface buffering and moisture control again, and old casing can compact or develop micro-sites for bacteria. If the second flush stalls, don’t keep adding water, increase fresh air exchange while keeping RH in range.