Growing fungus at home almost always means growing mushrooms, and yes, you can absolutely do it starting today. Oyster mushrooms are the single best choice for a first grow: they colonize fast, fruit aggressively, tolerate beginner mistakes, and can be ready to harvest in as little as three to four weeks from inoculation. If oysters aren't your thing, shiitake, lion's mane, and wine caps are all realistic at home too. What you shouldn't try to grow at home are wild-collected unknown species, molds for any kind of consumption, or anything requiring a professional mycology lab to safely identify and handle.
How to Grow Fungus at Home: Step-by-Step Mushrooms

Marcus Holloway
22 May 2026
What you can (and really shouldn't) grow at home
When people search for how to grow fungus at home, they're usually thinking about edible or medicinal mushrooms. If you're specifically trying to grow nether fungus, the biggest difference is that you need the right Minecraft setup and conditions rather than a standard mushroom workflow. That's the right instinct. Cultivated mushrooms like oysters, shiitake, lion's mane, and reishi are well-documented, commercially available as spawn, and safe to grow and eat when you're sourcing your starting material from a reputable supplier.
What you don't want to do is deliberately cultivate unknown molds. Unwanted molds, the green trichoderma, black aspergillus, and pink neurospora you'll sometimes see on contaminated grows, are not your friends. Mold exposure in damp indoor environments is linked to respiratory symptoms, cough, wheeze, and worsening asthma. Some molds produce mycotoxins, compounds that are toxic to humans and animals. If you see unexpected mold growth on your substrate or fruiting blocks, bag it up, seal it, and throw it away outside. Don't disturb it and breathe the spores in.
There are also specialty fungi that people sometimes ask about, like caterpillar fungus (Cordyceps) or termite mushrooms, that require very specific hosts, substrates, or environmental conditions that are genuinely difficult to replicate at home. Similarly, foxfire fungus is a bioluminescent wood-rotting species that isn't cultivated for harvest. Stick with species that have established home-growing workflows unless you're specifically interested in advanced experimental cultivation.
Pick your mushroom and decide on your setup
Your species choice should match your space, budget, and how much fuss you want to deal with. Here's an honest breakdown of the most common beginner options:
| Species | Difficulty | Substrate | Ideal Temp (Fruiting) | Time to First Harvest | Indoor or Outdoor |
|---|---|---|---|---|---|
| Oyster (Pleurotus spp.) | Very Easy | Straw, cardboard, hardwood | 60–75°F (15–24°C) | 3–5 weeks | Both |
| Shiitake | Easy–Moderate | Hardwood sawdust, logs | 55–75°F (13–24°C) | 8–12 weeks (logs), 6–10 weeks (bags) | Both |
| Lion's Mane | Moderate | Hardwood sawdust | 65–75°F (18–24°C) | 4–6 weeks | Indoor |
| Wine Cap (Stropharia) | Easy | Wood chips, straw | 55–75°F (13–24°C) | 4–8 weeks | Outdoor |
| Reishi | Moderate–Hard | Hardwood sawdust | 70–80°F (21–27°C) | 10–16 weeks | Indoor/Outdoor |
| Black Fungus (Wood Ear) | Easy–Moderate | Hardwood sawdust, logs | 60–75°F (15–24°C) | 6–10 weeks | Both |
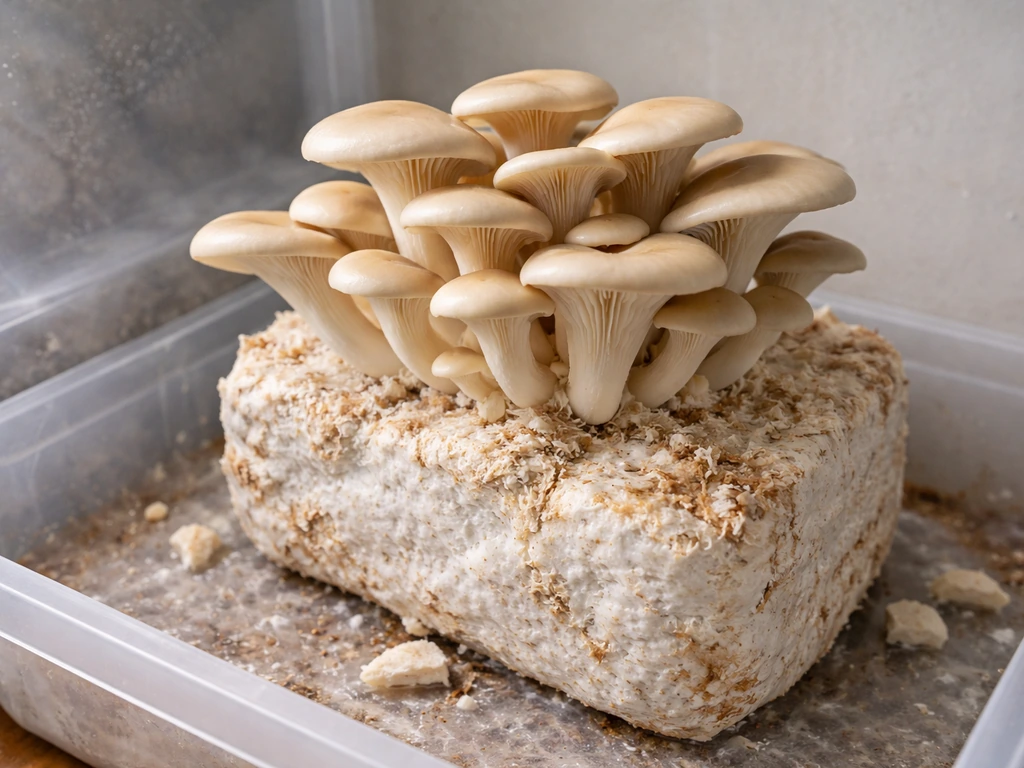
For a first grow, choose oyster mushrooms. If you have an outdoor garden bed or a shaded yard, wine caps on a wood chip bed are almost foolproof and require almost zero equipment. If you're specifically trying to figure out how to grow termite mushrooms, the starting point is similar, but you'll want to follow the species-specific setup and substrate approach wine caps. If you want to grow indoors year-round, oysters or lion's mane in a humidity tent or a dedicated grow chamber are the most reliable path to an actual harvest.
Indoor vs outdoor: which setup is right for you
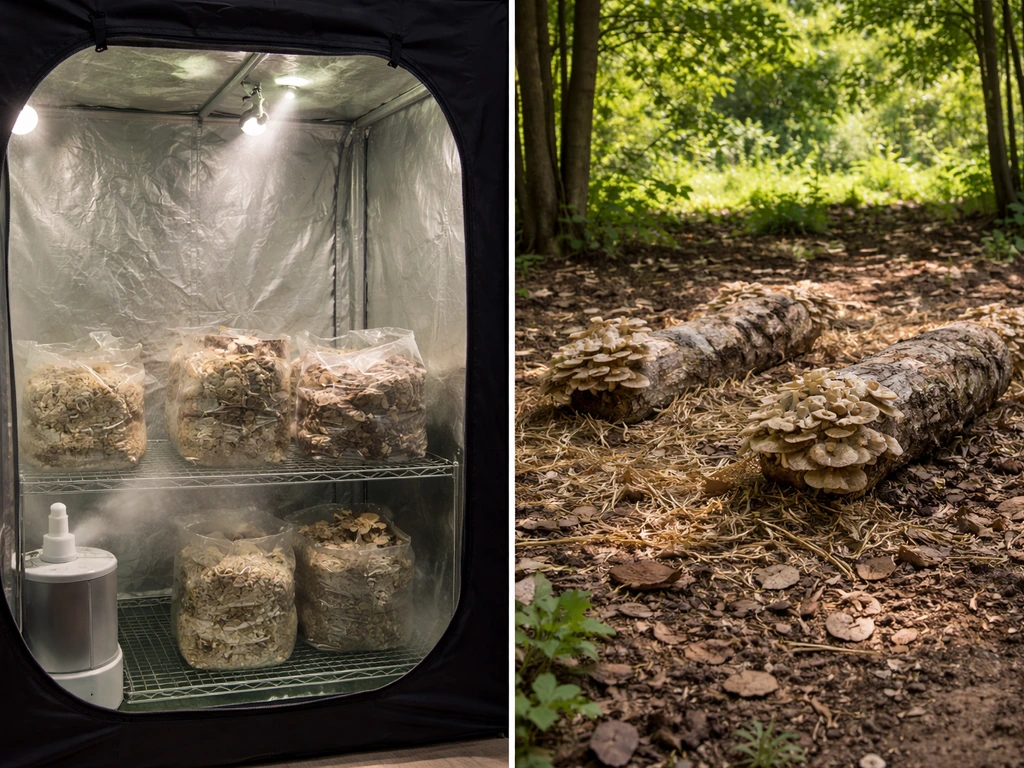
Indoor growing gives you control over temperature, humidity, and timing. You can grow year-round and adjust your environment to match your species. The tradeoff is that you'll need to actively manage humidity (typically 80–95% during fruiting) and fresh air exchange. A simple plastic storage tote or a Martha tent setup with a small ultrasonic humidifier handles this well for most beginners.
Outdoor growing is lower maintenance but seasonal and more dependent on your local climate. Wine caps grown in wood chip beds, oyster mushrooms on straw bales, or shiitake on inoculated hardwood logs are all great outdoor options. Log cultivation is particularly low-effort once set up: inoculate in spring, keep logs shaded and moist, and expect mushrooms within months, with harvests continuing for several years.
What you need before you start: the materials checklist
You don't need a lab. Here's what you actually need for a basic indoor oyster mushroom grow from spawn to harvest:
- Mushroom spawn: grain spawn (rye, wheat, or millet) is the most versatile; buy from a reputable supplier like North Spore, Fungi Perfecti, or a local mycology supplier. Avoid sellers without clear species labeling.
- Substrate: straw (wheat or oat straw) for oysters is cheap and widely available from farm supply stores. Hardwood sawdust pellets (used for pellet stoves, no additives) work well for lion's mane and shiitake.
- Supplement (optional): wheat bran or oat bran at 10–20% by dry weight boosts yields but also increases contamination risk for beginners.
- Grow bags or containers: filter patch bags (polypropylene, rated to 212°F/100°C or higher for sterilization) or 5-gallon buckets with holes drilled for fruiting.
- Large pot for pasteurization (straw) or pressure cooker for sterilization (sawdust/grain).
- Isopropyl alcohol (70% is more effective than 90%+ for disinfection), gloves, and a face mask for inoculation.
- Spray bottle for misting during fruiting.
- Humidity tent or Martha tent: a clear plastic storage tote (with lid slightly cracked) works for small grows; a wire shelf rack with clear plastic sheeting and a small humidifier works for larger setups.
- Thermometer and hygrometer: cheap combination units are under $15 and essential for hitting the right fruiting conditions.
- A still air box (SAB) or flow hood for inoculation: a SAB is just a clear plastic tote with two arm holes cut in the front side, and it dramatically reduces contamination during inoculation.
For spores versus spawn: spawn is far easier for beginners. Spores require additional steps like agar plate work, germination, and grain colonization before you have anything to inoculate substrate with. Unless you're specifically interested in strain development, buy ready-to-use grain spawn and skip the spore syringe route for your first grow.
Substrate prep and keeping things clean
The goal of substrate preparation is to kill competing organisms (bacteria, mold spores, other fungi) so your mushroom mycelium can colonize without competition. There are two main approaches: pasteurization and sterilization.
Pasteurization (straw and hardwood fuel pellets)
Pasteurization heats your substrate to 160–185°F (71–85°C) for 60–90 minutes. It kills most competing organisms without destroying all beneficial bacteria, which actually helps create a slightly competitive environment that oyster spawn can dominate. This is the right method for straw. Submerge chopped straw in hot water (heat a large pot to 160–180°F, add straw, keep it submerged with a weight for 60–90 minutes), drain thoroughly, and allow to cool to below 80°F (27°C) before inoculating. Excess moisture is the number one beginner mistake: squeeze a handful and only a few drops should come out.
Hardwood fuel pellets (HWFP) are a great straw alternative. Add boiling water to pellets in a bucket, let them hydrate and cool, then drain off excess water. No heating required beyond the initial boiling water. Fast, easy, and very consistent.
Sterilization (grain spawn and supplemented substrates)
Sterilization means bringing substrate to 250°F (121°C) at 15 PSI for 2.5 hours in a pressure cooker. This is mandatory for grain spawn jars or bags and for supplemented sawdust substrates, because the rich nutrition in these materials supports aggressive contamination if any competing organisms survive. After sterilization, jars and bags must cool completely (to under 80°F) before inoculation: rushing this step is one of the most common ways to kill your own spawn.
Inoculation workflow and keeping it clean
Contamination during inoculation is where most beginners fail. Here's the workflow that works in a regular home without a lab:
- Wipe down your work surface with 70% isopropyl alcohol and let it dry.
- Set up your still air box: a clear tote on a table, arm holes facing you. Let the air settle inside for a few minutes before working.
- Put on gloves and wipe them with alcohol. Don't touch anything non-sterile with your gloved hands during the process.
- Work quickly and minimally. The longer a container is open, the higher the contamination risk.
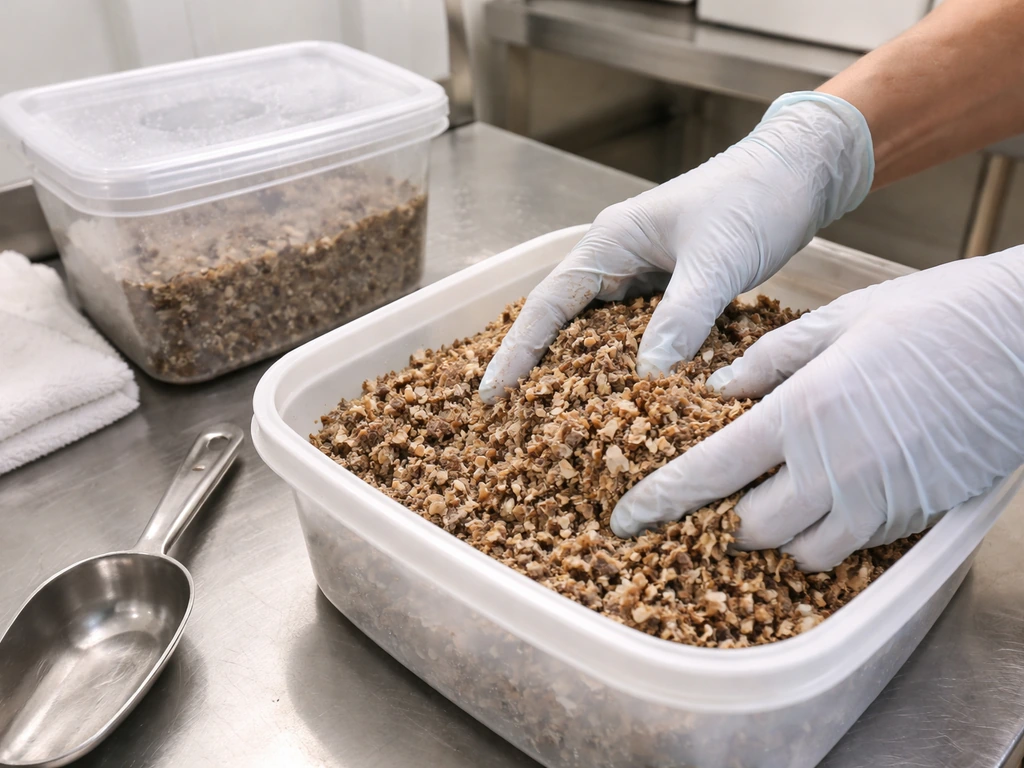
- Add spawn to your cooled substrate at a rate of 10–20% spawn by weight of dry substrate (more spawn = faster colonization = less time for contaminants to establish).
- Mix thoroughly (for grain-to-grain transfers or spawn-to-substrate), seal your bag or container, and label it with the date and species.
Inoculation, colonization, and what to watch for
After inoculation, your bags or containers go into a warm, dark space to colonize. You're looking for white, fluffy mycelium to spread through the substrate. Keep the area between 70–80°F (21–27°C) for most species during this phase.
Typical colonization timelines:
| Species | Colonization Time | Signs of Healthy Growth |
|---|---|---|
| Oyster mushrooms | 7–14 days (straw) | Dense white mycelium, sometimes blue bruising (normal) |
| Shiitake | 30–60 days (sawdust bags) | White mycelium, later browning/casing of surface |
| Lion's Mane | 14–21 days | Dense white mycelium, mild musty smell (normal) |
| Wine Cap (outdoor) | 4–8 weeks (wood chips) | White strands visible in chip layer |
| Reishi | 30–60 days | Slow white spread, fan-like growth at edges |
During colonization, you don't need to do much. Check your bags every few days for signs of contamination (anything that isn't white or off-white, any wet rot, any strong foul smell). Healthy mycelium smells earthy, mushroomy, or slightly sweet. Some CO2 buildup inside sealed bags is fine and actually helps mycelium spread. Don't open your bags during colonization unless you see a serious problem.
One thing that surprises first-time growers: metabolic heat. A fully colonizing bag or jar can feel noticeably warm. This is normal and a sign things are working. If your room is already warm, watch that your substrate doesn't overheat above 85–90°F (29–32°C), which can stress or kill mycelium.
How to trigger fruiting and get your first pins
Once your substrate is fully colonized (white throughout, no visible uncolonized patches), it's time to initiate fruiting. Mushrooms need a change in environmental conditions to know it's time to fruit. The main levers are temperature drop, increased fresh air exchange (lower CO2), and high humidity.
Environmental targets during fruiting
| Parameter | Target Range | Notes |
|---|---|---|
| Humidity (RH) | 80–95% | Mist walls of fruiting chamber 2–4x daily, not directly onto pins |
| Temperature | Species-dependent (see table above) | A 5–10°F drop from colonization temp helps trigger pinning |
| Fresh Air Exchange (FAE) | 4–8 air exchanges per hour | Fan on a timer, or cracked lid on tote; high CO2 causes leggy, stemmy mushrooms |
| Light | Indirect, 12 hrs/day | Not for photosynthesis; just as a directional cue for fruiting bodies |
| CO2 levels | Under 1000 ppm ideal | High CO2 is the main cause of long stems and underdeveloped caps |
To initiate fruiting with oyster mushrooms in bags: cut 2–4 small X-shaped slits (1–2 inches) in the side of the bag where you want pins to form, move the bag into your fruiting chamber, and start misting and fanning. Pins usually appear within 3–7 days. For shiitake on sawdust blocks, the standard technique is to soak the block in cold water for 12–24 hours (called a cold water soak or cold shocking) before moving it to fruiting conditions.
Harvest before the caps fully flatten and the edges start to curl upward. For oysters, this means harvesting when the caps are still slightly cupped and before they drop a heavy spore print. Twist and pull the entire cluster off at the base. For shiitake, cut the stem close to the block. After your first flush, let the block rest for 7–14 days with reduced watering before triggering the next flush.
When things go wrong: diagnosing and fixing common problems
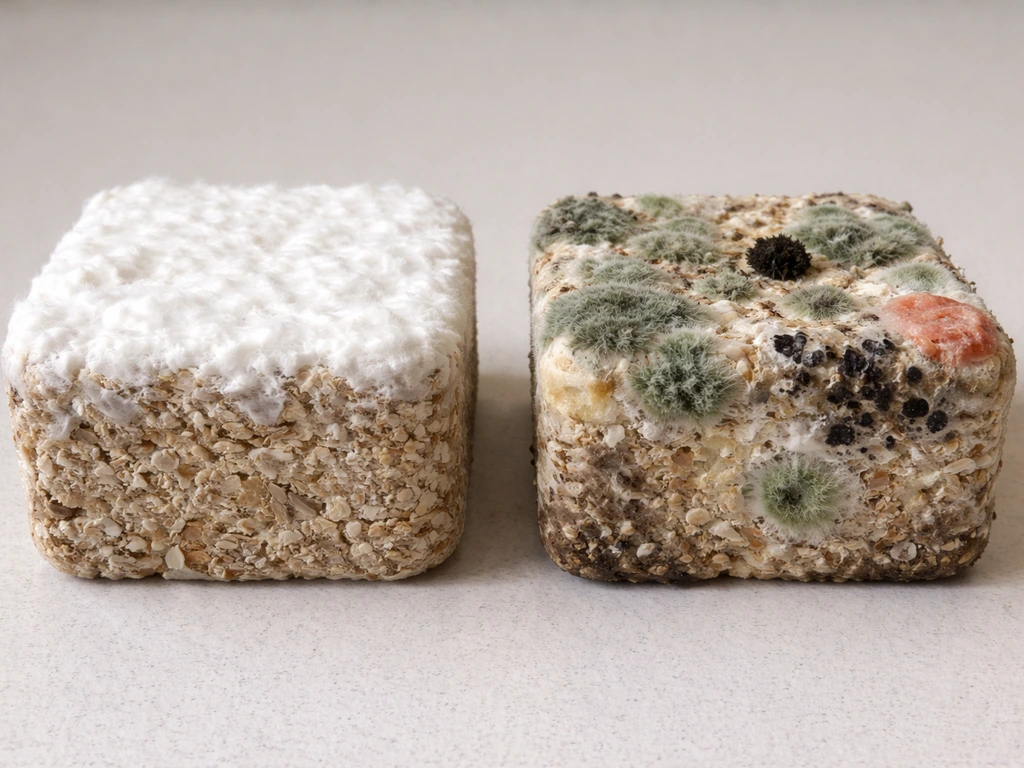
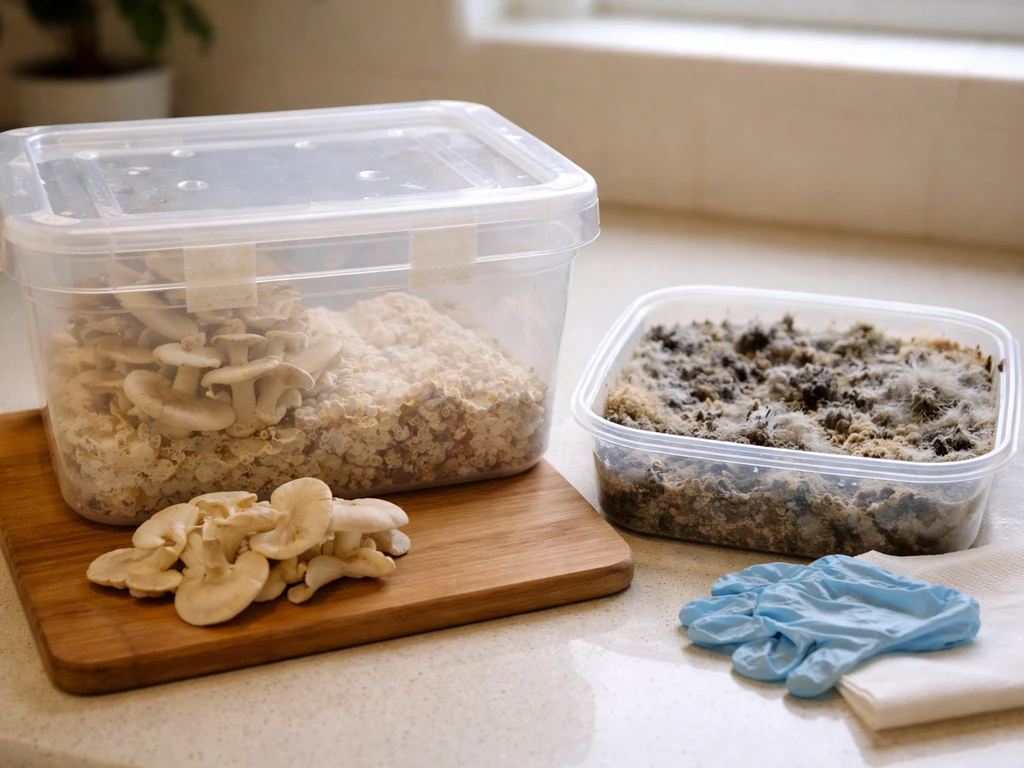
Green, black, or pink mold on your substrate
This is contamination, almost always trichoderma (green), aspergillus (black), or neurospora (pink/orange). If contamination is confined to one spot early in colonization, you might be able to isolate it by cutting and discarding that section, but if it's spreading, bag the whole block and throw it out. Don't open contaminated bags indoors to inspect them. The spore load is significant and not something you want to breathe. The CDC and NIOSH note that dampness and mold exposure can cause respiratory symptoms and infections, worsen or trigger asthma, and lead to hypersensitivity pneumonitis, allergic rhinitis, and eczema blank" rel="noopener noreferrer">Health Problems. Most contamination traces back to: insufficient sterilization, inoculating while substrate was still too warm, or sloppy inoculation technique.
No growth or very slow colonization
First check your temperature: if it's below 60°F (15°C), mycelium will slow dramatically. Move the bags somewhere warmer. If temperature is fine, check your spawn viability: old or improperly stored spawn loses vitality. If your spawn smells sour or is a different color than white, it may already be dead or contaminated. Spawn should be used within 4–6 weeks of purchase if stored at room temperature, or within a few months if refrigerated.
Colonization looks complete but no pins
This is almost always a fruiting condition problem. The most common causes are CO2 too high (not enough fresh air), humidity too low, or temperature hasn't dropped enough from the colonization phase. Try dropping the temperature by 5°F, increasing fanning frequency, and misting more aggressively. Some blocks also need a physical trigger: soaking shiitake blocks in cold water for 24 hours almost always works when other methods haven't produced pins.
Long, leggy stems and tiny caps
Classic high-CO2 morphology. Your fruiting chamber isn't getting enough fresh air. Fan more frequently, crack lids wider, or add more holes to your fruiting chamber. Once you correct the airflow, the next flush will develop properly shaped caps.
Mushrooms drying out or aborting before maturity
Humidity is crashing. Young pins are extremely sensitive to dry air. If they're starting to dry and crack, they won't recover. Mist more frequently and make sure your humidity stays above 85% during pinning. A wet paper towel or cloth hung in the fruiting chamber can help buffer humidity in small setups.
After your first harvest: scaling up, staying safe, and planning ahead
Most healthy blocks will produce 2–4 flushes before yields drop off significantly. Between flushes, rest the block for 7–14 days in lower humidity. After the final flush, your spent substrate makes excellent compost or garden mulch: the mycelium has broken down the material into something plants love.
When you're ready to scale up, the first step is usually making your own grain spawn from bulk grain (rye berries, wheat berries, or popcorn corn are all popular) instead of buying it every grow. This brings your per-grow cost down dramatically. After that, many growers experiment with agar work: pouring petri dishes with malt extract agar to clone healthy mushrooms from a small tissue sample, isolate clean genetics, and maintain cultures long-term. That opens up a whole world of strain selection and DIY spawn production.
A few safety basics worth keeping in mind as you grow:
- Always identify your mushrooms before eating. If you bought spawn from a reputable supplier and grew a single species in a controlled substrate, identification is straightforward. But don't eat anything you're unsure about.
- Handle contaminated blocks outdoors with a mask and gloves. Mold spore exposure in enclosed spaces is a real respiratory risk, especially for anyone with asthma or allergies.
- Don't let fruiting rooms get excessively moldy. A clean, well-managed grow room should not have visible mold growing on walls or floors. If it does, clean it with a diluted bleach solution and improve air circulation.
- Store fresh mushrooms in paper bags in the refrigerator. Most edible cultivated mushrooms keep well for 5–10 days. Black fungus (wood ear) can also be dried and rehydrated, which extends storage to months.
Your first grow won't be perfect. Mine wasn't either. But with a bag of oyster spawn, a bale of straw, and a basic understanding of what mushroom mycelium actually needs, you have everything required to get a real harvest. Start simple, observe carefully, and adjust as you go. The learning curve drops fast after that first flush. To understand what you are really working with, it helps to know how fungus grow in the soil and colonize organic material how do fungus grow in the soil.
FAQ
Can I grow fungus at home from food scraps or kitchen leftovers instead of buying spawn?
You can try foraging your own cultures, but it is not a reliable “how to grow fungus at home” path because you cannot control contamination. For edible mushroom cultivation, the consistent method is starting with purchased, reputable spawn. Food scraps tend to attract fast molds, and you also cannot safely identify unknown species for consumption.
Do I need to sterilize everything, or is pasteurizing enough?
Pasteurization is usually for straw-type substrates where competing organisms are reduced but not eliminated, and it can be enough for oyster-style grows. Grain spawn and any nutrient-rich substrates need sterilization because contamination pressure is much higher. If you are using sterilized spawn jars or bags, do not switch to pasteurization for the stage that requires sterilization.
How can I tell healthy mycelium from early contamination before it becomes obvious?
Healthy oyster mycelium spreads as uniform white or off-white growth and typically looks fluffy, not patchy with distinct colors. Early contamination often shows as localized spots that look darker, wet, slimy, or oddly colored compared to the surrounding white. Also rely on smell, if it turns strongly sour, putrid, or “off” compared to earthy/mushroom notes, treat it as a contamination risk.
What should I do if my bags are colonizing but slowing down, or stalling?
First check temperature, keep colonization generally in the 70 to 80 F (21 to 27 C) range for most common beginners. Next, confirm spawn viability, old or improperly stored spawn may not fully colonize. If your substrate was inoculated too warm, you can also get stalls, in that case the mycelium may never recover, and you may need to start fresh.
Is it safe to open a contaminated bag outdoors instead of throwing it away?
Do not open contaminated bags to “check” anything, even outdoors. If you see spreading contamination, bag it up, seal it, and dispose of it outside without disturbing it. The goal is to prevent releasing spores you do not want to breathe.
Can I reduce contamination by isolating my workspace instead of using better technique?
Improving technique matters more than workspace separation. Common high-impact fixes are inoculating when the substrate is fully cooled, keeping tools and gloves clean, minimizing how long open containers sit exposed, and not touching inside surfaces. Isolation can help, but it cannot compensate for rushing cooling or sloppy inoculation.
Why is my substrate warm during colonization, and at what point is it a problem?
Metabolic heat is normal, many bags feel noticeably warmer than room temperature. It becomes a problem when temperatures climb above roughly 85 to 90 F (29 to 32 C), which can stress or kill mycelium. If your room is hot, use more stable placement away from direct sunlight and check the temperature with a probe rather than guessing.
What causes mushrooms to form poorly shaped caps, and how do I correct it?
Most misshaping is linked to high CO2, not enough fresh air exchange, or uneven humidity/evaporation. Increase fresh air (more frequent fanning or more openings), and keep humidity high enough that young pins do not dry out. Once corrected, shaped growth often improves on the next flush rather than instantly.
Do I need to mist continuously, or is there a better way to manage humidity?
Continuous misting is not always necessary, and it can create overly wet surfaces that invite problems. Instead, aim for steady humidity in the 80 to 95% fruiting range, and adjust based on pin behavior. In small setups, buffering with a damp cloth or wet towel can stabilize humidity without constant heavy spraying.
How do I avoid harvesting too late or too early?
Harvest timing affects yield and mess. For oyster-type harvests, take clusters when caps are still slightly cupped and before the edges curl upward and drop spores heavily. If you wait until caps fully flatten and spores disperse, you may get a shorter next flush because the environment becomes more spore-laden and dry on surfaces.
After the first flush, should I keep the block in the same conditions?
Usually you should not maintain identical “pinning” conditions nonstop. After harvesting, rest the block for about 7 to 14 days with reduced watering and often lower humidity, then re-trigger fruiting when conditions and the block re-stabilize. If you rush directly back to heavy misting and fanning, some blocks produce weaker subsequent flushes.
How long can I store spawn before it stops working well?
A practical rule is to use spawn relatively quickly, room-temperature storage is typically around 4 to 6 weeks. Refrigeration extends that window for some products, but you still should not expect indefinitely high viability. If spawn smells sour or looks off-colored, assume it is compromised and do not push it onto a new substrate.
Can I reuse containers or grow bags between cycles to save money?
You can reuse some equipment, but do it carefully. Wash and allow thorough drying, and avoid reintroducing contamination. For anything that directly contacts substrate or fruiting surfaces, prioritize cleaning and controlled hygiene, because prior contamination can persist as spores even when items look “clean”.