blank" rel="noopener noreferrer">Growing caterpillar fungus at home almost always means growing Cordyceps militaris, not the legendary Ophiocordyceps sinensis that parasitizes ghost moth larvae in the Himalayas. That distinction matters enormously, because C. militaris is genuinely cultivatable indoors on a grain substrate in jars, while O. sinensis is not realistically achievable outside a specialized research setting. If you go in with that understanding, you can absolutely grow beautiful orange fruiting bodies at home in roughly 8 to 12 weeks from inoculation.
How to Grow Caterpillar Fungus at Home: A Beginner Guide

Marcus Holloway
16 May 2026
What caterpillar fungus actually is and which species to target
Cordyceps militaris is an entomopathogenic fungus, meaning it evolved to infect insects, but in cultivation it grows happily on grain-based substrates without any insect host at all. It produces vivid orange club-shaped fruiting bodies rich in cordycepin and other bioactive compounds, and it is the species behind most commercial cordyceps supplements. This is the one you want to grow.
Ophiocordyceps sinensis is the species traditionally harvested from wild caterpillar-fungus complexes found at high altitude in Tibet and Nepal. The fruiting body grows from the body of a parasitized ghost moth larva, and the conditions needed to replicate that system (specific host insect, soil composition, altitude, and multi-year life cycle) are impossible to reproduce at home. Most products sold as 'cordyceps sinensis' are actually mycelial cultures grown on grain, not the true worm-and-grass form. There is nothing wrong with mycelial culture for health purposes, but it is not the same thing as a fruiting body grow. Stick with C. militaris if you want actual fruiting bodies.
What you'll need before you start
The shopping list for a Cordyceps militaris grow is shorter than you might expect. The three things that matter most are a clean spawn source, a suitable substrate, and containers you can sterilize.
Spawn and spores
Liquid culture (LC) syringes are the most beginner-friendly starting point for C. militaris. You inject the liquid directly into your prepared substrate jars with minimal exposure to contaminants. Agar plates and grain spawn also work, but LC is the easiest entry point. Buy from a reputable supplier that specifically labels the material as Cordyceps militaris. Avoid vague 'cordyceps' listings without species confirmation.
Substrate
Supplemented grain is the standard substrate for home C. militaris grows. Brown rice or white rice are the most common choices, often used as cooked rice packed into jars. Some growers use a mix of brown rice and nutritional supplements like peptone or silkworm powder to boost yields, but plain cooked rice works well for a first grow. The substrate needs to be moist but not wet, sterilized, and cooled completely before inoculation.
Containers and equipment
- Wide-mouth mason jars (half-pint or pint) with modified lids: drill a hole and fit a polyfill or tyvek filter port for gas exchange
- Pressure cooker (15 PSI) for sterilizing substrate, or at minimum a stove-top steam sterilization setup for multi-hour pasteurization
- Still air box (SAB) or flow hood for inoculation: a clear plastic tub flipped upside down works fine as an SAB
- Isopropyl alcohol (70%) and latex gloves for sanitation
- A humidity tent or monotub with lid for fruiting (a clear plastic storage bin works)
- Small humidifier or spray bottle for maintaining humidity during fruiting
- LED grow light or fluorescent shop light for fruiting stage
- Thermometer and hygrometer to monitor conditions
Setting up your indoor grow space
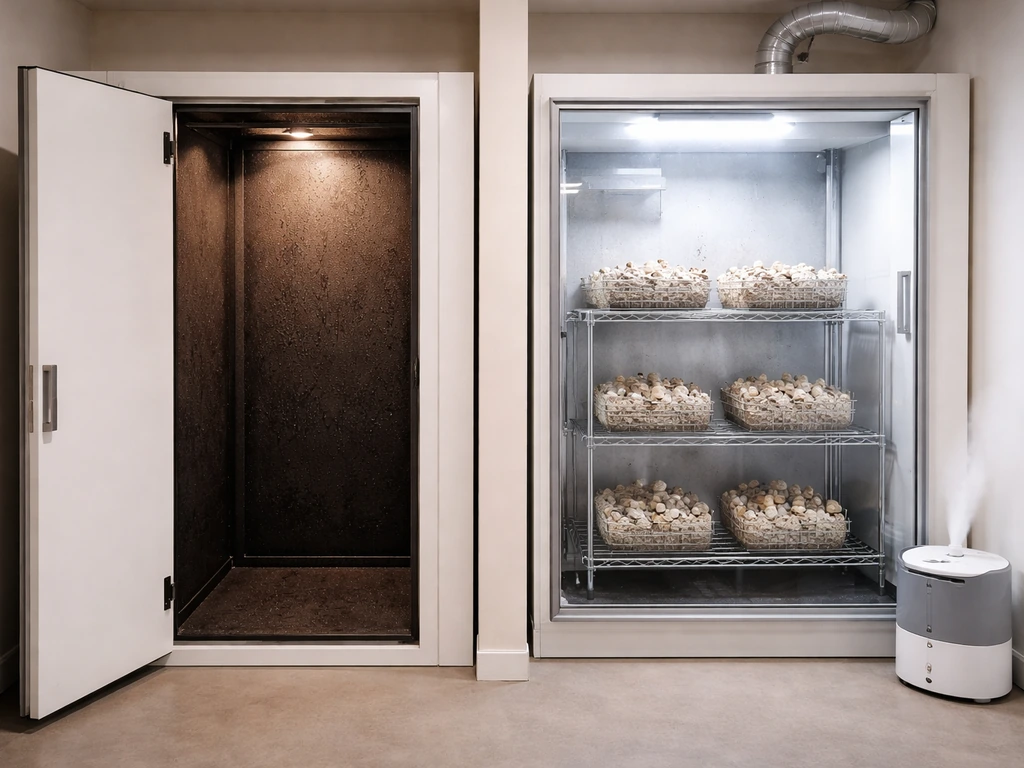
Cordyceps militaris has two clearly distinct phases: a mycelial colonization phase that needs warmth and darkness, and a fruiting phase that needs light, slightly lower temperatures, high humidity, and fresh air exchange. You need two different environments, and knowing this upfront saves a lot of confusion. A spare closet works for colonization. A shelf near a window or under a lamp works for fruiting.
Keep your colonization space between 20 and 25°C (roughly 68 to 77°F). In a peer-reviewed technical study, mycelium activation/incubation on PDA is carried out in the dark at about 20°C (for example, 5 days), followed by inoculation of a seed culture until surface coverage (for example, 10 days) Molecular Mechanisms of Temperature. This matches both lab-reported optima and the practical guidance used in commercial production. If your house runs cooler, a seedling heat mat under the jars keeps things in range. During colonization, block out light entirely. A cardboard box over the jars or a dark closet both work.
Your fruiting environment needs a target temperature around 18 to 22°C (64 to 72°F), humidity between 80 and 90%, 12 to 14 hours of scattered light per day, and regular fresh air exchange. A clear tote with a few small holes covered by polyfill acts as a simple fruiting chamber. Mist the walls (not the substrate surface directly) twice a day, and fan briefly to exchange CO2. A cheap timer on your grow light handles the light schedule automatically.
Substrate prep, inoculation, and incubation: step by step
- Cook your rice until just done (not mushy), then spread it out to cool and dry the surface slightly. You want moist grains, not wet clumps.
- Fill mason jars about two-thirds full with the cooled rice. Don't pack them tight. Wipe jar rims clean, then fit modified lids with filter ports.
- Pressure cook at 15 PSI for 90 minutes, or steam sterilize for 3 to 4 hours if you don't have a pressure cooker. Let jars cool fully (overnight is fine) before touching them.
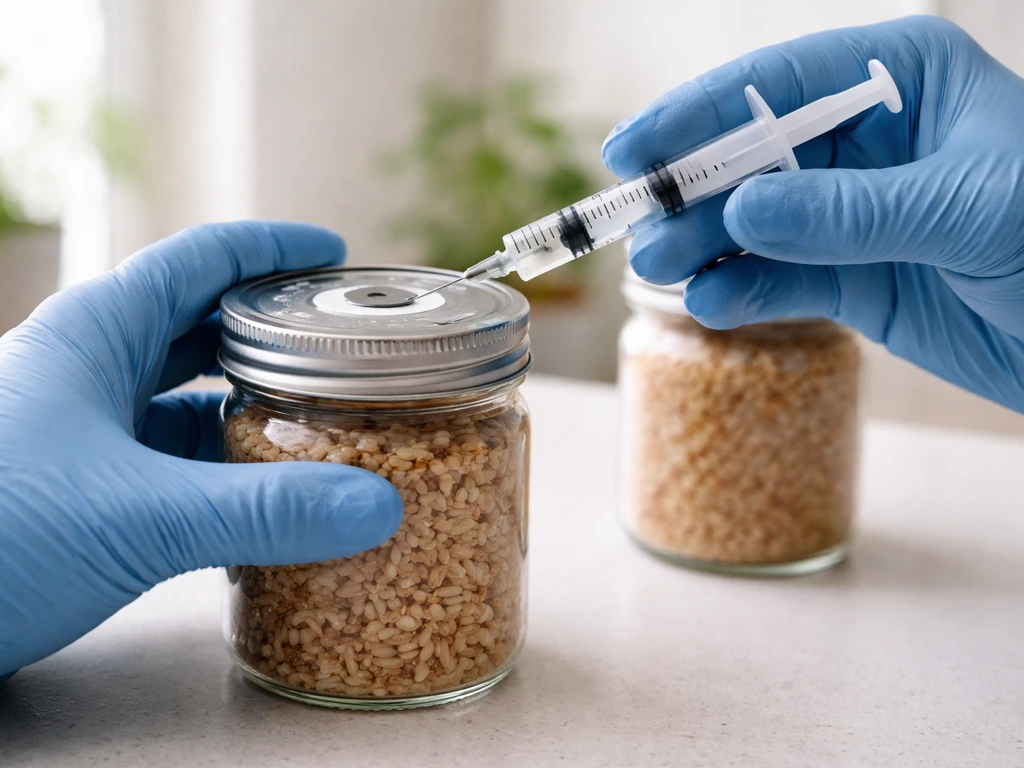
- Set up your still air box: wipe the interior with 70% isopropyl, let it air out for two minutes, then place your cooled jars and LC syringe inside.
- Flame sterilize the syringe needle until glowing, let it cool for 10 seconds, then inject 1 to 2 mL of liquid culture per jar through the filter port. Work slowly and avoid touching the needle to anything.
- Shake or swirl gently to distribute the inoculant through the rice.
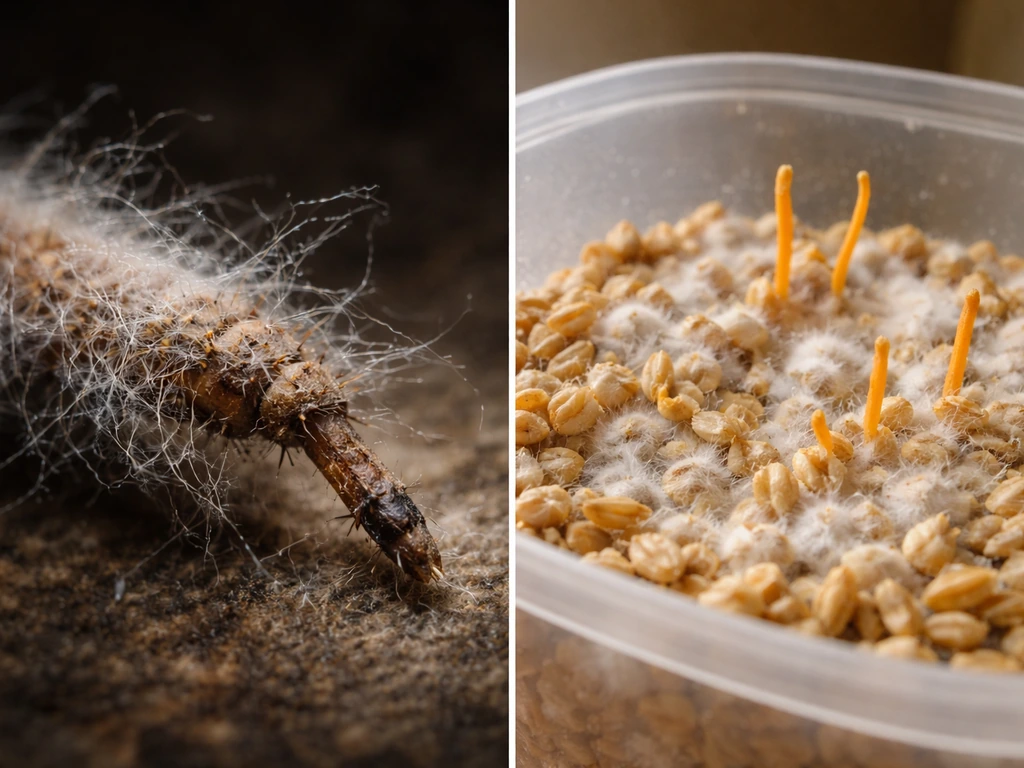
- Place jars in your dark, warm colonization space at 20 to 25°C. Check every few days for signs of white mycelial growth and, critically, for any green, black, or pink contamination.
- Colonization typically takes 10 to 20 days. Wait until the surface is fully covered with white mycelium before moving to fruiting conditions.
Triggering fruiting: the conditions that actually matter

Once your jars are fully colonized, it is time to switch everything up. This transition is where most beginners lose confidence, but the signals you're sending to the fungus are simple: introduce light, dial in humidity, drop the temperature slightly, and increase fresh air exchange.
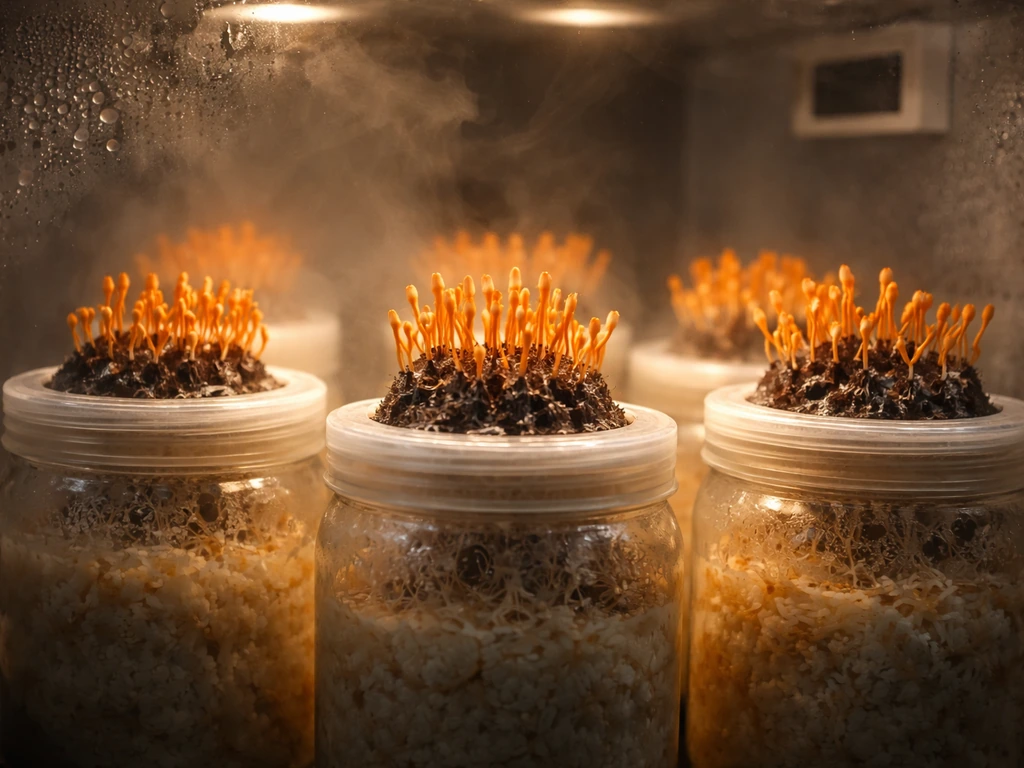
Move colonized jars into your fruiting chamber and open or remove the lids. If you're using wide-mouth jars, some growers just leave them open-topped inside a humidity tent. Target 80 to 85% relative humidity and a temperature of 18 to 22°C. Run your LED or fluorescent light on a 12 to 14 hour daily cycle. Scattered, indirect light works just as well as direct light for home setups.
Primordial pins typically appear within 10 to 15 days of introducing fruiting conditions. Full fruiting body development then takes another 30 to 40 days, so total time from switching to harvest is usually 6 to 8 weeks. Community experience generally puts the range at 4 to 6 weeks after fruiting conditions are introduced, depending on your strain and environment. Don't rush it. Cordyceps militaris fruiting bodies grow slowly compared to oyster mushrooms, for example, and the orange color deepens as they mature.
| Parameter | Colonization Phase | Fruiting Phase |
|---|---|---|
| Temperature | 20–25°C (68–77°F) | 18–22°C (64–72°F) |
| Humidity | Moderate (substrate moisture retained in jar) | 80–90% RH |
| Light | None (complete darkness) | 12–14 hours/day scattered light |
| Fresh Air Exchange | Minimal (filter port only) | Brief daily fanning or passive exchange via holes |
| Duration | 10–20 days | 40–55 days (pins + full growth) |
Harvesting, handling, and drying your cordyceps
Harvest C. militaris fruiting bodies when they are fully elongated and the tops show a slightly roughened texture, before the caps begin to release spores (you'll notice a faint orange dust if you've waited too long). Gently twist and pull the clubs from the substrate surface, or use clean scissors to snip at the base. Handle them carefully as they bruise easily.
After harvest, brush off any substrate material with a dry brush. Don't wash fresh cordyceps with water if you plan to dry them, as excess moisture promotes mold during drying. You can use them fresh immediately, or dry them for storage.
Drying and storage
For drying, a food dehydrator set to 50 to 60°C is the most reliable home option. Research comparing drying temperatures shows that 50°C preserves flavor and bioactive compounds well, while 60°C is often cited as the practical optimum balancing drying speed and compound retention. Avoid drying above 70°C as heat degrades key compounds like cordycepin. Dry until the fruiting bodies snap cleanly rather than bend, usually 4 to 8 hours depending on thickness.
Store dried cordyceps in an airtight glass jar away from light and heat. Properly dried and stored C. militaris fruiting bodies keep well for 6 to 12 months without significant quality loss. If you notice any softness or moisture returning to the stored material, re-dry immediately to prevent mold.
When things go wrong: troubleshooting common failures
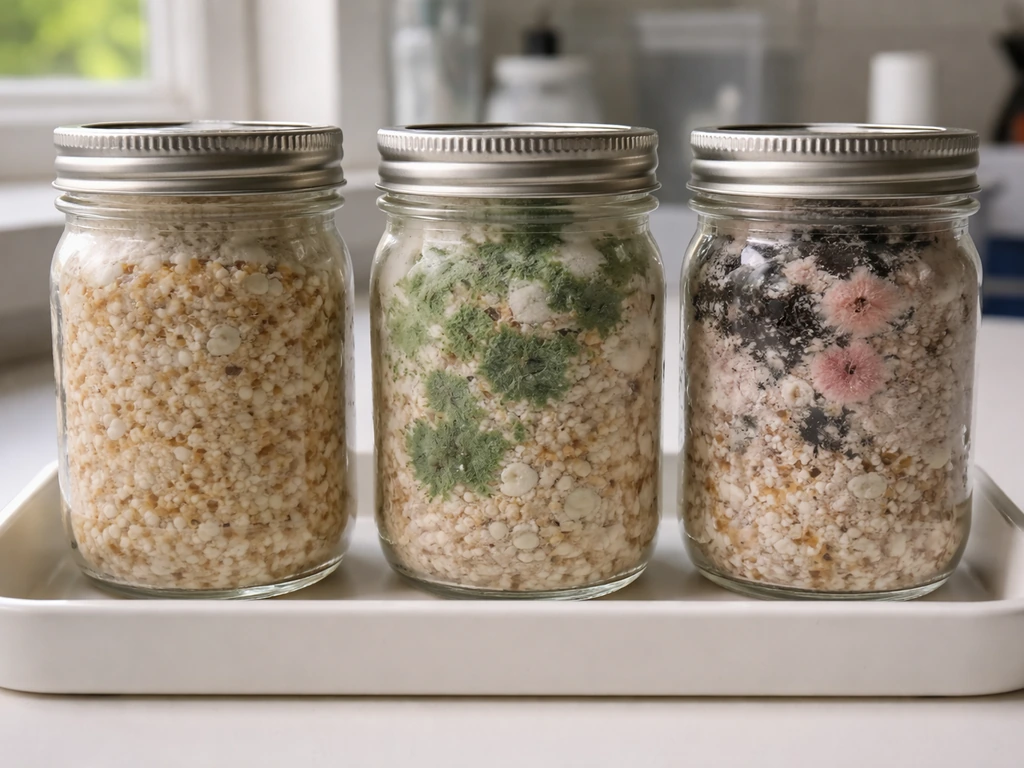
Green, black, or pink contamination in jars
This is Trichoderma, Aspergillus, or Neurospora moving in, and it almost always means inoculation wasn't clean enough or the jars weren't fully sterilized. Isolate and bin contaminated jars immediately. Do not open them indoors. Review your sterilization time (90 minutes at 15 PSI is non-negotiable for grain), and check that your jars were completely cool before inoculation. A jar that's even slightly warm creates condensation that pools and creates wet spots where bacteria and mold thrive.
Slow or no colonization
If you see no visible mycelial growth after two weeks, the most likely culprits are temperature too low, dead or weak liquid culture, or substrate that was too wet and went anaerobic. Check your thermometer. A common beginner mistake is assuming room temperature is fine when it's actually 16 to 18°C in a basement grow space. Add a heat mat and check your LC viability by inoculating a small test agar plate before committing to a full batch.
No fruiting bodies after colonization
This is the most frustrating outcome and the most common question in cordyceps growing communities. If you also want background on natural fungal development, see how do fungus grow in the soil for the soil-based perspective that explains why colonization can stall. The usual causes are missing one of the three fruiting triggers: insufficient light, humidity below 80%, or temperature too high (above 25°C during fruiting). Make sure you've fully committed to all three changes simultaneously. Also, some strains are slow starters. Give it at least three weeks before panicking. If humidity is the issue, a cheap hygrometer will confirm it within minutes.
Thin, pale, or stunted fruiting bodies
Pale orange color often means insufficient light intensity or duration. Increase your light period to 14 hours and move the light source closer. Thin or sparse fruiting bodies can also result from substrate that was too depleted or a poor strain. Supplementing your substrate with a small amount of nutritional yeast or peptone in future batches often improves both density and color.
Substrate drying out or going too wet
During fruiting, you want the surface moist but never pooling. If the top layer of rice looks crusty and dry, mist the walls of your fruiting chamber more frequently. If you see standing water at the jar base, you're over-misting and risking bacterial contamination. Mist the chamber walls rather than the substrate directly, and let the humidity do the work.
Safety, legality, and realistic expectations
Cordyceps militaris cultivation is legal in the United States, the United Kingdom, Canada, Australia, and most other countries. There are no controlled-substance restrictions on growing or consuming it. If you're outside these regions, a quick local check is worthwhile, but C. militaris is generally treated as a food or dietary supplement crop rather than a regulated substance anywhere it's commercially produced.
From a safety standpoint, C. militaris is well-studied and considered safe for consumption by healthy adults. People with autoimmune conditions or those on blood-thinning medication should check with a doctor before using cordyceps in quantity, since cordycepin has documented biological activity. As with any home-cultivated food product, basic hygiene during harvest and proper drying to prevent mold are the main practical safety considerations.
Set your expectations around timeline and yield realistically. A single pint jar of colonized rice substrate will typically yield 5 to 15 grams of fresh fruiting bodies, which translates to 1 to 3 grams dried. That's not a huge amount, but it's meaningful if you're growing for personal supplementation. Running 6 to 12 jars at a time gives you a useful harvest cycle.
From first inoculation to dried product, budget 10 to 14 weeks total for your first grow. If you are specifically asking how to grow foxfire fungus, note that most at-home guides are really about cultivating Cordyceps militaris rather than the true legendary species. You'll get faster and more efficient with each round as you dial in your specific setup.
One more honest note: if you're drawn to caterpillar fungus because of the traditional Ophiocordyceps sinensis reputation, understand that what you're growing is a related but distinct species. If you’re specifically asking how to grow nether fungus, it’s best to focus on whether you mean a mycelial culture or a true fruiting-body species and then follow that species’ substrate and fruiting requirements. C.
militaris contains the same key compound, cordycepin, and shares many of the adaptogenic properties that made the Himalayan variety famous. For practical at-home cultivation purposes, it is simply the better choice: faster, more forgiving, genuinely achievable, and well-supported by both research and a growing community of home growers. If you're interested in exploring other specialty fungi alongside this grow, varieties like black fungus mushroom or termite mushroom offer similarly interesting cultivation challenges once you've built confidence with your setup.
If you still want an even more adjacent specialty project, see how to grow foxfire fungus next to compare conditions and outcomes across different fungal cultivation styles termite mushroom. If you're also looking for a black fungus mushroom, the safest starting point is to identify the exact species you mean and follow its specific substrate and humidity needs before you buy spawn.
If you specifically want to grow termite mushrooms, you should start by researching the exact species and matching its preferred substrate and temperature range.
FAQ
Can I grow caterpillar fungus using fresh rice without cooking it first?
Cooking (or fully gelatinizing) rice makes starch more accessible and reduces the chance of uneven hydration inside the jar. If you use raw or parboiled grains, the moisture distribution can be inconsistent, which often leads to stalls, patchy colonization, or anaerobic pockets. For a first grow, stick with cooked rice packed into jars, then only experiment with changes one variable at a time.
Do I need an actual thermostat and hygrometer, or are adjustments by feel enough?
For reliable fruiting, you want at least a basic thermometer and a hygrometer. Cordyceps militaris is sensitive to humidity and temperature thresholds, and “by feel” often misses those targets (for example, a room that feels warm can still be below 18°C, or a humid chamber can drop below 80%). A cheap combo gauge lets you confirm that your environment is truly in the right range before troubleshooting lights and misting.
How do I prevent condensation inside my jars right after inoculation and during incubation?
Condensation usually comes from inoculating before the jars have fully cooled or from temperature swings that cause jar surfaces to cool faster than the air. Use a jar-cooling step long enough that jars are completely room temperature, then keep the colonization space stable. If you see wet spots, increase cleanliness and consider that jar contamination risk is already higher, isolate it early.
Why does my jar look colonized, but no pins appear after I switch to fruiting conditions?
If the colonization looks healthy, the missing trigger is often one of the three you may be under-shooting, light, humidity, or fresh air exchange. Also confirm timing, give it at least 10 to 15 days for primordial pins. If you are opening lids or removing them, ensure you still maintain humidity in the chamber, not just in the jar air volume.
Is it better to keep the jars sealed or cracked open during fruiting?
It depends on your chamber design. If your fruiting chamber is humid and you can maintain 80 to 85% relative humidity, leaving jars slightly open or removing lids can improve fresh air exchange. If humidity drops when jars are opened, use a humidity tent so air exchange increases without drying out the surface. The goal is surface moisture without letting the substrate stay wet or stagnant.
Can I reuse jars or substrate for another flush after harvesting?
Usually not with grain-based Cordyceps grow setups that were sterilized and then exposed during harvesting. Harvesting and handling can introduce contaminants that make a second attempt unreliable. If you do attempt a second flush, keep it in a clean, controlled environment and discard any that show contamination or off odors early.
What should I do if the fruiting bodies start releasing orange dust (spores) before I harvest?
Once you see spore release, the clubs are past the ideal texture and quality window. Harvest promptly when tops are slightly roughened but before noticeable dusting starts. If only a few tips sporulate, you can harvest the rest immediately and separate them from any mature, dusty pieces to reduce mess in the chamber.
Is it okay to rinse fresh cordyceps before drying?
Rinsing is not recommended if your plan is to dry them, because surface moisture increases mold risk during drying. If you must remove stubborn debris, use gentle handling and brushing first. If any pieces get wet, dry them faster and more thoroughly than usual, and inspect closely during the first hours of drying.
How can I tell if my dried cordyceps are overdried or still too moist?
Overdried usually feels very light and brittle, while too-moist material feels slightly flexible or can show condensation or clumping after a day in storage. A practical check is to store a small sample in an airtight jar, then re-evaluate after 24 to 48 hours. If you notice any softness returning, re-dry promptly until they snap cleanly again.
What is the best way to store dried cordyceps for long-term quality?
Use airtight glass containers and keep them away from light and heat. To reduce moisture cycling, store only fully dried material and keep the jar sealed between uses. If you live in a very humid climate, consider short-term portioning (open less often) so each time you open the container you do not reintroduce humidity to the entire batch.
Why do I get Trichoderma or Aspergillus contamination, even when I sterilize jars?
Sterilization helps, but contamination can also come from non-sterile handling (spawn work, opening jars, transferring to fruiting areas) and from opening contaminated material indoors. If you had issues, re-check the cooling step, minimize time jars are exposed, and isolate suspect grows immediately. Also avoid moving colonized jars through the same space where you handle cleaning chemicals or dusty materials.
Can I validate that my liquid culture is healthy before inoculating an entire batch?
Yes. Inoculate a small test using an agar plate (or a minimal substrate test if you are already equipped) so you can observe whether it grows robustly before committing. This is especially useful if your LC is old or if you have had prior stalls. If the test shows weak or no growth, replace the LC rather than continuing with the main batch.
Will different strains of Cordyceps militaris change the timing and appearance?
Yes. Strain differences can shift how quickly you see pins, how dense the clubs become, and how deep the orange color develops. If you’re getting pale color, sparse fruiting, or slow starting, adjust your fruiting triggers together (light duration, humidity, temperature) but also give slow strains enough time, at least three weeks before concluding something is fundamentally wrong.
Is caterpillar fungus dosing the same for everyone, and is more always better?
No. The safe approach is to start with a small dose and increase only if tolerated, because Cordyceps compounds have documented biological activity. People on blood-thinning medication or with autoimmune conditions should consult a clinician before using it in larger quantities. Also keep in mind that home-grown material quality can vary, so dosing should be based on your actual dried weight and consistency from batch to batch.