If you searched for 'Len's Island how to grow mushrooms,' here's the thing: Len's Island is a video game, and its mushroom mechanic (plant a Farming Frame in the caves, wait, collect) has no real-world counterpart. There's no special 'Len's Island mushroom' species or cultivation protocol. What people are really after when they type that phrase is a beginner-friendly, home-grow setup that feels as simple and satisfying as the game makes it look. The closest real-world match is oyster mushrooms (Pleurotus ostreatus and related species), which are the most forgiving, fastest-fruiting, and rewarding mushroom a beginner can grow indoors or outdoors at home. That's what this guide is built around.
Len’s Island How to Grow Mushrooms: Complete Guide

Marcus Holloway
11 May 2026
What You're Actually Growing Here
Oyster mushrooms are the go-to for beginners because they colonize quickly, tolerate a range of temperatures, fruit on cheap and easy-to-source substrates, and give you multiple harvests (flushes) from a single block. There are several varieties worth knowing about: blue/pearl oyster (Pleurotus ostreatus) fruits best in the mid-60s°F range, pink oyster (Pleurotus djamor) loves warmer temps around 70-80°F, and golden oyster (Pleurotus citrinopileatus) sits somewhere in between. If your home runs cool, go pearl oyster.
If it stays warm year-round, pink oyster is very happy. All three follow essentially the same cultivation process outlined in this guide. If you've been exploring other varieties like lion's mane, know that those follow a similar indoor block method but with some different substrate and fruiting requirements. If you specifically want lion's mane, look for a dedicated guide on how to grow lion's mane mushrooms from plugs so you can match the right substrate and fruiting setup.
Lion's mane is often grown using a similar indoor block approach, but you will need to adjust the substrate and fruiting conditions for outdoor setups. Lion's mane uses a similar indoor block approach, but the substrate mix and fruiting conditions are a bit different than oysters. If you decide to try lion's mane mushrooms, use the same indoor block idea but adjust the substrate and fruiting conditions for that species.
Materials You Need Before You Start
Spawn Type
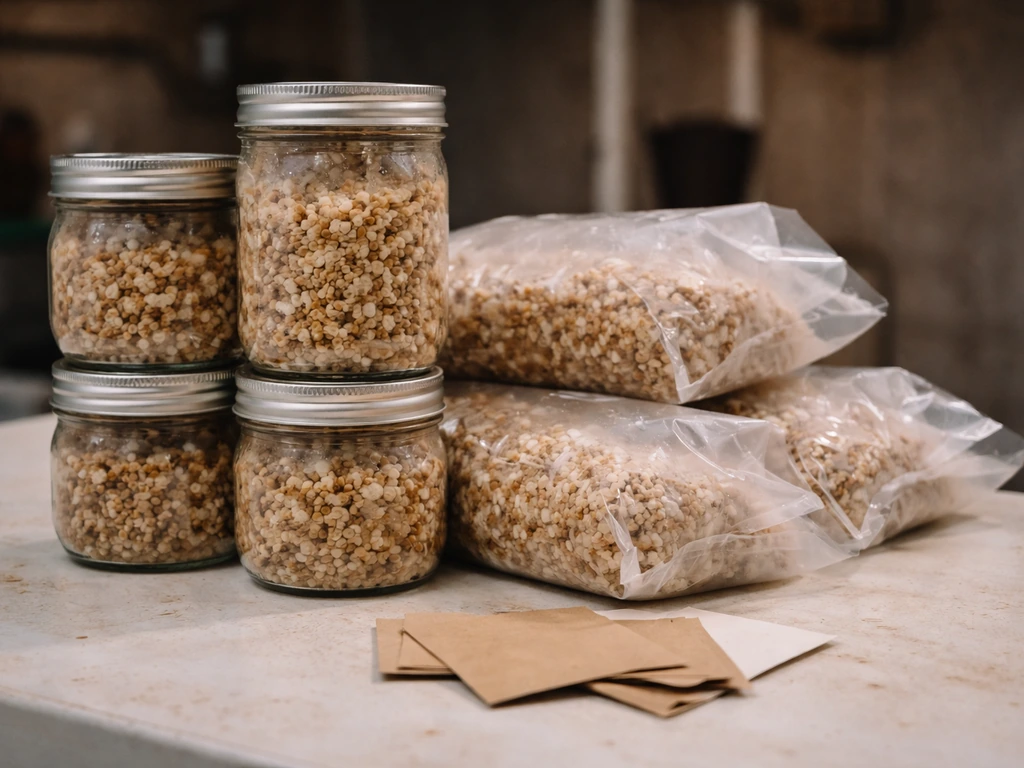
Grain spawn is your best bet. It colonizes fast, mixes well into bulk substrate, and is widely available from online suppliers. Grain spawn for oysters must be fully sterilized (not just pasteurized) during preparation, so if you're making your own, that matters. Buy it pre-made from a reputable vendor until you're comfortable with the process. A 1-2 lb bag of grain spawn will inoculate 5-10 lbs of substrate, depending on how aggressive you want colonization to be.
Substrate
Oysters love straw, hardwood sawdust, or a mix of both. Straw is cheaper and easier to source (feed stores carry it). Hardwood pellets (the kind sold as horse stall bedding) are a fantastic budget option: you hydrate them with hot water, they expand into fluffy sawdust, and they're already low in contamination risk. Target a moisture content of around 65-70% in your finished substrate, which feels like a wrung-out sponge: a firm squeeze produces a few drops of water but not a stream.
Tools and Supplies
- Grain spawn (1-2 lbs per grow block)
- Substrate: straw, hardwood pellets, or sawdust (5-10 lbs dry weight)
- Large bucket or tote for pasteurizing/hydrating substrate
- Boiling water or a large stockpot for pasteurization
- Polypropylene grow bags (filter patch bags) or large ziplock freezer bags for indoor grows
- Rubbing alcohol (70% isopropyl) and a spray bottle
- Latex or nitrile gloves
- Still-air box or flow hood for inoculation (a still-air box made from a clear storage tote works fine for beginners)
- Hygrometer and thermometer for monitoring your fruiting chamber
- Spray bottle for misting
- Humidity tent or fruiting chamber (a clear plastic tote or a martha-style wire shelf with plastic sheeting works)
Setting Up an Indoor Grow
Containers and Bags
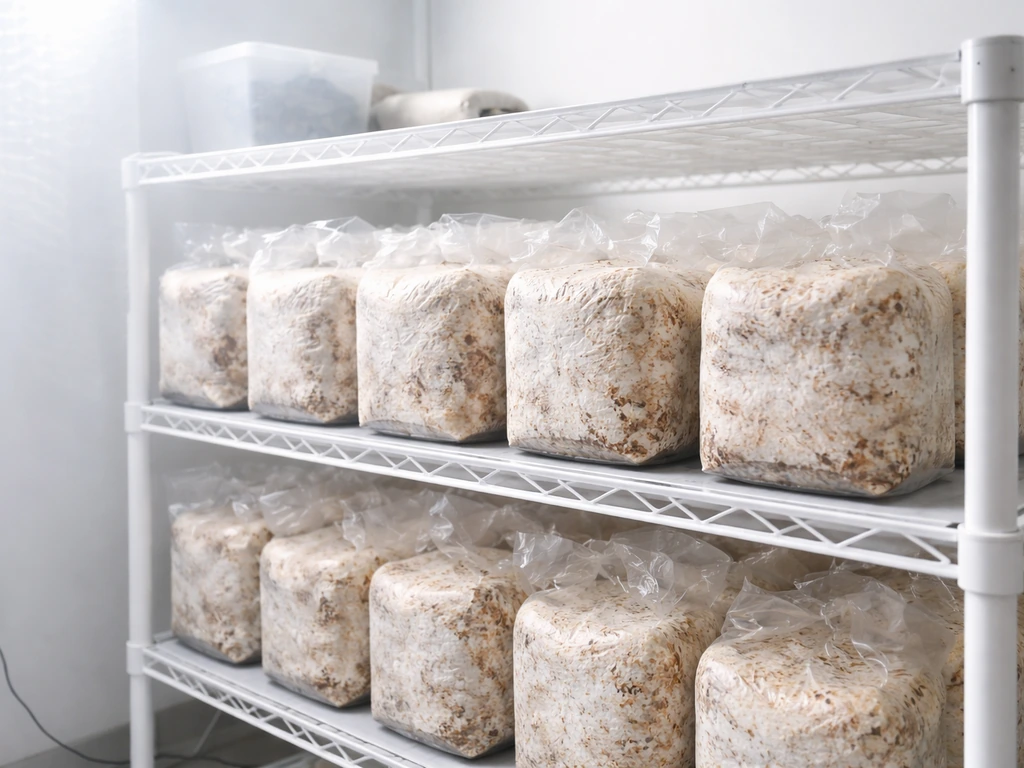
For indoor grows, filter patch grow bags are the cleanest and most reliable option. The filter patch allows gas exchange during colonization without letting contaminants in. If you're on a tight budget, large ziplock freezer bags with a small piece of polyfill stuffed into a corner hole work passably well. Once colonized, the block goes into a fruiting chamber: a clear tote with holes covered in polyfill, or a 'martha tent' setup with a ultrasonic humidifier on a timer.
Pasteurization vs. Sterilization
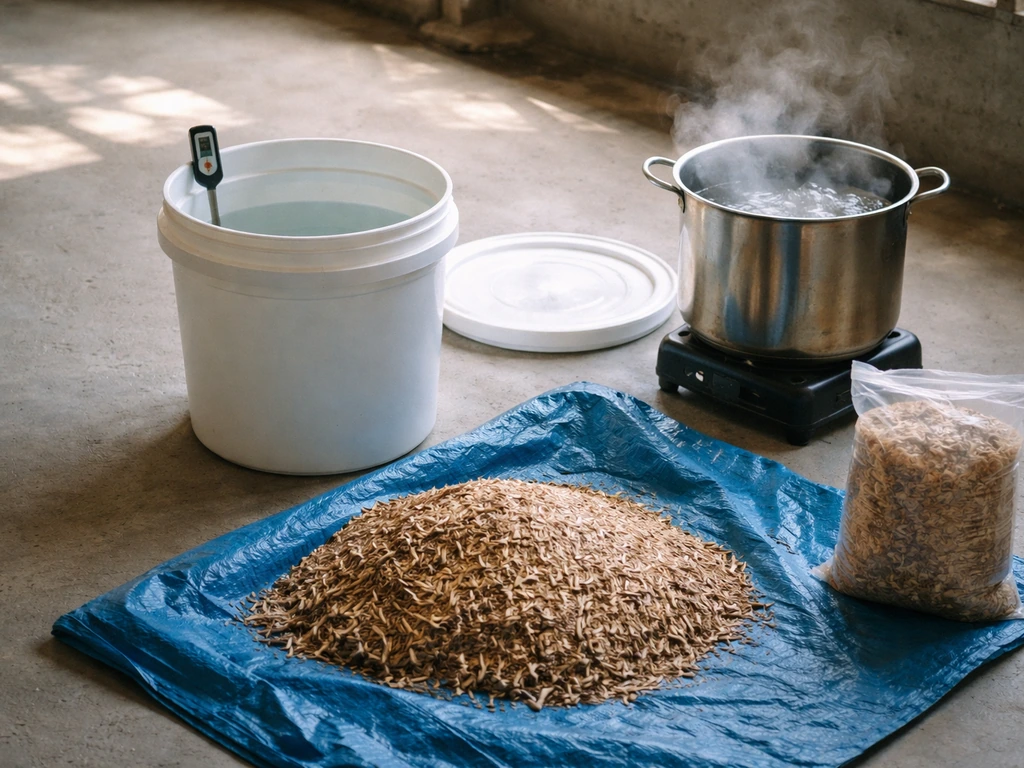
Straw substrate only needs pasteurization: submerge it in water held at 160-180°F for 1-1.5 hours, then let it drain and cool. Hardwood sawdust or pellet substrate needs full sterilization in a pressure cooker at 15 PSI for 2-2.5 hours, especially if you're using grain spawn mixed with sawdust. The rule of thumb is: the richer the substrate (more nutrients), the more aggressively you need to sterilize it, because contaminants love the same food your mycelium does. After processing, let everything cool to room temperature before inoculating. Inoculating warm substrate is one of the most common beginner mistakes and it kills your spawn.
Airflow and Environment
During colonization, you want warmth (70-75°F) and minimal disturbance. During fruiting, airflow becomes critical. Oysters are extremely sensitive to CO2 buildup: high CO2 causes long, stringy stems with tiny caps (sometimes called 'antler' morphology). You want to exchange the air in your grow space at least every 10 minutes.
That can mean opening the chamber and fanning a few times daily, or running a small computer fan on a timer. Keep fruiting temperatures in the mid-60s°F for pearl oyster, slightly warmer for pink or golden. For light, you don't need a grow light spectrum or high intensity. About 500-1,000 lux of indirect natural light or a simple LED on a 12-hour cycle is plenty.
Mushrooms don't photosynthesize; they just use light as a directional cue.
Setting Up an Outdoor Grow
Outdoors, oysters can be grown on straw bales, log sections, or in garden beds topped with inoculated substrate. Hardwood logs (oak, maple, alder) work extremely well for longer-term production: drill holes in a pattern across the log, pack in plug spawn (wooden dowels colonized with mycelium), seal with cheese wax, and let the log colonize in a shaded, moist spot for 6-12 months before the first fruiting. For a faster outdoor option, build an outdoor straw bale bed: pasteurize your straw, layer it with grain spawn in a shaded garden spot or under a shade structure, and expect fruits within 3-6 weeks depending on weather.
Shade, Moisture, and Timing
Outdoor grows need 70-80% shade. Direct sun dries out the substrate and kills pins. North-facing walls, the shaded side of a fence, or a simple shade cloth frame all work. Keep moisture consistent: outdoor grows benefit from daily misting or a drip line set to run briefly each morning. The ideal outdoor timing for pearl oyster is spring and fall when temperatures naturally sit in the 55-70°F range. For warmer climates and pink oyster, late spring through summer is perfect. In hot summers, move your outdoor grow to a cooler, shadier spot or transition to indoor growing.
Step-by-Step Grow Schedule
- Day 1 (Substrate prep): Pasteurize or sterilize your substrate. For straw, soak in 160-180°F water for 1.5 hours. For hardwood pellets, hydrate with boiling water and let cool to 65-70% moisture. Allow to cool completely (below 75°F) before moving to the next step.
- Day 1 (Inoculation): In your still-air box or as close to sterile conditions as possible, mix grain spawn into cooled substrate at roughly a 10-20% spawn rate by weight (1 lb spawn to 5-10 lbs substrate). Load into grow bags and seal.
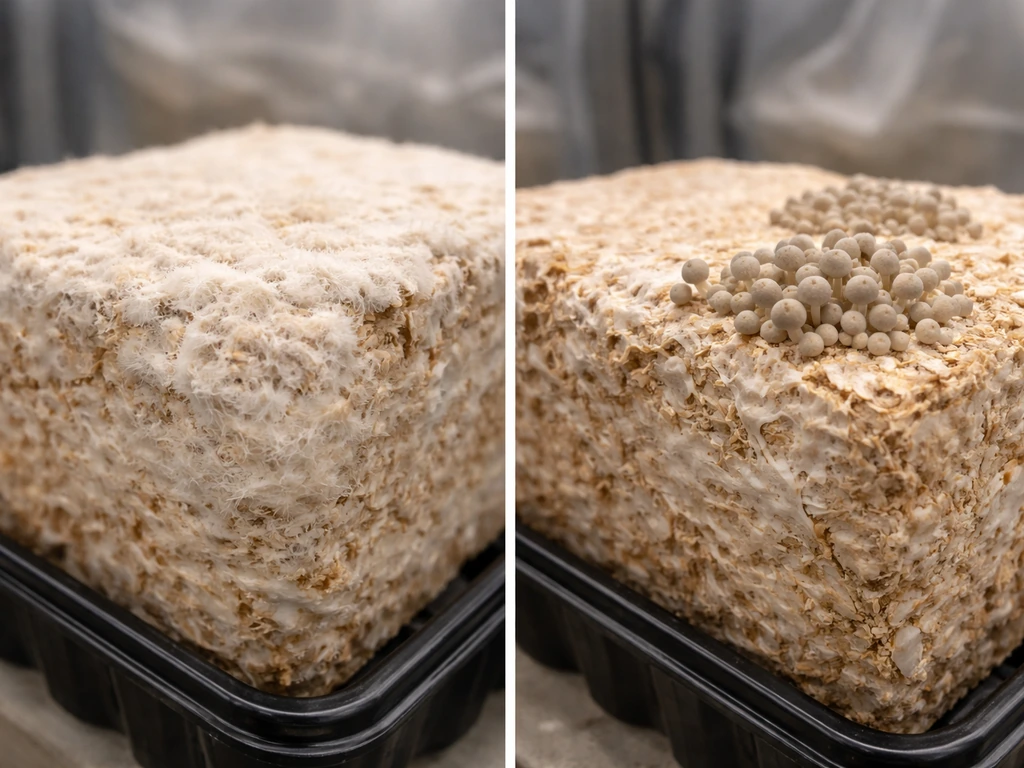
- Days 1-14 (Colonization): Keep bags at 70-75°F in a dark or dim location. Check daily for white, fluffy mycelium spreading through the substrate. Avoid disturbing the bags. Full colonization typically takes 10-21 days depending on temperature and spawn rate.
- Day 14-21 (Fruiting initiation): Once the block is fully white and firm, introduce fruiting conditions. Move to your fruiting chamber. Cut slits or open the bag. Drop temperature to mid-60s°F, increase humidity to 90%+ by misting walls and floor of the chamber (not directly on the block surface), and begin fresh air exchanges several times daily.
- Days 18-28 (Pinning): Tiny pins should appear within 3-7 days of initiating fruiting conditions. Once pins appear, maintain high humidity (around 90%) and keep up air exchanges. Avoid letting water droplets form directly on pinheads.
- Days 22-35 (Fruitbody development): Mushrooms grow rapidly once pinned, often doubling in size daily. As caps develop and begin to flatten, reduce humidity slightly to 80-85%. Keep air exchange consistent to prevent CO2 buildup and stem elongation.
- Days 25-40 (Harvest): Harvest when caps are still cupped or just beginning to flatten at the edges, before spores release. Twist and pull the entire cluster from the base in one motion.
- Post-harvest (Rest and reflush): Remove any substrate debris from the cut site. Allow the block to rest for 5-7 days with reduced misting. Resume fruiting conditions to trigger the second flush. Most blocks produce 2-3 flushes before exhausting, with each flush slightly smaller than the last.
When Things Go Wrong: Troubleshooting Your Grow
No Growth or Stalled Colonization
If you see zero mycelium growth after 5-7 days, the most likely cause is inoculation temperature: substrate that was still too warm killed the spawn. The second culprit is spawn that was old or stored poorly. Check that your colonization space is actually hitting 70-75°F (a simple thermometer stuck inside a spare bag of substrate will give you the actual reading, not just the room air temperature). If the spawn looks healthy but nothing is moving, try gently squeezing the bag to introduce a small amount of fresh air and redistribute the spawn contact with substrate.
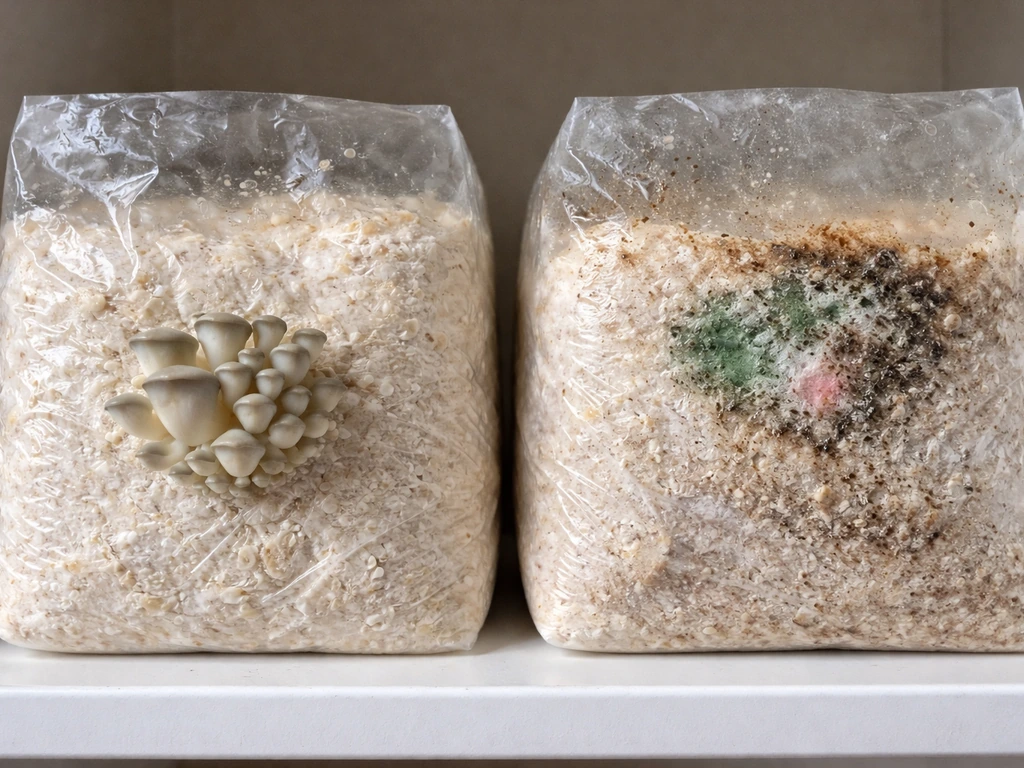
Contamination
Green (Trichoderma), black, or pink mold appearing in the bag is contamination. If it's localized to one spot and the mycelium hasn't reached it yet, some growers remove that section of the bag and continue. If contamination is spreading through more than 20-30% of the block, it's safer to toss it in a sealed bag and start over. Contamination is almost always traced back to three things: inadequate sterilization/pasteurization, inoculating while substrate was still too warm, or breaching sterility during inoculation. Wipe down your work surface with 70% isopropyl alcohol, wear gloves, and slow down. Rushing inoculation is how most contaminants get in.
Slow or No Pinning
If your block is fully colonized but won't pin, you're usually missing one of two triggers: a temperature drop or enough fresh air exchange. Try moving the block somewhere 5-10°F cooler for 24-48 hours (some growers cold-shock in the refrigerator briefly). Also check your fresh air exchange: if the chamber smells stale or earthy when you open it, CO2 is building up and suppressing pinning. Fan it out aggressively. Make sure the humidity stays above 85% during this pinning initiation phase. Letting the block dry out even briefly at this stage will abort pin development.
Long Stems and Small Caps
blank" rel="noopener noreferrer">This is a CO2 problem almost every time. A Reddit thread on r/MushroomGrowers similarly says that nearly all oyster mushroom queries, especially cases with long stems and small caps, are solved by increasing fresh air exchange to prevent CO2 buildup blank" rel="noopener noreferrer">Long, leggy mushrooms are a CO2 problem. Increase your fresh air exchanges. If you're using a small fruiting tote, fan it out at least 3-4 times daily. Long, leggy mushrooms are edible but not ideal, and the block is essentially signaling that it's struggling to breathe.
Drying Out or Overwatering
Oysters are sensitive at both extremes. A block drying out (surface looks cracked or pale) needs a quick soak: submerge in cold water for 1-4 hours, drain, and return to fruiting conditions. Overwatering shows up as standing water in the chamber, soggy substrate, and bacterial blotch on caps. Never mist directly on pinheads or fruiting mushrooms. Mist the walls and floor of the chamber instead, and make sure there's no pooling water anywhere. Standing water actively invites bacterial and mold problems.
Harvesting, Storing, and Setting Up Your Next Flush
Harvest timing is everything for flavor, texture, and future flushes. Pick when caps are still slightly cupped, showing that characteristic oyster shell shape, but just beginning to flatten at the outer edges. The moment you see the edges start to wave and the gills below become clearly visible, you're approaching spore drop. Harvest before that happens: late harvests trigger spore release, which can reduce the vigor of future flushes and fill your grow space with a fine white powder. Use the twist-and-pull method at the base of the entire cluster rather than cutting individual mushrooms; this removes the stem stub that can rot and invite contamination.
Fresh oyster mushrooms store in the refrigerator for 5-7 days in a paper bag (not plastic, which traps moisture and causes sliminess). For longer storage, slice them thin and dehydrate at 95-115°F until fully crisp, then store in an airtight jar. Dried oysters rehydrate well and keep for 6-12 months.
After harvest, scrape any remaining stem stubs from the cut site, let the block rest at slightly lower humidity for 5-7 days, then ramp fruiting conditions back up. Most blocks flush 2-3 times. By the third flush you'll notice smaller clusters and slower pinning: that's the block running low on nutrients. At that point you can chop it up and add it to a garden bed or compost, where it may even produce a surprise outdoor fruiting. To keep the grow cycle going, simply start a new block while your current one is resting between flushes. Once you have two or three blocks staggered at different stages, you'll have a near-continuous supply.
FAQ
How do I know the temperature is right when my room temperature and my substrate temperature differ?
Most home setups use a simple “feel” check plus a thermometer. During colonization, aim for the substrate to sit around the low- to mid-70s°F, not just the room. In fruiting, avoid large temperature swings, and if you use a humidifier, confirm the chamber stays above about 85% RH, since low humidity can stop pins even when airflow is correct.
Can I pause my grow for a week and restart without ruining the block?
You can, but you should be intentional. If you cut production to do this, do it after a flush and keep the block at normal fruiting humidity while reducing light and airflow so it does not dry out. When you restart, ramp fresh air and humidity back up gradually, then watch for pinning within about a week. Sudden over-drying is a faster way to lose a block than a short pause.
What should I track so I can troubleshoot contamination or slow growth next time?
Use clean, simple labels and keep records for troubleshooting. Write the date you inoculated, the spawn type (grain vendor and lot if possible), the substrate recipe, sterilization method (pressure cooker time or pasteurization temperature), and the bag temperature readings. When something goes wrong, these notes usually point to the exact step that drifted first.
Is it okay to mist directly onto the mushroom pins to increase humidity?
For oyster mushrooms, “less” is usually more for misting. Direct misting on pins can cause water to pool and trigger bacterial blotch or aborted pins. Mist the chamber walls and floor lightly, aim to maintain humidity through surface evaporation, and ensure there is never standing water.
What are signs my grow is too high in CO2, and what should I adjust first?
If your chamber gets stale quickly, do not rely on one fan cycle per day. Oysters generally need frequent fresh air exchange to prevent long stems and tiny caps. If you smell a strong earthy or stale odor, treat it as a CO2 warning and increase air exchange immediately while keeping humidity high.
My block looks cracked and dry on the surface, what’s the best rescue step?
When surface drying happens, do a short corrective soak, then return to fruiting conditions quickly. Submerge in cold water for 1 to 4 hours, drain well, and move back to the chamber with high humidity and good airflow. After that, avoid frequent handling that can knock off forming pins.
How can I tell if I’m overwatering versus just having normal humidity in the chamber?
Overwatering often shows up as soggy substrate and wet caps rather than normal condensation. The fix is to stop adding liquid, increase fresh air exchange so moisture evaporates, and remove any standing water. If caps develop dark, wet patches, you may need to harvest what you can and watch the rest closely for bacterial growth.
My block is colonized, it pinned once, but it won’t pin again, what should I check?
If pins start but stall, the most common misses are insufficient fresh air exchange, humidity dropping below about 85%, or temperatures being out of the right range for your variety. Also check that you did not harvest so late that the block spent energy on spore release and weakened its next flush.
What are the most common reasons oyster blocks fail due to contamination, and when should I throw it out?
Start by checking your work environment and process consistency, not the mushrooms. Common causes are incomplete pasteurization or sterilization, inoculating warm substrate, using old or poorly stored spawn, and breaking sterility during mixing. If contamination spreads beyond a small localized area, tossing the block early prevents it from seeding spores into your workspace.
Can I grow multiple oyster varieties (pearl, pink, golden) using the same setup?
Yes, but expect a slower and less predictable schedule. If you switch varieties, you may need a different target fruiting temperature, light timing, and substrate supplementation approach. For oysters, the same general block method works, but the warmer or cooler fruiting range will change how quickly you see pinning.
What’s the difference between problems during colonization versus problems during pinning?
First, separate “no growth” from “growth is starting.” If you see zero visible progress after about a week, most likely causes are inoculation temperature too high, old spawn, or colonization space not actually reaching the target temperature. If there is mycelium visible but no fruiting, the issue is almost always pinning triggers like fresh air, humidity, and temperature drop.