Lion's mane plug spawn are wooden dowels (usually 5/16" birch) fully colonized with Hericium erinaceus mycelium. You drill holes into a freshly cut hardwood log, hammer the plugs in, seal everything with wax, and wait. From plug installation to your first harvest, you're looking at roughly 9 to 12 months for full log colonization, then recurring flushes from that same log for several years. It's slow, but the payoff is real and the process is genuinely beginner-friendly once you understand what the mycelium needs at each stage.
How to Grow Lion’s Mane Mushrooms From Plugs Plug-to-Harvest Guide

Marcus Holloway
17 May 2026
What lion's mane plugs are and how this method works
Lion's mane plug spawn are short, cylindrical wooden dowels that have been sterilized and then colonized with pure lion's mane mycelium. Suppliers like Fungaia Farm and Fungi Perfecti grow them on white birch dowels with spiral grooves cut into the wood, which gives the mycelium more surface area to grip and spread from. Fungaia Farm, for example, sells lion’s mane plug spawn grown on 5/16" wooden white birch dowels. When you hammer these plugs into a drilled hardwood log, the mycelium migrates out of the dowel and into the log over time, eventually colonizing the whole thing.
This is different from buying a ready-to-fruit block kit, where the substrate is already fully colonized and just needs fruiting conditions. With plugs, you're starting the colonization process yourself using a real log. That means a longer wait, but it also means you can use locally sourced wood, set up an outdoor growing station, and get multiple years of harvests from a single log. If you happen to have a supplemented sawdust block kit rather than true plug spawn dowels, most of the fruiting and harvesting advice in this guide still applies, but you can skip the drilling and sealing steps entirely.
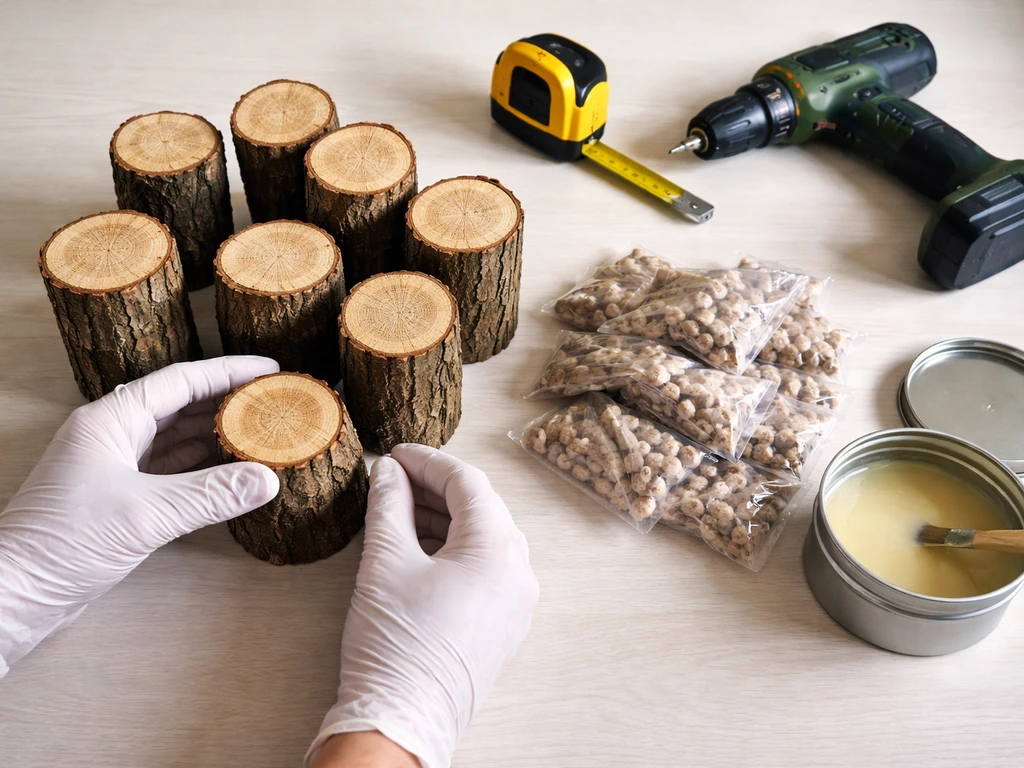
Materials checklist and picking the right wood
Getting the wood right is the single biggest factor in whether your log method succeeds. Lion's mane performs best on oaks (red oak, white oak, and other oak family members) and sugar maple. Beech, alder, and hornbeam also work well. Avoid conifers entirely, and skip any wood that smells sour, shows visible mold, or has been sitting around drying out for more than a few weeks after cutting.
- Lion's mane plug spawn (typically sold in packs of 50 to 100 plugs per supplier)
- Freshly cut hardwood log: 3 to 8 inches in diameter, 16 to 40 inches long
- Drill with a 5/16" spade or brad-point bit (match the bit size to your plug size)
- Rubber mallet or hammer for driving plugs
- Cheese or block wax, or beeswax, for sealing (and a double boiler or small pot to melt it)
- Paintbrush for applying wax
- Measuring tape or piece of tape on the drill bit to gauge hole depth
- Buckets or a large tub for soaking logs
Conditioning the log before inoculation
Your log needs to be freshly cut but not too fresh. Ideally, it was cut within the last 2 to 4 weeks. The natural antifungal compounds in living trees need a few weeks to break down after cutting, otherwise they'll fight the mycelium you're trying to establish. At the same time, the log should not have dried out.
Aim for a moisture content around 35 to 45 percent. If the log feels light or the cut ends look dry and cracked, soak it in clean water for 24 to 48 hours before inoculation. A full submersion soak (use weights or a tarp to keep it submerged) works better than just wetting the surface. Let it drain for a few hours before you drill, so the wood isn't dripping wet.
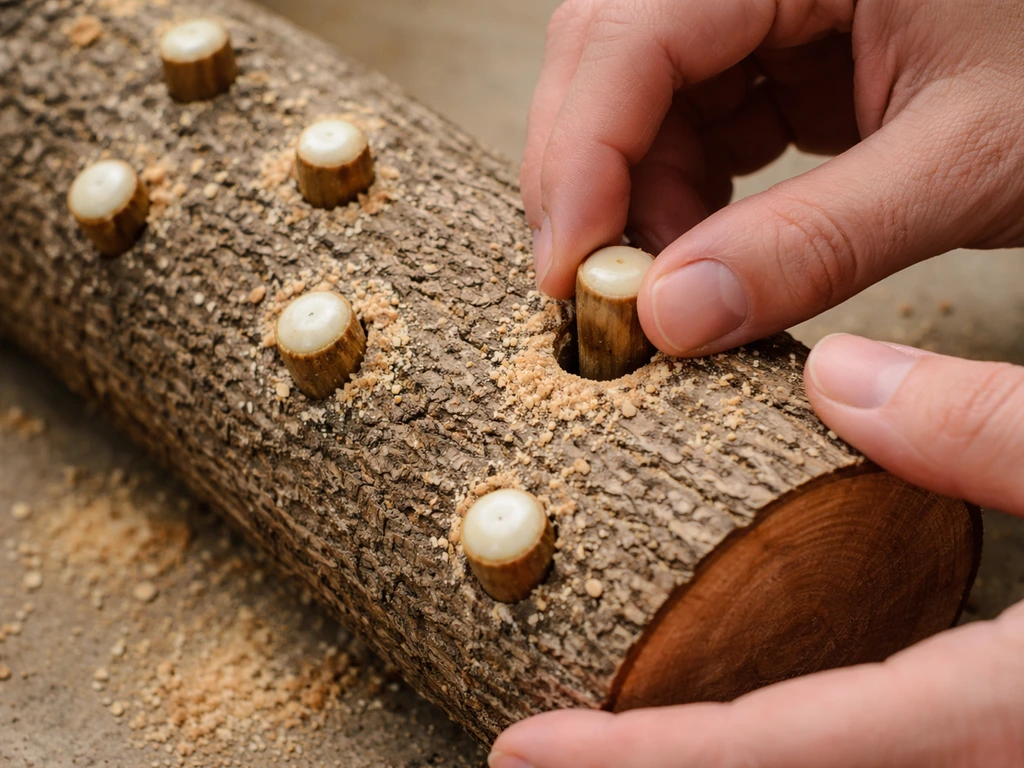
How to drill, space, and seal your plugs

Spacing and depth matter more than most beginners expect. Holes that are too shallow mean the plug sits proud of the surface and dries out. Holes drilled at random spacing mean the mycelium has to travel farther between inoculation points, which slows colonization and opens up more opportunity for competing molds to move in first.
- Wrap a small piece of tape around your drill bit 1 to 1.25 inches from the tip. This is your depth stop so every hole is the right depth for the plug to sit flush or just slightly below the surface.
- Drill holes in a diamond or staggered grid pattern: space holes about 4 to 6 inches apart along the length of the log, and offset each row by about 2 to 3 inches around the circumference. This gives roughly 30 to 50 plugs per standard-size log.
- Work your way around the log systematically so you don't miss spots. I like to mark rows with a chalk line to keep things even.
- Tap each plug into a hole with a rubber mallet until it sits flush with the bark. Don't hammer so hard you split the wood or crack the plug.
- Melt your wax in a small double boiler (never over an open flame directly). Use a paintbrush to coat each plug hole completely, extending about half an inch onto the surrounding bark to seal the edges. Also dab wax over the cut ends of the log.
- Let the wax cool and harden completely before moving the log.
The wax seal is doing two things: it keeps moisture inside the log from evaporating around the plug, and it blocks contaminants from entering the freshly drilled holes. Don't skip it or use tape as a substitute. Cheese wax from a homebrew supply store works perfectly and costs almost nothing.
Incubation: where the log lives for the next 9 to 12 months
After inoculation, the log enters the colonization phase. The mycelium is quietly spreading through the wood, and your job is mostly to keep conditions stable and not interfere. This is the longest part of the process, and it's also where most beginners make the mistake of either forgetting about the log entirely or checking it too aggressively.
Where to place the log
Outdoors is ideal if you live in a temperate climate. Place the log in a shaded spot, like under a tree canopy or on the north side of a building, where it won't get hit by direct sun. Shade cloth rated at 70 to 80 percent works well as a DIY shelter. The log can rest horizontally on a couple of short wooden rails to keep it off the wet ground and allow some airflow underneath, which reduces slug and slug-mold problems.
Indoors, a basement, garage, or shaded porch works. The key temperature range during colonization is 55 to 75°F (13 to 24°C). Lion's mane mycelium is not a fan of heat above 80°F, and colonization will stall or the log can develop contamination issues when temperatures spike. If you're in a hot climate, keep the log somewhere with stable, cooler temperatures.
Keeping the log moist through colonization
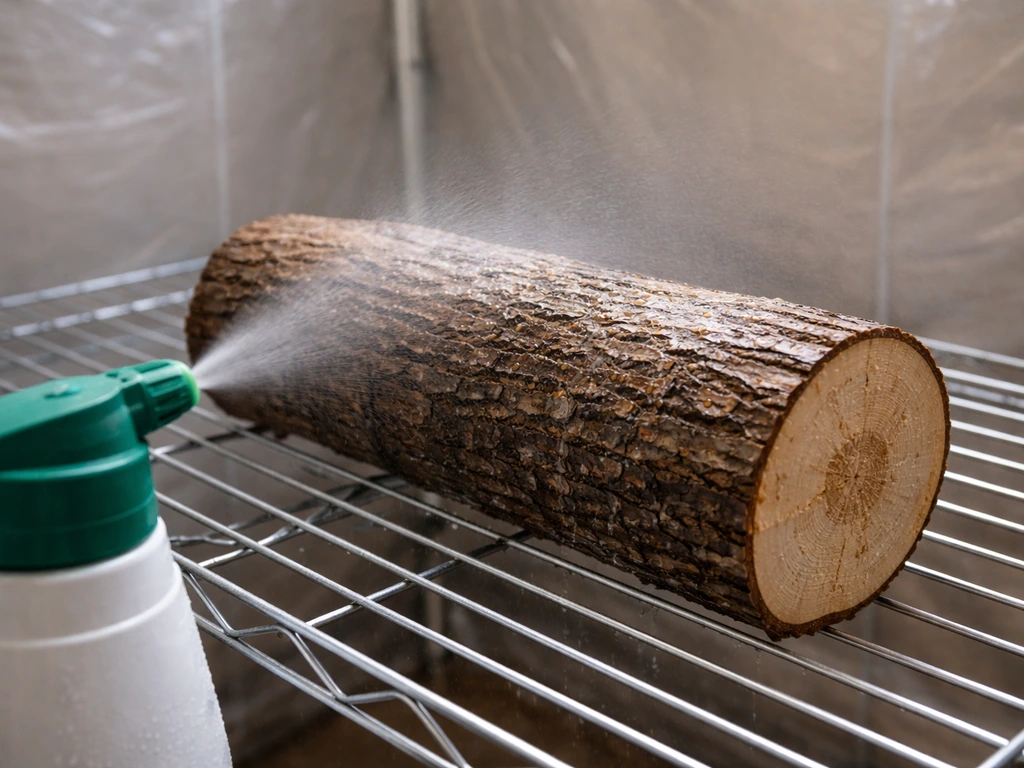
Moisture loss is the most common reason logs fail to colonize. The mycelium needs the wood to stay damp throughout the entire 9 to 12 month window. In dry seasons or indoors, you'll need to water the log regularly.
A simple approach is to soak the log in a tub of water for a few hours every 2 to 4 weeks during dry spells, or simply spray it down with a garden hose or misting bottle every few days if the weather is dry. In a naturally humid outdoor environment with regular rainfall, you may barely need to supplement at all.
You'll know the log is getting too dry if it starts to feel noticeably lighter than when you first inoculated it.
Fruiting: the conditions lion's mane actually needs
Once the log is fully colonized (you may see white mycelium showing at the cut ends or small primordia forming), you can start encouraging fruiting. Outdoors, this often happens naturally in fall when temperatures drop and rainfall increases. Indoors, you trigger it yourself.
| Condition | Colonization Phase | Fruiting Phase |
|---|---|---|
| Temperature | 55 to 75°F (13 to 24°C) | 60 to 70°F (15 to 21°C) ideal; can fruit down to 55°F |
| Relative Humidity | 60 to 75% is fine | 85 to 95% at fruiting surface |
| Fresh Air Exchange | Moderate; avoid stagnant sealed spaces | High; lion's mane is very CO2-sensitive |
| Light | Not required | Indirect light, 12 hours per day helps orient growth |
| Watering | Soak or spray every 1 to 4 weeks | Mist 2 to 4 times daily; soak log before fruiting trigger |
Triggering a flush
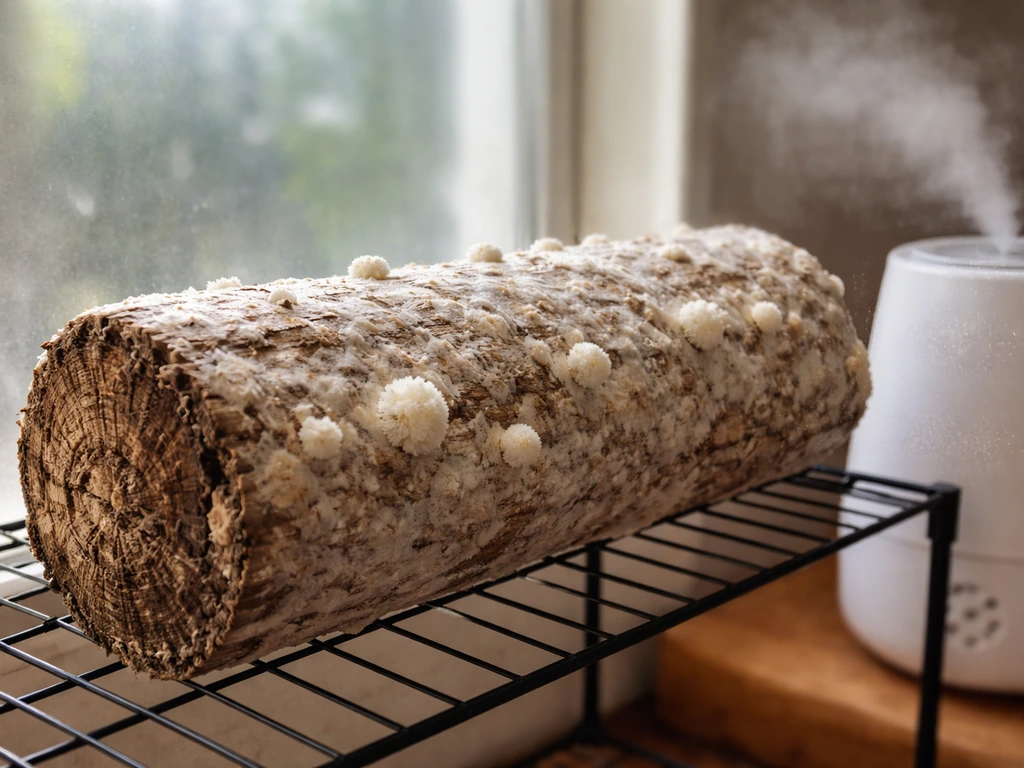
To trigger fruiting on a colonized log, give it a 24-hour cold-water soak (this mimics autumn rain), then move it to a spot with higher humidity and good fresh air exchange. Indoors, a humidity tent made from a clear plastic bag with several ventilation slits works well. Keep misting the log and the inside of the tent two to four times a day. You should see small white primordia forming within 7 to 14 days after the trigger soak, assuming the log is ready.
Fresh air exchange is non-negotiable for lion's mane. More than almost any other culinary mushroom, lion's mane responds to elevated CO2 by growing elongated, spindly, or coral-like shapes instead of the classic pom-pom form. If your fruiting body looks like a mass of thin fingers rather than a plump white globe, CO2 is too high and airflow is insufficient. Add more slits to your tent, or fan the area briefly a few times a day.
Harvest timing, handling, and getting more flushes
Harvest lion's mane when the fruiting body is still white and firm, before any yellowing or browning begins. The icicle-like spines should be visible but not yet releasing a white spore cloud. Depending on temperature, you'll typically have a 3 to 7 day window from when the primordia form to when they're at peak harvest size. Don't wait too long: once lion's mane starts to yellow, the flavor turns bitter and the texture degrades quickly.
To harvest, grip the base of the fruiting body and twist gently while pulling, or cut cleanly with a sharp knife right at the log surface. Leaving a large stub can harbor contamination, so a clean cut close to the wood is better. After harvest, let the log rest for 4 to 8 weeks before attempting another forced flush. Remove any leftover stub material and let the surface dry slightly before the next soak and trigger cycle.
A healthy inoculated log can produce 2 to 4 flushes per fruiting season and continue doing so for 3 to 5 years as long as the wood has not fully decomposed. The first flush is often the smallest as the mycelium is still establishing its full network. Subsequent flushes tend to be larger and more reliable.
Troubleshooting: what to do when things go sideways
Colonization has stalled or seems non-existent
If you're 3 to 4 months in and see no signs of mycelium at the cut ends or around the plugs, the most likely causes are that the log dried out too much, temperatures went too high during summer, or the plugs themselves were dead on arrival (rare but possible if they were stored improperly). Check the moisture: if the log feels notably lighter than when you inoculated, do a long 48-hour soak. Move it somewhere cooler if temperatures have been above 80°F. If things still don't move after another month or two, you can try re-inoculating with fresh plugs in new holes near the original ones.
Green or black mold around the plug holes
Green mold (Trichoderma) and black mold showing up around plug holes usually means the wax seal failed or was incomplete, or the log was already past its ideal freshness window when inoculated. Small spots of green mold can sometimes be scooped out and re-waxed, but widespread contamination on a log is hard to reverse. Keep that log well away from any other substrate or spawn you have, and chalk it up to a learning experience. For future logs, make sure cuts are fresh, the pre-soak is thorough, and wax coverage is complete.
Poor or no fruiting after colonization looks complete
If the log looks well colonized but isn't producing, it almost always comes down to one of three things: the fruiting trigger wasn't strong enough (try a colder, longer soak), humidity at the fruiting surface is too low, or CO2 is too high. Lion's mane is pickier about CO2 and humidity than oyster mushrooms, so a setup that works for other species might not be enough here. Try soaking the log for a full 24 hours in cold water (adding ice if necessary to get below 60°F), then moving it to a spot with measurably higher humidity and more airflow.
Small, sparse, or misshapen fruiting bodies
Stringy, coral-like, or very small fruits almost always mean poor airflow and elevated CO2. Yellowing fruits that are harvested small usually mean the temperature ran too warm. If you're in a high humidity environment but fruits are still pale and small, check whether the log has enough moisture internally by doing a fresh soak before the next flush.
Common mistakes and a practical day-by-day action plan
Mistakes that derail most first-time plug growers
- Using wood that was cut too long ago or has already dried significantly before inoculation
- Drilling holes too shallow so plugs sit above the surface and dry out
- Skipping wax or using inadequate wax coverage around plug edges and log ends
- Placing the log in direct sun or a spot that heats above 80°F in summer
- Forgetting to water or soak the log during dry months, letting it desiccate
- Expecting fruiting in the first few months and giving up too soon
- Harvesting too late once yellowing has started, then blaming the method for bitter flavor
- Ignoring airflow during fruiting, leading to CO2-stressed, deformed fruits
A simple action plan based on where you are right now
Use this as your at-a-glance routine depending on your current stage:
| Your Stage | What To Do This Week | What To Watch For |
|---|---|---|
| Just got plugs, no log yet | Source a freshly cut oak or maple log, 4 to 6 inches diameter. Soak 24 to 48 hours if needed. | Log feels heavy and moist. No visible mold or sour smell. |
| Log ready, installing plugs | Drill 5/16" holes in diamond pattern, 4 to 6" apart. Hammer plugs flush. Wax all holes and cut ends. | Plugs sit flush or just below surface. Wax fully coats each hole. |
| Plugs installed, colonizing (weeks 1 to 40) | Place log in shade. Soak or spray every 2 to 4 weeks. Keep temps below 80°F. | White mycelium visible at cut ends after several months. No green or black mold patches. |
| Colonization looks complete | Do a 24-hour cold soak. Move log to humid, high-airflow fruiting spot. Mist 2 to 4 times daily. | Small white pins forming within 7 to 14 days. |
| Fruiting bodies forming | Maintain 85 to 95% humidity. Ensure plenty of fresh air. Avoid direct sun. | Fruits expanding, white, firm. Spines developing but no yellowing. |
| Ready to harvest | Twist or cut at log surface. Enjoy. Let log rest 4 to 8 weeks. | Fruits peak white and firm before any color change begins. |
| After first flush | Let log surface dry slightly. Then re-soak and repeat fruiting trigger in 4 to 8 weeks. | New primordia forming at the same or new spots on the log. |
| Seeing problems | Check moisture (soak if light), check temp (move if hot), check airflow (add vents if CO2 issue), check for mold (isolate log if green/black patches widespread). | Improvement in mycelium activity or fruiting within 2 to 4 weeks of correcting the condition. |
The plug method for lion's mane is genuinely one of the more forgiving ways to get into log cultivation, partly because the logs are resilient once inoculated and partly because lion's mane mycelium is aggressive enough to outcompete most contaminants if the wood conditions are right. The patience required for that 9 to 12 month colonization period is the real learning curve, not the technique itself.
If you're also curious about speeding things up or working with indoor setups from the start, the fully indoor and kit-based approaches covered in guides on growing lion's mane at home cover the faster alternatives. If you want a faster first harvest or you prefer to grow without logs, check the other indoor and kit-based options for growing lion's mane at home.
For those with land or a garden, pairing log inoculation with outdoor placement is covered in detail in the outdoor lion's mane growing guide. But if you've got a good log and a pack of plugs, you're already set up for one of the most rewarding harvests in home mushroom growing. For more detailed step-by-step guidance, see our full guide on how to grow mushrooms from Len's Island.
If you want the fastest path, you can also follow a lion's mane mushrooms how to grow guide for alternative setups beyond log plugs. If you want different options beyond log plugs, use a lion's mane mushrooms how to grow guide to compare setups and timelines.
FAQ
I bought plugs, but they look like colonized sawdust. Can I still use the log plug method?
Yes, but treat it as a different process than true log plugs. If your “plugs” are actually colonized sawdust dowels or a supplemented block, you may not need the wax-sealed log-inoculation steps. Use the package instructions for what substrate you have, then only apply the log method (drilling and sealing) if you are truly inserting sterilized wooden dowels into raw hardwood logs.
How can I tell if my lion’s mane plugs are still viable before I inoculate?
Do not rely on the plug color alone. Healthy lion’s mane mycelium is usually white to pale cream, it should not smell sour, and it should feel firm and intact inside the wood. If the plugs look dark, feel mushy, or smell fermented or rotten, assume they are compromised and replace them before inoculating.
After soaking the log, how long can I wait before drilling and inserting the plugs?
A good practical rule is to drill and inoculate promptly after the soak and to keep the log from drying again. After a soak, let the log drain until it is not dripping, then inoculate soon. If you wait too long, the outer layer can dry out and the first weeks of colonization become slower and more contamination-prone.
What should I do if some plugs end up too proud above the log surface?
Spacing and depth should be consistent and tight to prevent the plug from drying out at the surface. If a plug sits too high (above flush), it can lose moisture faster and may develop mold around the hole. If you notice proud plugs after insertion, you may be able to re-seat them immediately by tapping them in further, then re-wax thoroughly.
My log is shaded, but colonization still seems to stall. What else should I check?
Even if you keep the log shaded, windy or sunny microclimates can dry the surface. If primordia fail to form or growth stalls during dry stretches, bump watering frequency and consider a simple windbreak around the log. Also verify you did a complete wax seal around each hole, gaps are a common cause of local drying and contamination.
Can I save a log if green mold shows up around a few plug holes?
Small amounts of green mold can sometimes be removed if it is limited and the surrounding wood is still well colonized. Scoop the spot carefully, let the area dry briefly, then re-wax only if the log surface is clean and not widely contaminated. If mold spreads, treat the whole log as a loss and isolate it completely to avoid transferring spores.
Why are my lion’s mane fruits growing stringy or coral-like instead of thick pom-poms?
Yes, and it matters for shape. If fruits come out elongated, thin, or coral-like, it usually means CO2 is too high or fresh air exchange is insufficient. Increase ventilation slits, reduce how often the tent gets sealed during misting, and avoid repeatedly opening in a way that cools the log too fast.
My fruits are pale and small. How do I tell if it’s humidity problems versus the log being too dry?
If fruits look pale and stay small despite good humidity, the log may be dry internally, even if the tent is humid. The most reliable fix is to do another full pre-fruiting soak before the next trigger cycle, then keep the fresh air exchange strong so the log’s moisture can support fast, healthy growth.
How do I know the exact time to harvest to avoid bitterness?
Yellowing usually means you waited past peak. Harvest as soon as the spines are clearly developed and the fruiting body is still white and firm. Once yellow or brown tones start, flavor turns bitter and texture degrades quickly, so extend your harvest routine to check daily during that 3 to 7 day peak window.
How soon after I harvest can I trigger the next flush, and should I soak right away?
A full cold-water soak is used to trigger fruiting, not to continuously maintain it. After harvest, the log needs a rest period before forcing again, typically 4 to 8 weeks. If you trigger too soon, you can exhaust the log and get weaker or inconsistent flushes.