Psilocybe zapotecorum is a subtropical wood-lover that can absolutely be grown indoors, but it rewards growers who take its specific needs seriously: colonization around 70–75°F, fruiting humidity locked between 85–95% (ideally 90 ± 5%), consistent fresh air exchange, and indirect light on a 12-hour cycle. Follow those conditions through colonization, fruiting, and harvest and you'll get productive flushes. If you're instead looking to grow boletus edulis, the process differs a lot because it relies on tree roots and outdoor or controlled symbiotic conditions how to grow boletus edulis. Skip any one of them and you'll be staring at stalled mycelium or contaminated tubs.
How to Grow Psilocybe Zapotecorum Indoors: Step by Step

Marcus Holloway
15 May 2026
What makes P. zapotecorum different from other species
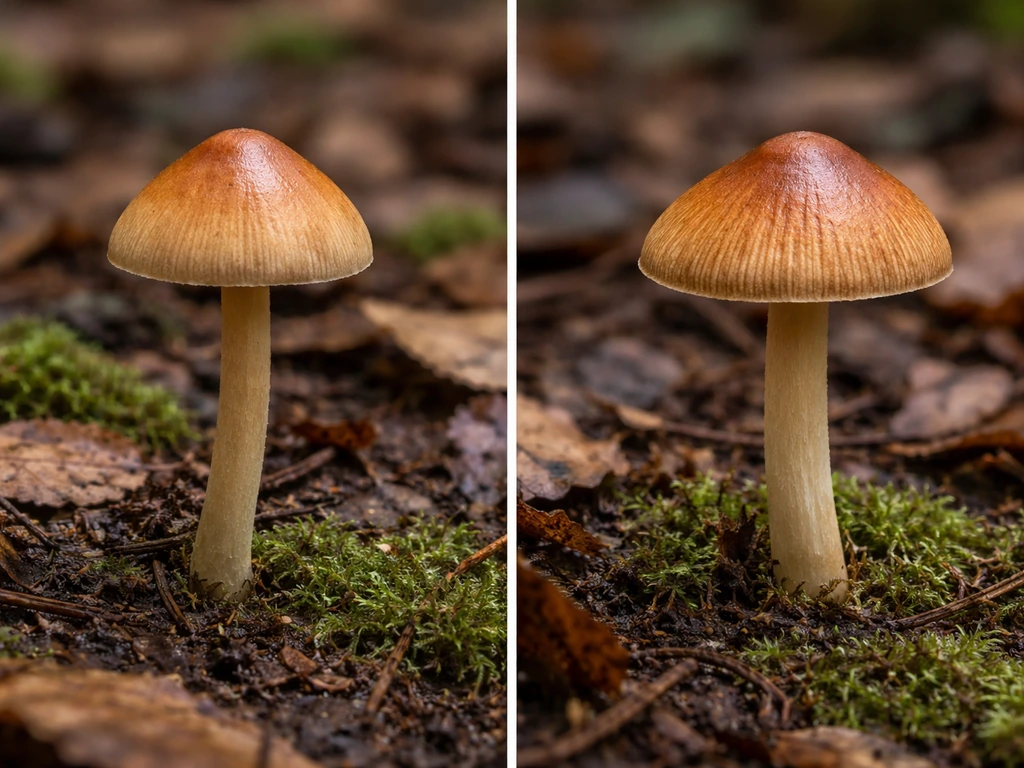
Before diving into the workflow, it's worth knowing what you're working with. P. zapotecorum is native to southern Mexico and Central America, where it grows in humid, wooded environments at higher altitudes. That translates to a species that wants reliable humidity, good air movement, and moderate temperatures rather than the warm, still conditions some other Psilocybe species tolerate. It's not the easiest beginner species, but it's also not out of reach if your grow space is set up properly. If you've already worked through species like Psilocybe tampanensis or grown sclerotia-producing varieties, the humidity and FAE management here will feel familiar. For complete beginners, take the setup section below seriously before spending money on cultures.
Indoor grow planning and setup
Start with your space before buying anything else. P. zapotecorum needs two distinct environments: a warm, stable colonization area and a separate fruiting space with tightly managed humidity and airflow. Most home growers use a spare closet, a grow tent, or a dedicated shelf with a plastic enclosure for fruiting. The key rule from ATTRA's mushroom cultivation guidance is practical: seal drafts in your fruiting area, and keep any heat-producing equipment (fans, controllers, timers) outside the fruiting zone itself so you're not fighting temperature and humidity swings caused by your own gear.
For colonization, you need a spot that holds 70–75°F consistently. A room-temperature shelf works for many growers, though a seedling heat mat with a thermostat gives you more control in cooler homes. A beginner's guide to Psilocybe zapotecorum also notes that ambient room temperatures are adequate for colonization and fruiting, with colonization potentially faster at around 75°F [ambient room temperatures are adequate for P. zapotecorum colonization and fruiting](https://doubleblindmag.
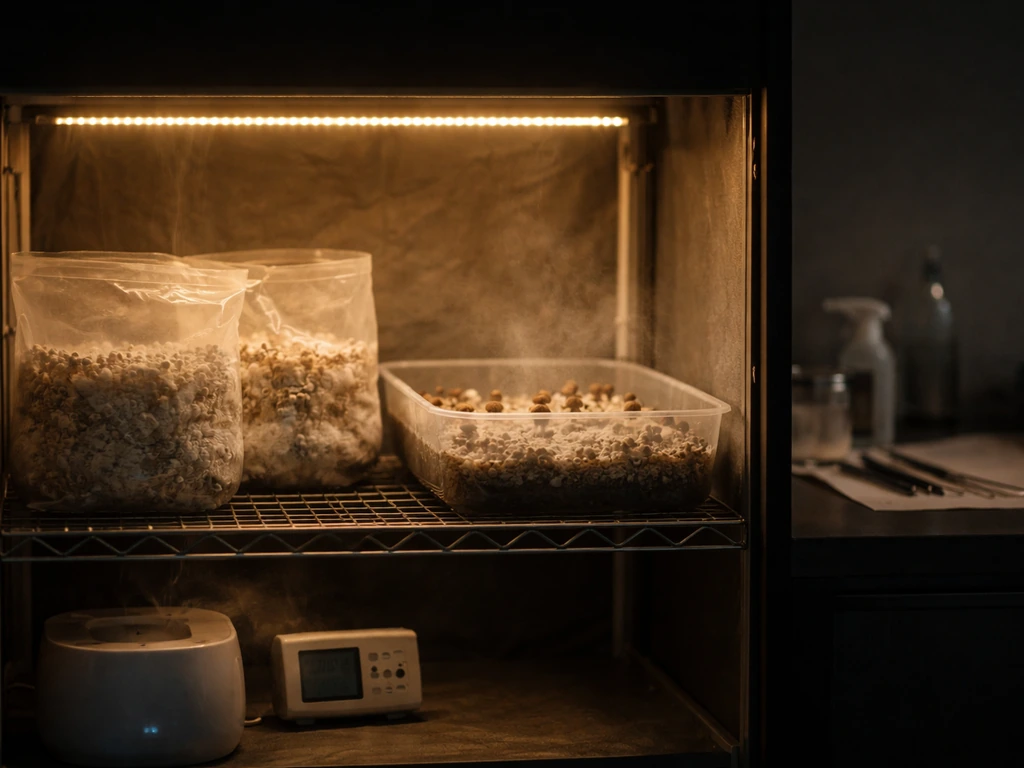
com/psilocybe-zapotecorum/). For fruiting, a martha tent (a wire shelf rack inside a large greenhouse-style tent) or a shotgun fruiting chamber (SGFC) both work well. A diffuser tub setup is another solid option specifically noted for this species, where humidity is maintained inside a plastic tub using a small ultrasonic humidifier or by manual misting, combined with filtered air holes for gas exchange.
Plan your space before purchasing cultures, because having colonized grain sitting around while you sort out your fruiting chamber is a recipe for contamination.
Supplies, media, and equipment checklist
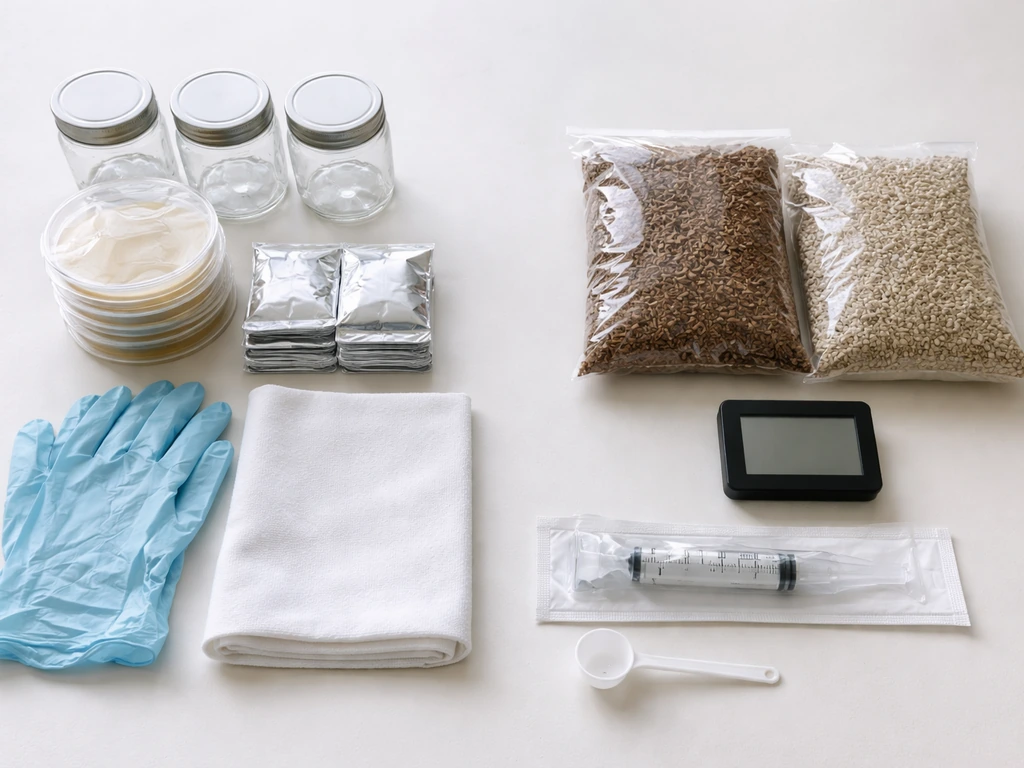
Here's what you need before you start. Split this into sterile/clean supplies and environmental gear so nothing falls through the cracks.
- Spore syringe or agar culture of P. zapotecorum from a reputable vendor
- Grain jars or grain bags (rye, wheat berries, or wild bird seed) for spawn
- Bulk substrate materials: coco coir (a reliable, widely used choice for this species), vermiculite, and optionally pasteurized hardwood sawdust
- Plastic tubs or grow bins (6-quart or 15-quart depending on batch size)
- Pressure cooker (15 PSI capable, for sterilizing grain)
- Still air box (SAB) or laminar flow hood for inoculation
- 70% isopropyl alcohol, alcohol lamp or torch lighter, nitrile gloves, face mask
- Polyfill or micropore tape for grain jar lids
- Digital hygrometer and thermometer combo for the fruiting area
- Spray bottle for misting or small ultrasonic humidifier
- Timer for lighting
- LED or fluorescent grow light (low wattage is fine) or access to indirect natural light
- Humidity-retaining tub lid with drilled holes covered by polyfill, or a martha tent setup
There's no single ideal substrate for psilocybin mushrooms, and P. zapotecorum is no exception. Coco coir (made from coconut husks) is the most commonly used bulk substrate because it's cheap, easy to pasteurize, naturally resistant to contamination, and widely available. A 50/50 coco coir and vermiculite mix is a reliable starting point. Some growers add a layer of pasteurized hardwood sawdust for added nutrition, though the contamination risk goes up with richer substrates, so beginners should stick with coco coir until they're comfortable with sterile technique.
Starting cultures: spores vs spawn and inoculation workflow
You have two entry points: spore syringes and agar/liquid cultures. Spore syringes are the most accessible and usually the cheapest, but they require an extra germination step on agar before you get clean, fast-colonizing mycelium. Liquid cultures (LC syringes) skip that step and inoculate directly into grain, which speeds things up considerably. Agar cultures give you the most control because you can visually select healthy mycelium before transferring to grain. For a first grow, a liquid culture is the best balance of speed and simplicity.
The inoculation workflow is straightforward but the sterile technique is non-negotiable. After you get fruiting dialed in for your chosen species, you may also want to learn how sclerotia form and how to grow sclerotia. Work inside a still air box or in front of a flow hood. Flame-sterilize your needle until it glows red, let it cool for 5 seconds, then inject into your grain jar through the self-healing injection port.
Use 1–2 mL of liquid culture per quart jar. Seal the jar, wipe the outside with isopropyl, and label it with the date. That's it. The whole process takes under a minute per jar once you're set up, but rushing or cutting corners on the sterility step is where most contamination originates.
Substrate preparation and inoculation steps
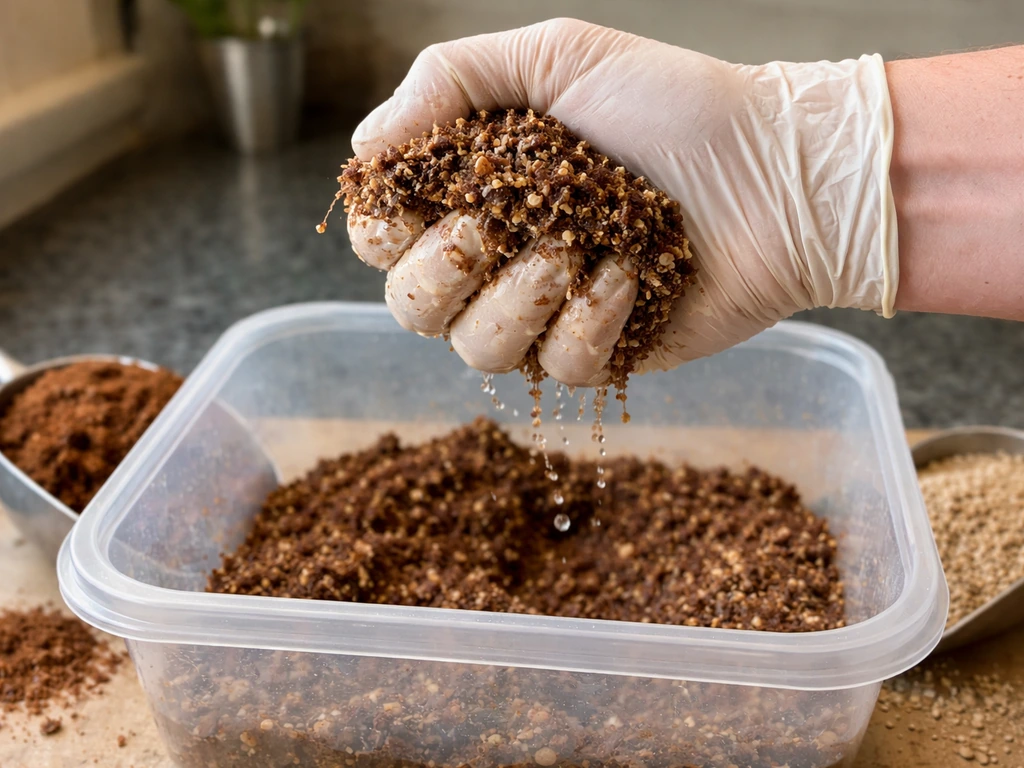
- Mix coco coir and vermiculite at a roughly 50/50 ratio by volume. Add boiling water until the mix reaches field capacity (squeeze a handful and only a few drops should come out). Let it cool to room temperature.
- Pasteurize the substrate by placing it in an oven bag or foil-covered tray at 180°F for 1.5 hours, or by pouring boiling water over it in a bucket and covering it for several hours. Coco coir does not need full sterilization.
- Sterilize your grain spawn separately in a pressure cooker at 15 PSI for 90 minutes. Let jars fully cool (24 hours) before inoculating.
- In your still air box or flow hood, inoculate cooled grain jars with your liquid culture or agar wedge transfer.
- Once grain jars are 30–50% colonized, break and shake to redistribute mycelium and speed up full colonization.
- When grain is fully colonized (white throughout with no off-colors), spawn to bulk substrate at a ratio of roughly 1 part grain spawn to 2–3 parts bulk substrate by volume.
- Mix spawn and substrate thoroughly in your tub, level the surface, and cover with a thin casing layer of straight vermiculite or coco coir (about 1/4 inch) to help retain moisture at the surface.
- Cover the tub loosely and move it to your colonization area.
Incubation and contamination prevention in an indoor grow
During colonization, keep the tub at 70–75°F in a dark or low-light area. Mycelium doesn't need light to grow, and stable temperature matters more than anything else at this stage. You should see white mycelium spreading through the substrate within a few days of spawning. Full colonization of the bulk tub typically takes 10–21 days depending on how healthy your spawn was, your spawn-to-substrate ratio, and ambient temperature.
Contamination prevention during incubation comes down to three things: starting with sterile grain, pasteurized bulk substrate, and not opening the tub unnecessarily. Every time you open it, you introduce air and potential contaminants. Resist the urge to check daily. Green, black, or pink coloration in the substrate is mold contamination.
If you see it in an isolated spot early, some growers remove that section with a sterilized spoon and hope the mycelium out-competes the rest. If contamination spreads more than 25% of the surface, scrap the tub, sterilize it thoroughly, and start over. Bright white, rope-like growth with a faint mushroom smell is healthy mycelium. Wet, slimy patches are bacterial contamination, almost always caused by substrate that was too wet or not properly pasteurized.
Fruiting conditions: environment control and workflow
This is the make-or-break phase for P. zapotecorum. Once the substrate surface is fully colonized (typically white all the way across with some thickening or 'consolidation' visible), it's time to trigger fruiting. Move the tub to your fruiting space and adjust conditions accordingly.
| Parameter | Target Range | Notes |
|---|---|---|
| Humidity (RH) | 85–95%, ideally 90 ± 5% | Use a hygrometer inside the fruiting space; mist walls not substrate directly |
| Temperature | 68–74°F | Room temp is generally adequate; avoid heat spikes above 76°F |
| Fresh Air Exchange (FAE) | 2–4 times per day minimum | Fan-less methods like polyfill holes work; avoid blowing directly onto surface |
| Light | Indirect or 12-hour cycle | Low-wattage LED or fluorescent is fine; light cues trigger pinning |
| CO2 | Low (below 1000 ppm ideally) | Achieved through adequate FAE; high CO2 causes long, spindly stems |
In practice, hit those humidity and FAE targets together, not separately. A common mistake is keeping a tub tightly sealed to hold humidity while forgetting that CO2 buildup suppresses pinning. The solution is using polyfill-covered holes in the tub lid (or the sides near the top) so gas exchange happens passively around the clock, while a thin layer of vermiculite on the surface and regular light misting on the inside walls maintains humidity. If you're using a martha tent, a small intermittent-mist humidifier set to maintain 90% RH paired with a passive vent fan on a timer handles both needs efficiently. Check your hygrometer twice a day until you trust that your setup is stable.
Light is often underestimated for pinning. P. zapotecorum responds to indirect light as a directional cue for fruiting body development. A simple 12-hour on/off cycle using a cheap plug-in timer and a low-wattage LED panel is all you need. Direct intense light is not necessary and can dry out the surface, so keep the light source a few feet away and indirect if possible.
Troubleshooting low yield, contamination, and stalled growth
No pins forming after full colonization
Wait at least 5–7 days after full colonization before worrying. If nothing is happening after 10 days in fruiting conditions, check humidity first (it's almost always the culprit), then FAE, then light. Try a cold shock: move the tub to a cooler area (around 60–65°F) for 12–24 hours, then return it to fruiting conditions. This mimics a natural temperature drop and can trigger pinning. Also confirm your surface isn't bone dry or waterlogged, both stall pinning.
Long, leggy stems with small or no caps
This is a CO2 problem. Your FAE is insufficient. Open the tub more frequently, increase the size of your polyfill ports, or add a brief fan pass over the tent vent. Leggy growth can also happen when humidity is too high and FAE is too low simultaneously, which is a common tub setup issue. You need both humidity and airflow, not just one.
Green or black mold appearing
Green mold (usually Trichoderma) is the most common contamination in home grows. If it shows up on grain jars, toss them immediately and do not open them inside your grow space. If it appears on the surface of a bulk tub post-colonization, isolate the tub and assess how much of the surface is affected. A small isolated patch can sometimes be scooped out and the area dry-salted with a pinch of salt to slow spread. Widespread contamination means the tub is done. Review your pasteurization and inoculation sterility for the next batch.
Low yield on first or subsequent flushes
Low yield usually comes from one of four things: humidity dropping below 85% during fruiting, CO2 buildup from inadequate FAE, a spawn-to-substrate ratio that was too low (thin colonization means fewer nutrients for fruiting bodies), or substrate that was too wet at spawn time. Go through each variable before your next flush. Also keep in mind that P. zapotecorum can take a bit longer to pin than some faster-fruiting species, so patience is part of the process.
Harvesting and aftercare (drying, storage, and next flushes)
Harvest P. zapotecorum just before or as the veil beneath the cap begins to tear. Once the veil breaks, spore drop starts, which isn't harmful but makes the substrate messier and can reduce future flush yields. Twist and pull each mushroom at the base with clean hands or gloves, removing the entire stem base to avoid rotting stubs. After each harvest, do a surface cleanup: use a clean spoon to scrape off any leftover stem bases or aborted pins, then lightly re-mist the surface and return the tub to fruiting conditions.
For drying, a food dehydrator at 95–105°F is the best option for home growers. Spread mushrooms in a single layer and dry for 4–8 hours until they're cracker-dry (they should snap cleanly, not bend). Air drying works but takes longer and risks mold in humid environments. Store dried mushrooms in an airtight glass jar with a food-safe desiccant packet in a cool, dark location. Properly dried and stored material stays potent for well over a year.
For subsequent flushes, give the tub a 'dunk and roll': submerge the entire substrate block in cold water for 6–12 hours (or pour a small amount of cold water over the surface, cover, and let it soak in), then drain any standing water and return to fruiting conditions. Most tubs will produce 2–4 flushes before yields drop off significantly. Between flushes, maintain your normal humidity and FAE routine. When the substrate starts showing signs of aging (dark, sunken patches, persistent contamination, no new pins forming after two weeks), it's time to start a fresh batch.
If you want to go deeper after working through this species, Psilocybe semilanceata and Psilocybe tampanensis follow similar indoor environmental principles but have their own specific quirks worth exploring separately. Both are worth understanding if P. zapotecorum has sparked your interest in the broader genus. If you’re specifically trying to understand how to grow mushrooms safely and legally for research on psilocybin, start by focusing on species requirements like humidity, fresh air, and sterile technique broader genus.
FAQ
How do I keep humidity at 90% RH without making the tub surface wet or slimy?
Aim for wet walls, not wet substrate. Use misting only to re-wet the inside of the enclosure, then stop once you see a uniform fine sheen on the surface. If you see pooling water or constant droplets, lower mist frequency, increase air mixing, and confirm your humidifier is not outputting directly onto the grow surface.
What humidity reading should I trust, and where should my hygrometer be placed?
Place the hygrometer at the same height as the substrate surface, ideally inside the fruiting chamber but not touching walls or the humidifier stream. Check it after the chamber has stabilized for at least 30 to 60 minutes, because RH near mist outlets can read artificially high while the surface stays too dry.
Can I use the same chamber for colonization and fruiting to simplify setup?
It’s possible but risky. Colonization benefits from stable warmth and low disturbance, fruiting needs tight humidity and active gas exchange with frequent mist control. Using one chamber usually causes temperature or airflow swings when you switch modes, which is why most growers prefer a separate warm incubation area.
Why do I get lots of mycelium but almost no pins after the tub goes white all the way across?
Full white colonization does not always mean the surface is ready for pinning. Check for consolidation without surface dryness, confirm your CO2 is controlled with passive ports plus stable FAE, and make sure you started fruiting at the right time window (wait about a week after full colonization rather than immediately).
What should I do if the tub smells strongly sour, rotten, or “off” rather than faintly mushroom-like?
Treat unusual odors as an early contamination signal. If the smell is accompanied by wet patches, discoloration, or rapid browning, discard the tub rather than trying to salvage small areas, since bacterial breakdown can spread internally where you cannot see it.
Is it better to remove contaminated spots early, or should I scrap the whole tub right away?
If contamination is limited to a small isolated patch early, some growers attempt removal once, then isolate the tub to prevent spore spread. If contamination covers more than roughly a quarter of the surface, or if it keeps reappearing after cleanup, scrap and review substrate pasteurization and grain sterility for the next run.
How do I choose between coco coir/vermiculite and a richer substrate layer like added sawdust?
Start with the simplest mix until you can keep pinning stable. Added nutrients can boost growth but also raise the chance of contamination and can worsen wetness problems, which is especially important for this species because fruiting success depends heavily on balancing RH and fresh air.
My tub looks healthy, but pins abort after they start. What usually causes that?
Aborts commonly happen from RH swings (dropping below the mid-80s), CO2 buildup, or surface dehydration between mist cycles. Review your hygrometer placement, reduce misting volatility (same times daily), and ensure your polyfill ports or venting strategy is not restricted.
Why are my stems too long and fruits look “leggy” or thin?
Leggy growth usually points to insufficient fresh air exchange and airflow mixing at the same time as overly high humidity. Increase passive port size or improve vent cycling, and avoid over-humidifying the chamber so the surface is hydrated without staying saturated.
How should I time harvest so I don’t lose the next flush?
Harvest right before or as the veil begins to tear. Waiting for full spore drop can leave you with messy substrate and can reduce the vigor of subsequent flushes, so plan to check the tub more closely in the final 12 to 24 hour window.
What is the safest way to “dunk and roll” between flushes if my tub tends to crack or dry out?
Use soaking rather than aggressive handling. Submerge gently, avoid excessive lifting of the substrate block, and keep the soak limited to the lower end of the range (about 6 hours) if you notice cracking. After draining, re-establish humidity gradually so the surface does not shock-dry.
How can I tell whether my issue is spawn quality, pasteurization, or fruiting-environment problems?
If contamination appears during colonization, suspect sterile grain handling and pasteurization consistency. If colonization is clean but fruiting stalls, suspect RH and CO2 balance, temperature timing (including the cold shock window), and surface condition (not bone dry or waterlogged).
Cold shock triggers pins for me sometimes, but other times it does nothing. How should I adjust?
Use cold shock only after the tub is truly ready (fully colonized, surface not dry), and keep it short and controlled (about 12 to 24 hours around the low-60s). If nothing happens, don’t repeat immediately, instead verify your humidity and FAE targets first because those are the most common “masking” factors.