Baby bella mushrooms, also called cremini or crimini, are just the brown variety of Agaricus bisporus harvested at a young stage before the cap fully opens into a portobello. You can grow them at home using either a ready-made kit or a spawn-plus-substrate setup, but they are more demanding than oyster mushrooms: they need a composted substrate, a specific casing layer on top to trigger pinning, and tight humidity and temperature control. Done right, you can get your first harvest in about 3 to 4 weeks after casing and pull 3 to 4 flushes from a single batch.
How to Grow Bella Mushrooms (Cremini) Step by Step

Marcus Holloway
2 May 2026

What "bella mushrooms" actually means for growers
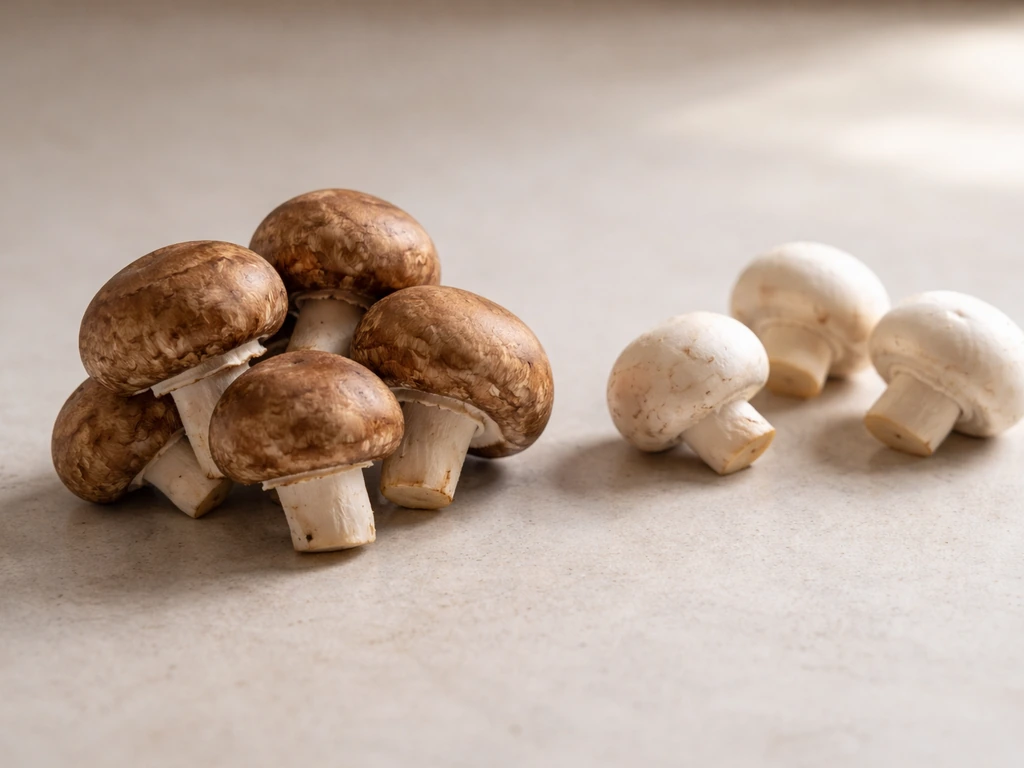
"Baby bella," "cremini," and "crimini" are all commercial names for the same organism: Agaricus bisporus, brown strain. The species also produces the familiar white button mushroom (same species, different pigmentation) and the portobello, which is just a cremini that has been left to grow until the cap opens flat and the veil tears fully.
When you search for how to grow bella mushrooms, you are almost certainly looking at Agaricus bisporus brown variety, and the cultivation method is the same across all three market stages. If you are also searching for how to grow mushrooms with specific strains and methods, the same Agaricus bisporus process and casing requirements apply how to grow bella mushrooms.
The only real difference is when you harvest: tight and closed for buttons, veil just starting to tear for cremini/baby bella, and fully opened veil for portobellos. This article focuses on growing and harvesting at the cremini stage.
It is worth noting that some growers loosely use "bella" to refer to other brown capped mushrooms, but for home cultivation purposes, Agaricus bisporus is the practical target. Specialty brown varieties like Boletus edulis (porcini) are an entirely different cultivation challenge with far less predictable indoor results, so do not let the naming confusion send you down the wrong path. If you specifically want how to grow boletus edulis, you will need different planning for its habitat and cultivation conditions than what works for cremini.
Kit vs spawn plus substrate: which should you start with?
For most people growing baby bellas for the first time, a kit is the smarter starting point. Agaricus bisporus is pickier than something like oyster mushrooms, and kits come with pre-colonized, pre-conditioned compost plus a casing layer already included or packaged separately. You skip the hardest parts: sourcing and conditioning compost, dialing in colonization temps, and timing the casing application. Several online suppliers (Out-Grow, North Spore, and similar retailers) sell Agaricus bisporus kits specifically labeled for cremini or baby bella production. You open the kit, apply the casing if it is packaged separately, manage humidity, and wait.
Spawn plus substrate is worth doing if you want to scale up, repeat cycles more cheaply, or just want the full learning experience. It takes more materials, more time, and more attention to detail, but once you get the workflow dialed in, each batch costs significantly less per pound of mushrooms than buying kits. The instructions below cover both paths, with the spawn-plus-substrate method explained in full so you know exactly what you are doing at each step.
| Factor | Kit | Spawn + Substrate |
|---|---|---|
| Upfront cost | Higher per batch | Lower at scale |
| Difficulty | Beginner-friendly | Intermediate |
| Setup time | 30 minutes | Several days to weeks |
| Substrate prep required | No | Yes |
| Casing needed | Usually included | You source and apply it |
| Repeat cycles | Limited | Easily repeatable |
| Where to buy | Online kit retailers | Spawn suppliers, home brew/garden shops |
Substrate and casing: what to use and how to prep it
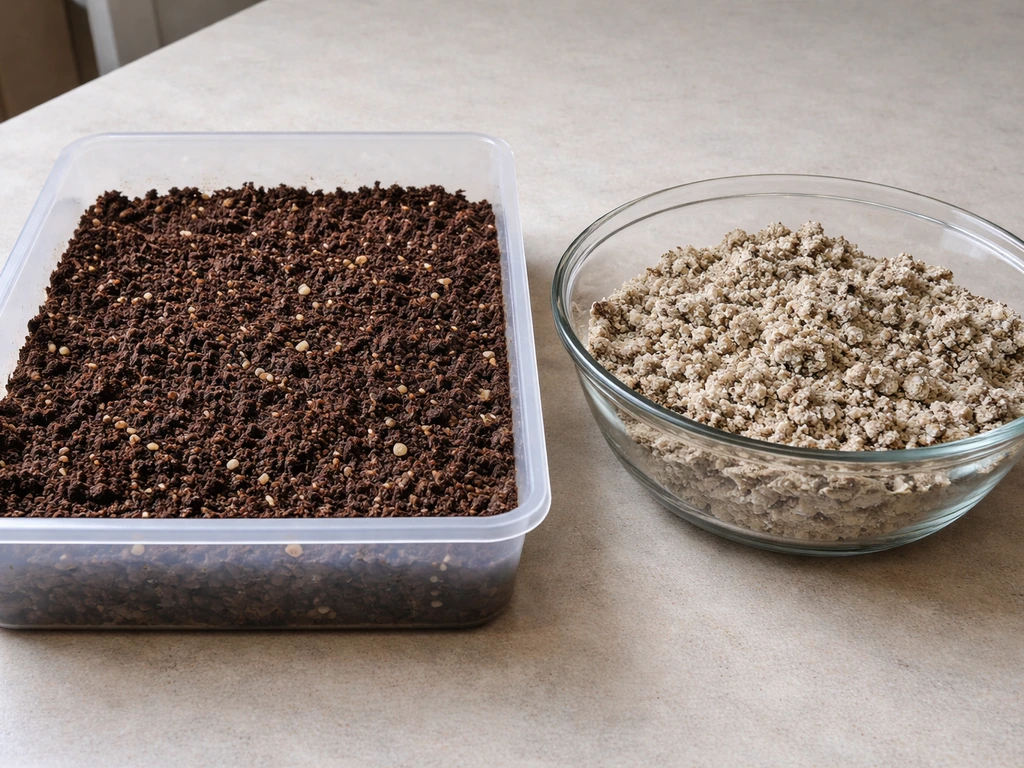
Agaricus bisporus does not grow on straw or wood chips the way oyster mushrooms do. It needs a nitrogen-rich, well-composted substrate, typically based on horse or mushroom compost with added gypsum (calcium sulfate) to improve structure and reduce clumping. Penn State's mushroom research program notes that all compost formulas for Agaricus require nitrogen supplements and gypsum. At home, the most accessible options are pre-composted horse manure (bagged from garden centers), commercial mushroom compost, or a mix of the two. Aim for a moisture content around 60 to 65 percent: squeeze a handful and a few drops of water should come out, not a stream.
For a spawn-plus-substrate workflow, mix your Agaricus spawn into the compost at roughly 1 part spawn to 3 parts substrate by weight. A practical starting batch might be 3 pounds of spawn mixed into 10 pounds of bulk compost. Spread it into a container (a 12-quart plastic tote or a shallow mushroom tray both work) to a depth of about 4 to 6 inches. Deeper beds tend to retain heat and moisture better, which matters for Agaricus.
The casing layer: the step most home growers underestimate
Here is the thing that surprises most first-time Agaricus growers: unlike oyster or shiitake, Agaricus bisporus will not pin without a casing layer applied on top of the colonized compost. The casing is not optional. Penn State puts it plainly: the casing layer is the only method of forcing the mycelium to shift from vegetative growth to fruiting. The casing layer works partly by providing moisture and physical anchorage for pins, and partly by hosting specific bacteria that provide a chemical trigger the mycelium needs to fruit. A Reddit mycology discussion on fruiting induction also hypothesizes that the casing supports the bacterial conditions needed for mushrooms to switch into fruiting hosting specific bacteria that provide a chemical trigger.
The standard home-grower casing is a peat moss and hydrated lime mix, usually about 3 to 4 parts peat to 1 part hydrated lime by volume, moistened to field capacity (moist throughout but not waterlogged). One big advantage of peat-based casing is that it does not need pasteurization because peat is naturally inhospitable to the main Agaricus pathogens. You can use it straight out of the bag after mixing in the lime and water. Spread a 1 to 1.5 inch layer evenly over the fully colonized compost surface. Do not apply casing before the compost is fully colonized, otherwise pinning will be patchy and slow.
Incubation: getting the mycelium to fully colonize
After mixing spawn into your compost and before applying the casing, the compost needs to incubate so the mycelium can spread throughout the substrate. Keep the temperature around 24°C (75°F) during this phase. Above 26.7°C (80°F) you start stressing the spawn, and if it hits 40°C (104°F) the mycelium dies. In summer or in warm rooms this can happen faster than you expect, especially since the mycelium itself generates some heat as it grows. A thermometer probe in the center of the bed is worth using.
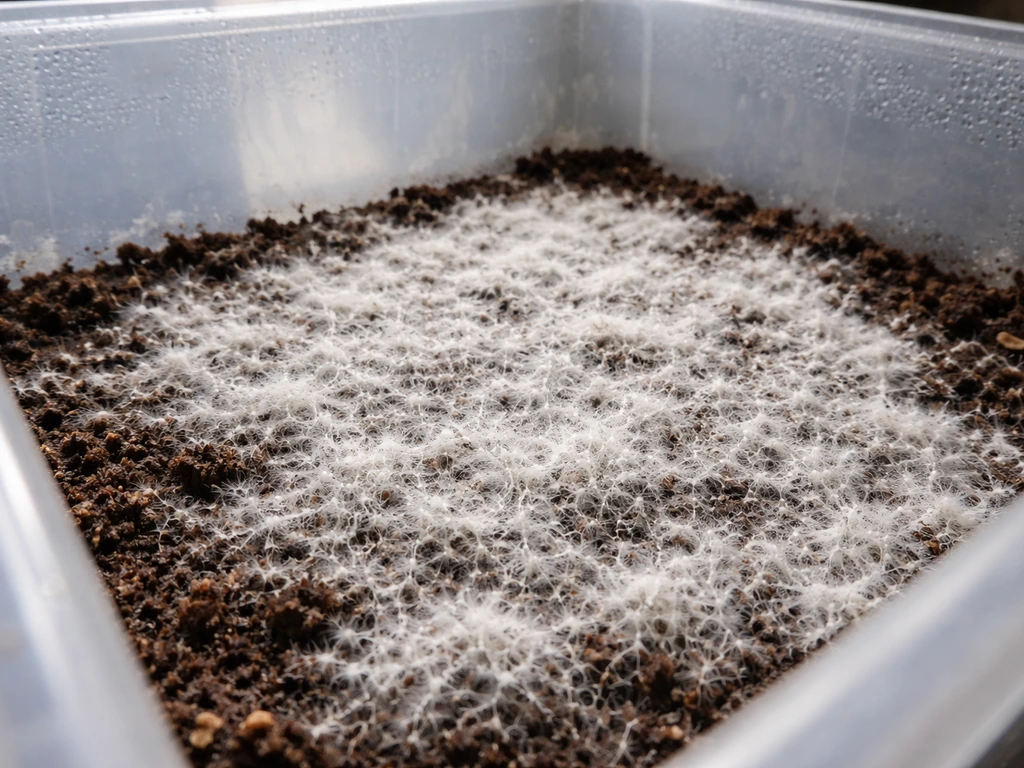
During incubation, keep the surface of the compost from drying out by draping a layer of damp newspaper or plastic loosely over the top. CO2 levels naturally rise inside a covered container and that is fine at this stage. Agaricus mycelium looks white and ropy (rhizomorphic) as it runs through the compost. Expect full colonization to take 10 to 14 days depending on temperature and spawn rate. When white mycelium is visible throughout and the surface looks well covered, you are ready to case.
Fruiting setup: fresh air, humidity, and temperature
Once the casing is applied, the environment shifts. The first 5 to 7 days after casing, keep conditions similar to incubation (around 24°C, high humidity, minimal air exchange) to let the mycelium colonize up through the casing layer. Then transition to fruiting conditions: drop the temperature slightly to 18 to 21°C (65 to 70°F), increase fresh air exchange, and maintain relative humidity at 90 to 95 percent.
A UC ANR production guide for button mushrooms (Agaricus bisporus) describes maintaining very high relative humidity, in the 90, 100% range, during production conditions and keeping fresh air exchange to a minimum relative humidity at 90 to 95 percent. That temperature drop combined with increased fresh air and the presence of the casing layer is what kicks off pinning.
Unlike many other mushroom species, Agaricus bisporus does not need light to trigger fruiting. Light has essentially no role in the process for this species. The casing does all the signaling work. That said, ambient room light will not hurt anything, so do not stress about keeping the grow area dark.
Fresh air exchange is critical once fruiting starts. High CO2 causes abnormal, elongated stems and small, deformed caps. In a home setup, fanning the grow container twice a day for a few minutes each time is usually enough. If you are growing in a tent or chamber, a small fan on a timer cycling a few minutes per hour works well. Target CO2 levels around 800 to 1,000 ppm in the fruiting area if you have a monitor.
Watering the casing is where most home growers slip up. The casing must stay consistently moist at field capacity, but you should never pour water directly in a way that damages or compacts the surface. Light misting with a spray bottle once or twice a day is the standard home approach. If the casing surface looks dry or starts to crack, the mushrooms will be small and sparse. If it looks waterlogged and shiny, you are overdoing it and risk disease problems.
Harvesting baby bellas and getting repeat flushes
First pins typically appear 18 to 21 days after casing. Once pins are visible, they develop quickly. For baby bella (cremini) stage, harvest when the caps are still dome-shaped and the veil on the underside is just beginning to stretch and tear but has not opened flat. If you wait until the cap is fully open and flat, you have a portobello.
If you pick while the cap is still tight and round, you have a button. The cremini stage is that middle window: the cap is expanding, the veil is showing tension, and the mushroom feels firm to the touch. Do not let them sit past that point because overripe mushrooms get soft quickly and drop spores, which is messy and can interfere with subsequent flushes.
To harvest, grip the mushroom firmly at the base and twist gently while pulling upward. This removes the base cleanly without leaving a stump that can rot and cause problems. After each flush, clean out any remaining stubs and dead tissue from the casing surface. Then water the casing back to field capacity and wait. The next flush typically follows in 3 to 5 days. A healthy bed will produce 3 to 4 flushes before yields drop off significantly. Penn State commercial data confirms 3 to 4 breaks as a typical crop cycle.
Troubleshooting: what to do when things go wrong
No pins forming
The most common cause is applying the casing before the compost was fully colonized. If the mycelium has not run all the way through the substrate, the trigger to fruit does not work properly. Another frequent culprit is not enough fresh air after casing. If the container is completely sealed with no air exchange, CO2 builds up and suppresses pinning. Check that you have dropped the temperature slightly into the 18 to 21°C range, increased airflow, and that the casing itself is moist throughout. Sometimes all it takes is an extra few days of patience after the fruiting conditions are established.
Green mold (Trichoderma) contamination
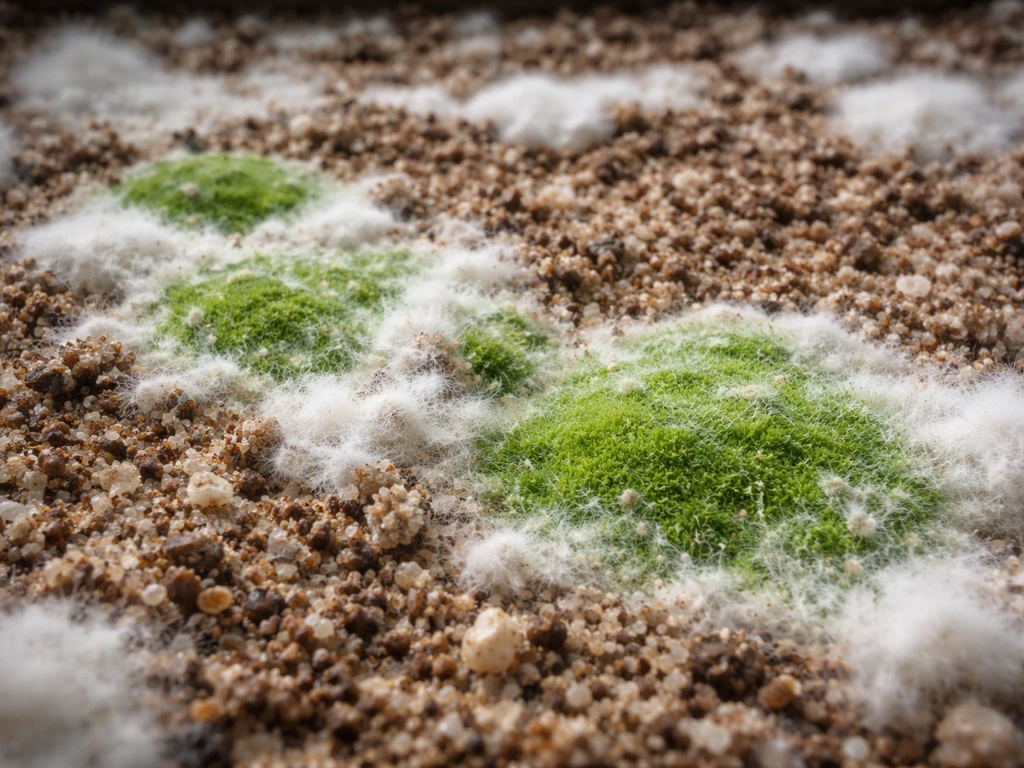
[Green mold is the most serious contamination problem in Agaricus beds. ](https://link. springer. com/article/10.
1007/s12600-024-01168-0) It starts as white patches that turn bright green as it sporulates, and it outcompetes the mushroom mycelium leaving dead zones in your casing. The main entry points are contaminated casing material, unsterilized tools, or working over the bed when sick or with dirty hands. If you see green mold, isolate that section immediately.
You cannot treat green mold once it is established, so your best move is prevention: use peat-based casing (naturally resistant), sanitize your tools and work surfaces with a diluted bleach solution before every session, and avoid touching the casing unnecessarily. PSU Extension confirms that green mold leads to non-productive areas and yield losses that cannot be recovered in affected sections.
Deformed caps or long, thin stems
Elongated stems and small or deformed caps are almost always a CO2 problem. Fan the grow area more frequently and for longer periods. If you are growing in a sealed bin, drill some holes and cover them with polyfill or a breathable membrane. Once you correct the airflow, the next pins that form should develop into properly shaped mushrooms.
Overlay (dense, unproductive surface growth)
Overlay happens when the mycelium forms a thick, mat-like layer on the casing surface without pinning. High CO2, incorrect moisture, and watering too aggressively on the casing surface all contribute. If you see a thick white mat with no pins after 3 weeks of fruiting conditions, scratch the surface of the casing very gently (just the top 1/4 inch), adjust your airflow, and reduce misting frequency. Sometimes this resets the surface enough to get pinning started.
Low yields or small mushrooms
Small mushrooms usually mean the casing dried out during development. Check the casing moisture daily. If it is pulling away from the container edges or feels dry even a centimeter below the surface, mist it more frequently. Low yields across an entire flush can also reflect poor spawn quality, old spawn, or compost that was not properly conditioned before use. For future batches, source fresh spawn from a reputable supplier and use it within the window recommended on the package.
Your practical setup and shopping list
You do not need much to get started. Cleanliness matters more than equipment. USU Extension puts it simply: cleanliness is the key to successful mushroom cultivation. Sanitize every surface, tool, and container with a diluted bleach solution (1 tablespoon bleach per quart of water) before you begin, and wash your hands thoroughly before handling spawn or casing material.
- Agaricus bisporus (brown/cremini) spawn or a ready-made cremini/baby bella kit from an online mushroom supplier
- Bagged composted horse manure or commercial mushroom compost (available at garden centers)
- Peat moss and hydrated lime for casing
- Gypsum (calcium sulfate), available at garden supply stores
- Shallow plastic totes or mushroom trays (12-quart totes work well for home batches)
- Spray bottle for misting
- Thermometer probe to monitor substrate temperature
- Hygrometer to track humidity in your fruiting area
- Diluted bleach solution for sanitation
- Damp newspaper or loose plastic sheeting for covering during incubation
For indoor space, a spare closet, a basement corner, or a small grow tent all work. The key variables to control are temperature (24°C for incubation, dropping to 18 to 21°C for fruiting), humidity (90 to 95 percent in the fruiting phase), and fresh air exchange (fanning twice daily minimum). A cheap hygrometer/thermometer combo from any hardware or online store will cover your monitoring needs for under $15.
A simple timeline to follow from day one
- Day 1: Source spawn and substrate materials. Sanitize all containers and tools. Mix spawn into compost at 1 part spawn to 3 parts compost. Fill trays to 4 to 6 inch depth. Cover loosely.
- Days 2 to 14: Incubation at 24°C. Keep surface moist with damp covering. Check daily for contamination or temperature spikes. Do not disturb unless needed.
- Day 14 to 16 (when compost is fully colonized): Mix and moisten your peat/lime casing to field capacity. Apply a 1 to 1.5 inch even layer over the surface.
- Days 14 to 21 (after casing): Let casing colonize at similar temperatures with minimal air exchange. Mist lightly to maintain moisture.
- Days 21 onward: Shift to fruiting conditions. Drop temp to 18 to 21°C, increase fresh air exchange, maintain 90 to 95% humidity. Fan the grow area twice daily.
- Days 32 to 42 (18 to 21 days after casing): First pins appear and develop into harvestable cremini. Harvest by twisting and pulling at the cremini stage.
- After each flush: Remove all stubs, remoisten casing, and wait 3 to 5 days for the next flush. Repeat for 3 to 4 total flushes.
Agaricus bisporus is more involved than most beginner mushroom species, but it is absolutely doable at home with some patience and attention to the casing step. Sclerotia form under the right conditions for certain mushroom varieties, so the method differs from the standard cremini (Agaricus bisporus) cultivation described here. Psilocybe tampanensis has very different legal and cultivation requirements than edible Agaricus varieties, so make sure you research local laws and species-specific guidance before attempting it.
Once you have run through one full cycle, the second one goes much faster because you know exactly what to watch for. Start with a kit if you want results quickly, move to spawn-plus-substrate when you want to scale up and reduce cost, and keep your grow area clean every single step of the way.
If you are specifically trying to grow Psilocybe semilanceata, the setup, legality, and biological requirements are different from Agaricus and you should follow a species-specific guide. If you are also curious about psilocybe zapotecorum specifically, the grow requirements are different enough that you will want a separate guide for that species how to grow psilocybe zapotecorum.
FAQ
Can I grow bella mushrooms outdoors instead of indoors?
In most climates, outdoor growing is unpredictable because temperature swings and drying are harder to control, plus casing moisture can’t be kept at field capacity consistently. If you try outdoors, use sheltered, shaded conditions, protect from direct rain, and still maintain the casing step, but expect lower yields and more contamination pressure than indoor setups.
What if my compost is not fully colonized when I apply the casing?
That’s one of the most common reasons for no pinning or patchy pinning. Wait until you see white mycelium throughout the bulk compost and the surface is fully covered, then case. If you already cased early, you can sometimes improve results by stabilizing fruiting conditions, but recovery is uncertain.
How thick should the casing layer be for cremini (bella)?
Stay close to 1 to 1.5 inches (about 2.5 to 4 cm). Too thin dries out faster and can reduce pin count, too thick can slow colonization upward through the casing and delay the first pins.
Do I need to pasteurize or sterilize peat-based casing?
For peat-based casing, you typically do not pasteurize because peat is naturally resistant to the main Agaricus competitors. Still, keep the casing sealed until use, and avoid cross-contamination from dirty tools or surfaces.
How do I know whether my CO2 is too high besides checking with a monitor?
If stems elongate, caps stay small, or mushrooms look distorted, CO2 is likely elevated. Fix it by increasing fresh-air exchange (more frequent fanning, or longer fan cycles) and then wait a few days to see the next pin set improve.
Is light required to grow cremini mushrooms?
No, Agaricus bisporus does not require light to trigger fruiting, the casing and environment do the work. You can keep normal ambient room lighting, but focus your effort on temperature, humidity, and fresh-air exchange.
What humidity target should I aim for during fruiting, and how do I maintain it?
Target 90 to 95% relative humidity during fruiting. Use a hygrometer, mist lightly and consistently, and avoid soaking the casing until it becomes shiny or waterlogged. If humidity is unstable, enclose the grow area (tent or plastic sheeting) and control fresh air through a timed fan.
How should I water the casing, and how can I tell if I’m overdoing it?
Mist lightly so the casing stays moist throughout, it should look evenly damp, not pooled. If you see standing water, excessive shine, or a sour smell, you likely overwatered and increased disease risk. Reduce misting frequency and improve airflow without drying the casing.
What causes the casing to form an overlay, a thick mat with no pins?
Overlay is usually driven by imbalanced conditions, commonly high CO2, incorrect casing moisture, or overly aggressive misting that disrupts the casing surface. If you see a thick white mat after fruiting has started, gently scratch only the top layer, reduce misting, and increase fresh air, then wait for pinning to resume.
How long should I expect between casing and first pins, and between flushes?
First pins typically appear around 18 to 21 days after casing if temperatures and airflow are correct. After harvesting a flush, the next one commonly comes about 3 to 5 days later, as long as you clean stubs and re-moisten the casing to field capacity.
Should I remove all mushroom stubs after a harvest?
Yes. Leaving dead base tissue on the casing can rot and invite contamination or reduce performance of the next flush. After twisting off, wipe or remove obvious stubs and then mist to restore the casing to field capacity.
How can I prevent green mold from taking over?
You can’t reliably cure established green mold, so prevention matters. Use clean, dedicated tools, sanitize work surfaces before each session, minimize touching the casing, and use peat-based casing. If a localized patch appears, isolate that section immediately, but assume overall yield may drop in that area.
Why are my mushrooms small and sparse across the whole flush?
Common causes are casing drying during development and poor-quality or old spawn. Check casing moisture daily, if it feels dry or pulls back from edges, increase misting. For future batches, use fresh, reputable spawn and follow the supplier’s recommended use-by window.
What should I do if I accidentally grew at too high a temperature during incubation?
If the bulk compost exceeded the ideal incubation range, mycelium growth can stall or die, leading to weak colonization and poor pinning. If you caught it early, stabilize temperature promptly and resume incubation until the substrate looks fully covered, but if colonization is clearly incomplete, the batch may need to be discarded.
Can I use a different casing material than peat and hydrated lime?
You can, but it changes disease resistance and water-holding behavior. Peat plus hydrated lime is a proven home standard because it resists Agaricus competitors and supports consistent field capacity. If you experiment with other casings, expect to re-tune moisture, timing, and possibly pasteurization practices.
What’s the easiest path for beginners, kit or spawn plus substrate?
A kit is usually easiest because it handles the most failure-prone steps, pre-conditioned compost and (often) casing prep timing. Choose spawn plus substrate if you want lower cost per batch and better control, but be prepared for extra attention to compost quality, incubation temperature, and casing application timing.