Growing psychedelic mushrooms indoors, from spores to first harvest, is genuinely achievable for a motivated beginner with basic equipment and patience. The process shares a lot of DNA with growing gourmet mushrooms: you need clean technique, the right substrate, and consistent environmental controls. What makes psilocybin mushrooms different is the legal layer, which you cannot ignore. This guide walks through everything, start to finish, in the order you actually need it.
How to Grow Psychedelic Mushrooms Indoors Step by Step

Marcus Holloway
24 Mar 2026
Legality and Safety: Read This Before You Do Anything Else
Psilocybin is a Schedule I controlled substance under federal law in the United States (21 U. GovInfo’s official U.S. Code entry for 21 U.S.C. § 812 lists Schedule I controlled substances, including psilocybin psilocybin is a Schedule I controlled substance under federal law in the United States. S.C. § 812). That classification applies nationwide, regardless of what individual states or cities have done locally. Cultivating psilocybin mushrooms at home is, at the federal level, manufacturing a controlled substance. That is the baseline reality, and it has real consequences: a U.S. Department of Justice case out of Denver resulted in a guilty plea for possession with intent to distribute psilocybin mushrooms, and that happened in Colorado, which has some of the most permissive state-level rules in the country.
State and local law varies enormously. Colorado's Proposition 122 decriminalized personal possession and use of psilocybin for adults 21 and older, and the state has moved toward regulated medical access through its Natural Medicine Health Act. Colorado legislative materials on Proposition 122 also discuss the scope and limits of state action, including references to psilocybin and psilocyn and the distinction that this does not legalize under federal law blank" rel="noopener noreferrer">Proposition 122 decriminalized personal possession and use of psilocybin for adults 21 and older. But decriminalization of possession is not the same as a legal right to cultivate, and distribution remains prosecutable. Other states are far less forgiving: Utah classifies psilocybin distribution as a second-degree felony with multi-year prison exposure; Wisconsin and Illinois treat possession and manufacture as serious felony-level conduct; Maine has debated decriminalization bills without a stable legal outcome. If you live somewhere other than Colorado or a handful of decriminalization cities (including Utah), the risk profile for cultivation is significant.
One thing that is widely legal in most U.S. states is purchasing and possessing psilocybin spores for microscopy purposes, because the spores themselves do not contain psilocybin. That legal window is where most hobbyist cultivators start, and it is why this guide discusses the spore-to-culture workflow. The moment those spores germinate and mycelium forms, the legal calculus changes. Know your local laws before proceeding.
On the safety side: mushroom cultivation involves working with organic materials that can harbor mold, bacteria, and fungal bioaerosols. Spores and hyphal fragments are respirable and can trigger allergic reactions or bronchial irritation, and people who are immunocompromised face elevated risk from serious fungal infections including mucormycosis. Work in well-ventilated spaces, wear an N95 mask when handling dry substrate or checking for contamination, and keep your grow area away from living spaces used by vulnerable people. There is no safe indoor airborne threshold for mold spores established by CDC or NIOSH, so prevention and containment are the only real tools you have.
Choosing Your Species, Strain, and Starting Material
Which species makes sense for a first grow
Psilocybe cubensis is the overwhelmingly common choice for home cultivators, and for good reason. It is forgiving of temperature swings, colonizes a wide range of substrates, and fruits reliably with basic technique. Within the species, strain matters more than most beginners realize. Strains like Golden Teacher, B+, and Penis Envy are among the most documented in hobbyist communities. Golden Teacher in particular has a reputation for being stable and relatively contamination-resistant, which makes it a practical first pick. Penis Envy strains produce potent mushrooms but colonize more slowly and are less prolific, so save those for after you have a few successful grows behind you.
Spores vs. spawn: what you're actually working with
Spores are the reproductive cells of the fungus, analogous to seeds. They do not contain active mycelium yet, which is part of why their sale for microscopy is treated differently under the law in many states. Spawn refers to mycelium that has already colonized a carrier medium, such as grain or sawdust, and is ready to be introduced to bulk substrate. Think of spawn as a starter culture, like sourdough starter: someone has already done the early germination work.
Starting from spores gives you the most flexibility and is the most common path for hobbyists sourcing from online vendors. The tradeoff is additional steps: you need to get spores to germinate and establish a viable mycelial culture before you can move to colonization. Starting from grain spawn skips that process and is faster but requires either making your own spawn (which means having a culture already) or sourcing it from a trusted vendor. For this guide, the focus is on the spore-to-fruit workflow.
The Step-by-Step Indoor Grow Workflow
Here is the full process laid out in order. Each stage is covered in more detail in the sections below, but having the whole map in front of you helps you understand why each step exists.
- Acquire spores from a reputable vendor (for microscopy, where legal).
- Germinate spores into liquid culture (LC) or agar to establish live mycelium.
- Transfer healthy mycelium to sterilized grain to create grain spawn.
- Inoculate bulk substrate with grain spawn.
- Allow full colonization of the bulk substrate (the 'colonization' phase).
- Initiate fruiting conditions: higher humidity, fresh air exchange, and indirect light.
- Monitor for pins (primordia), then developing mushrooms.
- Harvest just before or as the veil beneath the cap begins to tear.
- Dry and store, then either compost the substrate or attempt additional flushes.
The realistic total timeline from spore to first harvest runs between 6 and 12 weeks depending on your technique, temperature, and whether you hit any contamination setbacks. If you start from grain spawn instead of spores, you can cut 2 to 4 weeks off that estimate.
From Spores to Living Culture: Germination and Liquid Culture
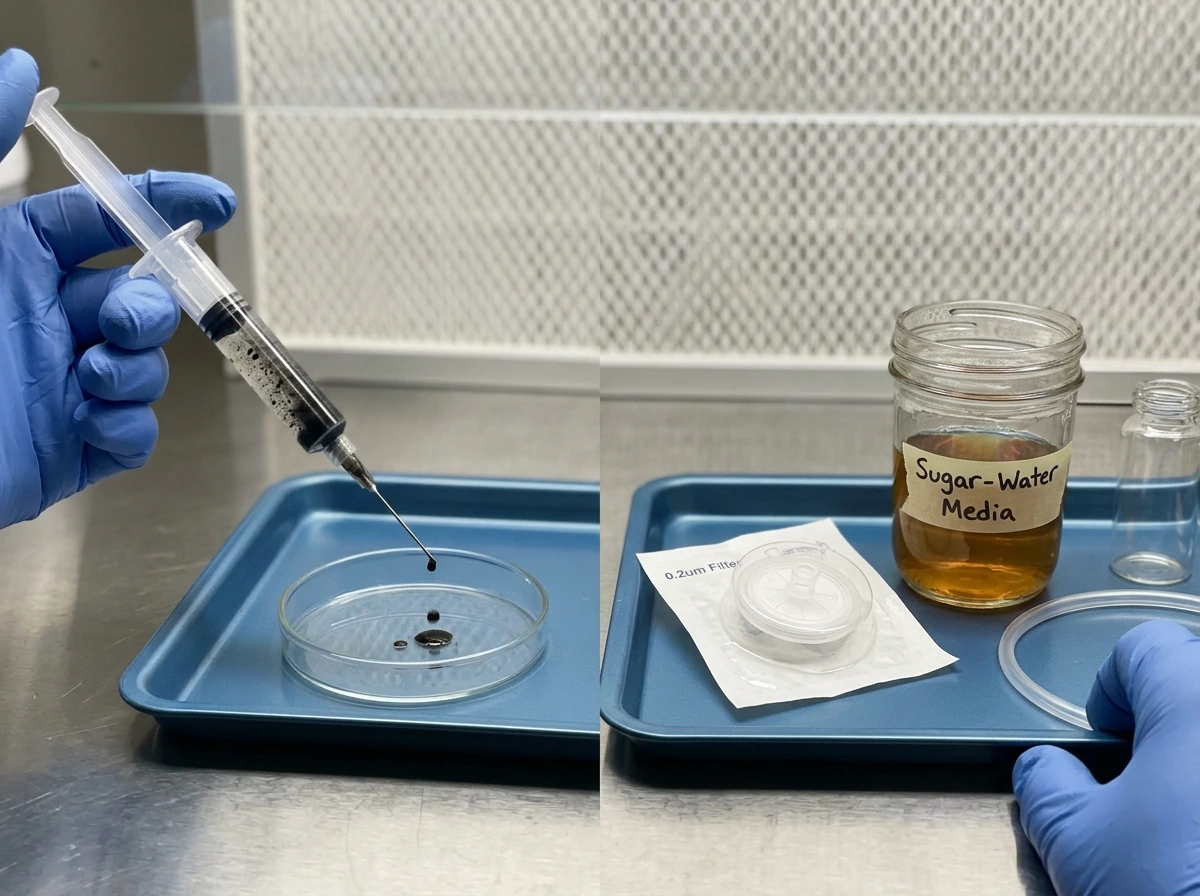
When you receive a spore syringe, what you have is a water-based suspension of spores. To get viable mycelium, those spores need to germinate, and you need to give them a food source. The two most common early-stage methods are agar plates and liquid culture (LC).
Liquid culture is a solution of water and a simple sugar (typically light malt extract or honey at about 4 percent concentration) that has been sterilized and inoculated with spores. Spore germination in LC typically begins within 24 to 72 hours, and you can observe mycelial growth in the liquid within 3 to 7 days under good conditions. What you are watching for is a spreading, white, stringy or fluffy growth in the solution, not cloudiness, which usually signals bacterial contamination. Once the LC is healthy and active, you can use it to inoculate sterilized grain jars to build out your grain spawn.
Agar is the other route and gives you more ability to isolate strong, clean growth. You pour sterilized nutrient agar (potato dextrose agar and malt extract agar are both common) into petri dishes under still-air or flow-hood conditions, let it solidify, and then inoculate with a small drop from your spore syringe. Mycelium grows across the plate and you can visually inspect it, cut out the cleanest, most vigorous sectors, and transfer those to fresh plates or directly to grain. Agar work is slower but produces more reliable, contamination-free cultures. It is worth learning if you plan to do multiple grows.
Once your grain jars are inoculated, full colonization typically takes 2 to 4 weeks at 75 to 80 degrees Fahrenheit. The grain should be completely white and bound together with mycelium before you move to bulk substrate. Partial colonization is one of the most common reasons grows fail at this stage: people rush the transfer and introduce contamination through exposed substrate.
Substrate and Container Preparation
Substrate options and what actually works
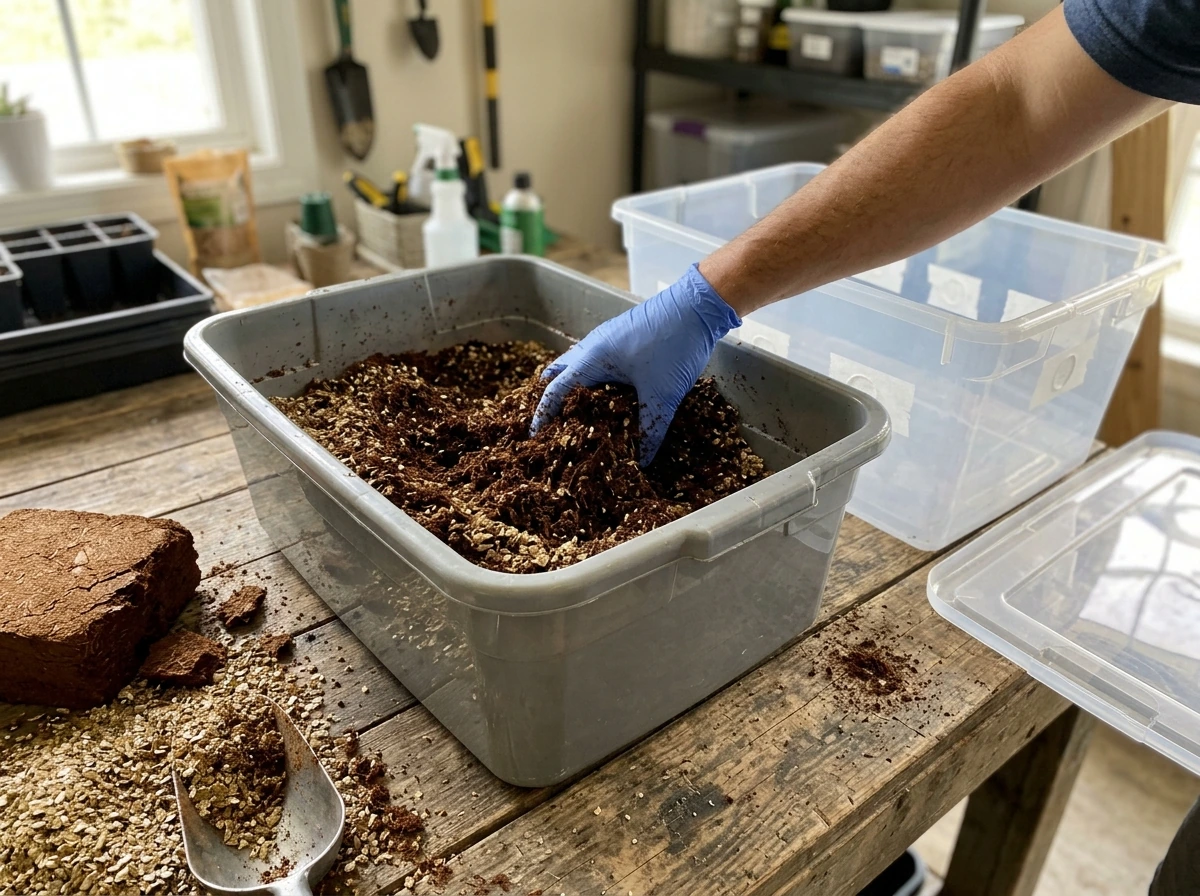
Substrate is the bulk growing medium your mycelium colonizes before fruiting. For Psilocybe cubensis, the most proven beginner substrate is coco coir mixed with vermiculite, often called CVG. It is cheap, widely available, takes pasteurization well, and resists contamination better than nutrient-dense options like manure-based mixes. A common ratio is 650 grams of coco coir to 650 grams of vermiculite with about 700 milliliters of boiling water, though you can scale this up or down.
Higher-nutrition substrates like manure, straw, or masters mix (a blend of hardwood sawdust and wheat bran) can produce heavier yields but are much more prone to contamination and require proper sterilization rather than simple pasteurization. Start with CVG and move to richer substrates once you have contamination-free colonization dialed in.
Pasteurization vs. sterilization
Pasteurization means heating your substrate to a temperature range (around 160 to 180 degrees Fahrenheit) that kills most competing organisms while leaving some beneficial microbes intact. It is appropriate for lower-nutrition substrates like CVG. Sterilization (pressure cooking at 15 PSI for 90 to 120 minutes) kills everything and is required for grain and high-nutrition bulk substrates. The distinction matters because sterilizing CVG is overkill and wastes time and energy, while pasteurizing grain is not thorough enough and invites contamination. Penn State's mushroom production research describes HEPA-filtered airflow during cooling after pasteurization, and the same concept applies at home: let your substrate cool in a clean space with minimal air disturbance before mixing in spawn.
Containers and setup
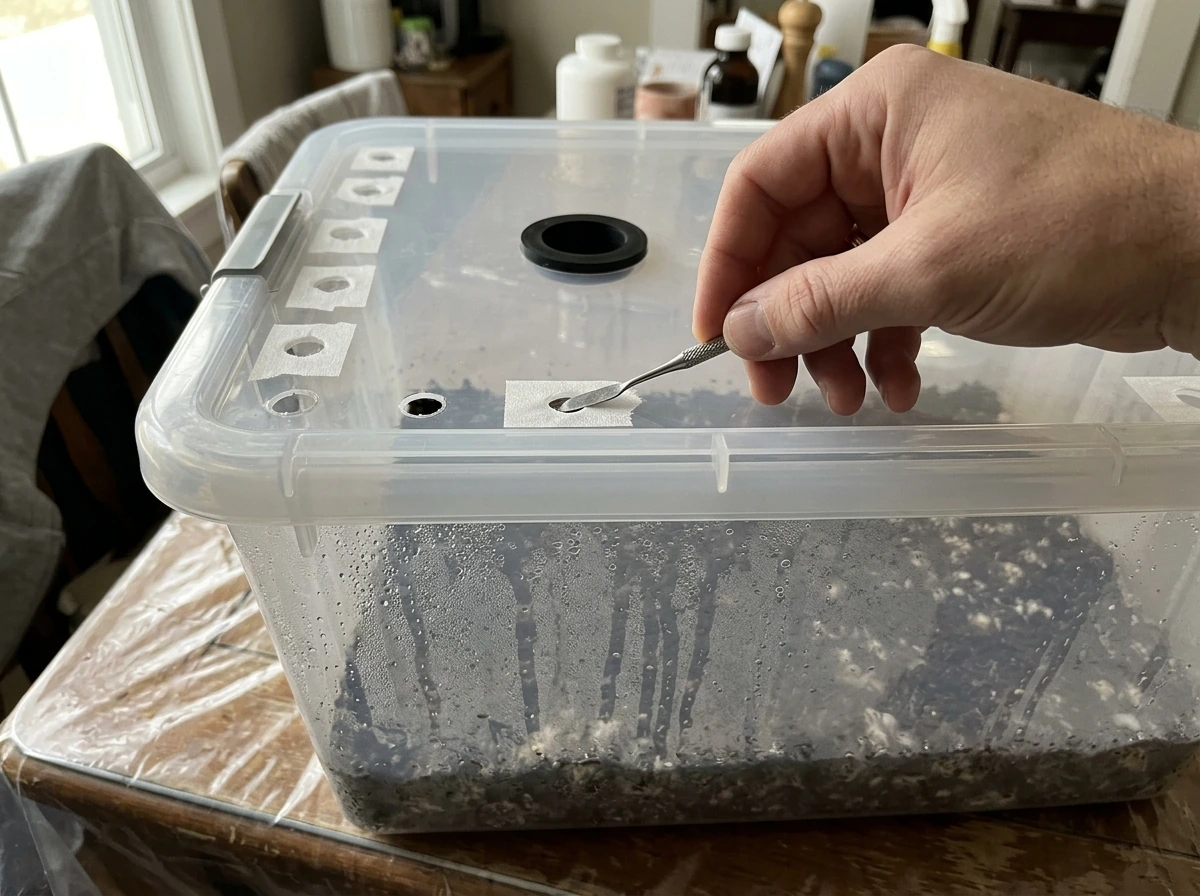
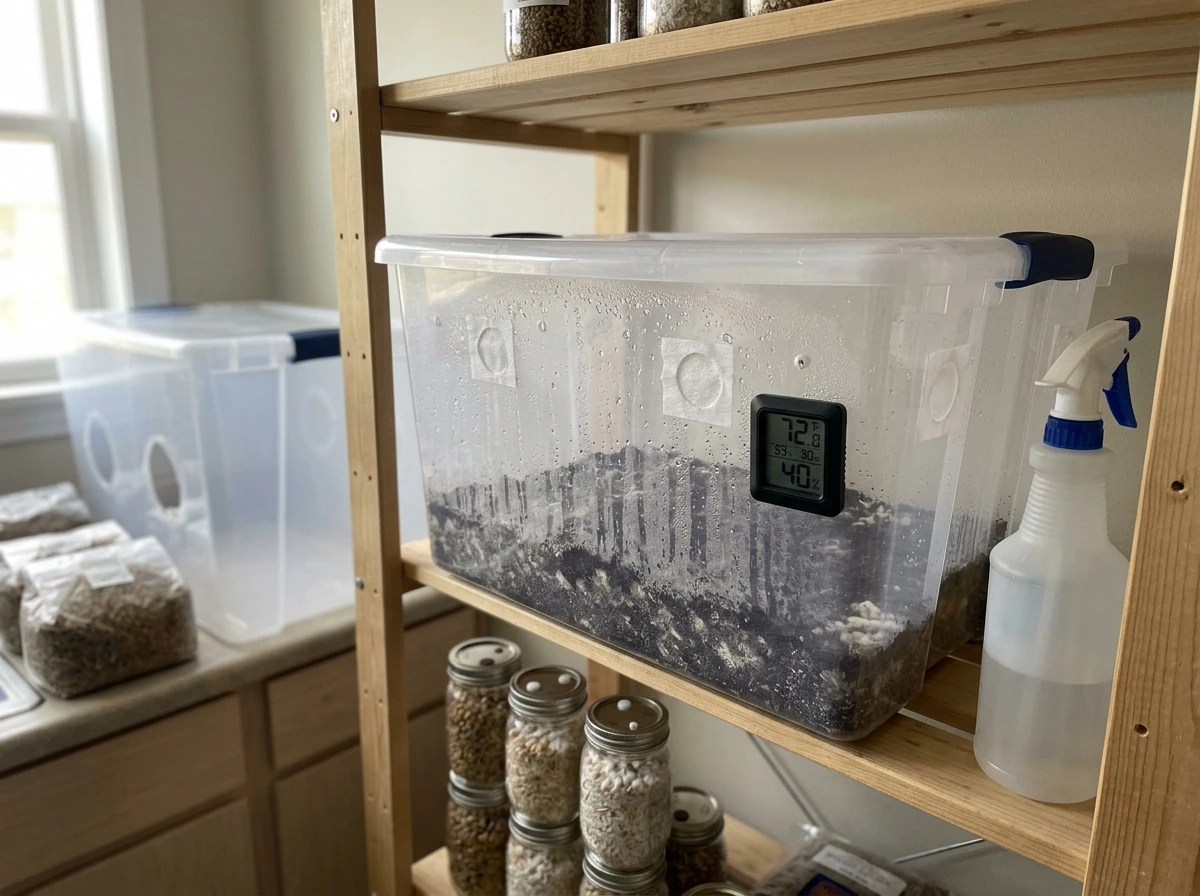
For a simple first grow, a clear plastic storage tote (often called a monotub) works well as both colonization vessel and fruiting chamber. A 66-quart tote is a common size. Drill holes around the sides at substrate level and stuff them with polyfill for passive air exchange, or leave the lid slightly cracked. Some growers use the unmodified tub method where the lid sits askew to allow gas exchange. Wide-mouth mason jars work well for grain spawn, typically in quart or half-pint sizes.
Environmental Controls: Getting the Conditions Right
This is where most home grows succeed or fail. The environmental targets are not complicated, but they require some consistency. Here is what you are controlling and why.
| Parameter | Colonization Phase | Fruiting Phase |
|---|---|---|
| Temperature | 75–80°F (24–27°C) | 70–75°F (21–24°C) |
| Relative Humidity | No misting needed (sealed container) | 90–95% RH |
| CO2 / Fresh Air Exchange | Minimal FAE (lid on, polyfill ports) | Multiple FAE cycles per day (fan or manual fanning) |
| Light | Not needed / indirect ambient fine | Indirect light 12 hrs/day cues pinning |
Humidity
During fruiting, you want relative humidity in the 90 to 95 percent range inside the chamber. The easiest way to achieve this at home is to mist the walls of the tub (not the substrate directly) with a clean spray bottle once or twice a day and fan the chamber for 30 to 60 seconds after each misting. Some growers add an ultrasonic humidifier to a tent setup for larger grows. A basic digital hygrometer placed inside the chamber will tell you what is actually happening; guessing is how you end up with shriveled pins or a soggy substrate.
Fresh air exchange and CO2
During colonization, you want low fresh air exchange. Carbon dioxide buildup actually helps mycelium colonize. Flip to fruiting and the opposite is true: elevated CO2 (above roughly 1,500 ppm) causes long, spindly stems and prevents cap development. Fresh air exchange drops CO2 and signals to the mycelium that it has broken through to the surface. In a monotub, fanning the chamber open two to three times a day for 30 to 60 seconds handles this. In a grow tent with a small inline fan, a few air changes per hour is sufficient. Fruiting chambers targeting 800 to 1,500 ppm CO2 produce well-formed mushrooms.
Temperature
Colonization runs best slightly warmer, around 75 to 80°F. A seedling heat mat under your grain jars works well, but keep an accurate thermometer on the substrate rather than just on the mat, since direct contact can overheat the bottom layer and stress the mycelium. Drop to 70 to 75°F for fruiting. Cooler temperatures during fruiting improve mushroom density and potency for many strains.
Light
Mushrooms do not photosynthesize, so light is not an energy source. It is a directional cue. Indirect ambient light or a simple LED on a 12-hour cycle is enough to cue pinning and direct mushroom growth upward. Avoid direct intense light or total darkness during fruiting.
Troubleshooting Contamination and Stalled Grows
Identifying contamination
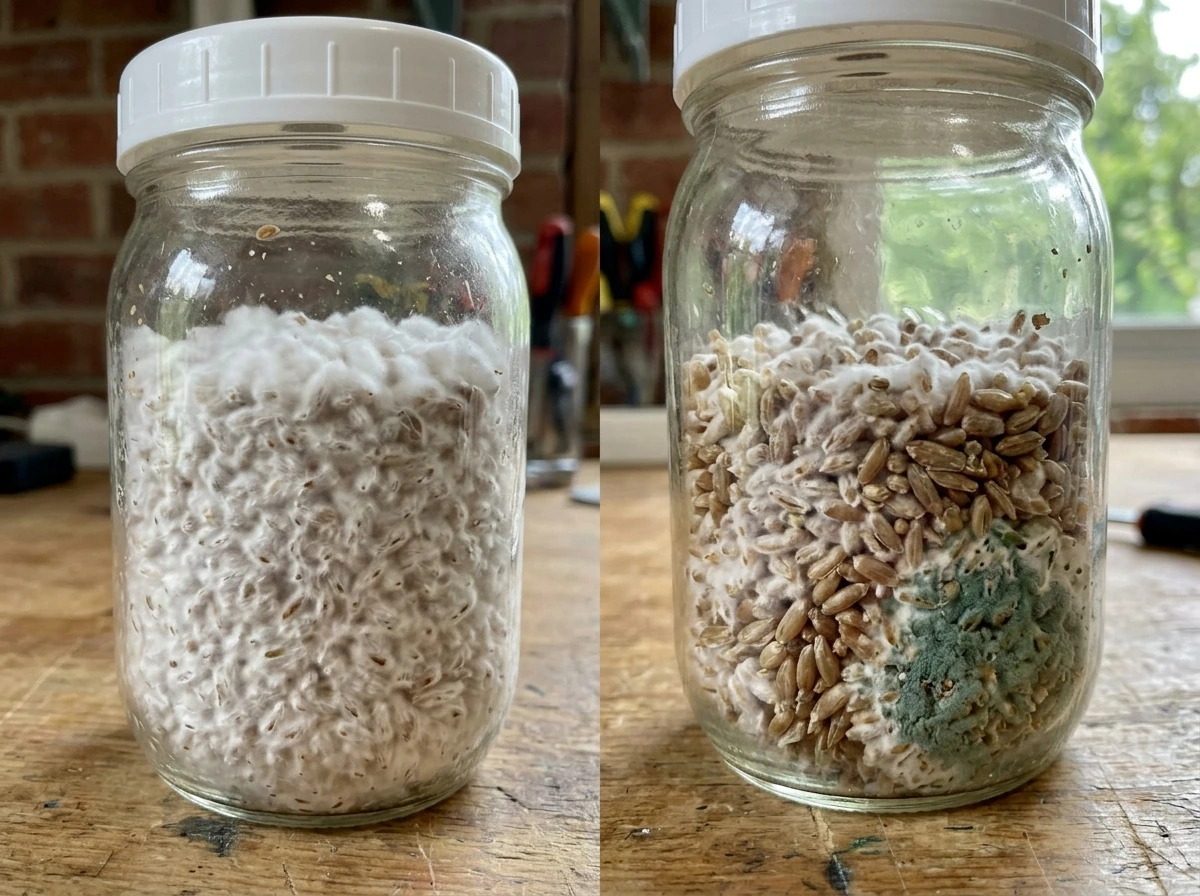
Contamination is the most common reason first grows fail, and it usually appears as color. Healthy mycelium is white or off-white and fuzzy. If you see green, blue-green, or black patches with a powdery texture, that is almost certainly Trichoderma or another mold. Wet, slimy patches with a sour smell are bacterial contamination. Yellow to brown discoloration that smells bad is another bacterial indicator. Pink or orange growth is also a contamination flag.
Do not try to salvage contaminated grain jars. Remove them immediately from your grow space, seal them in a plastic bag before opening (to contain spores), and dispose of them outdoors. Bacterial contamination in bulk substrate is trickier: small patches can sometimes be cut out if caught early, but in most cases, contaminated bulk substrate should be bagged and removed. The Shroomery community's troubleshooting threads are worth reading because they show photographs of what each contamination type looks like in practice, which helps calibrate your eye.
Where contamination enters
Spores and bacteria are everywhere, on your hands, clothes, and in the air. Contamination most often enters through: not allowing substrate to cool completely before inoculating, handling jars or tubs without gloves and a face mask, reusing syringes without flame-sterilizing the needle between jars, lifting lids unnecessarily during colonization, and inadequate sterilization of grain. The fix is always process: slow down, clean your hands and surfaces with isopropyl alcohol, and do inoculation work in the still-air environment of a large clear storage tub you have misted with alcohol (a still-air box).
Why pins fail to develop or stall
If your substrate is fully colonized but no pins appear after a week of fruiting conditions, check these in order: humidity is too low (below 85 percent), CO2 is too high (not enough FAE), temperature is too warm (above 80°F), or the substrate was not fully colonized before switching to fruiting. The presence of primordia, those tiny white pinheads just breaking the surface, tells you the mycelium is genetically and environmentally ready to fruit. No primordia after two weeks of correct fruiting conditions usually means an environmental issue, not a genetic one.
Harvesting and Handling Your First Flush
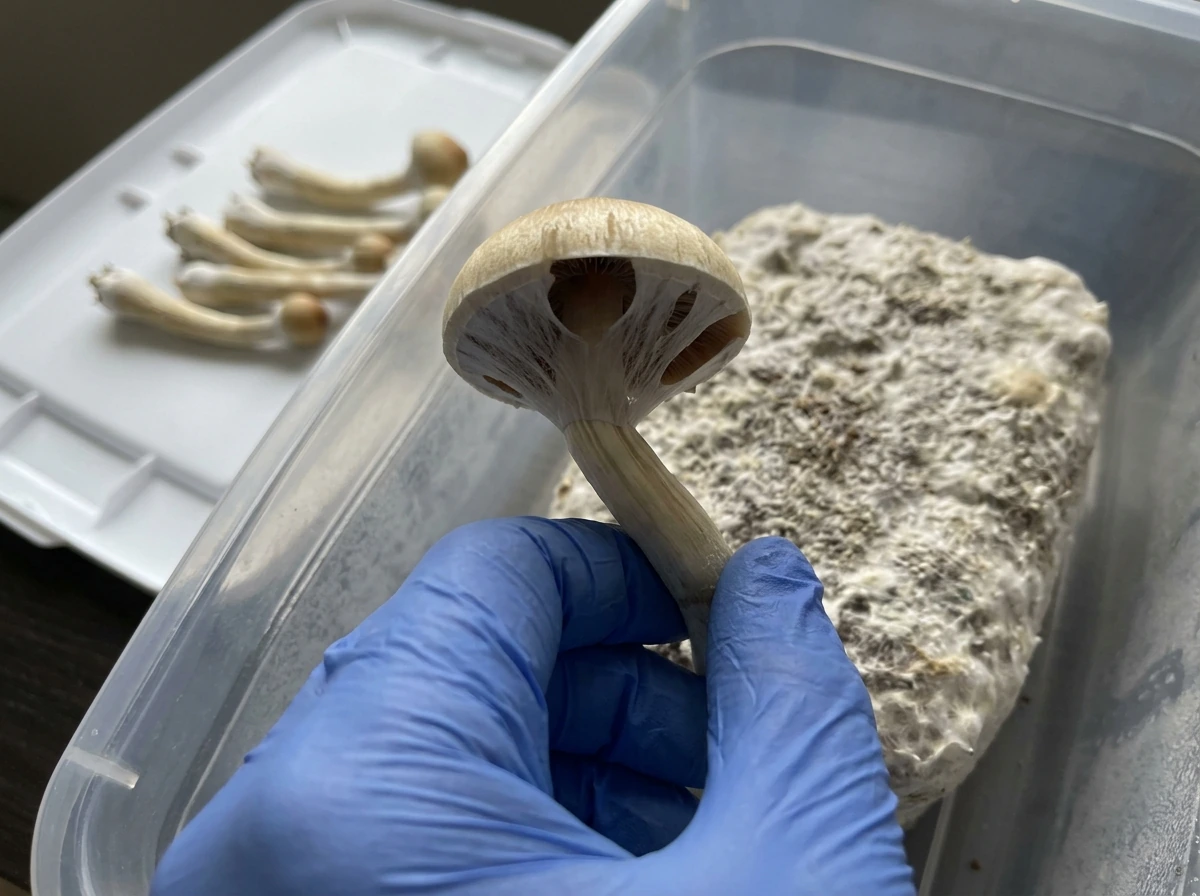
Harvest timing makes a real difference to both potency and cleanliness. The right time to harvest is just before or as the veil under the cap begins to tear away from the stem. Once the veil tears, spores drop, which makes your tub messy and can complicate subsequent flushes. The mushrooms do not become more potent after veil break, and they can begin to degrade. Most fruiting bodies are ready to harvest 5 to 7 days after pins appear, though this varies by strain and temperature.
To harvest, grip the base of the stem as close to the substrate as possible and twist gently while pulling upward. This usually removes the entire stem cleanly. Do not use scissors to cut at the surface because stubs rot and invite contamination for the next flush. After harvesting, remove any aborts (small, stunted mushrooms that stopped developing), wipe the surface clean with a damp paper towel, and return to fruiting conditions. A healthy substrate can produce two to four flushes before it is spent, with the first and second flushes typically being the largest.
For drying: spread freshly harvested mushrooms on a wire rack in front of a small fan at room temperature for several hours to remove surface moisture, then transfer to a food dehydrator at 95°F (no higher, to preserve potency) until cracker-dry. Properly dried and stored in an airtight jar with a desiccant packet, they will remain stable for months to years.
Where to Keep Learning (Without Getting Misled)
The online cultivation community is genuinely useful, but it has a noise problem. Here is how to navigate it without wasting months on outdated or incorrect techniques.
Shroomery and community forums
Shroomery's cultivation forums are the oldest and most referenced repository of hobbyist technique. When you go there, start with the pinned 'Getting Started' threads and look for posts tagged or cited by accounts with a long post history and positive community reputation. Reddit users who point newcomers to Shroomery specifically recommend looking for 'Trusted Cultivator' posts and 'Up To Date TEKs' (technique documents) rather than just the most recent threads. The keyword TEK is shorthand for technique, and threads labeled as such usually contain step-by-step instructions. Cross-reference any specific claims (like timing or temperature) against at least two independent sources, because Shroomery posts can be years old and reflect methods that have since been improved.
YouTube
YouTube has excellent visual walkthroughs for tasks like building a still-air box, inoculating grain jars, and setting up a monotub. Search for terms like 'monotub setup cubensis,' 'grain spawn inoculation technique,' or 'liquid culture mushrooms.' The most useful channels tend to be those focused on cultivators who grow both gourmet and specialty mushrooms, not just psilocybin species, because their technique tends to be more rigorous and their content avoids the legal ambiguity that causes some creators to be vague or incomplete. Watch multiple videos of the same technique and note where they agree before deciding what to do. Do not rely on a single video creator as your only authority.
Books and written guides
Paul Stamets and J.S. Chilton's 'The Mushroom Cultivator' remains one of the most thorough technical references for indoor cultivation, covering grain preparation, agar work, and fruiting chamber design in depth. It predates the internet era but the fundamental biology has not changed. North Spore's blog and growing guides (available free online) are consistently well-sourced and up to date for gourmet and specialty mushrooms, with contamination and substrate guides that apply directly to any indoor grow setup. For state-specific legal context, the sibling guides on [growing in Colorado] cover the regulatory landscape in each of those states in more detail if you need jurisdiction-specific guidance.
What to watch out for
- Vendors or creators who claim specific yields ('ounces per tub guaranteed') without caveats: yields vary enormously by strain, substrate, and environment.
- Guides that skip sterilization entirely for grain: grain must be pressure cooked, not just pasteurized.
- Advice to add hydrogen peroxide to LC as an antifungal shortcut: this is contentious and can damage mycelium.
- Anyone dismissing contamination risk as minor: it is the single biggest failure point in home cultivation.
- Outdated spore-to-substrate 'direct inoculation' methods that skip the grain spawn step: they work occasionally but have much lower success rates than the grain-to-bulk workflow.
Your first grow is mostly a learning experience. Most experienced cultivators have a contamination horror story from their first few attempts, and the lessons you pick up from watching a tub go green are often more valuable than anything you read. Keep notes on each grow: what substrate you used, your sterilization time and pressure, inoculation conditions, and when you saw colonization or contamination. Those notes are what let you systematically improve rather than just hoping the next one goes better.
FAQ
Is it ever legal to grow psychedelic mushrooms if I live in a state where psilocybin is decriminalized or allowed for adults?
Decriminalization for possession or limited access programs does not usually create a blanket right to cultivate. If federal law still treats cultivation as manufacturing a controlled substance, you can face enforcement even when local penalties for possession are reduced. The practical next step is to check whether your state specifically mentions cultivation or “production” in its exemptions, not just decriminalization language.
Can I start from spores without using agar or liquid culture?
Yes, but it is typically higher risk for beginners. Skipping agar or LC means you cannot visually select clean mycelium early, so contamination is harder to diagnose and isolate. A common compromise is to use a quick agar step to confirm cleanliness before moving to grain, then keep your process fully consistent.
What’s the difference between contamination and “slow growth,” and how do I tell early?
Contamination usually shows up as distinct colors or textures (green, blue-green, black powdery growth, wet slime, or strong sour odors) and tends to spread rather than grow as a uniform mycelium network. Slow colonization is often environmental (temperature, moisture, or under-sterilized grain) and is typically visually uniform. If you see no color changes and growth is simply behind schedule, adjust conditions before assuming the batch is ruined.
If my grain jars are 70 to 80 percent colonized, should I move them to bulk?
Generally no, because partial colonization is a frequent failure point. Transferring early increases the chance that uncolonized pockets will support contaminants in bulk substrate. If you cannot wait for full colonization, at minimum verify that the remaining uncolonized areas are not showing wet spots, unusual odors, or color shifts.
My monotub is humid but yields are small, what should I check first?
Check fresh air exchange and surface evaporation patterns before changing substrates or genetics. Low or inconsistent FAE can lead to stalling or malformed fruits even when humidity is correct. Use a hygrometer inside the chamber and confirm that the chamber is not accumulating condensation on the tub walls continuously (too much direct wetness can also cause aborts).
How long should I wait before deciding a flush is a lost cause?
If you have correct fruiting conditions, most strains show pin activity within about a week of starting fruiting. After that, reassess one variable at a time (humidity, CO2/FAE, temperature, and whether the substrate fully colonized before switching). If there are no pins or primordia after roughly two weeks, treat it as an environmental issue, not a “bad luck” genetics problem, and reset conditions.
Is misting the only way to maintain 90 to 95 percent humidity in a tub?
No. Misting walls works well for small monotubs, but larger setups often do better with a controlled humidification system to avoid big swings. If you use a humidifier, place it so it increases chamber humidity without directly wetting the substrate surface, and ensure you can still control airflow so CO2 does not stay too high.
What should I do if my humidity is high but the mushrooms are aborting?
Abort patterns can come from oversaturation on the surface, excessive direct misting, or temperature and airflow instability. Try reducing how often you mist, fan briefly after misting (as your protocol specifies), and verify temperature at substrate level rather than only near your heat source. Also check for contamination signs, because some bacterial issues present as watery, failing fruits.
How do I store dried mushrooms to avoid potency loss and moisture absorption?
Airtight storage with a desiccant packet helps prevent moisture re-entry, but packaging matters too. Use an airtight jar or vacuum-sealed bag and store it in a cool, dark place. Once dried mushrooms pick up humidity, re-crisping does not fully restore stability, so prioritize good sealing and consistent dryness.
Can I reuse my grow substrate or grains after a flush?
You usually can reuse bulk substrate for multiple flushes until it becomes weak, but grain jars are typically single-use for inoculating bulk. For bulk, expect yield to decline after the first and second flushes, and stop when colonization or fruit size drops sharply. If you notice persistent contamination in later flushes, it is safer to discard rather than attempt to “salvage” repeated material.
What are the most common “beginner mistakes” that create contamination despite clean technique?
Most issues come from small workflow breaks, like not cooling sterilized materials fully before inoculation, handling jars without proper protection, and opening tubs too often during colonization. Another frequent mistake is reusing tools or syringes without the level of sterilization you need between containers. A practical mitigation is to limit lid openings to what your step requires, and keep one consistent routine for each stage.