You can grow stinkhorn mushrooms at home, but they work differently from almost every other mushroom you might cultivate. There is no bag kit, no sterilized grain spawn, and no fruiting chamber involved. Stinkhorns (most commonly Phallus impudicus or Mutinus elegans) are saprobic fungi that feed on buried decaying wood and organic matter. The best method is outdoor cultivation in a shaded bed loaded with wood-chip mulch or composted woody debris, mimicking the conditions where they naturally appear.
How to Grow Stinkhorn Mushrooms Step by Step

Marcus Holloway
17 May 2026
Get the substrate right, keep it consistently moist, and the eggs will form underground on their own timeline. What you end up with is fast and dramatic: a fully emerged fruiting body can go from cracked egg to full height in as little as 1. 5 to 3 hours.
What stinkhorns actually are and whether you should grow them
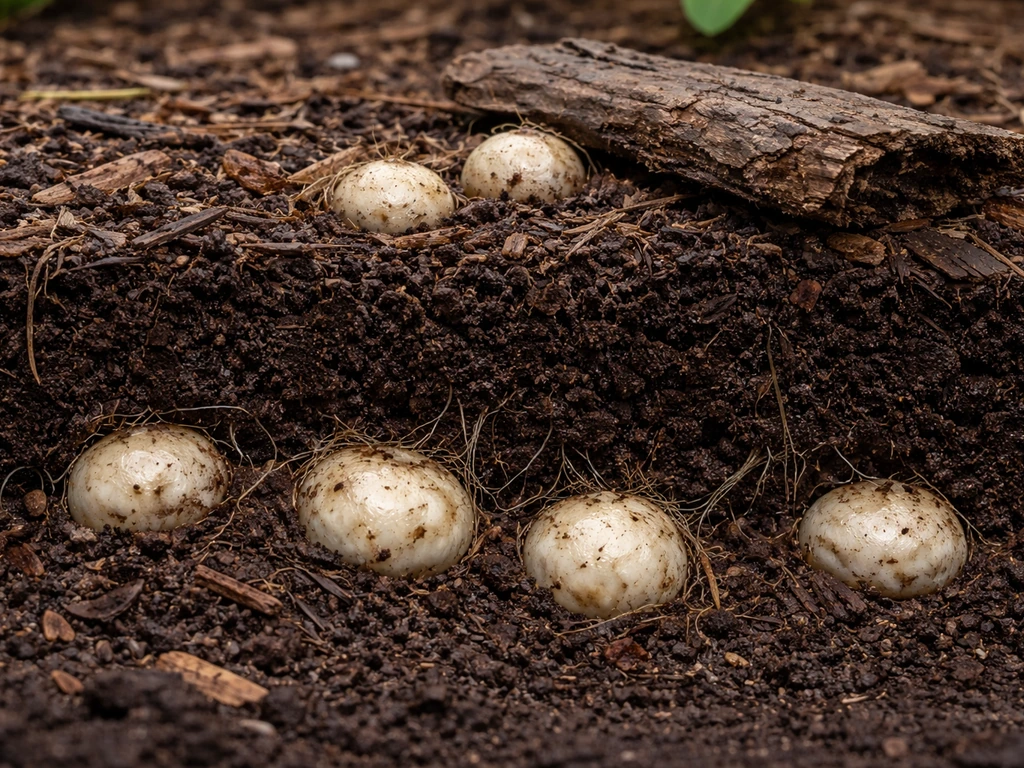
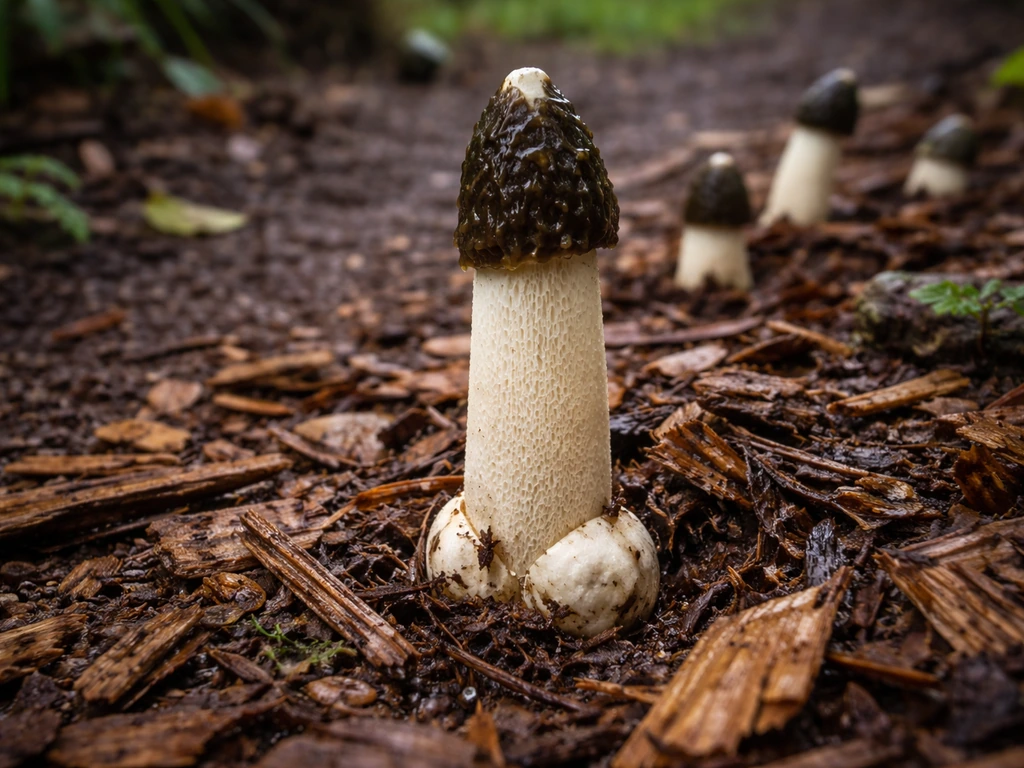
Stinkhorns belong to the family Phallaceae, a group of fungi that spend most of their lifecycle quietly underground, slowly breaking down buried wood and organic debris. The above-ground event most people associate with them is brief and theatrical: a white, egg-shaped structure forms just below or at the soil surface, then ruptures when enough water is available. From that crack, a hollow stalk erupts at roughly 5 mm per minute, reaching up to 20 to 25 cm tall.
The tip is coated with an olive-brown slimy mass called the gleba, which contains the spores and smells genuinely awful, somewhere between rotting meat and sewage. That smell is not a flaw; it is the entire dispersal strategy. Flies, beetles, slugs, and other invertebrates are drawn to it, eat the slime, and carry spores elsewhere.
So why would anyone deliberately grow one? Mostly curiosity, science projects, ecosystem interest, or the sheer weirdness of the thing. Some mycology enthusiasts collect them for spore work or want to observe the lifecycle up close. The egg stage is reportedly edible (it has a mild, radish-like smell and jelly-like texture), though guidance on eating it is genuinely mixed and most sources recommend caution.
If you are cultivating stinkhorns for food, manage expectations carefully. If you are also wondering how to grow beefsteak mushrooms, you will need a different substrate and setup approach than stinkhorns manage expectations carefully. If you are growing them to observe or to enrich a woodland garden bed, this guide has you covered. Just know going in that the smell during fruiting is intense and brief, and that once spores are released, flies will absolutely find them.
What you need: spawn, substrate, and setup
Sourcing spawn or starter material

This is where stinkhorn cultivation diverges sharply from growing something like king trumpet or oyster mushrooms. This is where stinkhorn cultivation diverges sharply from growing something like king trumpet or oyster mushrooms, so if you want the closest culinary-path alternative, see how to grow king trumpet mushroom next. If you are trying to grow king mushrooms instead, you will need to switch to a different substrate and a more standardized spawn approach king trumpet or oyster mushrooms.
If you are also interested in how to grow king stropharia mushrooms, the approach to sourcing and substrate is quite different from stinkhorns. Commercial plug spawn or grain spawn for stinkhorns is not widely available as a standardized product.
Your best sourcing options are: liquid cultures from specialty mycology suppliers (a few online vendors do carry Phallus impudicus cultures), wild-collected eggs from your own property or a location where you have permission to forage, or mature stinkhorn tips used to inoculate fresh substrate directly. If you go the wild-collection route, gather the intact eggs before they rupture and use them the same day.
Some specialty suppliers also sell stinkhorn spawn as a niche product, so check current listings at mycology-focused retailers. Do not purchase anything labeled vaguely as "garden fungus spawn" without confirming the species.
Building the right substrate
Stinkhorns are strongly associated with decaying wood debris. The ideal substrate is a mix of wood chips (hardwood or mixed), aged bark mulch, partially composted leaves, and a small amount of finished compost to introduce microbial activity.
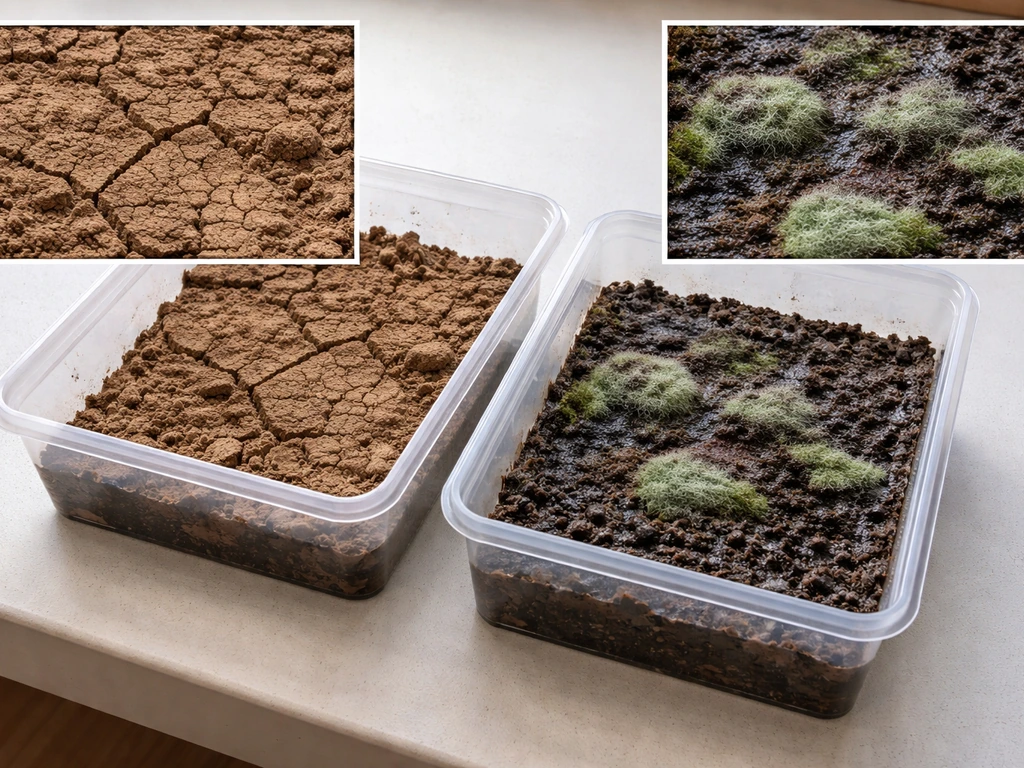
Think less about sterile grain jars and more about building a rich woodland floor. A good working ratio is roughly 70% wood chips or bark mulch to 30% composted organic matter by volume. The substrate should feel like a damp sponge when squeezed, not dripping and not bone dry. Adding chunks of partially rotted wood or old wood-based compost significantly boosts colonization because stinkhorn mycelium thrives on lignin-rich material.
Avoid fresh wood chips that have not aged at all, as the off-gassing and terpenes from green wood can inhibit fungal growth early on. Let fresh chips sit and weather for at least 4 to 6 weeks before using them.
Outdoor site selection
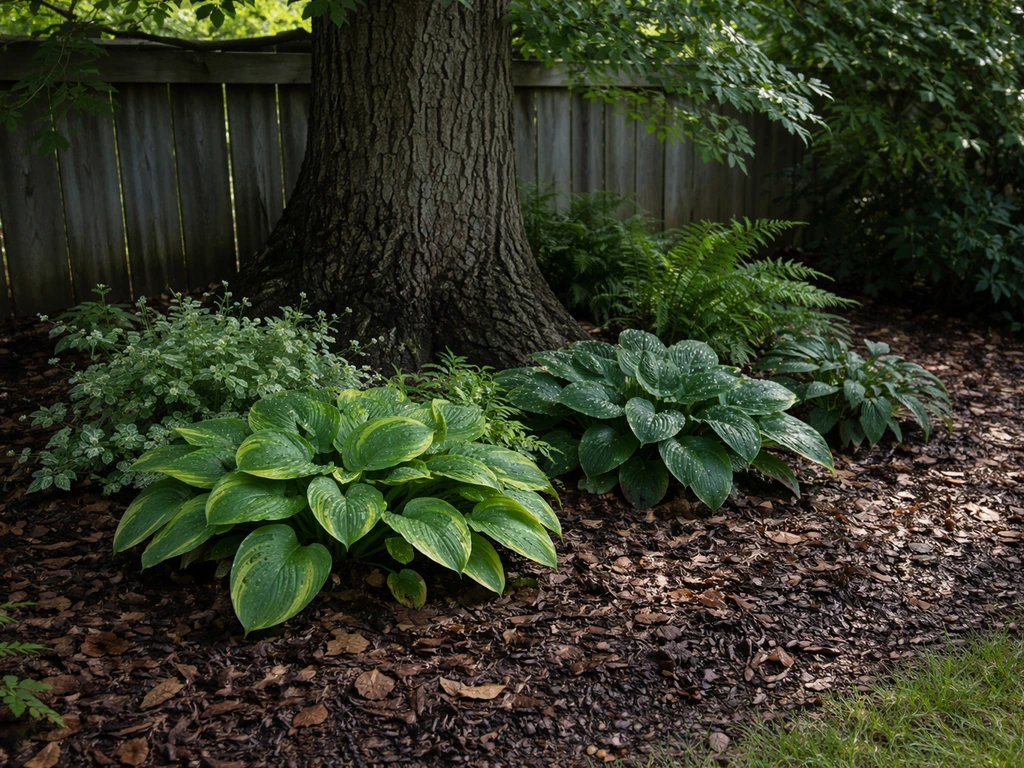
Pick a shaded or semi-shaded spot. Direct afternoon sun will dry out the substrate too fast and essentially halt development. Good spots include the base of a tree, a shaded garden border, near an old stump, or along a fence line with filtered light. The area should be somewhere you can water regularly without drama, and somewhere you are genuinely comfortable with occasional intense odor and a small insect gathering. Proximity to windows, doors, outdoor seating, or children's play areas is worth reconsidering.
Growing stinkhorns outdoors: step by step
- Prepare the bed: Dig out the planting area to about 20 to 30 cm deep. This gives the mycelium room to establish and for the egg structures to form properly below ground.
- Layer and mix substrate: Fill the bed with your wood chip/compost substrate mix. It should mound slightly above ground level to account for settling. Water it thoroughly until it is evenly moist throughout.
- Introduce spawn or eggs: If using liquid culture, mix it into the top 10 to 15 cm of substrate while stirring to distribute evenly. If using collected eggs, bury them 5 to 10 cm deep across the bed, spaced roughly 20 to 30 cm apart. If using mature gleba from a stinkhorn tip, mix the slime with a cup of water and pour it across the substrate surface, then lightly rake it in.
- Mulch the surface: Add a thin top layer (2 to 3 cm) of loose leaf litter or additional bark mulch. This retains moisture and mimics the natural forest floor environment.
- Maintain consistent moisture: Water the bed every 1 to 3 days depending on weather. The substrate should never fully dry out. In hot weather, a daily light watering is better than occasional heavy soaks. Use a gentle spray to avoid displacing the surface layer.
- Target temperature range: Stinkhorns fruit best in warm conditions. Aim for soil temperatures between 18°C and 28°C (roughly 65°F to 82°F). In temperate climates this corresponds to late spring through early autumn. Eggs can form earlier and remain dormant underground until temperatures rise.
- Watch for eggs: After successful colonization, small white egg-shaped structures will begin appearing at or just below the surface. They range from about 4 to 6 cm tall and 3 to 5 cm wide. These are your signal that fruiting is imminent.
- Let them fruit or collect: Once eggs appear and begin to crack, the fruiting body will emerge within hours. If you want to collect the egg for eating or spore work, do it before the tip cracks open. If you want to observe the full lifecycle, leave it.
Realistically, expect to wait 4 to 12 weeks after inoculation for the first eggs to appear, depending on how established the mycelium gets and whether environmental conditions cooperate. Stinkhorns are not a fast-reward cultivar in the way oyster mushrooms are. The payoff when it works, though, is genuinely unlike anything else in home mushroom cultivation.
Can you grow stinkhorns indoors?
Technically yes, but you need to go in with honest expectations. The main barriers are the smell (which is not containable in most home environments once fruiting starts), the need for a large volume of woody substrate rather than compact containers, and the difficulty of recreating the natural soil conditions that trigger egg development. That said, some growers have had success with large tubs or bins set up in garages, basements, or outbuildings where odor is less of a concern and temperatures can be managed.
Indoor setup
Use a large plastic storage tub or bin with a minimum volume of 50 to 75 liters. Fill it with the same wood chip and compost substrate described above. Inoculate as described for the outdoor method. Place the tub in a warm space (18°C to 28°C) away from direct heating vents, which will dry the substrate. Do not seal the tub with an airtight lid; stinkhorn mycelium needs gas exchange. A loosely fitted lid or a layer of breathable cloth over the top works well. Mist the surface every day or two to maintain moisture, and check that the substrate 10 cm down stays consistently damp.
Humidity and airflow indoors
Target ambient humidity of around 70 to 85% in the grow space if you can measure it. Because stinkhorns fruit from a substrate rather than from a colonized block exposed to open air, the critical humidity is in the substrate itself rather than the surrounding room air. That said, extremely dry air will wick moisture from the surface fast, so a small humidifier or regular misting helps. Airflow matters during the fruiting stage: some fresh air exchange prevents CO2 buildup, which can inhibit development. Cracking a door or window periodically is enough. Avoid strong fans blowing directly onto the substrate, which dries it out too quickly.
One honest note: if your stinkhorn fruits indoors and the gleba is exposed, the smell will fill the space immediately and linger for hours. Plan for this. Having the tub near an exterior door or window you can open fast will help. The odor phase is short (the gleba dries out and fades within a day or two), but it is intense while it lasts.
Timing, harvesting, and what to expect
| Stage | What to look for | Approximate timeline |
|---|---|---|
| Mycelium colonization | White thread-like mycelium visible in substrate when you dig gently; earthy smell | 2 to 8 weeks post-inoculation |
| Egg formation | Small white lumps at or just below the surface, 4 to 6 cm tall | 4 to 12 weeks post-inoculation |
| Egg maturation | Eggs enlarge and become more prominent; pinkish or off-white outer skin may appear | Days to weeks after first eggs form |
| Eruption | Egg cracks; stalk begins extending rapidly | Triggered by sufficient water availability |
| Full emergence | Hollow stalk at full height (up to 25 cm), olive-brown slimy cap | 1.5 to 3 hours after crack forms |
| Spore dispersal | Flies and insects arrive; slime begins to thin and disappear | Hours to 1 to 2 days post-emergence |
| Collapse | Stalk wilts and falls; substrate surface left with residue | Within 1 to 3 days of full emergence |
If you want to harvest the egg for tasting, timing is everything. You need to catch it before the outer skin cracks. Slice it open and you will find a gelatinous inner layer surrounding the compressed, unexpanded fruiting body. The smell at this stage is mild. Once the stalk starts pushing out, the opportunity is gone. If you want to collect spores for future inoculations, gather the gleba carefully from the cap surface using a spoon or knife into a small container of water, then use that mixture to inoculate new substrate. Wash your hands well afterward and do not touch your face while handling mature gleba.
Established beds can produce eggs sporadically throughout the warm season, from late spring through early autumn in temperate climates. You are unlikely to get synchronized flushes the way you would with cultivated edibles like oysters. Instead, expect occasional eggs appearing over weeks or months as conditions fluctuate. Each individual fruiting body lives for only a day or two above ground, so check the bed regularly once eggs start forming.
Troubleshooting common problems
No eggs forming after several weeks
The most common reason is insufficient moisture or temperatures outside the ideal range. Dig 10 cm into the substrate: if it feels dry, your watering frequency is too low. If the soil temperature is below 15°C, the mycelium may be dormant and waiting for warmth. The second most common issue is that the inoculant did not establish, especially with liquid culture applied to substrate that was too wet (anaerobic conditions kill mycelium) or too dry (culture desiccates before colonizing). Try refreshing the bed with a new inoculation into lightly amended substrate and maintain consistent moisture. Also check that no foot traffic or digging has disrupted the bed, as physical disturbance can set colonization back significantly.
Mold and contamination
Green or black mold in the substrate usually means it is staying too wet without enough airflow, or that the wood chips were too fresh and high in sugars. If you see mold patches, reduce watering frequency slightly, turn the affected areas to expose them to air, and remove visibly contaminated material. Unlike indoor grain cultivation where a contaminated jar is thrown out, outdoor beds are more resilient because you have a large volume of substrate and competing microbial diversity can often outpace isolated contamination. If mold becomes pervasive, strip the top 5 cm of substrate, replace it with fresh wood chips, and recheck your moisture levels.
Pests
Flies and insects gathering around mature stinkhorns are not a problem to fix; they are part of the process. However, if you have pets (especially dogs) that are attracted to the smell and try to eat fruiting bodies, remove mature stinkhorns before they fully open or fence off the bed. Slugs will also visit and while they spread spores, they can damage eggs and young fruiting bodies. Hand removal of slugs in the evening is the most practical approach. There are no effective registered chemical treatments for stinkhorn management, so physical intervention is always the answer.
Managing the odor
You cannot stop a stinkhorn from smelling. What you can do is manage where and when the odor happens. Siting the bed well away from living spaces is the most important step. If a fruiting body opens in an inconvenient location (near a door or seating area), remove it immediately by cutting the stalk at the base and bagging it. Do this with gloves. Once removed and sealed in a bag, the odor will dissipate from the outdoor area within a few hours. Do not compost removed stinkhorns in an open pile; the smell will linger and spores will spread. Bag them and put them in the bin, or bury them deeply in an out-of-the-way spot.
Too hot and drying out fast
In heat waves or in exposed spots, substrate moisture drops fast. A thick top-dressing of leaf litter or additional mulch (4 to 5 cm) helps retain moisture. Watering in the early morning or evening (not midday) reduces evaporation. If conditions stay above 30°C for extended periods, egg development may stall even if moisture is adequate; this is a natural dormancy response and growth typically resumes when temperatures moderate.
Safety and responsible growing
Stinkhorns are not toxic in any dangerous sense, but there are practical safety points worth respecting. Wear gloves when handling mature fruiting bodies or collecting gleba for spore work. The slime is not harmful to skin, but it smells terrible and is surprisingly tenacious. Wash hands thoroughly after any handling. Do not eat stinkhorn eggs unless you are confident in your identification and have done your research; while the immature egg stage is reportedly edible, guidance remains genuinely cautious and species misidentification is a real risk for beginners.
If you are using substrate or compost containing stinkhorn mycelium in other parts of your garden, be aware that you are potentially spreading the fungus. This is usually not a problem ecologically (stinkhorns are beneficial decomposers that contribute to nutrient cycling), but if a neighbor or household member is particularly sensitive to the odor or to having fungi in the garden, it is worth communicating before you start seeding new areas.
From a legality standpoint, growing stinkhorns for personal, non-commercial use is not regulated in most countries, but it is worth checking your local rules around foraging and transporting wild fungal material if you are collecting eggs or gleba from public land. Collecting from private land without permission is a separate issue. If you are purchasing cultures or spawn from an online supplier, the material itself is legal in most jurisdictions. There are no CITES listings or invasive species restrictions on common stinkhorn species like Phallus impudicus in most temperate regions, but always verify this for your specific location if you are unsure.
On the hygiene side, keep the grow area clean of spent fruiting bodies, especially in summer when fly populations are high. The NC Department of Agriculture also emphasizes sanitation and hygiene expectations for safe mushroom handling, including keeping facilities clean and managing contaminated material keep the grow area clean of spent fruiting bodies.
Leaving old collapsed stinkhorns in the bed is not dangerous, but it does encourage more insect activity than some people are comfortable with. A quick weekly sweep of the bed to remove anything past its prime keeps the setup tidy and reduces unwanted pest pressure. If you ever move on to more controlled indoor cultivation of other species, the same principles of substrate hygiene and contamination awareness will serve you well there too.
FAQ
Will stinkhorns keep coming back in the same bed after the first fruits?
Yes, stinkhorn eggs can sometimes remain viable in the bed and produce sporadic fruits later, especially when the substrate stays damp. If you see eggs, avoid heavy digging or foot traffic until after the above-ground stage is done, since disturbance can reset colonization in that patch.
How do I apply liquid culture without killing the mycelium?
Don’t use a sterile, grain-jar mindset. If you already have the right woody mix, liquid culture should be applied when the substrate is damp but not dripping, then left undisturbed for weeks. If the substrate is anaerobic (sour smell, water pooling), pause and adjust moisture and aeration before re-inoculating.
Why do I see eggs but then no stalks?
Strong sunlight is often the reason you get eggs that never fully expand. In practice, aim for filtered light, and if you see the surface drying or cracking, add a 4 to 5 cm leaf-litter or mulch top-dressing and water in the morning or evening instead of midday.
Can I grow stinkhorns while minimizing how far spores spread?
Yes, but timing and placement matter. Remove mature fruits before the gleba fully dries and spreads spores widely, seal them in a bag, and only then dispose. If you want to encourage localized flowering, use a siting strategy that places the bed away from high-traffic pathways and doors.
What if I only have fresh wood chips, can I still succeed?
If you can’t get woody chips aged for at least 4 to 6 weeks, use a higher proportion of aged bark mulch and partially composted leaves while keeping fresh chips to a smaller fraction. Also keep moisture consistent, since fresh wood can swing from too wet to too inhibitory during early colonization.
What moisture level should I target indoors in a tub?
Yes, but it is more sensitive to moisture swings than outdoor beds. If the substrate surface dries between mistings, the eggs may fail to develop, and if it stays soggy, you can trigger anaerobic conditions or mold. A simple test is to squeeze a handful of substrate from 5 to 10 cm down, it should feel like a damp sponge, not leak water and not crumble dry.
How can I tell whether lack of results is a temperature issue versus an inoculation failure?
It helps to monitor bed temperature and only “correct” moisture, not constantly rework the bed. If the soil or substrate is below about 15°C, growth may pause even with watering. Wait for warming trends before assuming the inoculation failed.
What’s the safest, cleanest way to harvest eggs or collect spores?
For harvesting eggs or collecting gleba, do it very early before the outer skin cracks, then handle gently to avoid smearing spores everywhere. After handling, wash hands thoroughly, keep pets and kids away, and do not touch your face while you’re still in the grow area.
What should I do if I get no eggs after 12 weeks?
A practical approach is to leave the bed alone once you inoculate, then troubleshoot only the top cause. If it’s been 4 to 12 weeks with no eggs, check (1) moisture 10 cm down, (2) temperature range, and (3) whether the substrate is actually woody-rich and not overly watery or overly fresh. Re-inoculate into lightly amended, properly dampened substrate rather than soaking the whole bed.
Is mold always a deal-breaker, and how do I respond?
You can expect other saprobes and molds, but you don’t want persistent wetness. If you see green or black mold, reduce watering slightly, improve breathing space (especially indoors), and remove only the visibly contaminated portion. If the odor becomes sour or the substrate pools water, fix moisture first, because mold usually follows poor moisture balance.
How can I reduce stinkhorn smell in a home yard?
In most home setups you can’t fully eliminate the odor, but you can reduce exposure. Choose siting, then manage timing by removing and bagging fruits immediately when they start to mature. Sealing outdoor-removed fruits prevents lingering odor and reduces ongoing insect attraction in your yard.
What should I do if my dog keeps trying to eat stinkhorns?
If pets try to eat the fruiting bodies, remove fruits early and consider a physical barrier, like fencing around the bed or placing the bed where pets cannot access. Removal is also faster than trying to treat chemically, because the common approach is physical intervention and removal before full opening.
If I reuse compost or substrate in other garden areas, will stinkhorns show up there too?
If you use this substrate elsewhere, you are essentially reseeding decomposer ecology, which is usually beneficial but may be unwanted near living areas. Keep in mind that even small introduced areas can later produce odor events, so communicate with household members who are sensitive and avoid spreading into indoor-adjacent garden corners.