You can grow shaggy mane mushrooms (Coprinus comatus) at home using straw or compost-based substrates, starting from either spores or grain spawn, with incubation around 25-28°C and fruiting humidity above 85%. The most important thing you need to know upfront: shaggy manes autodigest within hours of maturity, turning from pristine white cylinders into black ink. That means your entire harvest window is short, sometimes under 24 hours per flush, so timing your harvest is just as important as how you grow them.
How to Grow Shaggy Mane Mushrooms: Step-by-Step Guide

Marcus Holloway
22 May 2026
What shaggy mane mushrooms are (and what you're signing up for)
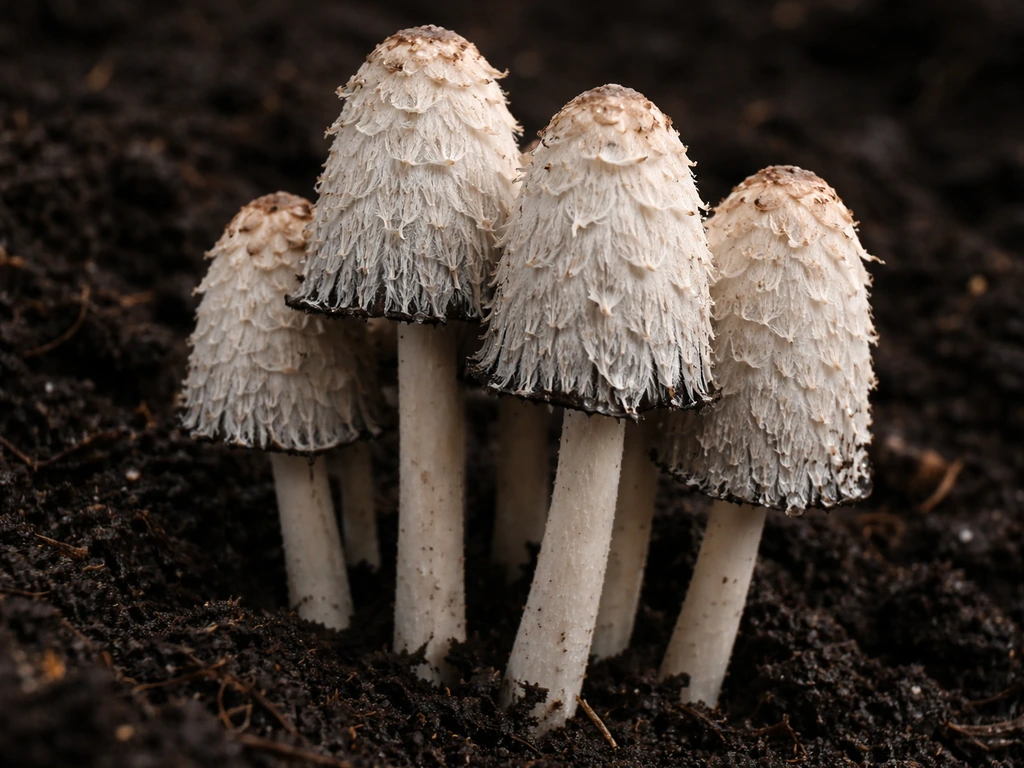
Shaggy mane, also called shaggy ink cap or lawyer's wig, is a tall, cylindrical mushroom with white scales that look shaggy or layered. When young, the gills are white and tightly packed against the stem. As the mushroom matures, those gills go through a predictable and fast color sequence: white, then pink, then black. Once they start going black, the tissue begins to liquefy through a process called autodigestion, turning the entire fruiting body into a puddle of black ink within roughly 24 hours. That's not a sign something went wrong. It's just what shaggy manes do.
As an edible mushroom, shaggy mane is genuinely delicious when harvested young. Coprinus comatus is a choice edible mushroom, especially when young, before the gills start to turn black blank" rel="noopener noreferrer">shaggy mane is genuinely delicious when harvested young. The texture is tender, the flavor is mild and nutty, and they work well sautéed. But the eating window is unforgiving. Once any blackening starts at the base of the cap or on the gills, the mushroom is past its prime for most cooking purposes. You need to be ready to check your fruiting area daily, sometimes twice a day during active pinning.
In the wild, shaggy manes pop up in disturbed ground, lawns, roadsides, and waste areas rather than deep forest. That habitat tells you a lot about their growing preferences: they like loose, nitrogen-rich soil, good air exchange, and don't need shade or bark-heavy wood substrates the way some other species do. That makes them well-suited to outdoor bed cultivation, which is actually the easiest and most reliable method for most home growers.
Choosing your grow method: indoors, outdoors, or a container setup
Before you buy anything, decide where you're growing. Each method has real tradeoffs depending on your space, climate, and how much control you want.
Outdoor bed cultivation (easiest for beginners)
This is the method I'd recommend if you have any outdoor space at all. You prepare a substrate bed directly in the ground or in a raised container outdoors, inoculate it with spawn, and let the mycelium colonize over several weeks. Shaggy manes are aggressive colonizers and handle outdoor conditions well in temperate climates. The main downside is that fruiting is seasonal and somewhat weather-dependent. You get the best results in spring and autumn when soil temperatures are in the 15-20°C range.
Indoor tubs or grow bags (more control, more work)
If you want to grow year-round or don't have outdoor space, you can use large plastic storage tubs or polypropylene grow bags. Shaggy manes do grow indoors but need consistent humidity, fresh air exchange, and a casing layer to trigger pinning. The main challenge is that they're not as forgiving as oyster mushrooms when conditions drift. They're more sensitive to stale air and low humidity than many growers expect coming from other species.
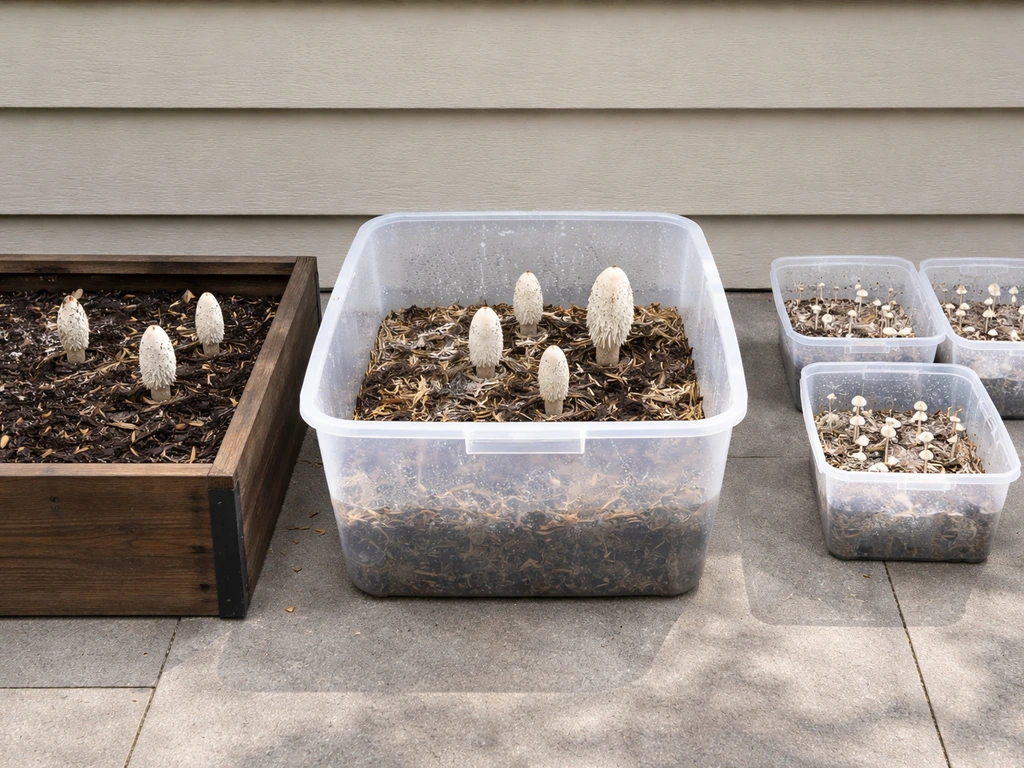
DIY container beds (the middle ground)
A solid middle-ground option is a large plastic storage bin or wooden planter box kept outdoors or in a sheltered spot like a garage or greenhouse. You fill it with prepared substrate, inoculate with spawn, and manage watering yourself. This gives you more control over contamination than a straight ground bed, while still benefiting from the natural humidity fluctuations that shaggy manes like. It's a great option for small patios or balconies.
| Method | Best for | Pros | Cons |
|---|---|---|---|
| Outdoor ground bed | Beginners with garden space | Low cost, natural conditions, minimal management | Seasonal, less contamination control, weather-dependent |
| Indoor tubs or grow bags | Year-round growing, no outdoor space | Full environmental control, grow any time | More equipment needed, humidity/FAE management required |
| DIY container bed | Small outdoor spaces, beginners wanting some control | Cheap, flexible, easier moisture management than ground beds | Limited yield per container, needs regular watering |
Getting your starting material: spores vs spawn
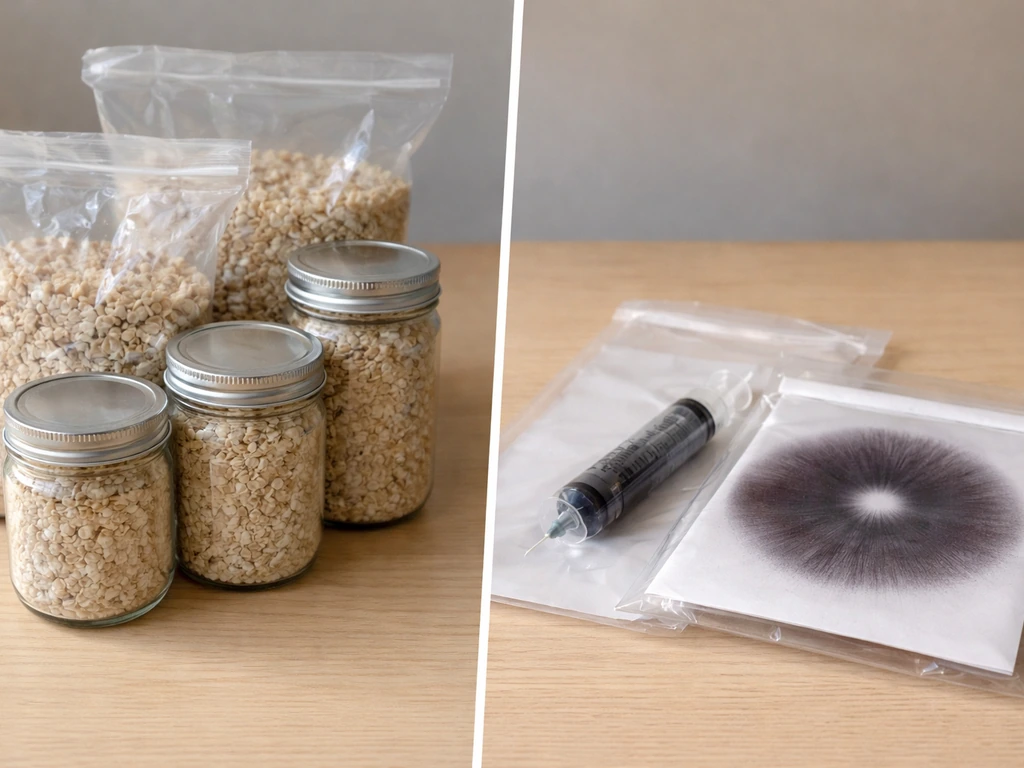
You have two main options for starting a shaggy mane grow: spore prints or syringes, or ready-to-use grain spawn. They're very different in terms of time, effort, and predictability.
Spores (slower, more variable, cheaper)
Spores are the starting point for all mushroom cultivation, but working with shaggy mane spores directly is genuinely tricky. You need to germinate them on agar first, select healthy mycelium, and then transfer to grain before you can inoculate your actual substrate. For a beginner, this adds weeks of work and a high contamination risk. The upside is that spores are inexpensive and more widely available than spawn for less common species. If you're just getting started and want results without a steep learning curve, skip spores for now.
Grain spawn (faster, more reliable, recommended)
Grain spawn is mycelium already colonized onto rye, wheat, or millet berries. You buy it ready to use, mix it directly into your prepared substrate, and the mycelium starts spreading immediately. This is the practical choice for most home growers. Shaggy mane grain spawn is available from specialty mushroom suppliers online. One thing to check before ordering: confirm the supplier has recent positive reviews specifically for Coprinus comatus, as this species is less commonly offered than oyster or lion's mane, and quality varies more between suppliers.
A third option worth mentioning is collecting wild spawn by digging up mycelium-rich soil from an area where shaggy manes are already growing naturally. This works and is free, but introduces a real contamination and misidentification risk. I'd only go this route if you're confident in your identification skills and can clearly see actively fruiting shaggy manes at the collection site.
Substrate and prep: what shaggy manes actually want
Shaggy manes are not wood-decomposers. They grow on nitrogen-rich organic material: composted manure, straw, compost, cardboard, or combinations of these. Unlike oyster mushrooms, they don't do well on straight hardwood sawdust. The best performing substrates for home grows are composted wheat straw, spent mushroom compost, a mix of straw and horse or cow manure compost, or coffee grounds blended with straw.
Moisture content: getting it right
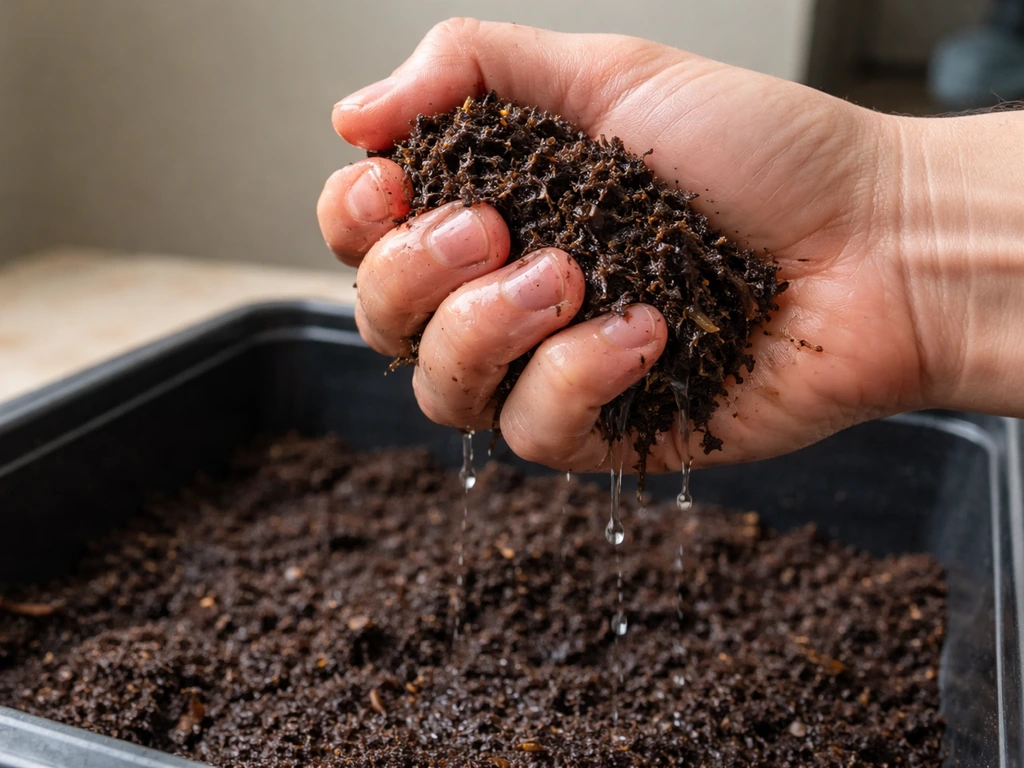
Target a moisture content of around 65-70%. The classic field test: grab a handful of substrate and squeeze hard. You should see just a few drops of water escape. If water streams out freely, it's too wet. If nothing comes out and the material feels dry or crumbly, it needs more water. Getting this right matters more than most people realize. Substrate that's too wet invites bacterial contamination and anaerobic conditions. Too dry and the mycelium stalls.
Pasteurization vs sterilization
For straw and compost-based substrates, pasteurization is sufficient and far easier than full sterilization. Pasteurize by submerging your straw or compost in water heated to 65-82°C and holding it there for 60-90 minutes. You can do this in a large pot or even a heavy-duty plastic bag filled with near-boiling water. After pasteurization, drain the substrate and let it cool to below 30°C before adding your spawn. Adding spawn to hot substrate kills the mycelium. Full sterilization (pressure cooking at 121°C) is only necessary if you're working with sawdust-heavy mixes or doing agar/grain work, and it's overkill for a straw bed setup.
Spawning and incubation: doing it right the first time
Once your substrate is cooled and pasteurized, you're ready to spawn. Mix your grain spawn through the substrate at a rate of about 10-20% by dry weight. So for 1 kg of substrate, use 100-200 g of spawn. More spawn means faster colonization and less opportunity for contaminants to establish.
- Let substrate cool fully to below 30°C after pasteurization before touching it.
- Mix spawn evenly throughout the substrate rather than layering it on top.
- Pack the inoculated substrate into your tub, bag, or outdoor bed at a depth of 10-15 cm.
- Cover with a loose lid, plastic sheeting, or damp newspaper to hold moisture during colonization.
- Keep the setup in a dark location at 25-28°C. Research has shown colonization on 500g substrate takes around 20 days at room temperature (28-30°C), so plan on 3-4 weeks for larger volumes at home.
- Check weekly for signs of healthy white mycelium spreading through the substrate. It should look fluffy or ropy and smell earthy.
During incubation, you don't need high humidity in the room itself since the substrate holds its own moisture. What you're watching for is healthy white colonization without any green, black, or orange patches (which signal mold contamination). A little yellow metabolite on the surface of the substrate is sometimes normal, but anything fuzzy or brightly colored that isn't white is a warning sign.
Adding a casing layer
Shaggy manes almost always need a casing layer to trigger pinning. Once the substrate is fully colonized, cover it with a 2-3 cm layer of casing mix. A good simple casing is 50/50 peat moss and hydrated lime (adjusted to pH 7.5-8), or just garden topsoil lightly pasteurized. The casing doesn't provide nutrition. It creates the microclimate and moisture-holding surface that signals to the mycelium that it's time to fruit.
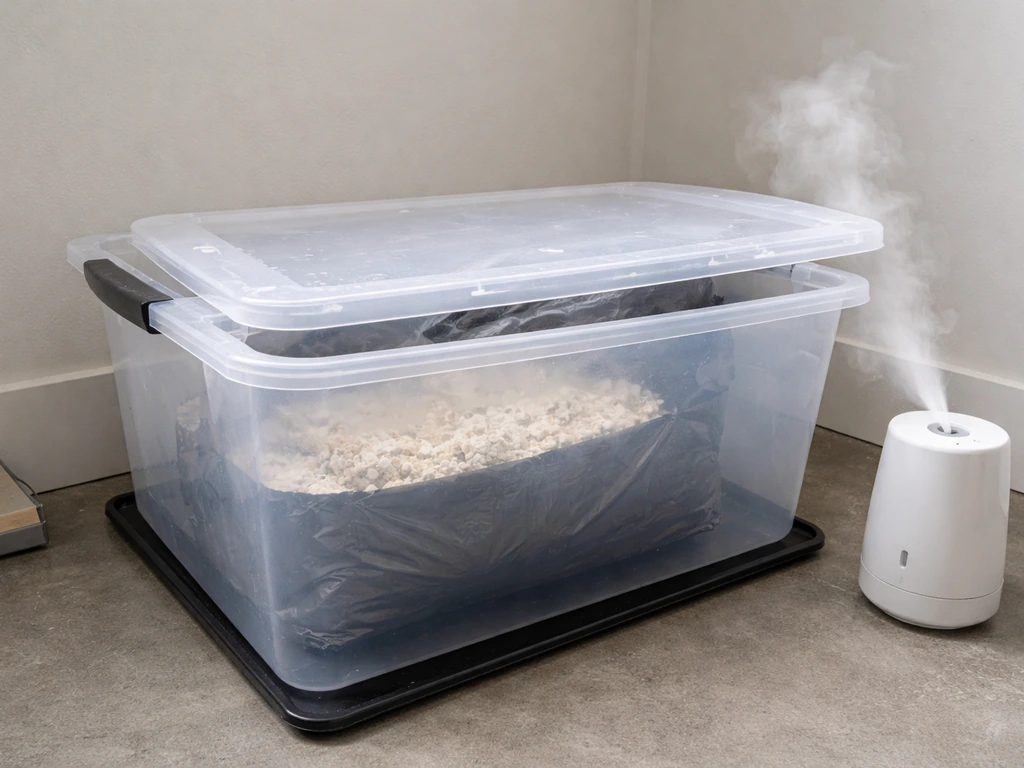
Fruiting setup: humidity, fresh air, light, and watering
Once the casing is applied and you're ready to initiate fruiting, environmental targets become critical. Shaggy manes need high relative humidity but cannot tolerate stagnant, CO2-saturated air. This combination trips up a lot of first-time growers who seal their tubs too tightly in an attempt to keep humidity up.
- Temperature: 15-20°C for fruiting. Unlike colonization, which prefers warmer temperatures, shaggy manes pin better in cooler conditions mimicking autumn. Dropping from 25°C to 18°C can help trigger pinning.
- Humidity: Target 85-95% relative humidity at the fruiting surface. Mist the casing lightly once or twice daily with a clean spray bottle. Avoid letting water pool.
- Fresh air exchange (FAE): This is non-negotiable. Shaggy manes abort pins and develop abnormally in high CO2 environments. If growing indoors, fan or open the grow space briefly 2-3 times per day. If using a tub, create filtered holes in the lid rather than sealing it completely.
- Light: Indirect, ambient light is enough. Direct bright light is not needed or beneficial. A north-facing window, a few hours of diffuse daylight, or even a dim room light for 12 hours a day is sufficient.
- Watering: Keep the casing layer visibly moist but never waterlogged. If the surface looks dry or is pulling away from the tub edges, mist it. If water is pooling, back off and increase your air exchange.
Pins typically emerge within 1-3 weeks after casing, assuming temperatures, humidity, and FAE are dialed in. You'll first see tiny white bumps pushing up through the casing layer. These grow fast once they start, sometimes several centimeters per day under ideal conditions.
Harvesting shaggy manes before they disappear on you
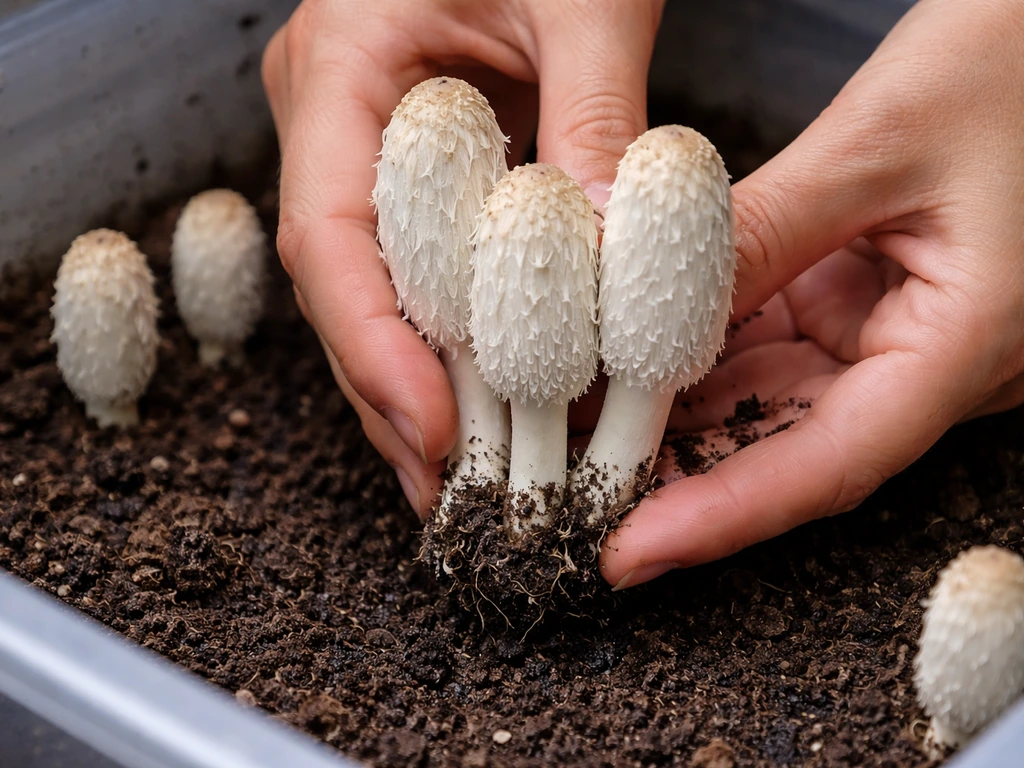
This is where shaggy mane growing differs most sharply from growing something like oyster mushrooms. You need to harvest early and often. Do not wait until the cap opens or flares outward. The correct harvest stage is when the cap is still tightly cylindrical, fully white or barely showing any pink coloration at the base or gill edge. The moment you see pink starting on the gills, you have a very short window, probably hours, before blackening begins.
To harvest, twist and pull gently at the base rather than cutting. This helps avoid leaving stem tissue that can rot and promote bacterial growth in your casing. After picking, use the mushrooms immediately or refrigerate them in a paper bag (not plastic) for up to 12-24 hours. They will continue to autodigest even in the fridge, just more slowly. There is no reliable way to preserve them long-term except by cooking and freezing promptly after harvest.
After the first flush, top up the moisture in the casing layer, maintain your fruiting conditions, and wait. A well-maintained bed can produce 2-4 flushes over several weeks before the substrate is exhausted. Outdoor beds can sometimes continue producing for a full season if they're in good soil and get adequate rainfall or watering.
Troubleshooting and contamination prevention
Shaggy manes are more susceptible to contamination than some other cultivated species because they prefer nitrogen-rich substrates that competing organisms also love. Staying ahead of problems is much easier than trying to fix them.
Common problems and what to do
| Problem | Likely cause | Fix or prevention |
|---|---|---|
| Green or black mold patches during colonization | Trichoderma or Aspergillus contamination from wet substrate or dirty tools | Remove affected section immediately. Ensure substrate cooled before spawning and tools were sanitized. |
| Mycelium not spreading after 2 weeks | Substrate too wet or too dry, or spawn was dead/weak | Check moisture with squeeze test. Rehydrate or add more spawn if viable. |
| Pins forming then aborting before developing | High CO2, low humidity, or temperature too high during fruiting | Increase fresh air exchange, mist more consistently, and lower temp to 15-18°C. |
| Mushrooms blackening before you can harvest | Missed harvest window due to fast maturation | Check fruiting area twice daily during active fruiting. Harvest earlier, at fully white stage. |
| Foul smell from substrate | Bacterial contamination, usually from substrate too wet or unclean water | Discard the batch. Next time pasteurize more thoroughly and use clean water. |
| No pins after casing (4+ weeks) | Casing pH wrong, not enough moisture, or temperature not triggering fruiting | Try a slight temperature drop to simulate autumn chill (10-15°C for a few days), re-mist casing, and check pH if possible. |
Contamination prevention habits that actually help
- Always pasteurize your substrate before inoculation, even if it seems clean.
- Let substrate cool completely before spawning. Residual heat above 30°C kills mycelium.
- Use gloves and wipe down surfaces with isopropyl alcohol (70%) when handling spawn or prepared substrate.
- Don't mix fresh spawn into wet or steaming substrate. Patience here saves batches.
- Inspect your grow every 2-3 days during colonization so you catch contamination early while it's still localized.
- Remove any obviously contaminated sections with a clean spoon and seal the area if it's a small spot; discard the whole batch if contamination is widespread.
Realistic yield expectations
Home growers can realistically expect 100-300 g of fresh mushrooms per flush from a 1 kg substrate tub, depending on conditions and substrate quality. Outdoor beds can yield more per square meter but are less predictable. Don't compare shaggy mane yields to oyster mushrooms, which are prolific fruiters. Shaggy mane is a more finicky species that rewards attention to detail over volume. If you've grown lion's mane before and found it moderately challenging, shaggy mane is in a similar difficulty bracket, largely because of its specific environmental needs and the extremely short harvest window. If you want to grow lion's mane mycelium as well, the substrate and spawn steps are similar, but the conditions you fine-tune will differ how to grow lion's mane mycelium.
The key takeaway after all of this: shaggy manes are absolutely growable at home, and the outdoor bed method makes them accessible even to complete beginners. Start with quality grain spawn, use a straw or compost-based substrate, nail your moisture content, and be ready to harvest fast. If you want to try a different species next, this guide to how to grow lion's mane from spores will walk you through spore start-to-harvest steps. If you’re specifically trying to figure out how to grow lion’s mane mushroom in Australia, many of the same basics like substrate preparation and good moisture management still apply, but the species’ temperature and fruiting needs differ lion's mane. For a full walkthrough, follow these steps for how to grow djon djon mushrooms from starting material to harvest timing grain spawn. Check your bed every morning during fruiting season and you'll get there.
FAQ
How do I know if my shaggy manes are at the right harvest stage?
Harvest when the caps are still tightly cylindrical and the gills are fully white (or just barely starting to show pink at the very base). If you see any blackening starting on the cap or gill surface, you are already past the best cooking window, even if the mushroom looks mostly white at the top.
What should I do if I miss a harvest and some mushrooms turn black and liquefy?
Remove the blackening fruits immediately and bag them for disposal. Don’t scrape it into the casing, since the liquid is basically an ink-like breakdown that can spread mess and bacteria. Then reduce moisture slightly at the casing surface and increase fresh air a bit to slow further collapse on nearby pins.
My casing dries out between checks, how often should I re-moisten it?
Expect to top up moisture after each harvest and during active pinning as needed, usually lightly misting or watering only the casing surface. Avoid soaking, you want the casing to feel evenly hydrated, not pooling or dripping, since oversaturation increases bacterial blotches and stalling.
Do shaggy manes need a separate humidifier, or can I rely on water in the tub?
You can often manage without a humidifier if your substrate and casing hold water well, but you must still prevent high evaporation and keep the casing from drying. The key is maintaining humidity while also providing fresh air exchange, if you seal for humidity you increase CO2 and risk deformed, delayed, or stalled pins.
How much fresh air exchange (FAE) is enough without drying everything out?
Use small, frequent air exchanges rather than one long “air out” session. If you see pins that stop growing while the casing looks fine, stale air is a common cause. Conversely, if pins shrink or abort quickly, the casing is likely drying, so add moisture rather than increasing ventilation further.
What do contamination colors mean in shaggy mane grows?
Healthy colonization is white. Fuzzy growth that is green, black, or orange is a clear warning. Slight yellow metabolite can happen on the substrate surface and is not automatically contamination, but if it spreads, becomes patchy, or develops a fuzzy texture, treat it as mold and remove affected sections when possible.
Can I grow shaggy manes on plain manure compost or straight straw without mixing?
Straight manure-heavy material often swings too far in bacteria load, and straight straw alone may not provide enough nitrogen for strong yields. A mix like composted straw plus a portion of manure compost usually performs better, and pasteurization is especially important to reduce competitors.
Is pasteurization enough if my substrate keeps getting bacteria or sour smells?
If you repeatedly see bacterial problems, tighten pasteurization time and ensure the substrate fully reaches the target temperature (a thermometer helps). Also confirm your moisture is in the 65 to 70% range, since overly wet substrate creates anaerobic pockets that encourage bacterial takeover even when pasteurization was done.
Why did my pins form but then stop before maturing?
Common causes are low fresh air exchange, casing that is too dry, or temperature drifting out of the target range. Check the casing moisture first, then increase FAE slightly. Also confirm incubation is complete, if you fruit too early before full colonization, pins often abort.
Should I refrigerate harvested shaggy manes, and how long can I wait to cook them?
Refrigeration in a paper bag can buy time, typically up to about 12 to 24 hours. They still keep autodigesting, just more slowly, so don’t wait for visible browning. Cook promptly once they are still mostly white and firm.
What’s the best way to avoid stem tissue left behind during harvest?
Twist and pull gently at the base, aim for a clean removal without tearing. Cutting can leave more stem bits in the casing, which can rot and become a bacterial hotspot, especially when fruiting is happening repeatedly over the same bed.
How do I choose between ground beds, tubs, and grow bags for beginners?
If you can use outdoor space, ground or raised outdoor beds are usually the most forgiving because the environment fluctuates naturally and humidity is easier to maintain. Tubs and bags give more control for patios or indoors, but they require closer monitoring of fresh air and casing moisture, small drifts can stall pins quickly.
Can I start from spores instead of grain spawn, and is it realistic at home?
It is possible, but it adds major steps and time. You typically need agar germination, selection of healthy mycelium, then transfer to grain before you can inoculate substrate. For most home growers, grain spawn is the practical choice because it reduces contamination risk and shortens the route to fruiting.
Is collecting wild spawn a good option if I can’t find Coprinus comatus grain spawn?
It can work, but the risk is high because misidentification and hidden contamination are common. Only consider it if you can positively confirm the species where you collect and you clearly see active shaggy mane fruiting, then expect you might still need to manage contamination at the start.