Growing Psilocybe mushrooms at home is genuinely achievable for a motivated beginner, but it requires you to get three things right from the start: understanding the legal situation where you live, choosing the correct species for your setup, and following a real end-to-end workflow rather than a patchwork of forum tips. This guide walks you through all of it, species by species, indoor and outdoor, from spore to harvest.
How to Grow Mushrooms Psilocybe: Cubensis, Mexicana, Subaeruginosa

Marcus Holloway
24 Mar 2026
Legal and safety reality check before you do anything
Let's be direct: psilocybin and psilocin, the two active compounds in Psilocybe mushrooms, are Schedule I controlled substances under US federal law. The federal “Schedule I” regulatory listing is hosted on GovInfo’s CFR section, including 21 CFR § 1308.11. Cultivating mushrooms that contain them is federally illegal, and most US states follow the same position. California law, for example, explicitly makes it unlawful to cultivate spores or mycelium capable of producing psilocybin-containing mushrooms with intent to produce those compounds. Other states have varying rules. A handful of cities and states have decriminalized personal possession or moved toward regulated therapeutic frameworks, but decriminalization is not the same as legal cultivation.
Spores are a different story in many jurisdictions. Because Psilocybe spores do not themselves contain psilocybin or psilocin, the DEA has confirmed they are not considered controlled substances in that pre-germination state. That is why spores can be legally sold for microscopy purposes in most US states (with exceptions including California, Georgia, and Idaho). The moment you germinate those spores with the intent to produce fruiting bodies, the legal picture shifts. Before you proceed, check your specific jurisdiction. The UC Berkeley Center for the Science of Psychedelics maintains a regularly updated law and policy map that is one of the most reliable places to check current status by location.
On the safety side, two risks are worth naming. First, misidentification: wild Psilocybe species can be confused with toxic look-alikes, and the DEA has specifically flagged misidentification as a real hazard. If you are foraging rather than cultivating, get your identification confirmed by an expert before consuming anything. Second, contamination and mycotoxins: mold contamination in a grow is not just a yield problem. Mold exposure can affect health through fungi, including mold spores, and the health impact depends on factors such as moisture conditions and individual susceptibility mold contamination in a grow. Certain molds produce mycotoxins, including carcinogenic aflatoxins, and some of that risk is not visible to the naked eye. Temperature and humidity control during your grow is not just about yields, it is also about keeping your substrate clean and safe.
Picking the right species for your situation
The three species this guide covers, Psilocybe cubensis, Psilocybe mexicana, and Psilocybe subaeruginosa, are not interchangeable. They have different substrates, different environmental needs, and very different difficulty levels. Choosing the wrong one for your setup is the most common beginner mistake.
Psilocybe cubensis: the right starting point for most growers
Cubensis is the workhorse of home cultivation. It colonizes aggressively, tolerates a wider range of conditions than most species, and fruits reliably. With proper humidity, temperature, and fresh air exchange, you can see fruiting bodies within about a month of inoculation. Naturally, it appears from February to December in the northern hemisphere and November to April in the southern hemisphere, which tells you it likes warmth and doesn't need a cold trigger to fruit. For indoor grows, that is a significant advantage. If you are new to Psilocybe cultivation, start here.
Psilocybe mexicana: the sclerotia grower's choice

Mexicana is interesting because it produces sclerotia, dense underground storage bodies sometimes called philosopher's stones, in addition to fruiting bodies. It fruits naturally from May to October. Indoors, it is typically grown on rye berries with a pasteurized casing layer made from a coir, coffee, vermiculite, and gypsum mix. It is a step up in complexity from cubensis, mostly because the sclerotia workflow adds a stage that cubensis growers skip. It is a rewarding species once you understand it, but it's not the easiest starting point.
Psilocybe subaeruginosa: the outdoor wood-lover
Subaeruginosa grows on wood debris in Australian native forests and pine plantations, and it behaves very differently from cubensis. It is lignicolous, meaning it breaks down woody material rather than dung-based substrates. It requires a temperature drop to trigger fruiting, a process called cold triggering, and it is not well-suited to typical indoor monotub setups. The good news is that an established outdoor patch can fruit for several years with seasonal returns. If you are in a temperate region with cold winters, subaeruginosa is your outdoor candidate. Trying to grow it like cubensis indoors will frustrate you.
| Species | Substrate | Indoor/Outdoor | Difficulty | Key Trigger | Timeline to First Flush |
|---|---|---|---|---|---|
| P. cubensis | Grain/coir/manure-based | Both | Beginner | Warmth + humidity | 4-5 weeks from inoculation |
| P. mexicana | Rye berries + coir/coffee/verm casing | Primarily indoor | Intermediate | Stable warm temps | Longer; sclerotia add a stage |
| P. subaeruginosa | Wood chips/debris | Primarily outdoor | Advanced | Cold temperature drop | Seasonal; established patches return annually |
Spores vs spawn: what you're actually buying and why it matters
When people talk about starting a grow, they usually mean one of two things: starting from spores or starting from spawn. These are not the same thing, and the choice affects your timeline, your risk of contamination, and the skills you need.
Starting from spores
Spores are the reproductive cells of the mushroom. You buy them as a spore syringe (spores suspended in water) or a spore print (spores pressed onto paper). In most US states, spore syringes are legally sold for microscopy purposes. To grow from spores, you inoculate a sterile grain substrate, then wait for the spores to germinate into mycelium, then colonize the substrate, and finally fruit. This process is longer and carries more contamination risk because the early germination window is vulnerable. It is the right choice if you want to preserve and work with specific genetics, or if spawn is unavailable.
Starting from grain spawn
Grain spawn is colonized grain, meaning someone else already germinated spores and grew mycelium through a grain substrate like rye, wheat, or oats. You mix this into your bulk substrate and colonization happens much faster because the mycelium is already established and active. Contamination risk is lower, and the timeline to fruiting is shorter. Most experienced growers use grain spawn for efficiency. The trade-off is that you are dependent on the quality and genetics of whoever produced the spawn.
The general workflow from spore to harvest
- Acquire spore syringe or spore print from a reputable supplier (for microscopy purposes in legal jurisdictions)
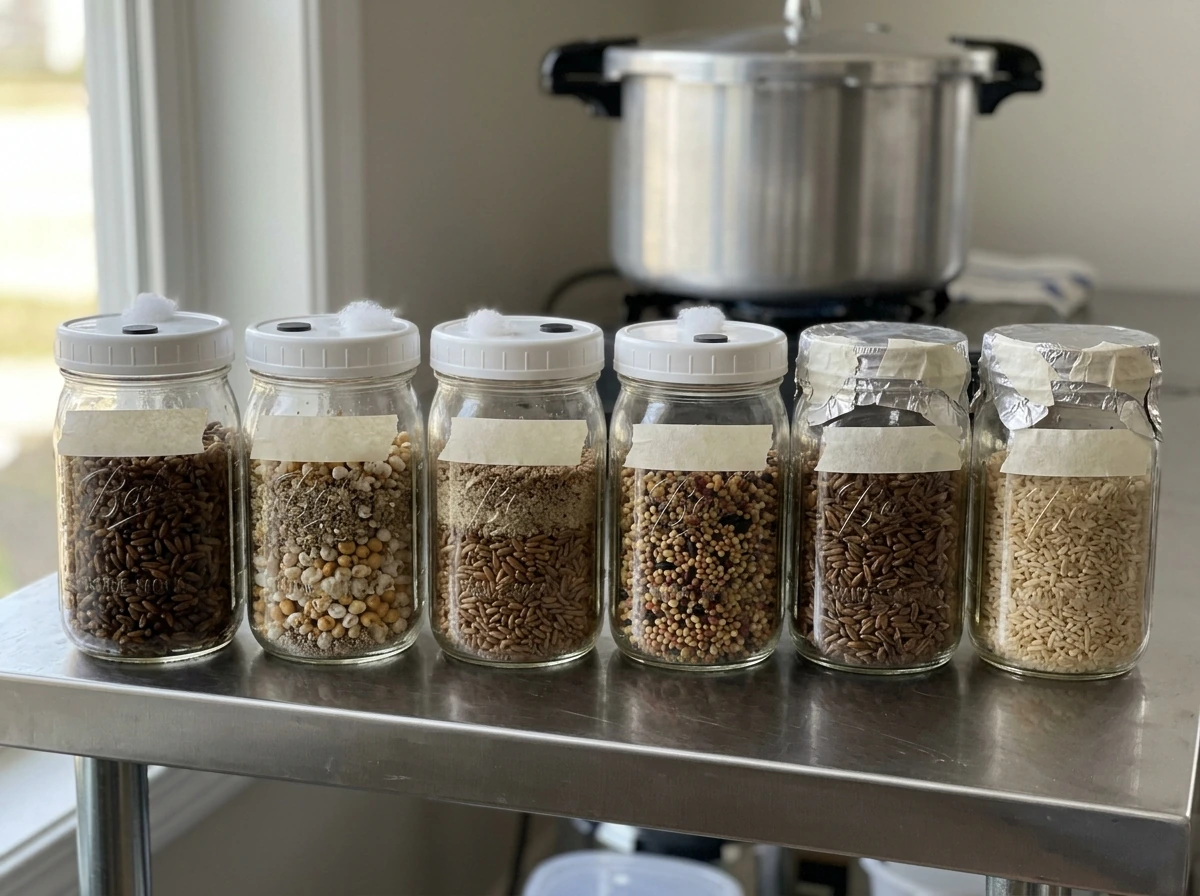
- Prepare and sterilize grain jars (rye, wheat, or oat berries, pressure cooked at 15 PSI for 60-90 minutes)
- Inoculate sterilized grain jars with your spore syringe under sterile conditions (still air box or laminar flow hood)
- Wait for full colonization: mycelium should cover all grain, typically 2-4 weeks at 75-80°F
- Mix colonized grain spawn into bulk substrate at a roughly 1: 3 to 1:5 ratio (spawn to substrate by volume)
- Allow bulk substrate to fully colonize, usually 1-2 additional weeks
- Introduce fruiting conditions: drop temperature slightly, increase humidity to 90%+, and begin fresh air exchanges
- Harvest pins as caps begin to open, before the veil fully breaks
- Allow additional flushes by rehydrating the substrate; expect 2-4 flushes before yields decline
Indoor cultivation: monotub and other setups
Indoor cultivation gives you control over every variable that matters: temperature, humidity, fresh air exchange (FAE), and light. For cubensis especially, this control translates directly into consistent yields.
The monotub method
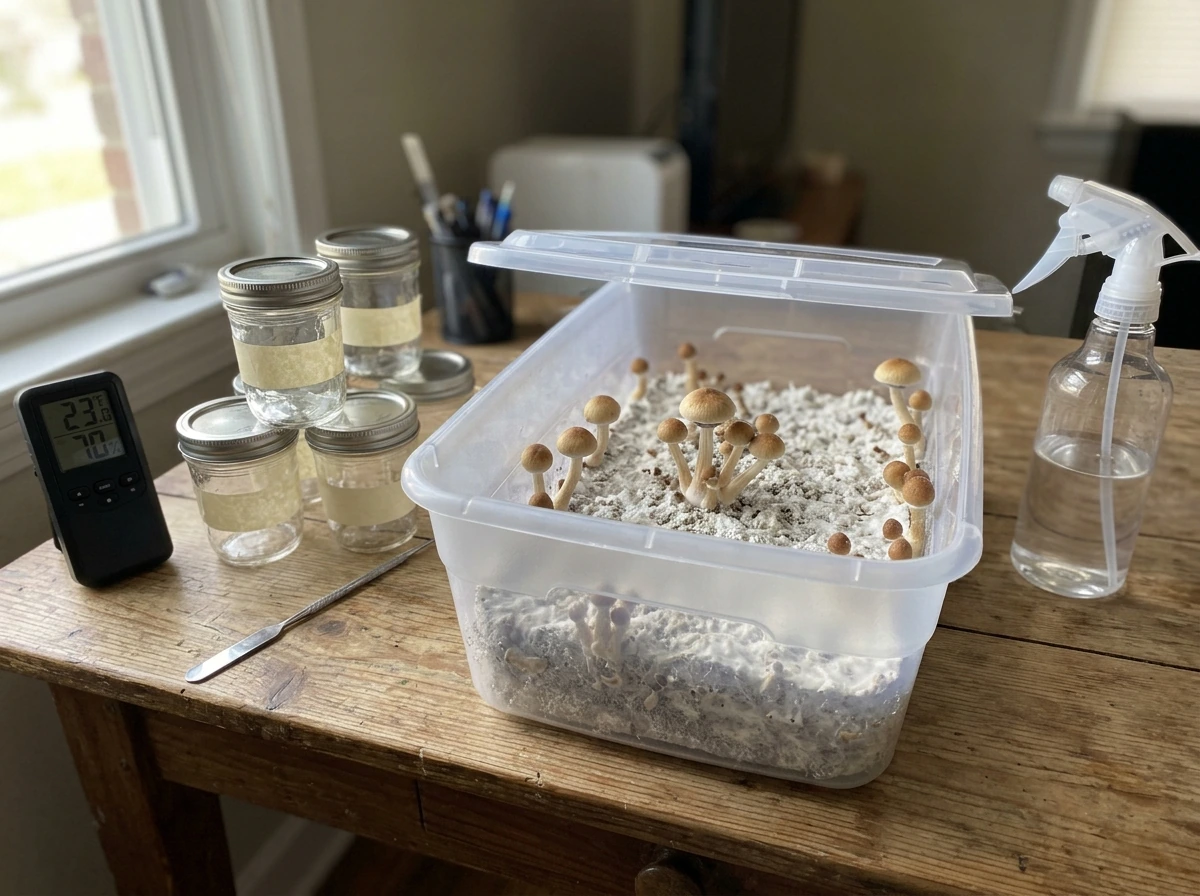
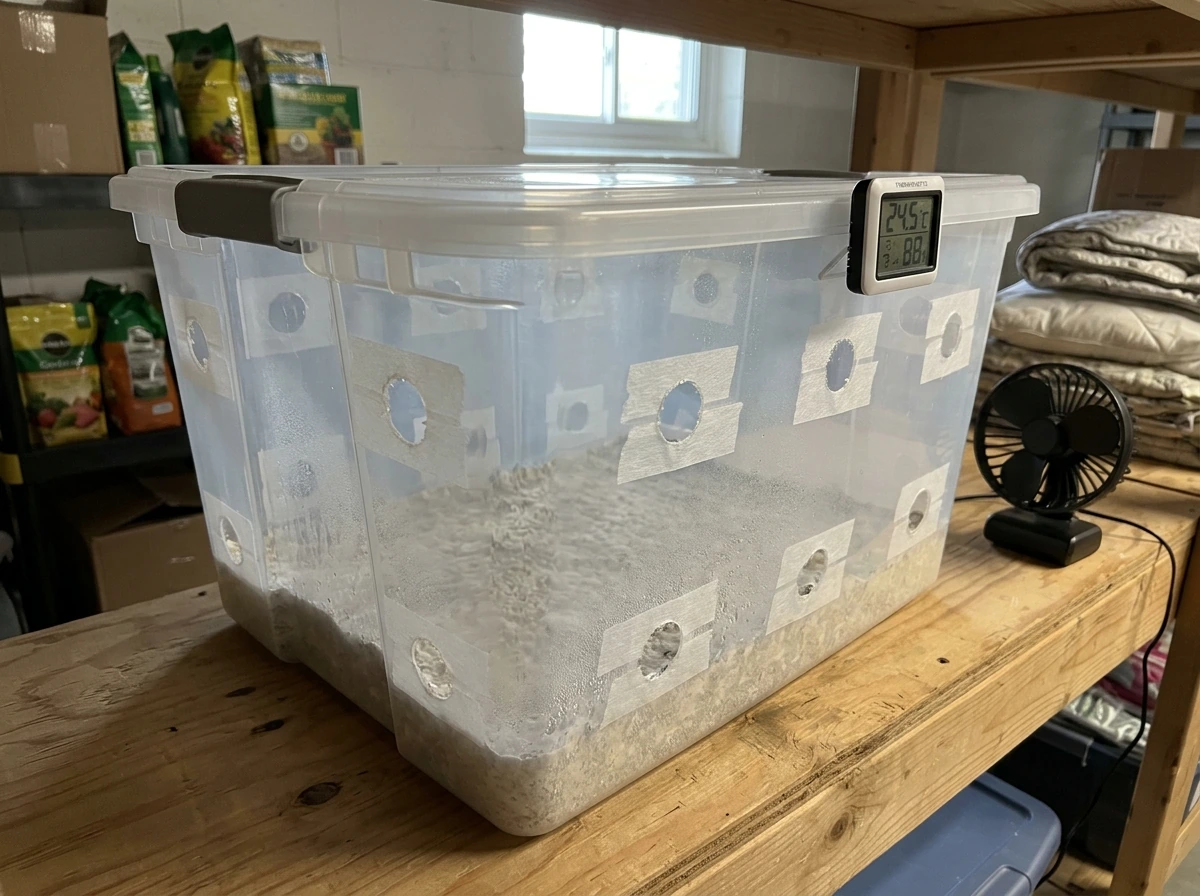
The monotub is the most popular community method for a reason: it is cheap, effective, and scalable. You take a large, lidded plastic storage tote (66-quart is a common size), drill holes around the upper sides and cover them with polyfill stuffing or micropore tape for passive fresh air exchange, mix your spawn and bulk substrate directly in the tub, and let it colonize and fruit in the same container. The lid stays on loosely during colonization to retain humidity and CO2, then is cracked or removed partially during fruiting to increase FAE. The standard bulk substrate for cubensis monotubs is a mix of coco coir and vermiculite, pasteurized rather than sterilized, hydrated to field capacity, meaning it holds moisture without dripping when squeezed.
The monotub is the approach you will see documented across mushroom cultivation communities and video tutorials. It is effective because the large substrate mass holds moisture well and the passive FAE through polyfill holes is usually sufficient for cubensis without over-drying the surface. Dial in your environment and the tub does most of the work.
Other indoor setups
The shotgun fruiting chamber (SGFC) is a smaller version using a clear tote with many holes drilled on all sides. It relies on misting and fanning for humidity and FAE rather than passive exchange. It is good for small grain jar grows and PF Tek (brown rice flour and vermiculite in half-pint mason jars), which is a beginner-friendly inoculation method. The SGFC requires more active management but works well when you're learning.
For Psilocybe mexicana, the indoor setup is similar but the substrate mix differs. Rye berry grain jars are the preferred colonization medium, and the fruiting stage typically involves a casing layer of pasteurized coir, spent coffee grounds, vermiculite, and a small amount of gypsum applied over the colonized grain. The sclerotia develop below the casing layer and can be harvested without disturbing the fruiting bodies above.
Environmental parameters for indoor fruiting
These numbers apply broadly to cubensis and mexicana indoor grows. Subaeruginosa needs different conditions covered in the outdoor section.
- Temperature during fruiting: 74-78°F (23-26°C) is the target range
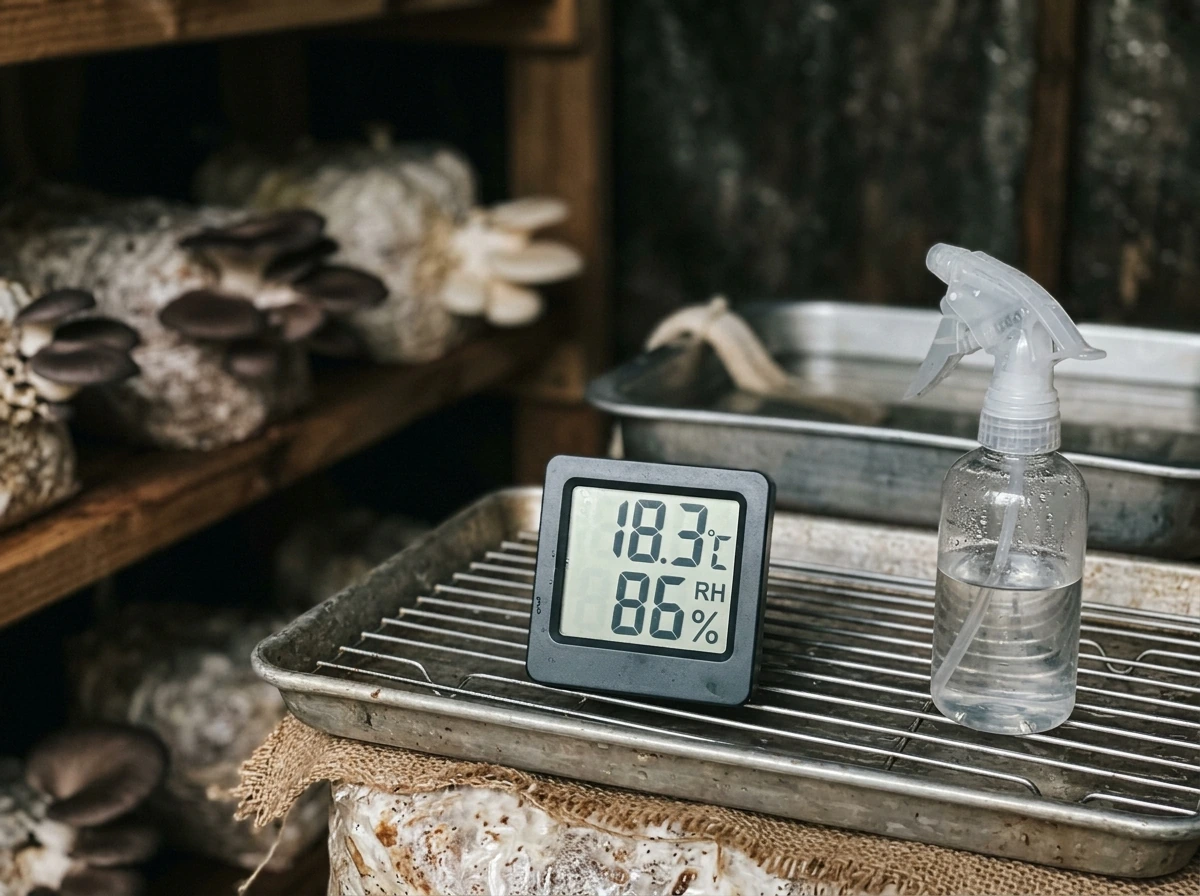
- Relative humidity: 90% or higher throughout fruiting; most species prefer 80-95% RH
- Fresh air exchange: introduce fresh air 2-4 times daily by fanning or through passive holes; FAE removes CO2 and triggers pinning, but too much FAE dries the surface and stalls growth
- Light: indirect natural light or a simple LED on a 12-hour cycle is sufficient; Psilocybe mushrooms do not photosynthesize but use light as a directional cue
- Colonization temperature: slightly warmer at 77-80°F speeds mycelial growth but keep it consistent
Growing outdoors: cubensis and subaeruginosa
Outdoor cultivation trades control for scale and long-term sustainability. Done right, an outdoor patch can produce for multiple seasons with minimal ongoing effort.
Psilocybe cubensis outdoors
Cubensis grows naturally in warm, humid climates on dung-enriched soils. Outdoor beds work best in tropical or subtropical regions, or during warm summer months in temperate climates. The practical approach is to prepare a bed of pasteurized compost or manure-amended soil, mix in colonized grain spawn, cover with a thin casing layer of coir or peat, and water regularly to maintain moisture. Shade is important to prevent the bed from drying out. Expect the patch to fruit during warm, humid periods, roughly aligned with the natural February to December northern hemisphere window. The patch is vulnerable to competing fungi and bacteria, so site selection matters: partial shade, good drainage, and protection from heavy rain are all helpful.
Psilocybe subaeruginosa outdoors

Subaeruginosa is the right choice for growers in temperate regions, particularly in Australia and parts of the Pacific Northwest where it occurs naturally. It grows on wood debris, so your outdoor bed should be built from hardwood chips or woody garden debris rather than manure-based substrate. Mix colonized wood-loving spawn into the chip bed, keep it moist, and site it in a shaded, cool location. The critical factor is the cold trigger: a significant temperature drop in autumn signals the mycelium to fruit. You cannot skip this. If your climate doesn't get genuinely cold, subaeruginosa will not fruit reliably. Once an outdoor patch is established, it can return seasonally for several years, which makes the initial effort worthwhile. For more detail on cultivating subaeruginosa specifically, there is a dedicated guide on this site covering the species in depth.
Species-specific substrate and environment at a glance
Each species has non-negotiable substrate and environmental requirements. Getting these wrong is the most common reason grows fail. Here is a practical reference.
| Species | Preferred Substrate | Colonization Temp | Fruiting Temp | Key Environmental Need |
|---|---|---|---|---|
| P. cubensis | Grain (colonization), coir/vermiculite bulk (fruiting), or manure-amended soil (outdoor) | 77-80°F | 74-78°F | 90%+ RH, regular FAE, indirect light |
| P. mexicana | Rye berries (colonization), coir/coffee/verm/gypsum casing (fruiting) | 75-80°F | 72-77°F | Stable temps, casing layer moisture for sclerotia |
| P. subaeruginosa | Hardwood chips and wood debris | 60-68°F | 50-65°F | Cold temperature drop to trigger fruiting (cold triggering) |
One thing worth emphasizing: field capacity is a term that matters for every species. Your bulk substrate should be moist enough that it barely holds together when squeezed but does not drip water. Too wet and bacterial contamination spikes. Too dry and colonization stalls. This is not a vague guideline, it is the single most important physical property of your substrate.
When things go wrong: contamination, slow growth, and poor yields
Every grower deals with contamination, slow growth, or disappointing flushes at some point. The key is recognizing the symptom early enough to do something about it.
Contamination: what to look for and what to do
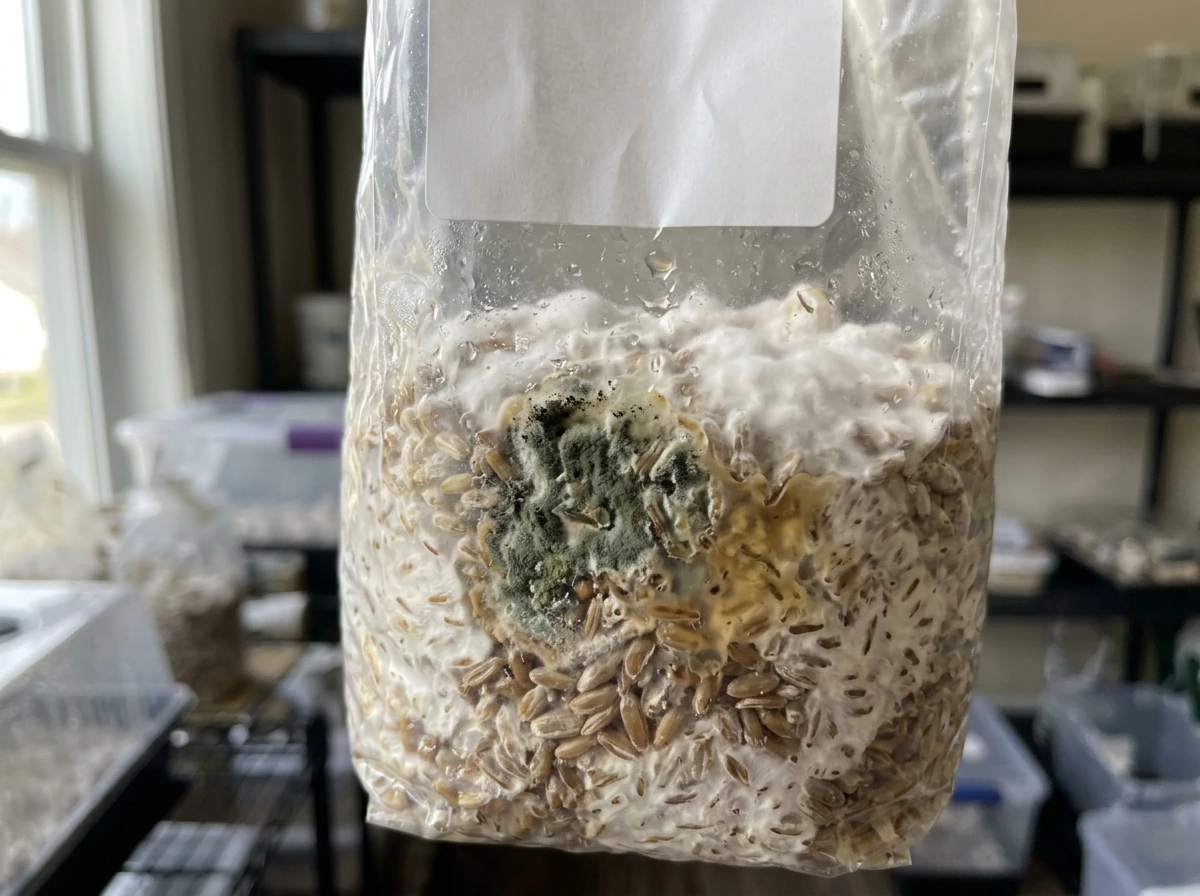
Green or black fuzzy growth on your substrate is almost always Trichoderma or Aspergillus mold. Yellow, pink, or slimy patches usually indicate bacterial contamination. Any of these are serious because contaminating molds can produce mycotoxins and will outcompete your mycelium rapidly. The decision rule is simple: if contamination is localized to one corner or a small area and your mycelium is clearly ahead of it, some experienced growers remove the contaminated section and continue. If contamination is widespread, seal the container in a bag without opening it and discard everything. Do not open a heavily contaminated tub inside your house. The spores will spread.
Prevention is far more effective than remediation. The most common contamination causes are: substrate that is too wet, poor sterilization of grain jars, sloppy inoculation technique, and insufficient polyfill in FAE holes (allowing contaminant spores to enter). Pressure cooking grain at 15 PSI for at least 60 minutes eliminates the vast majority of competing organisms. Working quickly and cleanly during inoculation matters more than having a laminar flow hood, though a hood does help.
Slow growth and colonization stalls
If your mycelium is not growing after 2 weeks, check temperature first. Colonization below 70°F slows dramatically. Check that your substrate is at field capacity and not waterlogged, and confirm there are no signs of contamination hiding under the surface. Sometimes a jar that looks clean on the outside has a contaminated pocket inside. If growth is genuinely slow but clean, slightly raising the ambient temperature by 2-3 degrees often resolves a stall.
Low yields and poor pinning
Inadequate pinning is almost always one of three things: humidity is too low, FAE is insufficient, or temperature is fluctuating. Mushrooms need CO2 reduction through fresh air exchange to initiate pinning. If your tub stays sealed, CO2 builds up and pins won't form. But excessive FAE dries the substrate surface, which also stops pinning. The balance point for a monotub with polyfill holes is usually passive exchange, meaning the holes do the work and you don't fan aggressively. If you are seeing lots of mycelium but no pins, try cracking the lid slightly more and misting the walls (not the substrate surface directly) twice daily.
Between flushes, rehydration is critical. After your first harvest, the substrate has given up significant moisture. Dunking the entire substrate block in cold water for 8-24 hours (called the dunk and roll method) rehydrates it and often triggers the next flush. The first flush typically arrives 4-5 weeks after inoculation and about 2 weeks after applying a casing layer. Subsequent flushes arrive roughly every 5-10 days. Individual pins reach harvest size about 7-10 days after first appearing. Plan around these timelines and you will not be caught off guard.
Subaeruginosa-specific issues
With subaeruginosa outdoors, the most common failure is impatience. This species fruits on its own seasonal schedule and cannot be rushed without a genuine cold trigger. If your patch is not fruiting, verify that temperatures have actually dropped into the 50-65°F range for at least a few weeks. Watering is also critical during dry periods: wood chip beds dry out faster than manure-based substrates. Keep the bed moist but not waterlogged through autumn. If the first season produces little, do not abandon the patch: the mycelium may still be establishing, and subsequent years can be significantly more productive.
Your realistic next steps
If you are starting today with cubensis indoors, your first purchase is a pressure cooker, rye berries, coco coir, vermiculite, and a spore syringe from a reputable supplier in a legal jurisdiction. Set up a still air box from a clear tote for your inoculations. Follow the monotub workflow outlined above. Your first flush should arrive around week 5-6 if you keep temperatures in the 74-80°F range and humidity at 90% or above.
If you are planning an outdoor subaeruginosa grow, start your spawn run indoors in late summer so mycelium is established in a wood chip bed before autumn temperatures drop. Time the cold trigger to coincide with natural seasonal cooling rather than fighting it. For Psilocybe mexicana, focus on mastering the rye berry inoculation workflow and the casing layer technique before attempting the sclerotia harvest stage.
This site also has species-specific guides for Psilocybe azurescens, Psilocybe natalensis, Psilocybe ovoideocystidiata, and Psilocybe cyanescens if you want to go deeper on a particular variety after getting comfortable with the fundamentals here. Each species has its own quirks, but the core workflow, sterile grain colonization, bulk substrate, environmental control, and patient harvesting, carries over across all of them. how to grow psilocybe ovoideocystidiata
FAQ
If spores are legal in my state, can I still start a grow from a spore syringe for cultivation?
Yes, but spore status depends on intent and where you live. Even when spores are legally sold for microscopy, using them in a way that demonstrates you intend to produce psilocybin-containing fruiting bodies can still be treated as unlawful. If you are unsure, confirm the rules for “intent to cultivate” and “spores capable of producing” in your jurisdiction before ordering any genetics.
Why do grows fail even when I pasteurize the substrate properly?
Don’t treat “pasteurized” the same way you treat “sterilized.” Pasteurization greatly reduces competitors but does not make the bulk substrate sterile, so cleanliness and moisture control become the real safety net. A good sign you are close is that your substrate stays at field capacity and you do not see persistent bacterial odors or fast-spreading discoloration within the first days of colonization.
My monotub looks healthy but no pins yet, what should I check first?
A common mistake is misting directly onto the substrate surface in hopes of triggering pins. For monotubs, a better first adjustment is to reduce CO2 buildup and stabilize humidity, then mist walls or manage fresh air exchange more gently. Misting the surface too aggressively can create localized wet spots that invite bacteria and delay pinning.
What is the safest way to handle contamination once I notice mold in the grow?
If you see green or black fuzz, do not open the container to “inspect” closely. For localized contamination, some growers remove the affected section while keeping the remaining substrate undisturbed. If contamination is spreading or widespread, seal the tub in a bag and discard it without opening indoors to avoid dispersing contaminant spores.
Do I need grow lights to pin psilocybe mushrooms indoors?
You can, but only if you reduce variable swings. If you add lights, use them as a control aid (for example, consistent low-intensity illumination or photoperiod) and avoid overheating the enclosure. The bigger levers for pinning are CO2 reduction (FAE) and stable humidity, so lighting should not be your substitute for airflow and moisture balance.
When should I move grain spawn into bulk, and how strict is timing?
For grain spawn, you want fully colonized grain before mixing into bulk, but “done” is not the same as “waiting forever.” If you wait too long, the spawn can start to lose vigor or develop secondary issues. If colonization is complete and uncontaminated, move to bulk promptly so your bulk does not sit waiting at suboptimal moisture and temperature.
How do I know whether my grow needs more fresh air exchange or less?
Fresh air exchange can be too low or too high. Too little, and CO2 stays elevated so pinning stalls. Too much, and the surface dries out so pins fail to form. A practical decision aid is to adjust in small steps, for example crack the lid slightly more or reduce fan intensity, then observe pin development over 24 to 48 hours rather than changing everything at once.
How do I schedule harvests across multiple flushes?
Plan around rehydration and flush intervals, not around single-day events. After the first harvest, substrate moisture drops, and the dunk-and-roll step (cold soak for hours) often determines whether the next flush is strong. If you want predictable scheduling, record harvest dates and expect subsequent flush windows to come roughly every 5 to 10 days.
My mycelium is slow, what troubleshooting steps should I do in order?
If growth is stalled after about two weeks, temperature is the first check. Colonization slows dramatically below the target range, and cold spots can occur even if your room feels warm. Then confirm field capacity (not waterlogged), and look for hidden contamination in the jar rather than assuming “no visible mold” means “clean inside.”
Why won’t subaeruginosa fruit in my climate, even though I water consistently?
Subaeruginosa outdoors requires a real cold trigger, not just “cooler weather.” A reliable patch usually needs a sustained temperature drop into the mid-range you can measure in the growing area for weeks, then consistent moisture afterward. If your region has mild winters, expect poor results unless you can genuinely provide the cold conditions in a legal and appropriate way.
Do I really need a laminar flow hood, or is a still air box enough?
Yes, some contamination risks are tied to handling. Gloves and clean tools help, but the bigger issue is technique, speed, and minimizing exposure of sterile materials. Using a still air box for inoculations can help reduce airborne spores reaching jars, but you also need a workflow that prevents unnecessary talking, movement, and open-air time.
What are the most common substrate mistakes beginners make with mexicana versus cubensis?
Yes, if you are using rye berries for colonization or coir-based casing layers, verify you can control moisture consistently in your conditions. Overly wet casing or bulk can increase bacterial problems, and overly dry casing can prevent proper development. Use field capacity checks (squeeze test, no dripping) and keep humidity stable rather than chasing daily changes.