Black poplar mushrooms almost always refers to Cyclocybe aegerita, also sold as Pioppino or Velvet Pioppino. It's a wood-loving species that colonizes best around 21–27°C but absolutely needs a cold drop to 10–16°C to trigger pinning. Get that temperature shift right and you'll pull 2–3 solid flushes from a block. Research literature also describes Cyclocybe aegerita as a cultivated edible mushroom that produces consecutive flushes on spawn substrate. Skip it and you'll stare at a fully colonized substrate that never fruits. That's the single most important thing to understand before you start.
How to Grow Black Poplar Mushrooms: Step by Step Guide

Marcus Holloway
21 May 2026
What exactly are black poplar mushrooms?
The species is Cyclocybe aegerita, previously classified as Agrocybe aegerita. Both names still float around in spawn catalogs and research papers, so don't be confused if you see either. The common names include Pioppino (Italian), Velvet Pioppino, and Black Poplar mushroom, a nod to its natural habitat on dying poplar stumps and other hardwood logs across Europe and Asia.
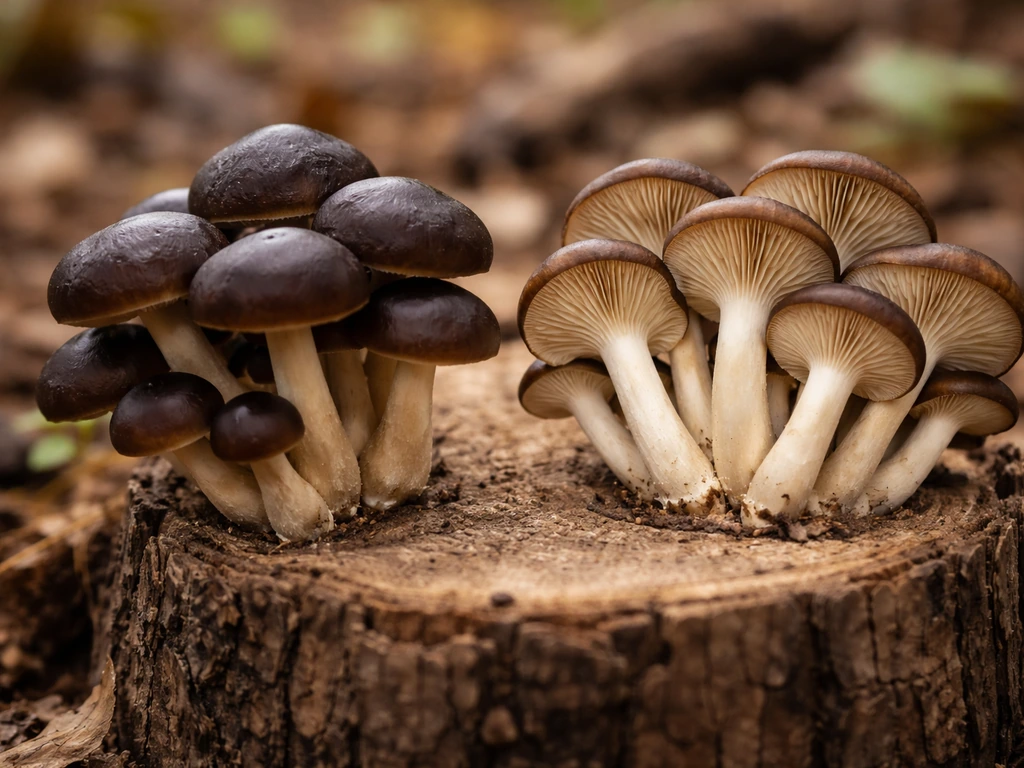
It produces clusters of chestnut-brown caps with a firm, meaty texture and a mild, earthy flavor that holds up well in cooking. It's a saprotrophic wood-decomposer, meaning it breaks down lignocellulosic material rather than forming partnerships with tree roots the way pine mushrooms do, which makes it fully cultivatable at home without needing a living host tree. Pine mushrooms, on the other hand, are a different category of wood-decomposer with their own cultivation needs.
One thing worth noting upfront: this species sits in a different category from black morels or parasol mushrooms in terms of cultivation approach. Parasol mushrooms have different cultivation needs than black poplar mushrooms, especially around substrate choice and fruiting conditions. It's more similar to oysters or shiitake than to morels, which are notoriously difficult to fruit indoors. Pioppino is grower-friendly once you understand its temperature requirements, making it a great choice for intermediate growers who want something beyond basic oysters.
What you need before you start
Supplies checklist
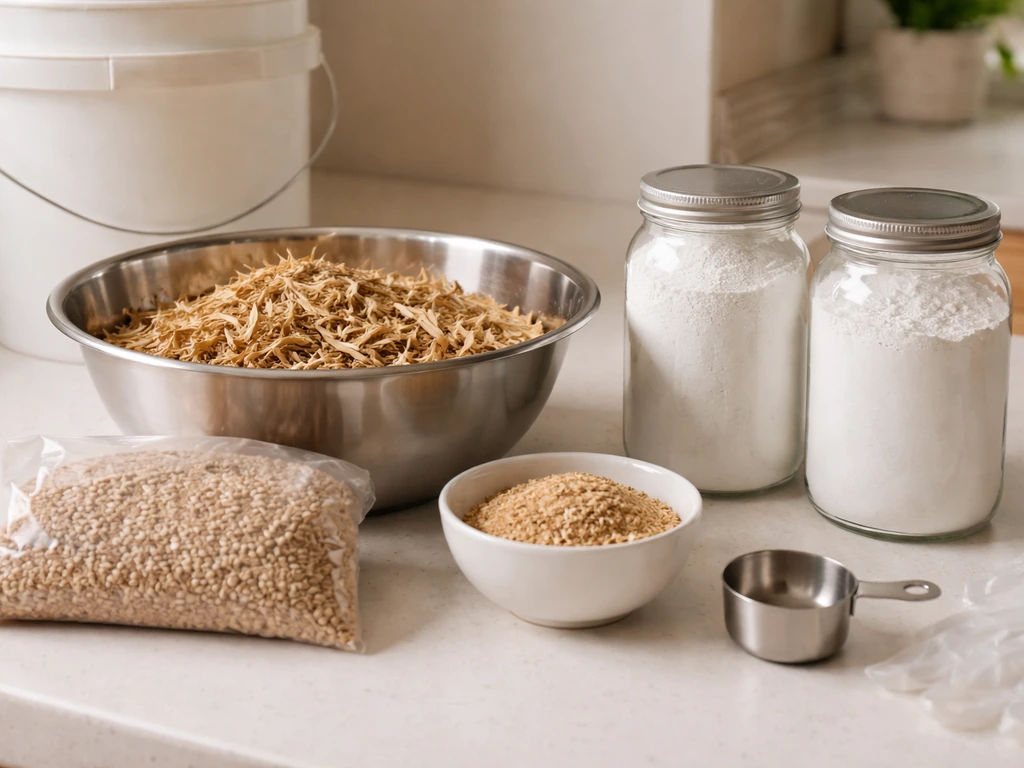
- Pioppino grain spawn (wheat grain is ideal) or a pre-made inoculated kit
- Substrate ingredients: wheat straw, hardwood sawdust, wheat bran, gypsum, and hydrated lime
- 5-gallon buckets or large grow bags with filter patches
- A large pot or pressure cooker for pasteurization or sterilization
- A thermometer and hygrometer for your fruiting space
- A spray bottle or ultrasonic humidifier
- Nitrile gloves, isopropyl alcohol (70%), and a still-air box or flow hood for cleaner inoculation
Where to source spawn
Grain spawn is the easiest starting point for home growers. Look for it under "Pioppino," "Agrocybe aegerita," or "Cyclocybe aegerita" from established online suppliers. Wheat grain spawn is well-documented for this species and has been used in yield studies showing biological efficiencies above 120% when inoculated at 5% by dry substrate weight. If you're brand new to growing, a pre-colonized kit is a lower-risk first attempt. Kits give you a colonized block ready to fruit, which removes the inoculation and incubation variables entirely. But if you want to grow from scratch and understand the full process, grain spawn is the way to go.
Indoor vs outdoor growing
You can grow Pioppino both ways, but the temperature-drop requirement is the deciding factor. Indoors, you have full control over when you trigger fruiting, which is a big advantage. You colonize at room temperature, then move the block to a cooler space (a basement, a mini fridge set to 10–16°C, or a garage in autumn/spring) to initiate pins. Outdoors on logs or stumps works well in climates where autumn temperatures naturally fall into that 10–16°C window. Log cultivation is lower-maintenance but slower, with a longer wait before first flush. For most home growers, starting indoors with a supplemented straw or sawdust block gives you faster, more predictable results.
Building and prepping your substrate
Cyclocybe aegerita is a confirmed wood-decomposer, but research shows it actually performs very well on straw-based substrates when properly supplemented. One of the best-tested formulations is 78% wheat straw, 20% wheat bran, 1% gypsum, and 1% hydrated lime (all by dry weight). The wheat bran boosts nitrogen content, the gypsum improves structure and gas exchange, and the lime raises pH slightly to suppress competitor molds during colonization. Hardwood sawdust can replace part of the straw if you want a denser, more wood-forward substrate. Plain sawdust alone without supplementation tends to produce lower yields.
Once you've mixed your dry ingredients, hydrate the substrate and let it soak for 16–18 hours. You're targeting a field capacity moisture level, where the substrate clumps when squeezed but doesn't drip more than a few drops. After soaking, either pasteurize the substrate by holding it at 65–80°C for 1–2 hours (hot water bath or steam pasteurization works for straw), or fully sterilize it in a pressure cooker at 15 PSI for 2.5 hours if you're using a heavily supplemented mix. More supplementation means higher contamination risk, so sterilization becomes more important when bran content is elevated. Let everything cool to below 30°C before inoculating.
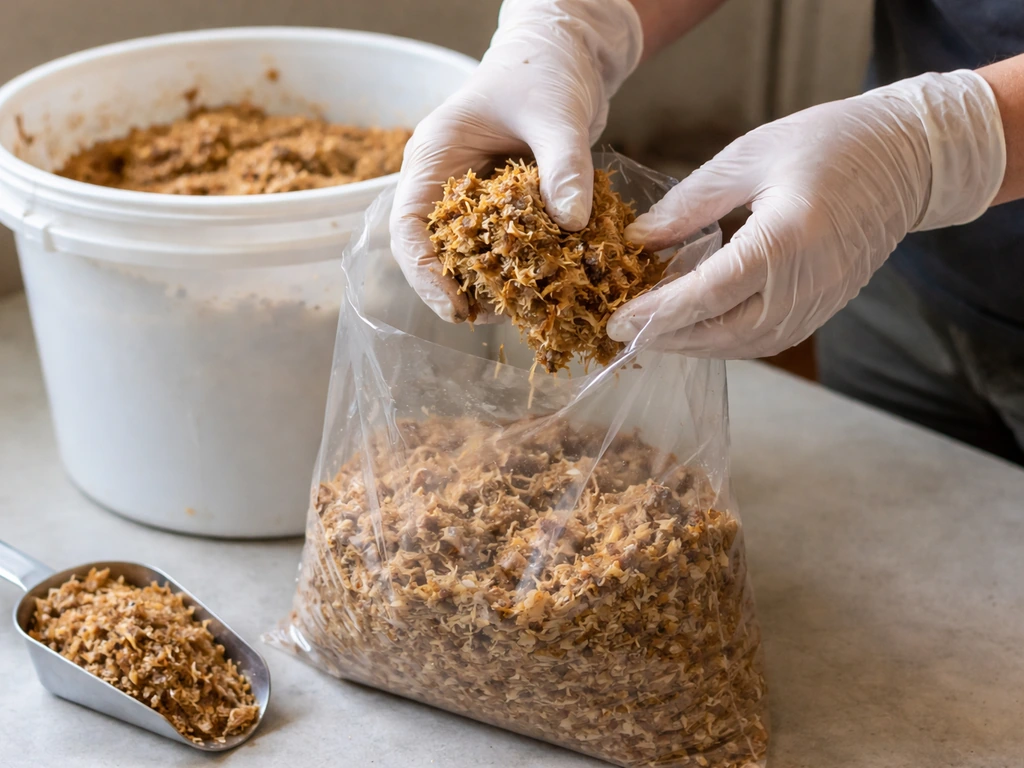
Inoculation and managing the spawn run
Work as cleanly as possible. Wipe down your workspace with 70% isopropyl alcohol, wear gloves, and ideally inoculate inside a still-air box if you don't have a flow hood. Mix grain spawn into the cooled substrate at a rate of 2–5% by dry weight of substrate. A 5% inoculation rate has shown the best yields in controlled studies, with one trial recording 251g of fresh mushrooms and 123.8% biological efficiency. Higher inoculation rates help the mycelium colonize faster, outcompeting potential contaminants. Once mixed, pack the inoculated substrate into grow bags or buckets, seal or close them loosely to allow minimal gas exchange while keeping contaminants out, and move them to your incubation space.
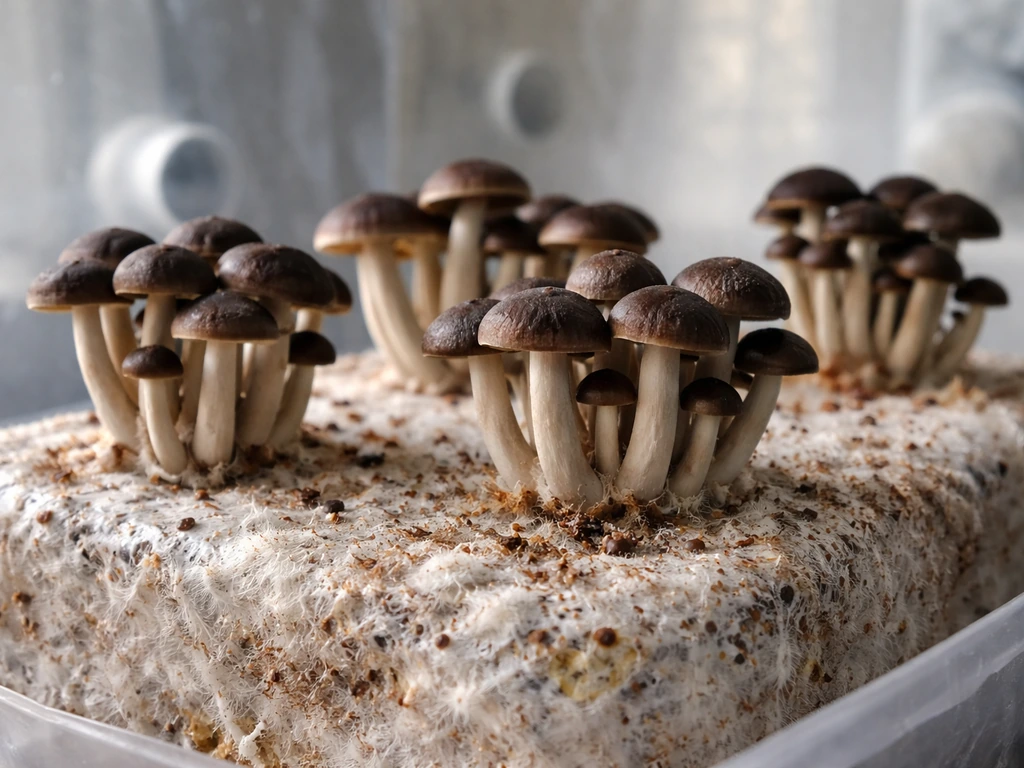
Colonization happens at 21–27°C (70–80°F). Expect full colonization in roughly 2–3 weeks depending on inoculation rate, substrate density, and ambient temperature. The mycelium should appear white and rope-like across the substrate. Don't open bags unnecessarily during this phase. Check for green, black, or pink patches, which signal contamination and mean that bag should be removed immediately before it spreads. Once the substrate is fully colonized and looks uniformly white, it's time to trigger fruiting.
Setting up for fruiting
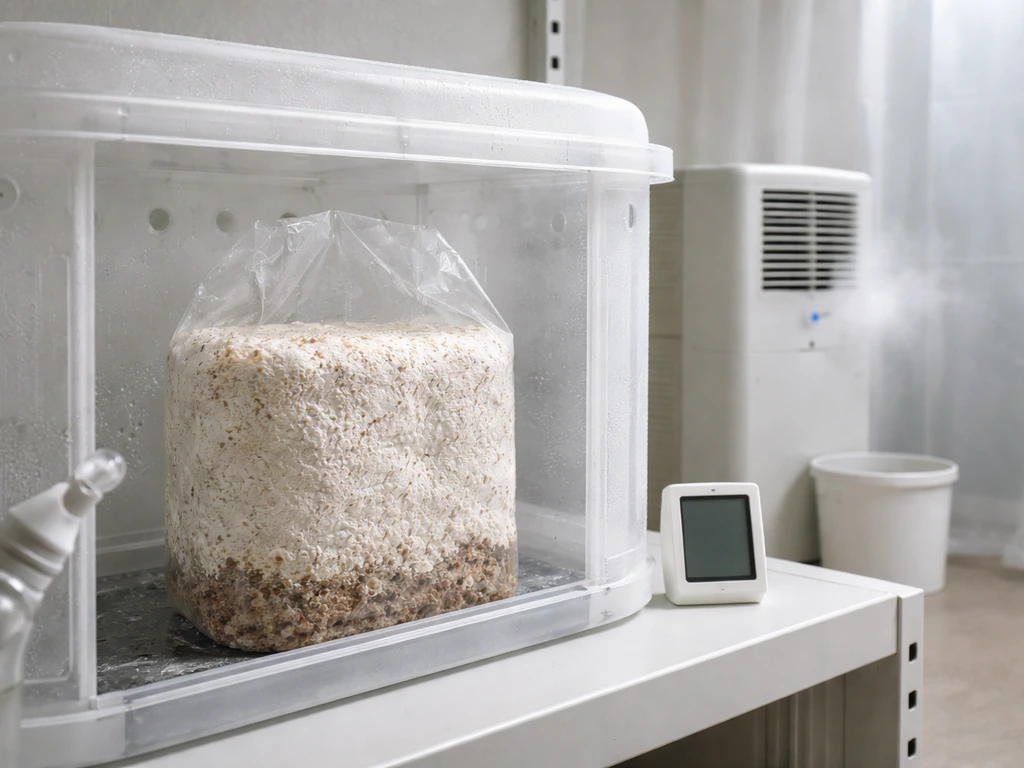
This is where most people go wrong with Pioppino. A fully colonized block that stays at room temperature will just sit there looking happy but never pin. You need to drop the temperature to 10–16°C to shock the mycelium into reproductive mode. Move the block to a basement, a temperature-controlled grow tent with cooling, or even a mini fridge with the door propped slightly for air exchange. Some growers use their garage in autumn when outdoor temps naturally fall into range. Hold that cool temperature consistently and maintain the following environmental targets during fruiting:
| Parameter | Target Range | Notes |
|---|---|---|
| Temperature | 13–18°C (55–64°F) | Cold drop is essential to trigger pins |
| Relative Humidity | 90–95% | Lower slightly once pins appear |
| Fresh Air Exchange | 4–8 times per hour | FAE is critical, CO2 buildup stalls pins |
| Light | 500–1,000 lux | 12-hour light cycle works well |
| Watering | Mist walls/substrate surface | Avoid directly soaking developing pins |
Open the top of your grow bag or cut an X in the side to expose the colonized surface. Mist the walls of your fruiting chamber rather than blasting pins directly with water. Once you see small primordia forming, ease back on humidity slightly. The shift from very high humidity to a marginally lower level seems to encourage further development and reduces the risk of abort. Fresh air exchange is non-negotiable for this species: CO2 buildup leads to long, spindly stems with small caps. If you're growing in a tent or chamber, a small fan running on an intermittent timer works well for FAE without drying everything out.
Harvesting and what to expect from each flush
Small primordia typically appear within 5–8 days of opening the fruiting environment. From there, the mushrooms develop fast: they're usually ready to harvest within about 4 days of visible pinning. Harvest before the caps fully flatten and the veil underneath tears open. At that stage the mushrooms are firm, flavorful, and shelf-stable for a few more days in the fridge. Once caps open wide and start dropping spores, quality drops quickly and shelf life shortens. Twist clusters gently at the base or use a clean knife to cut close to the substrate surface.
After the first harvest, clean off any leftover mushroom stumps from the substrate surface, mist lightly, and let the block rest for about one week before pushing for a second flush. Follow the flush-to-flush steps in the commercial pioppino kit instructions PDF to manage subsequent harvests after the first flush [flush-to-flush steps after the first harvest](https://www. rivercitymushrooms. ca/s/RCM-Pioppino-Mushroom-Grow-Kit-Instructions.
pdf). During this rest period, keep conditions similar to incubation rather than full fruiting intensity. A well-maintained block typically yields 2–3 flushes before exhausting its nutrients. First flushes tend to be the heaviest.
Total fresh yield per block depends heavily on substrate formulation and inoculation rate, but under good conditions you can reasonably expect biological efficiencies above 100%, meaning more than 1g of fresh mushrooms per 1g of dry substrate used.
When things go wrong: fixes for the most common problems
Contamination during colonization
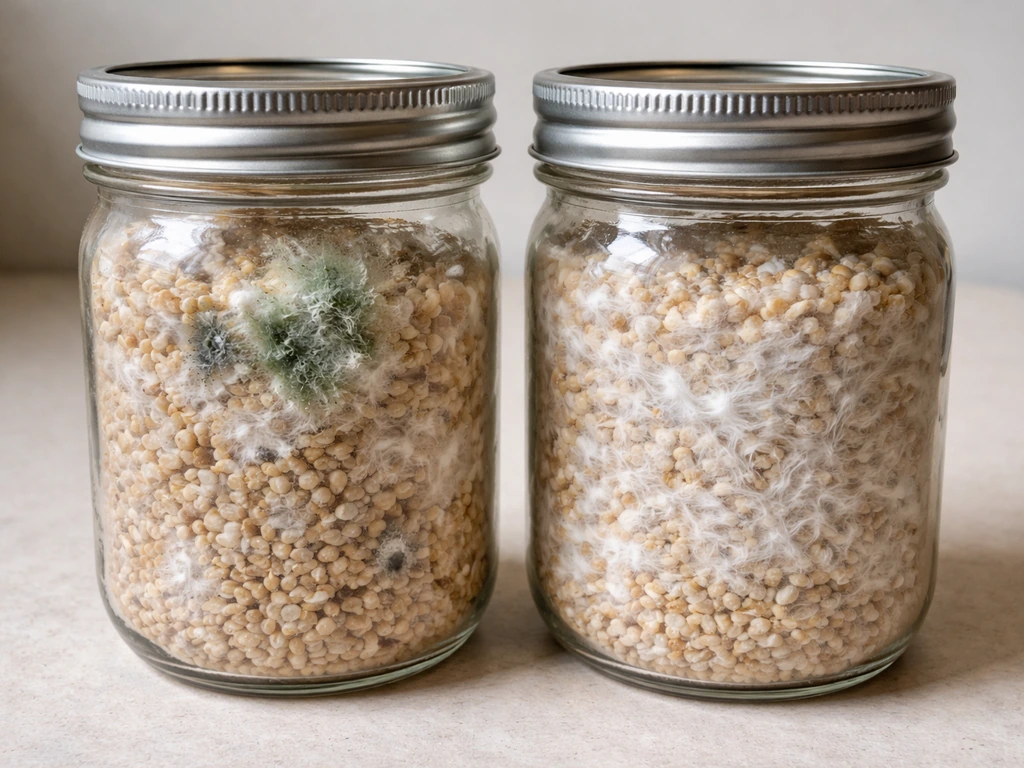
Green (Trichoderma) or black mold during the spawn run almost always traces back to substrate that wasn't fully pasteurized or sterilized, inoculation that happened while the substrate was still too warm, or poor hygiene during mixing. If you catch a contaminated spot early and it's isolated to one small area, some growers cut it out and keep going, but my honest advice is to remove the bag entirely if contamination is spreading. It's not worth risking your whole grow space. Next time, let the substrate cool fully, use a higher spawn rate, and clean your work area more thoroughly.
No pins forming after colonization
This is almost always a temperature problem. If your block has been sitting at room temperature (above 18°C) in the fruiting chamber, the mycelium simply won't pin. Double-check your thermometer and make sure you're actually hitting 10–16°C, not just close to it. Inadequate fresh air exchange is the second most common culprit: CO2 accumulation suppresses pinning. Increase ventilation, verify your FAE setup is actually moving air, and give it another week at proper conditions before giving up.
Slow or stalled colonization
If the mycelium is barely moving after two weeks, the incubation temperature is likely too low, or the substrate is too wet and oxygen-starved. Check that you're hitting 21–27°C consistently. If substrate is waterlogged, there's not much to be done with that batch, but future batches should be squeezed more firmly before bagging. A low spawn rate also means slower colonization and more competition risk. Bumping up to 5% spawn by dry substrate weight speeds things up noticeably.
Long, spindly stems and small caps
This is a CO2 problem. Pioppino responds strongly to high CO2 by stretching toward fresh air. Increase your fresh air exchange rate, open fruiting bags more or add more ventilation holes, and consider repositioning your fan if you're using one. Ideal FAE for this species is 4–8 air changes per hour. It's more ventilation than a lot of home growers expect.
Pins aborting before reaching harvest size
Pinning aborts typically happen when humidity drops suddenly, temperature swings too much, or direct airflow dries out the young fruits. Make sure your humidity is staying at 90–95% consistently, especially during the early pinning stage. Avoid pointing a fan directly at the fruiting surface. If your grow space is very dry, a cheap ultrasonic humidifier on a timer makes a big difference. Also make sure you're not over-misting directly onto pins, which can cause them to rot rather than develop.
No second or third flush
If your block produced a first flush but nothing after that, it usually needs more rest and rehydration. After harvesting, soak the block or substrate in clean cold water for a few hours to rehydrate the mycelium, then drain and return to fruiting conditions. Make sure you've cleaned all old mushroom stumps off the surface, since decaying material invites mold. Give it the full one-week rest at colonization temperatures before moving back to fruiting conditions. Some blocks simply run out of nutrients after two flushes, which is normal.
FAQ
Can I grow black poplar mushrooms if I cannot maintain 10 to 16°C reliably indoors?
You can still try, but plan around the trigger rather than the schedule. A reliable way is to use a dedicated cooling spot you can measure with a thermometer and log for a week, like a basement corner or insulated cabinet with a small cooler, then move the fully colonized block there consistently. If your “cool” area routinely drifts above 16°C, expect little pinning or delayed pinning, even when humidity and fresh air are perfect.
What substrate should I choose if I am getting inconsistent yields, even though temperature drop seems correct?
Match your substrate to your equipment and hygiene level. If you are not confident with sterilization and your workspace is not very clean, start with the straighter straw plus modest supplementation approach rather than heavy bran loads. Also ensure the mix is at field capacity after soaking, if it is too wet you can get slow or patchy colonization, if too dry the mycelium struggles to recover after opening the fruiting environment.
How do I know my moisture level is right without using complicated tools?
Use the squeeze test. Grab a handful of hydrated substrate, if it forms a solid clump and releases only a few drops, it is close to field capacity. If it pours freely or drips continuously, it is waterlogged, tighten your soaking time next run or reduce hydration. If it crumbles immediately and never compacts, add time to hydration or increase soaking slightly, then drain briefly before bagging.
Do I need to fully sterilize if I am using pasteurization, and what determines which one to use?
The decision mainly depends on how much you supplement and how clean you can stay. Higher bran percentages and more “nutrient-dense” mixes raise contamination risk, so sterilization (pressure cooker) becomes the safer choice. For lower supplementation straw mixes, pasteurization at 65 to 80°C for 1 to 2 hours can work well if inoculation and cooling are done promptly and the substrate is not left warm after pasteurization.
My blocks look fully white in incubation, but they never pin. Besides temperature, what else should I check first?
Check CO2 and surface exposure. If the colonized surface stays sealed, it can limit fresh air exchange, so open the bag top or cut an X before you start fruiting. Also verify your incubation to fruiting move is not causing a temperature rebound, some setups “cool” during the move but drift back above 16°C in the first day, which can prevent pin formation.
Is using a mini fridge for the temperature drop a good idea, or will airflow and drying ruin it?
It can work well if you control drying and provide fresh air without blasting the fruits. Propping the door slightly can help exchange air, but you still need humidity at 90 to 95% during early pinning. Avoid direct fan placement on the fruiting surface, use indirect airflow or timed ventilation so the chamber breathes without desiccating primordia.
How much fresh air is enough, and how can I tell if CO2 is the problem?
Aim for frequent exchange, roughly 4 to 8 air changes per hour in many home setups. A telltale CO2 symptom is long, thin stems with small caps that never fully “set” into normal clustered shapes. If you see that pattern, increase ventilation and check that your air path is actually moving, not just circulating the same air across the top.
What should I do if I see contamination, can I remove the bad area and save the block?
If contamination is isolated and small, some people remove the affected material, but it is risky with wood-loving cultivars because the mycelium network can be compromised locally. If you see spreading green, black, or pink patches, remove the entire bag to protect your workspace. For future batches, the fastest improvements are to fully cool substrate before inoculation and tighten hygiene during mixing.
My primordia appear, then they stall or abort. What common mistakes cause this?
Most stalls come from humidity dips, temperature swings, or direct airflow drying the developing pins. Keep humidity consistently around 90 to 95% during early pinning, and mist the chamber walls rather than spraying the pins directly. If you are using a fan, run it intermittently and keep it aimed so it does not hit the fruiting surface directly.
How do I harvest to avoid damaging future flushes?
Harvest at the right maturity, before the caps fully flatten and the veil opens and tears. Twist clusters gently at the base or cut close to the substrate surface with a clean blade. After harvesting, remove leftover stumps thoroughly, then mist lightly and give the block about one week at incubation temperatures before returning to fruiting conditions.
After the first flush, should I rehydrate the block every time, or only when yields drop?
Rehydration is usually worth doing when the second flush is weak or there is visible dryness or stall signs. After the first harvest, soak in clean cold water for a few hours, drain, then return to similar incubation conditions for the full rest period. If your first flush was already strong, rehydrating can still help because the surface can dry out faster than the rest of the block.